**Any words in** *this format* **are defined in the dictionary.**
**Any words in** *this format* **are defined in the dictionary.**
**Any words in** *this format* **are defined in the dictionary.**
This page will talk about using the Iso booth or field equipment for recording sound effects, be it for whatever project you require sound assets for.
If you are unfamiliar with any of the mentioned equipment, visit the [EQUIPMENT PAGE](http://10.42.32.18/books/audio/page/equipment) to learn more about tools available from the lab.
Sound effects for movies, TV, video games, and other visual media commonly are acquired through Foley. "What is *Foley*?" Foley is a term derived from film, and it stands for the recreation of everyday sound effects you hear in your life. Upon recording sound effects, your assets would get implemented into a project post-production. However, this is something you can do in advanced, in anticipation of a project being finished. We're going to talk about using items around the lab to record either in the iso booth or on the field. To learn more about editing your sound effects post production, visit the Adobe Audition Introduction page. ### Iso Booth At your disposal are two condenser mics: the AT2020 and the WA45. The mic outside the booth is a dynamic mic that you should not consider, as it is less sensitive and the environment in the lab is muddled with background noise and A/C (hopefully that will change when we move into the HIVE) [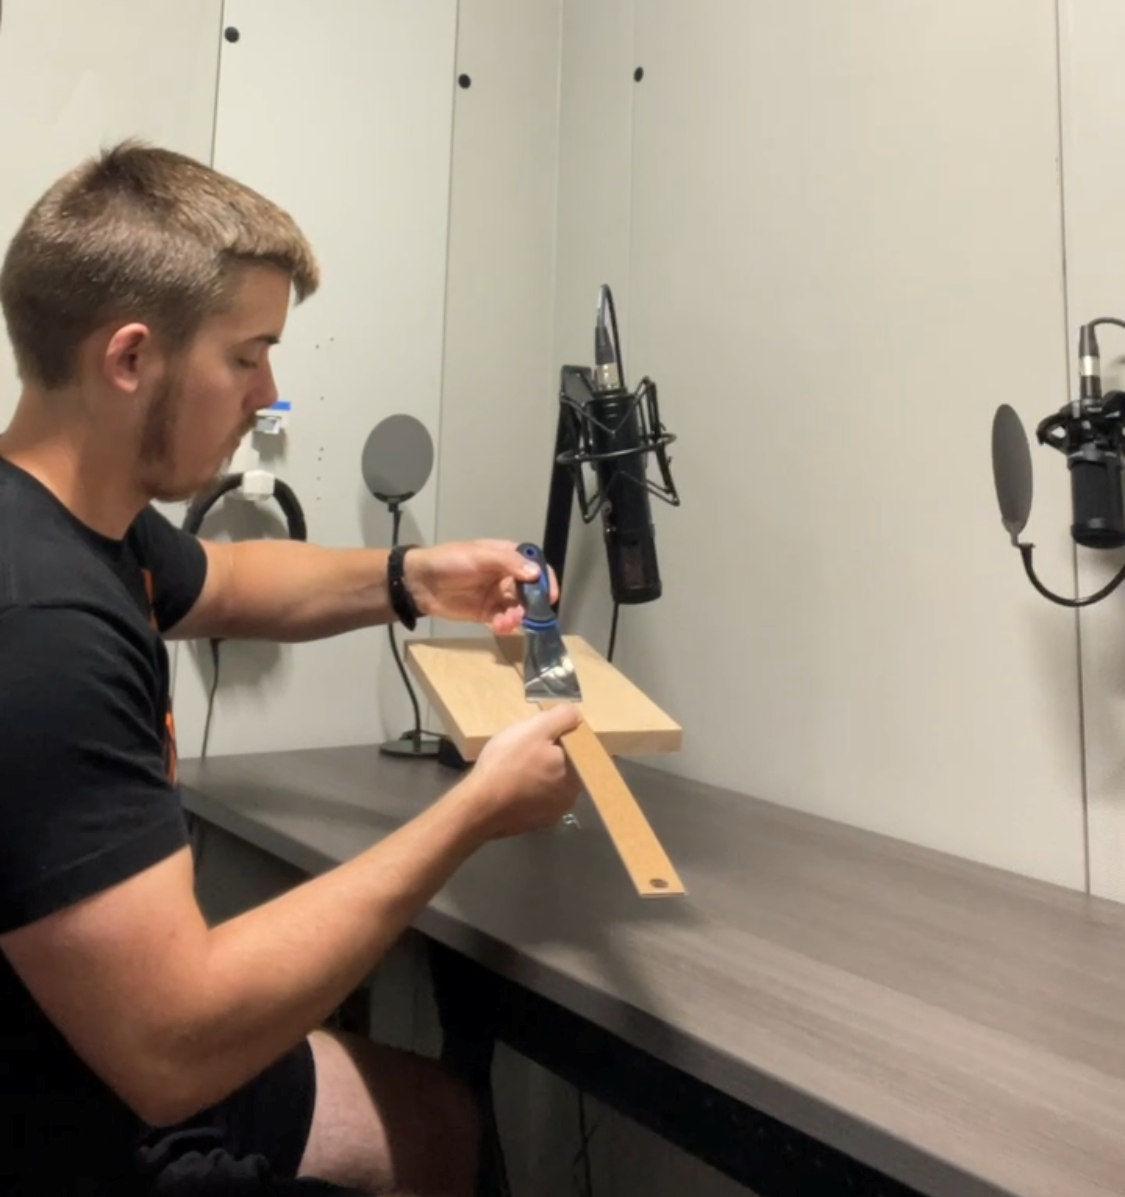](https://scil-wiki.su.edu/uploads/images/gallery/2023-11/bxlc.png) The sautering station has tools in the lockers and drawers that can be accessed, with permission from faculty. These tools are capable of creating sounds that can be edited and used for immersive experiences. An example of a VR experience that uses Foley is the French75 project. Be sure to put the keys to the lockers and the booth back after borrowing them, as well as make sure to put the items used in their respective places. ### Field Equipment Should you want to record interactions outside the lab, you can always use the field mic and handy recorder. Depending on how long you'll be out of the lab, consider taking some batteries from the charging station to swap out. # Ambisonic Audio If you're looking into recording and processing surround sound audio, be it for a VR project or some other immersive experience, this chapter provides some helpful insights for recording, processing, and mixing ambisonic audio. # Ambisonic Plug-insThis page references an ARVR Alumni's senior capstone project. The project is an immersive experience of the SU Marching Band's first performance at Shentel stadium. Two GoPro Max's and 4-channel Ambisonic mics were used to capture video and 360 audio.
Words that are highlighted like this will be defined in the DICTIONARY dropdown menu at the top of this page.
Ambisonic Equipment is accessible through SCiL and through Prof.Spice at Ohrstrom Bryant Theatre. Should SCiL want to record audio to be converted into AmbiX format and used in a VR project, this page will go over the equipment used in ambisonic production.
### GoPro Max [](http://10.42.32.18/uploads/images/gallery/2023-07/Maiimage.png) All GoPros can be signed out on a clipboard. You must ask a SCiL Lab Employee or SCil Faculty member to check out GoPros and the accessories that come with one. When you turn it on, you simply make sure your set to record a video in 360 format, then hit the record button at the top. Afterwards, you can either connect the GoPro to your computer via USB, or can take out the SD card and plug it into an SD card reader to download onto your own storage device. (SD card readers are in the SCil Lab) >>Picture<< When you are recording with the Gopro, keep in mind which direction it is facing and do the same for your ambisonic mic. This information will prove important when you go to import your ambisonic audio into the video and want it to be properly spatialized. ### 4-Channel Mic >>Picture<< This mic will record ambisonics in A-Format, which can be converted into B-Format post-production. (See [Ambisonic Plug-ins](http://10.42.32.18/books/audio/page/ambisonic-plug-ins) page for more information.) # Post Production Audio Editing So you've recorded something or acquired audio from somewhere, though it needs touching up. In this chapter, we'll explore a few software that are handy for refining an audio clip to it's highest quality. # Adobe Audition - IntroductionThis page will cover using Adobe Audition for post-production editing. To learn about specific features, view the left-hand view and navigate to any of the listed topics that interest you. If you do not see what you're looking for, consider adding a section to this page!
**Video Tutorial** [Adobe Audition Video Tutorial](https://youtu.be/en3qUvJG42s) IF AT ANY POINT IN THESE TUTORIALS YOU SEE A VIEW BEING USED THAT YOU DO NOT HAVE, YOU CAN FIND IT BY NAVIGATING TO **Window**, THEN LOOKING FOR THE VIEW YOU ARE MISSING [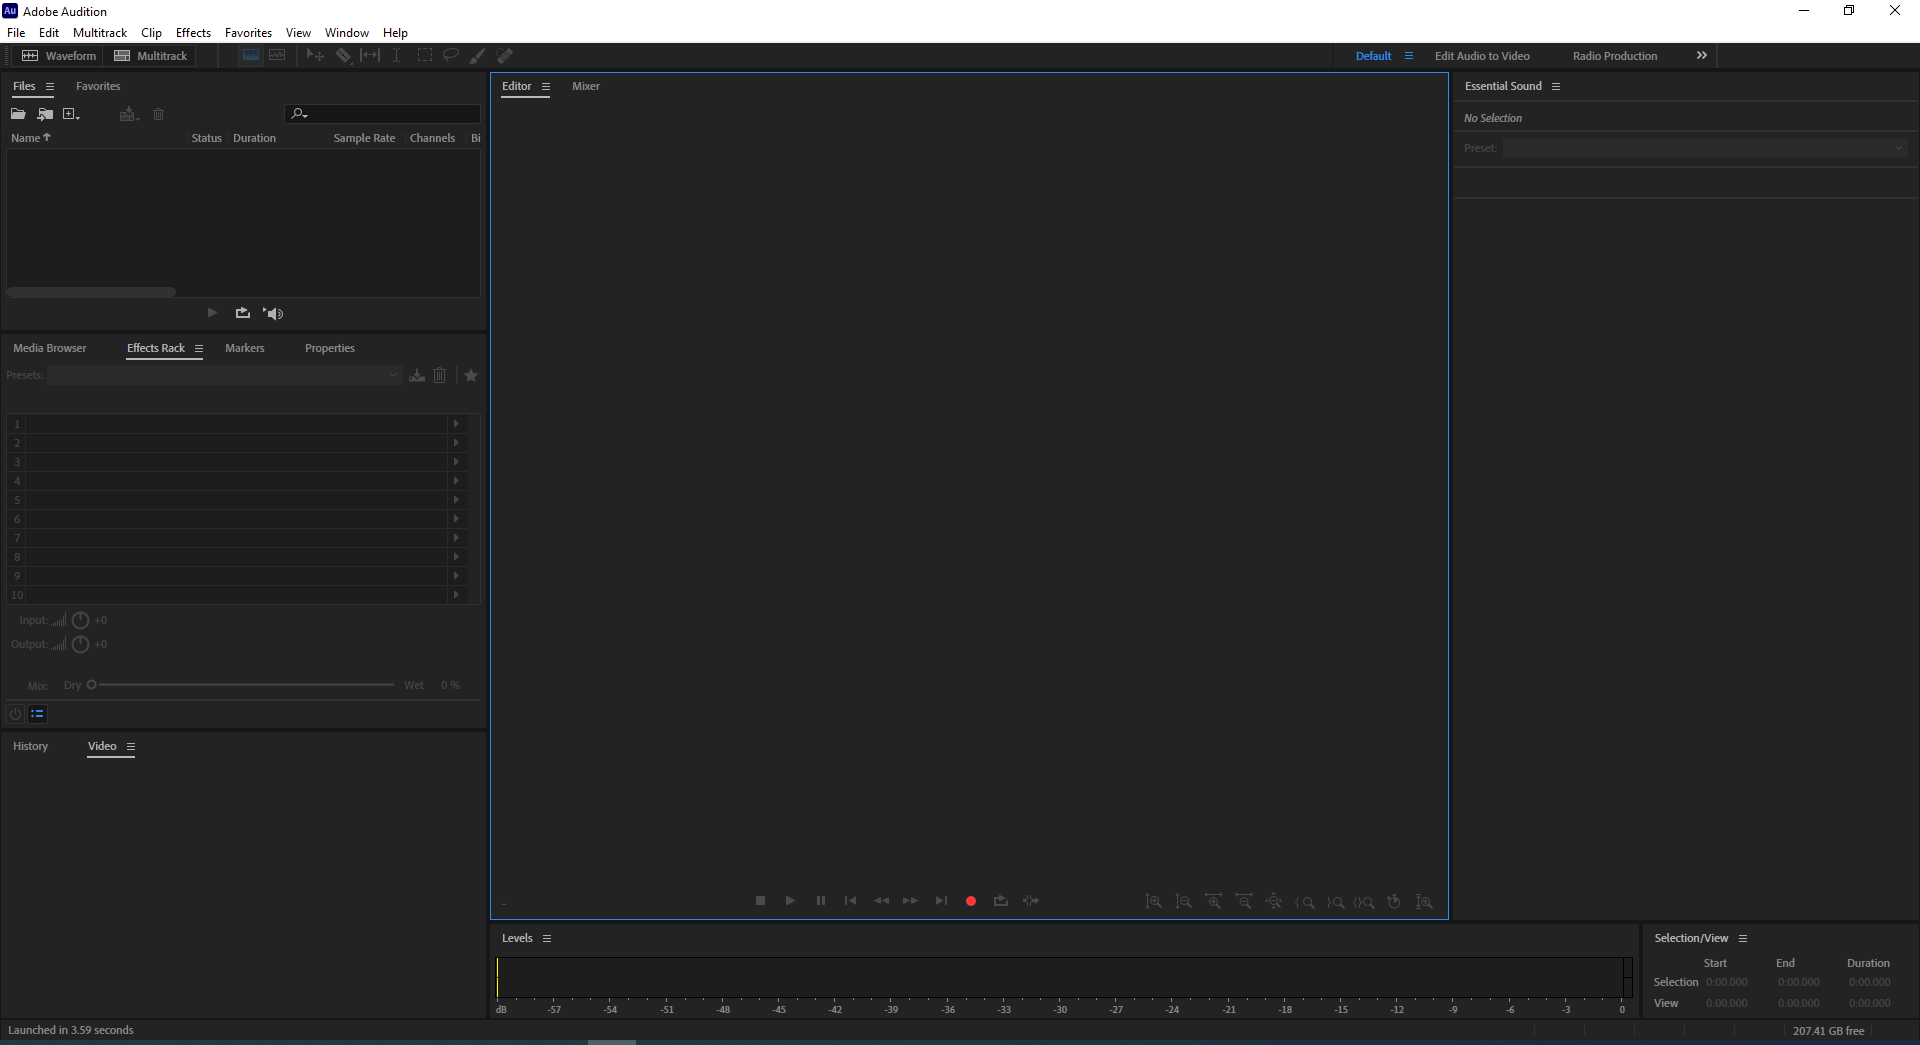](https://scil-wiki.su.edu/uploads/images/gallery/2023-11/audition-interface.png) Audition is a useful tool for editing sounds in need of doctoring, layering, or polishing. If you do not have a sound to play around with before reading through this page, you can access free-to-use sounds [here](https://sites.google.com/view/baggonotes/sound-library?authuser=1&read_current=1). #### IMPORTING THE SOUND Currently, we are in the waveform editor, which is handy for editing a single sound. You can change to Multi-track editor, but that will be approached later on. The waveform editor is known to be a 'destructive editor', meaning the changes you make to a waveform in these cannot be undone unless you use *Ctrl + Z* or *Command + Z* [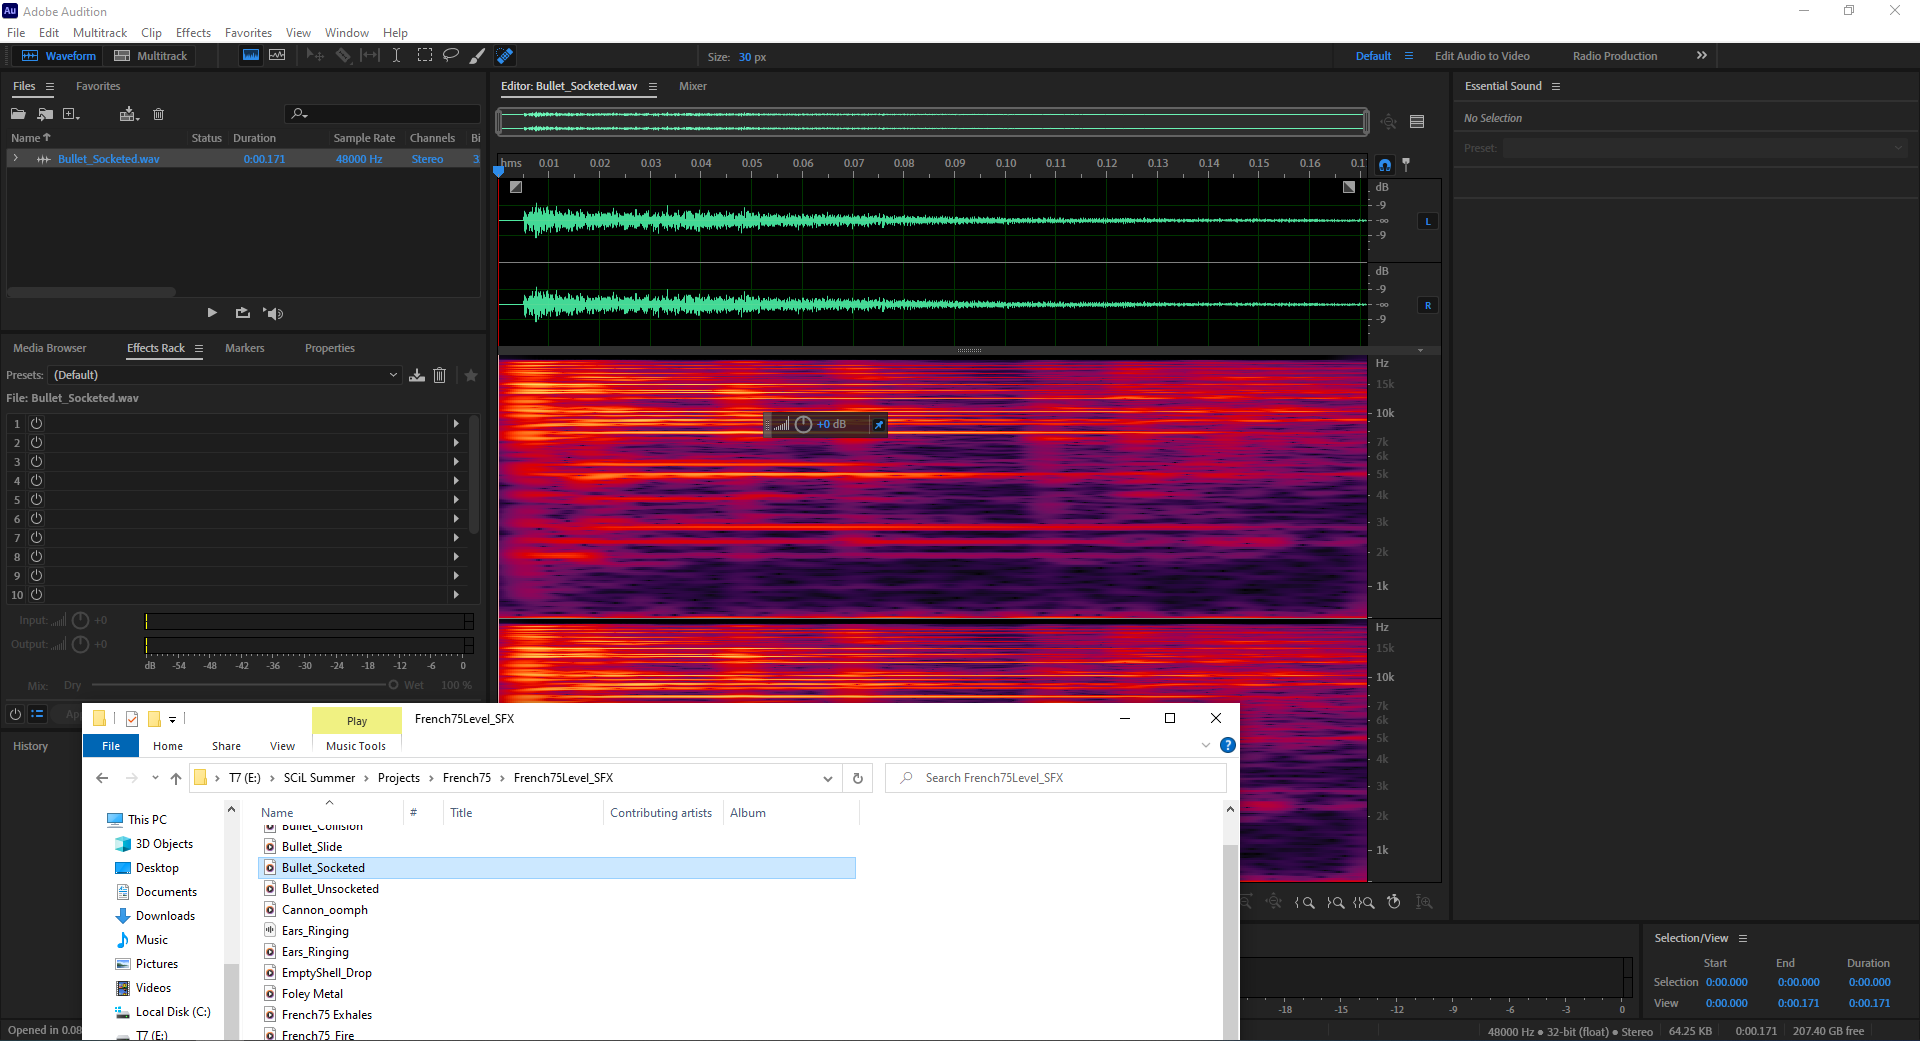](https://scil-wiki.su.edu/uploads/images/gallery/2023-11/audition-sfx-imported.png) In the *Files* view, beneath the Waveform editor and Multitrack buttons, I have dragged and dropped my Bullet\_Socketed .wav file into the view. You can see it has appeared and displays various information. You can resize this view to better display information by dragging the borders around, or you can click, hold, and drag the File tab to relocate it with a different view or as its own view. (The Bullet\_Socketed .wav file is part of a sound library created and used for the French75 VR experience. Audition was used to edit some of its sounds, you can view it in the SCiL lab or see more about it [here](https://www.instagram.com/reel/Cvu9KsrrYRH/?utm_source=ig_web_copy_link&igshid=MzRlODBiNWFlZA==).) If you lack a sound to import into Audition and don't feel like going to [Freesound.org](https://freesound.org/home/) for a quick download, you can always record a sound. To do so, navigate to **File --> New --> Audio File**, then name and create a file. It will appear in the file view and now you can record something. [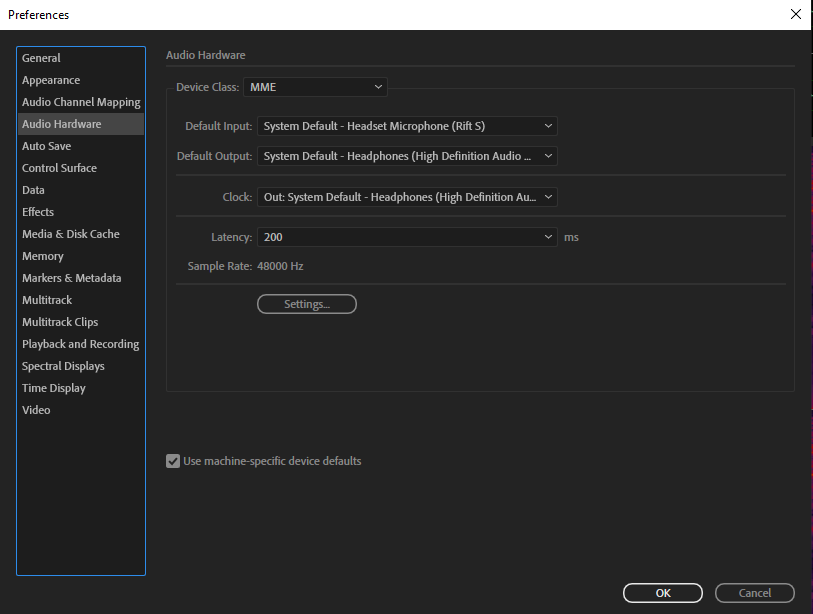](https://scil-wiki.su.edu/uploads/images/gallery/2023-11/preferences.png) Make sure your input and output devices are set the way you want them. To access these Audio Hardware preferences, navigate to **Edit --> Preferences --> Audio Hardware**. [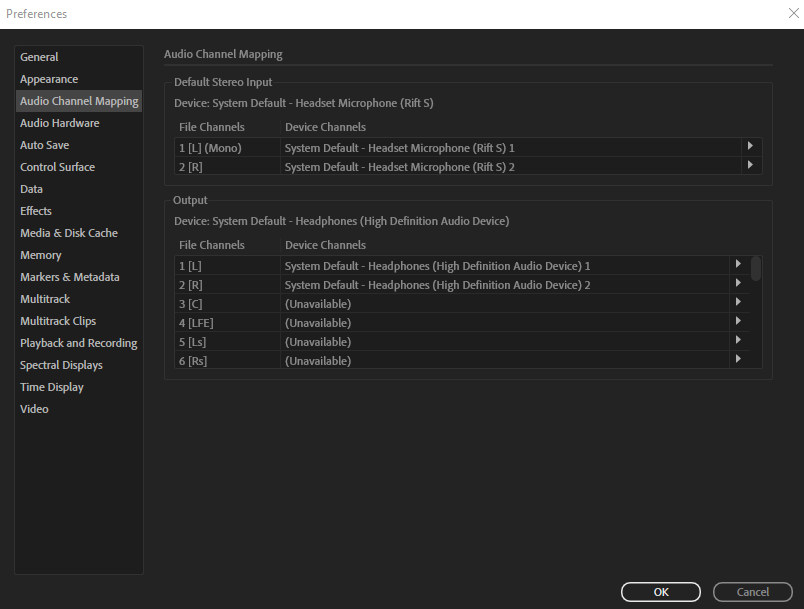](https://scil-wiki.su.edu/uploads/images/gallery/2023-11/channel-mapping.png) While still in the **Preferences** window, click **Audio Mapping** and double-check whether or not your Device Channels are mapped to the device you want to hear audio through. Lastly, consider using the iso booth, if you're in the lab, for a higher quality recording than the computers in the lab will get you with its standard equipment. You can learn more about using the iso booth through the [*Using The Iso Booth*](http://10.42.32.18/books/audio/chapter/using-the-iso-booth) chapter. #### Changing Volume [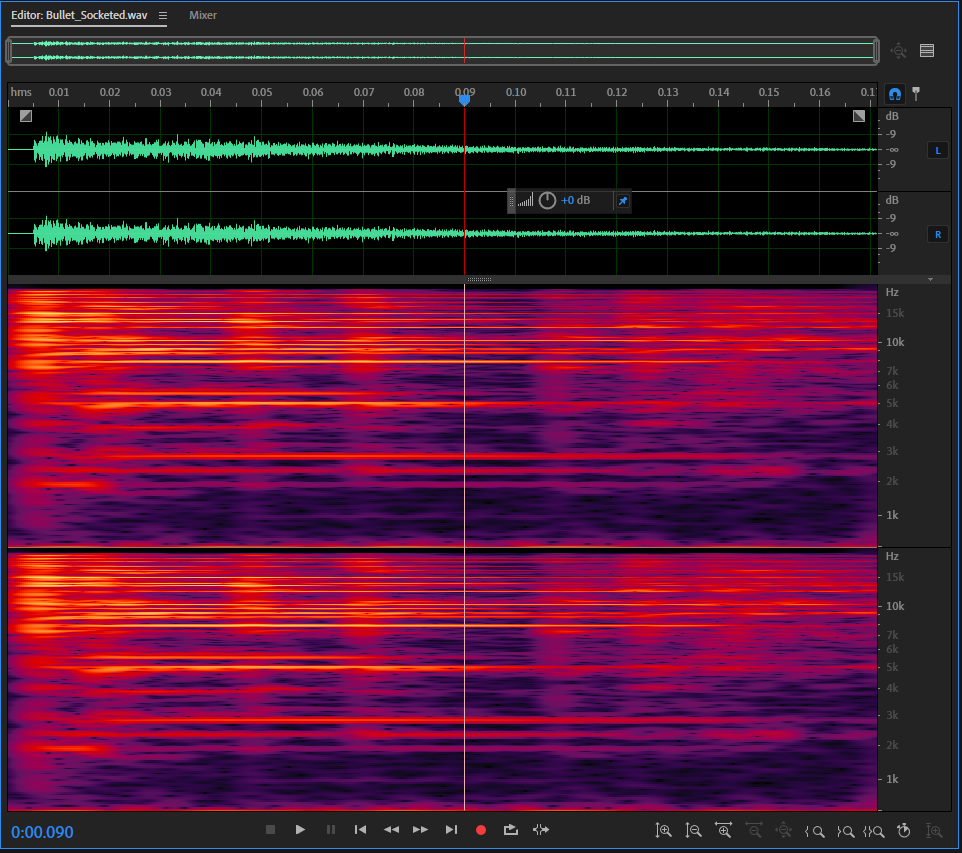](https://scil-wiki.su.edu/uploads/images/gallery/2023-11/hud-gain-knob.png) If you've recorded a sound using the red record button at the bottom of the editor view or obtained your sound in any other way, there are a couple of ways for changing the volume. The first you'll notice is probably the gain knob near your waveform that can be turned to change the levels of your clip. This is a manual method that can yield nice results but you risk excessive changes for certain portions of your waveform. [](https://scil-wiki.su.edu/uploads/images/gallery/2023-11/audition-highlighting.png) You can change the levels for a specific part of your clip as a workaround. Simply click and drag the area of your waveform you would like to change, then adjust the gain knob as desired. To zoom in/out on a clip, you can use Ctrl or Alt / Command or Option + Scroll Wheel to toggle the zoom on your clip in various ways. To scroll left or right in your clip, hold Shift + Scroll Wheel. You can also hover your mouse over the timeline when using your scroll wheel to zoom in or out. The timeline displays the amount of seconds in your audio clip, and changes depending on how zoomed in you are. Another way of adjusting the audio is by navigating to **Favorites --> Normalize to -0.1 dB** and clicking that option. Doing so will make your waveform the loudest it can be without clipping. #### Adding Effects If you navigate to **Effects** at the top toolbar, you will see an array of effects that can be applied to your audio clip. These effects generally function as follows: Amplitude and Compression: This can make your SFX sound louder, smoother, or nicer. Delay and Echo: Can delay the time a sound is played, or have it echo at a specified rate and level (i.e. eighth notes, sixteenth notes) Filter and EQ: Used to focus on the high or low end of a sound's frequency range, as well as boost one of these ranges. Modulation: Additive effects that manipulate your sound with layering, pitch bending, or phasing. Noise Reduction / Restoration: Used to remove background noise, though can also affect the sound you WANT to hear. Use carefully. Restoration can take a weak part of your clip and sometimes bring it back. Reverb: Extends the decay of your sound, making it so it takes longer for the sound to taper off. Special: Special effects that vary in functionality and can be played around with. (I like the Distortion effect) Stereo Imagery: For context, stereo audio is two channels of audio for your left and right ear. However, when both sounds play, there is a 'middle channel' effect. Using Stereo imagery effects, you can decide what to do with this middle channel sound. For example, removing the middle sound completely. (See video [here](https://youtu.be/3w80bn439zM)) \- An example of using stereo imagery shown in the video is how during a recording of a band, the speaker points out how the vocalist tends to always be positioned in the middle during these recordings. Using the 'Center Channel Extractor' from the Stereo Imagery Effects List, he is able to isolate the singer's voice and ignore the instruments playing more in the right and left channels. Time and Pitch: Time and pitch allow you to harmonize or tweak the pitches of your audio clip in various ways. #### Multitrack Editor The Multitrack Editor is a non-destructive editor. Any trims, cuts, edits, or effects added to a sound here will not permanently save to your individual audio files being edited together in this view. That being said, you can edit multiple audio files in this view, so let's set that up. [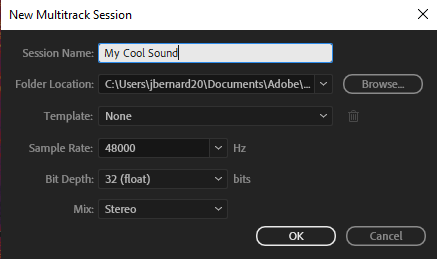](https://scil-wiki.su.edu/uploads/images/gallery/2023-11/multitrack-session.png) Start by going to **File --> New --> Multitrack Session**, then name your session whatever you would like. Once done, click 'OK'. [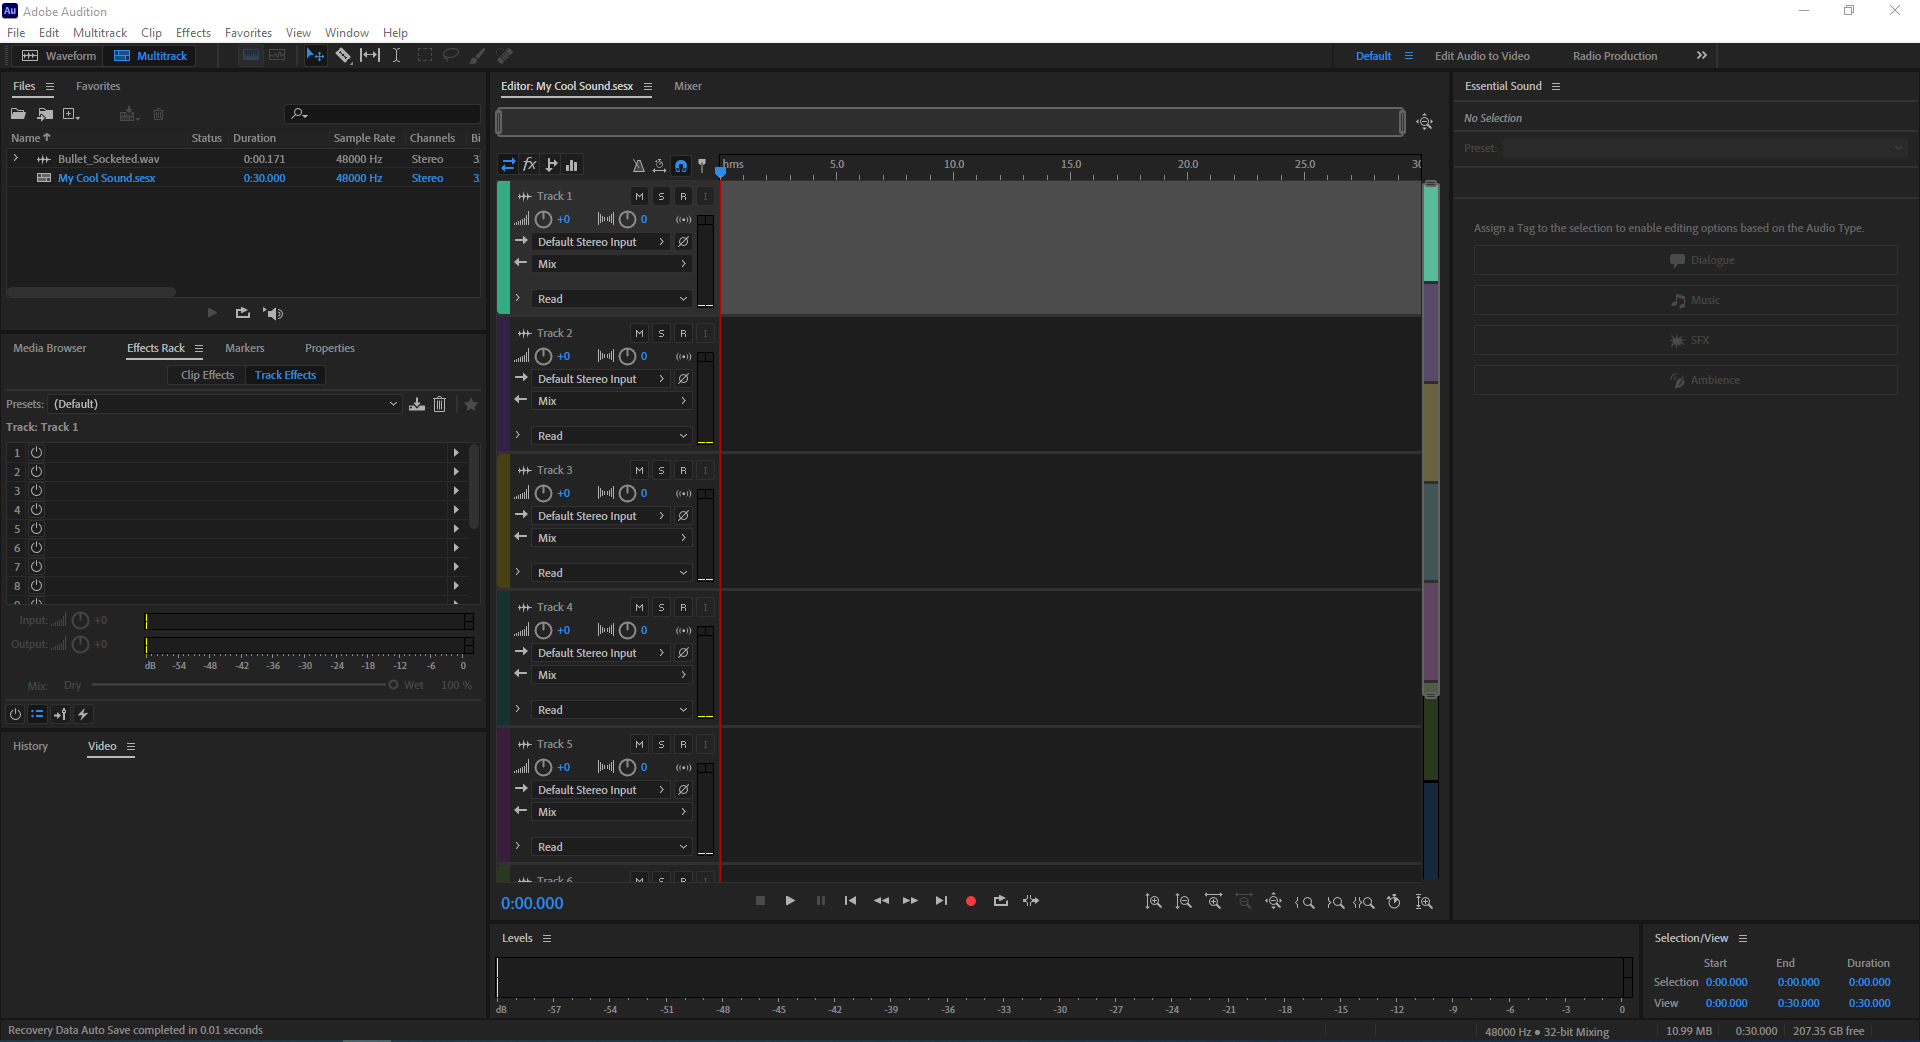](https://scil-wiki.su.edu/uploads/images/gallery/2023-11/multitrack-view.png) Your multitrack session will be created. You can see we have multiple tracks we can drag audio into. [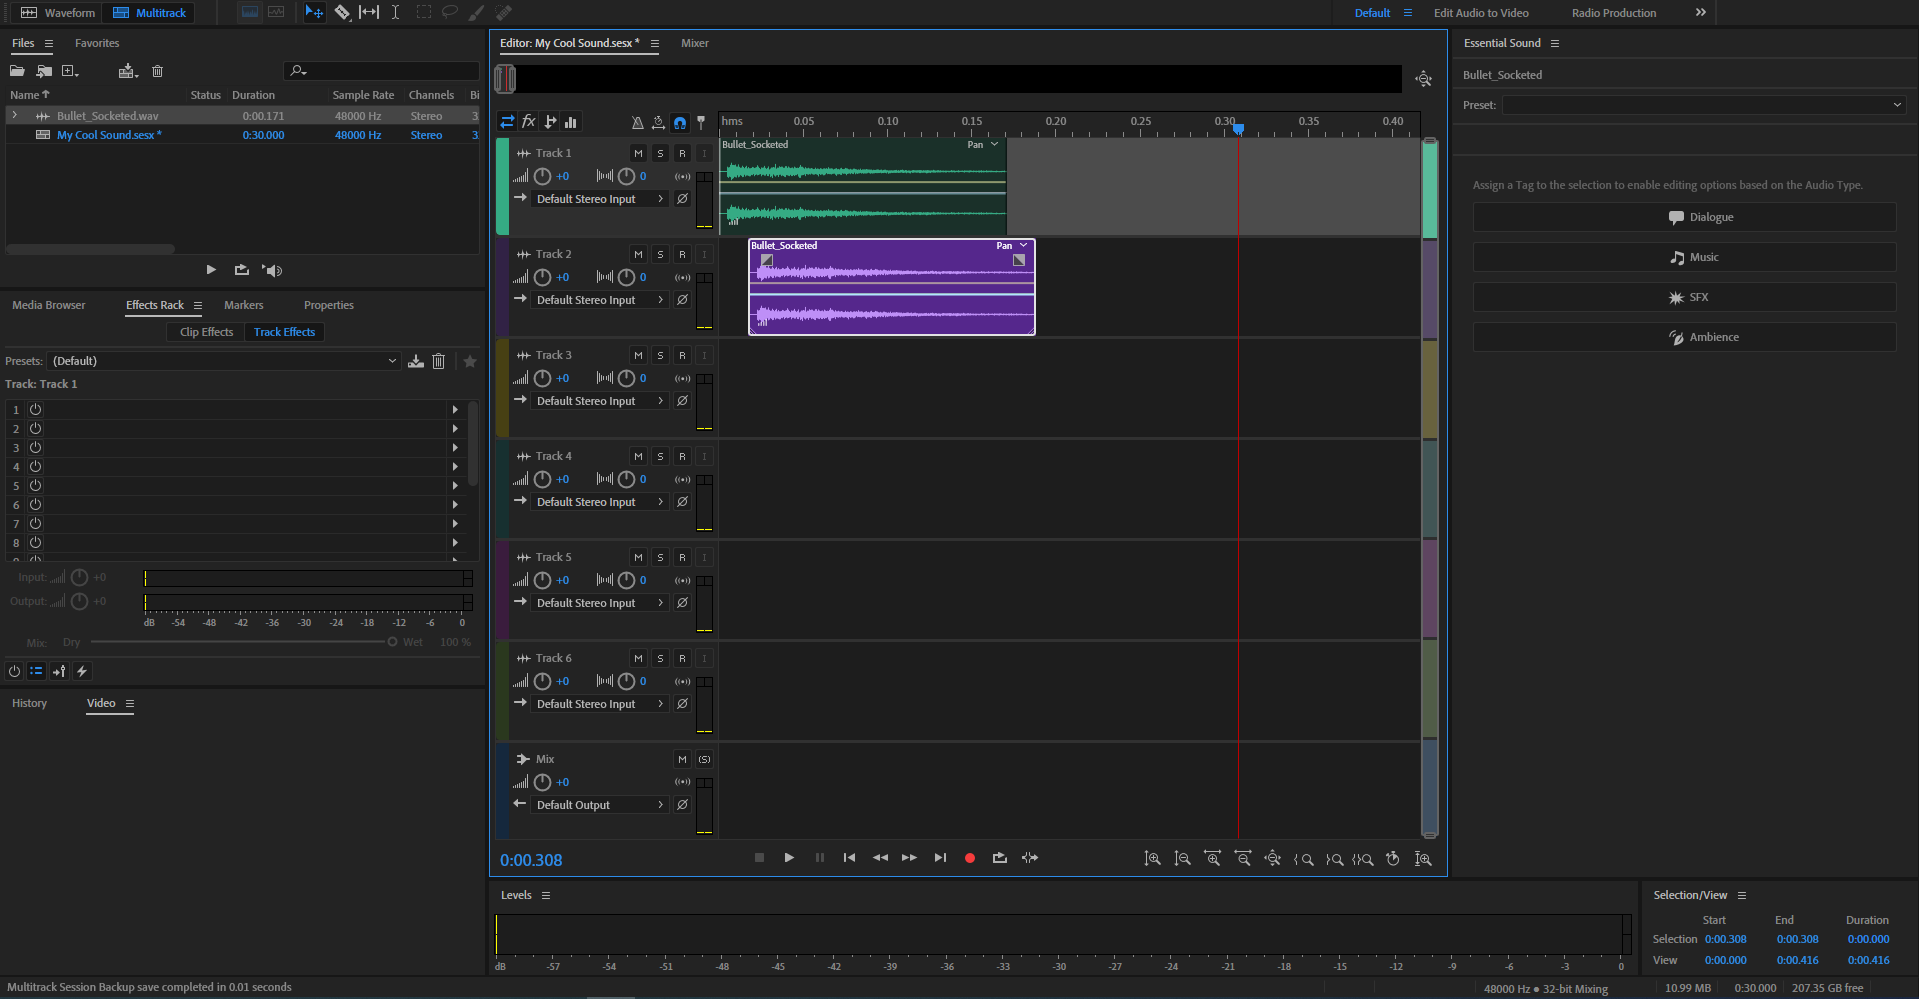](https://scil-wiki.su.edu/uploads/images/gallery/2023-11/audio-drag.png) This is a multitrack editor, so it makes sense to have multiple clips to edit. I dragged in two audio clips and as I dragged them in, was able to determine where on the timeline they would be placed before letting go of my right-click. To zoom in/out on a clip, you can use Ctrl or Alt / Command or Option + Scroll Wheel to toggle the zoom on your clip in various ways. To scroll left or right in your clip, hold Shift + Scroll Wheel. You can also hover your mouse over the timeline when using your scroll wheel to zoom in or out. The timeline displays the amount of seconds in your audio clip, and changes depending on how zoomed in you are. [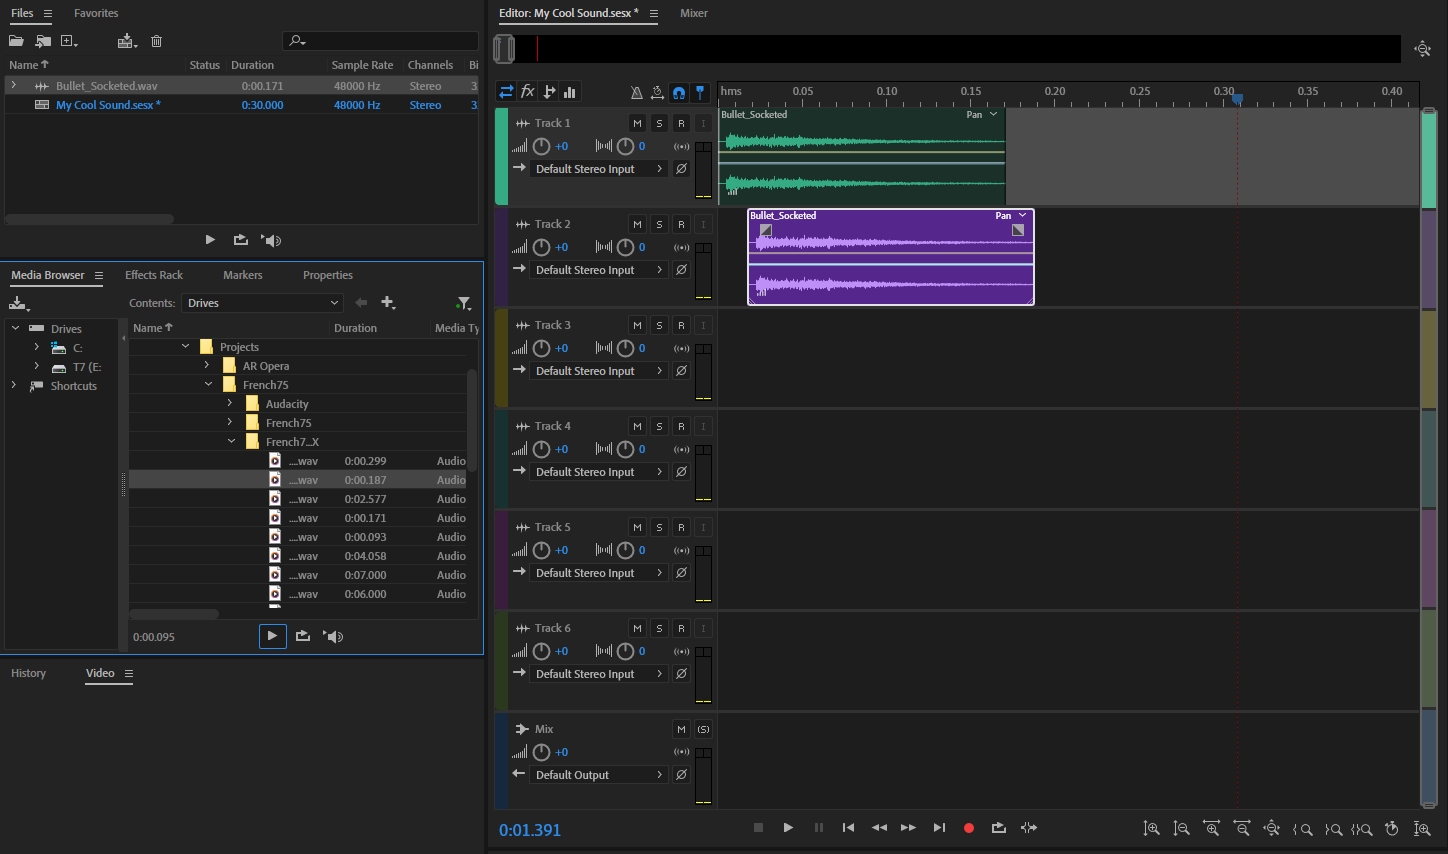](https://scil-wiki.su.edu/uploads/images/gallery/2023-11/media-browser.png) An easy way to search for more files to add is through the media browser view. You can search through your files there and once you find downloaded sounds, can preview them with the play button beneath. You can also toggle the *Auto Play* button, the rightmost button on your bottom toolbar in the Media Browser view. This enables a feature where any audio file you select while browsing will automatically play, making previewing your sound a more-seamless process. [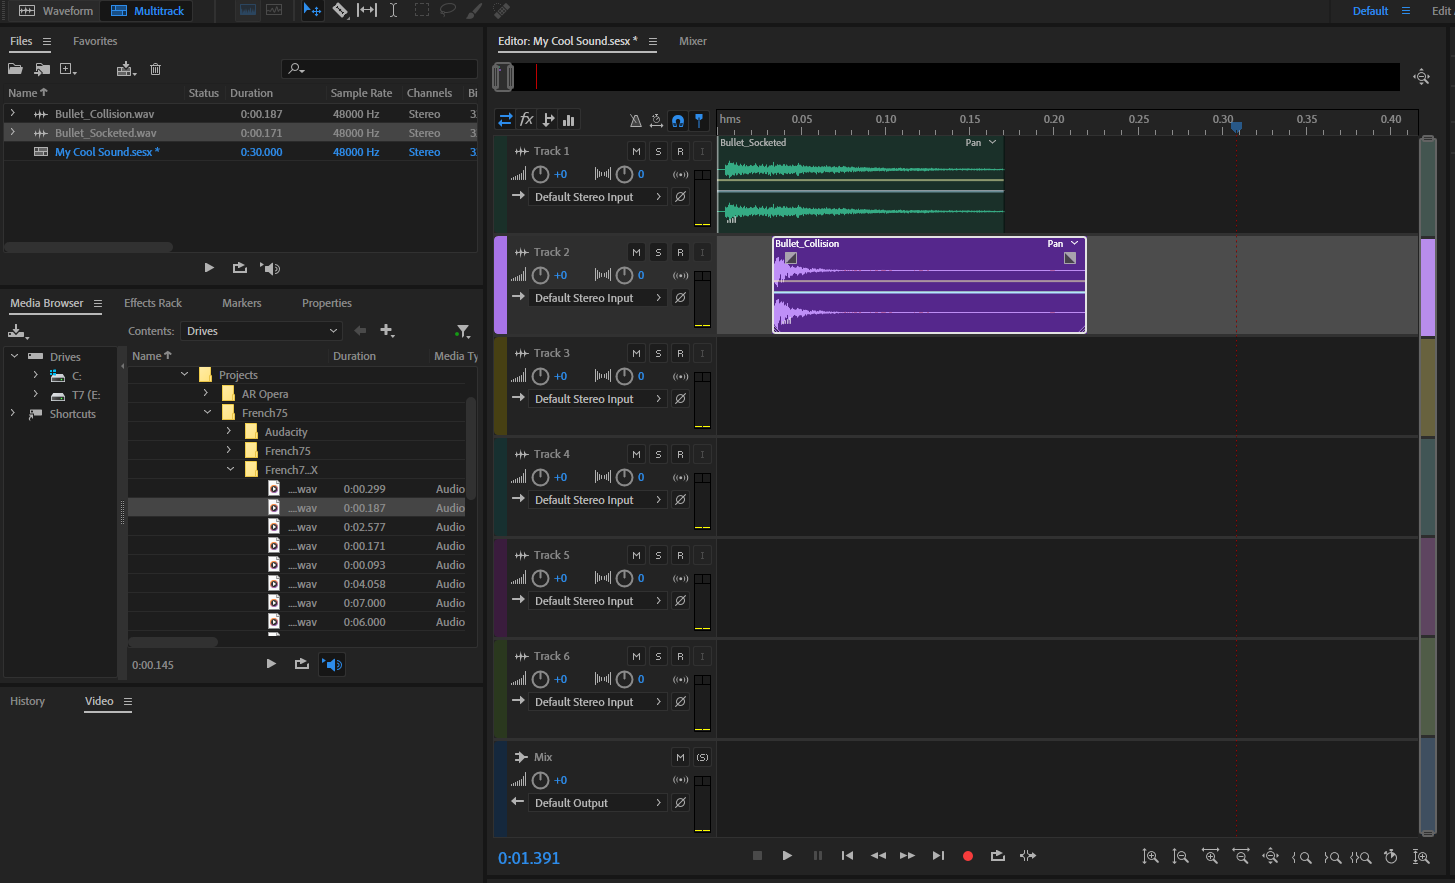](https://scil-wiki.su.edu/uploads/images/gallery/2023-11/new.png) When you drag and drop your desired clip into the Editor, a new Audio clip is created in your files view. This can be edited in the waveform editor, should you want to make changes specific to that sound. [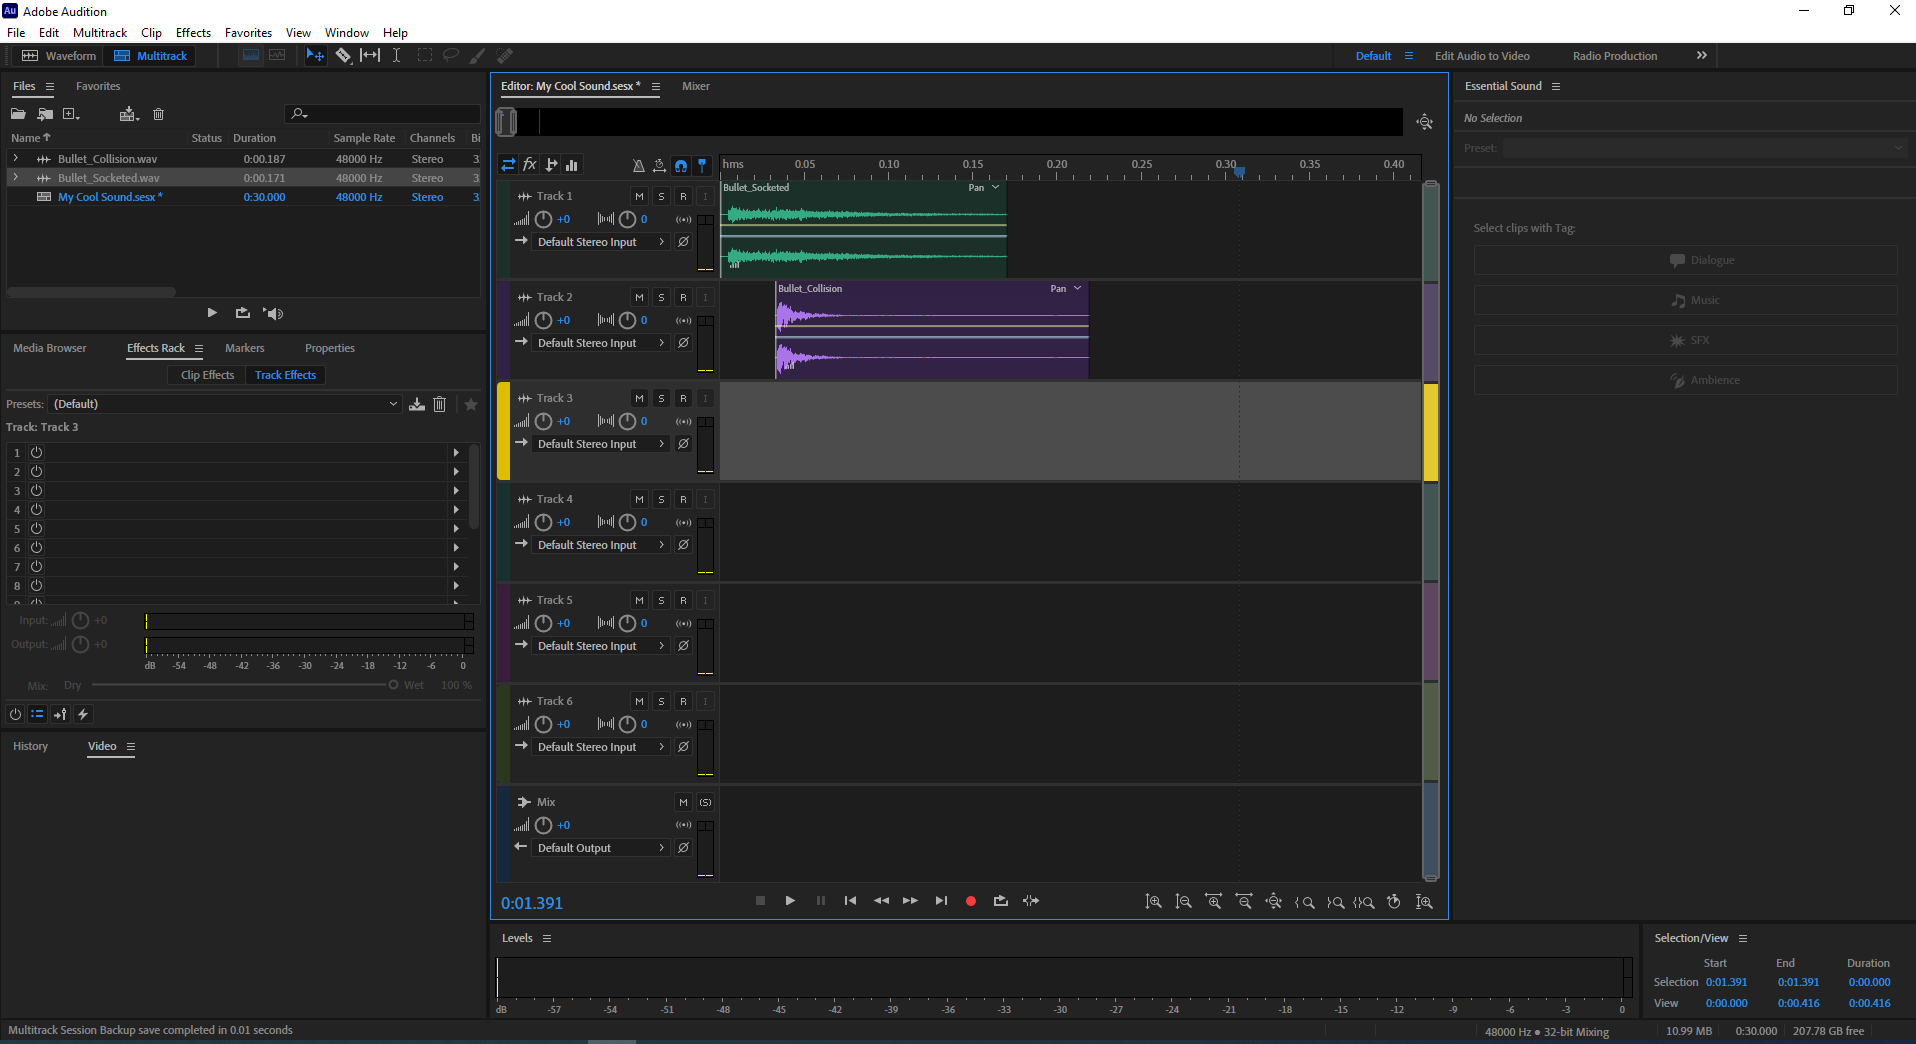](https://scil-wiki.su.edu/uploads/images/gallery/2023-11/effects-rack.png) Adding effects to your channels can be done through the Effects Rack view. This rack will show the effects you have enabled for whichever track you have selected. In the example above, I have track 3 selected, and so above the effect slots you can see "Track 3" shown as the current track we can apply or disable effects. [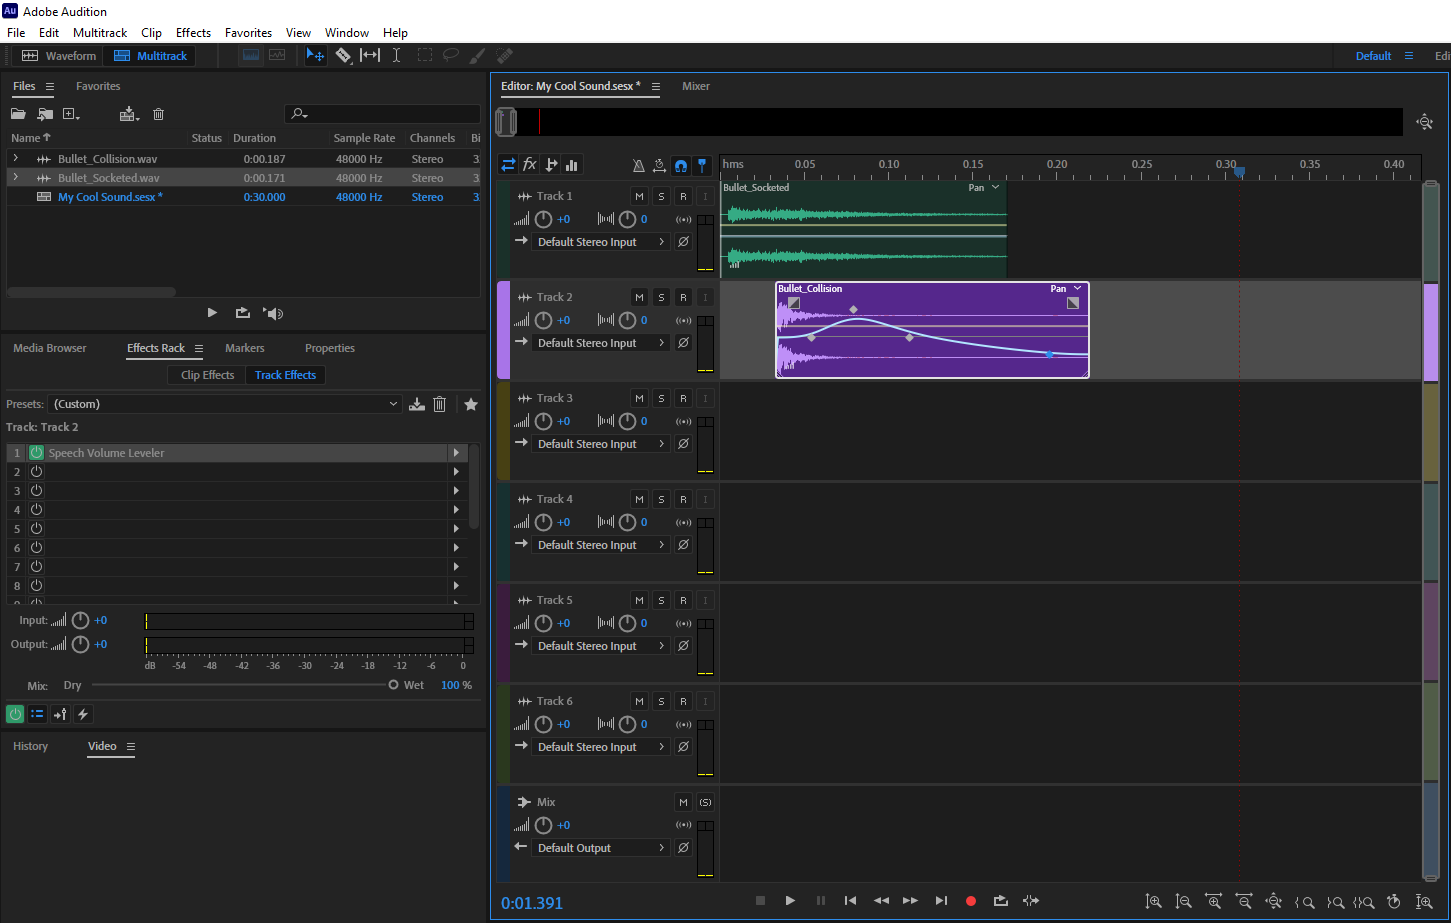](https://scil-wiki.su.edu/uploads/images/gallery/2023-11/spline-curves.png) When an effect is added to a track, you can see the power button icon turns green in the Effects Rack. Clicking that icon will revert it to its original state and disable the effect, though it will not delete it. This allows you to test your sound with and wihtout an effect. [](https://scil-wiki.su.edu/uploads/images/gallery/2023-11/track-zoomed.png) Taking a closer look at a track, there is some information to digest... Starting with the track panel, the left knob changes your track's overall volume. The other knob is for panning to the left or right ear. The dropdown, currently labeled "Default Stereo Input" provides a shortcut to your Audio Hardware settings and lets you switch between mono or stereo. (Mono plays audio through one channel, and stereo plays through two) **M** is the Mute button. Enabling it will mute the corresponding track. **S** is the Solo button. This will let you hear the track with this button enabled while ignoring others. **R** is the Record button. Enabling this will set the track to live mode, and when you record, it will create a clip for that track. **I** is the Input button. When enabled, this track will be listening for input from whatever device is selected. This is also the device that will capture audio, should your track be ready to record. Below the **'I'** button is your meter. Should your volume be too loud, the meter will clip, which is signified by two red rectangles that can appear at the top of the meter. The icon under the record button is your **Sum To Mono** button. This initiates the process of summing the channels of a multi-channel format (left and right channels in stereo) into a single mono channel and dividing the output by the number of channels being summed. The info present in all channels is preserved while the differences are canceled out. Beneath the aforementioned button is the **Reverse Polarity** button. If you click this button, you probably wouldn't notice a difference, and that's because it's simply flipping your audio signal 180 degrees. For this button to have use, you would be using it with two audio tracks, as a means of achieving a fuller sound. [(More on polarity, plus Phasing)](https://www.bhphotovideo.com/explora/pro-audio/tips-and-solutions/polarity-vs-phase-what%E2%80%99s-the-difference#:~:text=If%20we%20leave%20the%20polarity,full%20and%20accurate%20sound%20recording.) [](https://scil-wiki.su.edu/uploads/images/gallery/2023-11/track-zoomed-1.png) Moving to the clip, there are a few bits of information that can appear on it as you're editing... The waveform envelope icon in the bottom left functions like a slider when hovering your mouse over it. It can adjust the overall volume of the clip by dragging left or right. The FX icon is an indicator that effects have been applied to the track and are affecting the clip. The grey squares on both top corners are your fade in/out sliders. They can be dragged left and right to determine the endpoints of a fade in/out. If you drag up or down, the shape of the line will bend. You can also hold certain keys while dragging to obtain various effects: Shift - Fixes either fade duration or shape Alt - Apply symmetric fades Ctrl - Change the fade's shape The blue line with points on it is your volume automation line, whereas the semi-transparent yellow line is the panning automation line. If you click one or the other, it will become highlighted and show you any points that have been added. You can add points by clicking somewhere on the line, can undo the action with Ctrl/Command + Z, or can use the select tool then right-click and choose "Delete Selected Keyframes." The automation line starts off with a pointy waveform when you add points to it, however as you can see in the picture, my line is smoother. To do this, simply right-click 6the automation line and enable **Spline Curves**. #### Rendering Using the knowledge above, you're ready to begin experimenting with Audition and using it to record, mix, and polish audio. [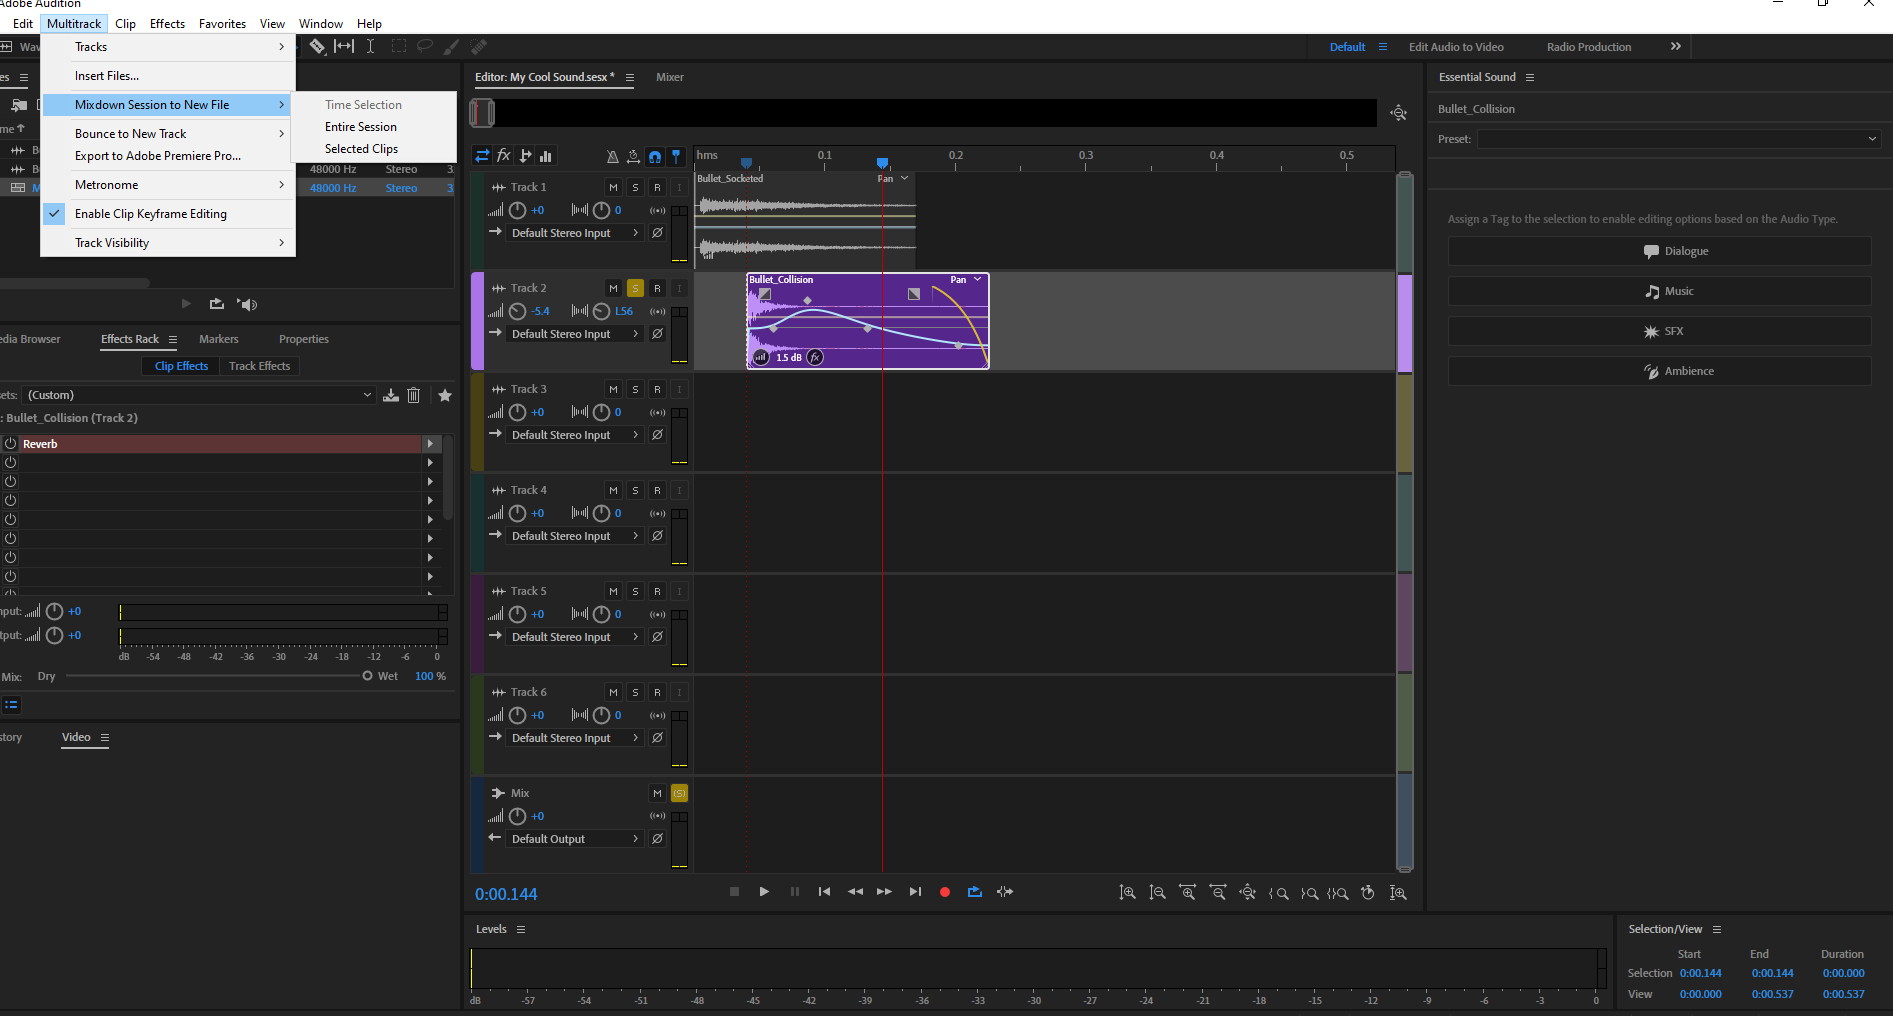](https://scil-wiki.su.edu/uploads/images/gallery/2023-11/screenshot-2.png) When you *Mixdown* a multitrack session, you are taking all tracks with audio and combining them into a single audio file. To do this, go to **Multitrack --> Mixdown Session to New File** **--> Entire Session,** then select that option. [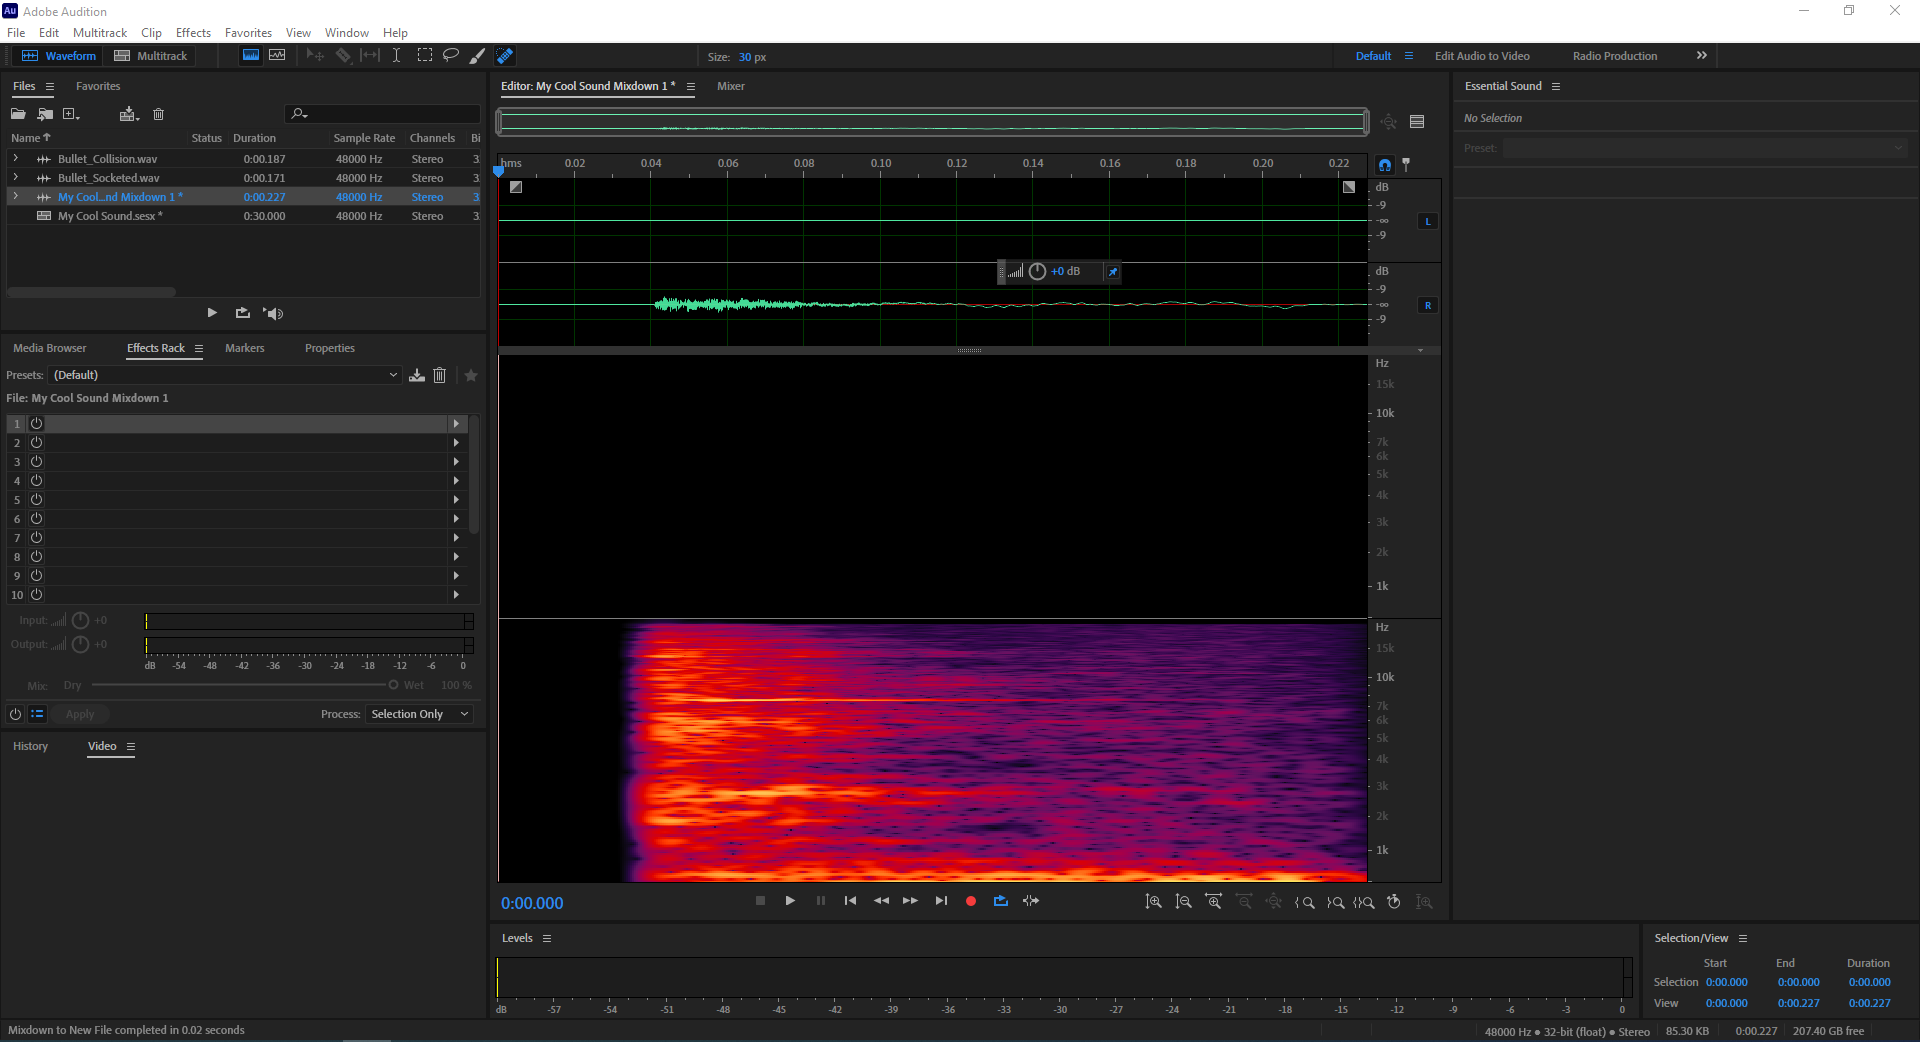](https://scil-wiki.su.edu/uploads/images/gallery/2023-11/render.png) Since the file is to be rendered as a single wave file, Adobe Audition creates a new waveform file that appears in the File View. This is your Multitrack Session's render, where all sounds have been put into a single channel. [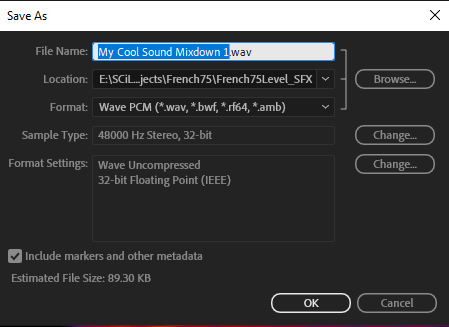](https://scil-wiki.su.edu/uploads/images/gallery/2023-11/save-as.png) To save your track as an audio file, go to **File --> Save As** and the window above will appear. You can name your file, specify the directory, choose a specific audio file type, and view the format settings to double-check they're correct. #### Helpful Videos Good Job! There is plenty more to learn about Adobe Audition. [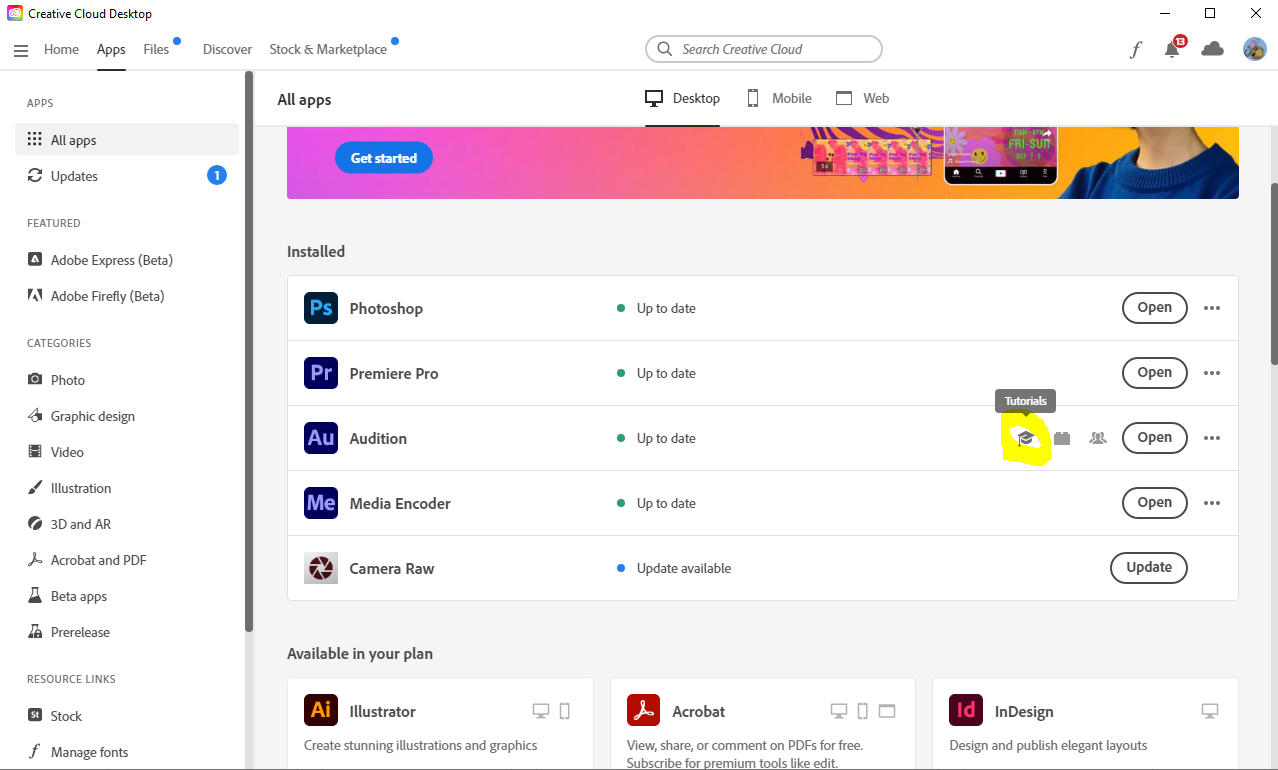](https://scil-wiki.su.edu/uploads/images/gallery/2023-11/tutorials.png) Like with any Creative Cloud product, you can access tutorials for the product by opening Creative Cloud, selecting an application like Audition, and clicking the graduation hat icon. Below are some Audition videos that may interest you. REMOVING BACKGROUND NOISE - [Link](https://youtu.be/n4FHoi1cs_s "Link") RADIO VOICE EFFECT - [Link](https://youtu.be/B400UzHCTk0 "Link") VINTAGE VOICE EFFECT - [Link](https://youtu.be/kVT2t7OSUxI "Link") MOVIE TRAILER VOICE EFFECT - [Link](https://youtu.be/mWBksoPzgIc "Link") PODCAST EDITING (Has good editing tips in general)- [Link](https://youtu.be/ceC-8UyUzec "Link") Good Luck and have fun! # Reaper - IntroductionThis tutorial will go over the basics of editing a session in Reaper.
If you are here to learn about using the Iso Booth, visit the *Using The Iso Booth* chapter, linked [HERE](http://10.42.32.18/books/audio/chapter/using-the-iso-booth).
REAPER is a handy tool when it comes to editing any type of audio. This tutorial will scratch its surface and tutorial videos will be provided at the end, shedding insights on how this tool can be utilized. # SFX Resources and Conversion ToolsThis page provides a list of resources for acquiring audio files without needing money. Should you need a WAV file and can only get mp3s for free, methods of converting mp3s to WAV while maintaining quality will be shared.
To learn methods for converting your mp3s into WAVs, either use the page navigation menu and click *mp3 to WAV*, or scroll down until seeing that header. ### Freesound.org [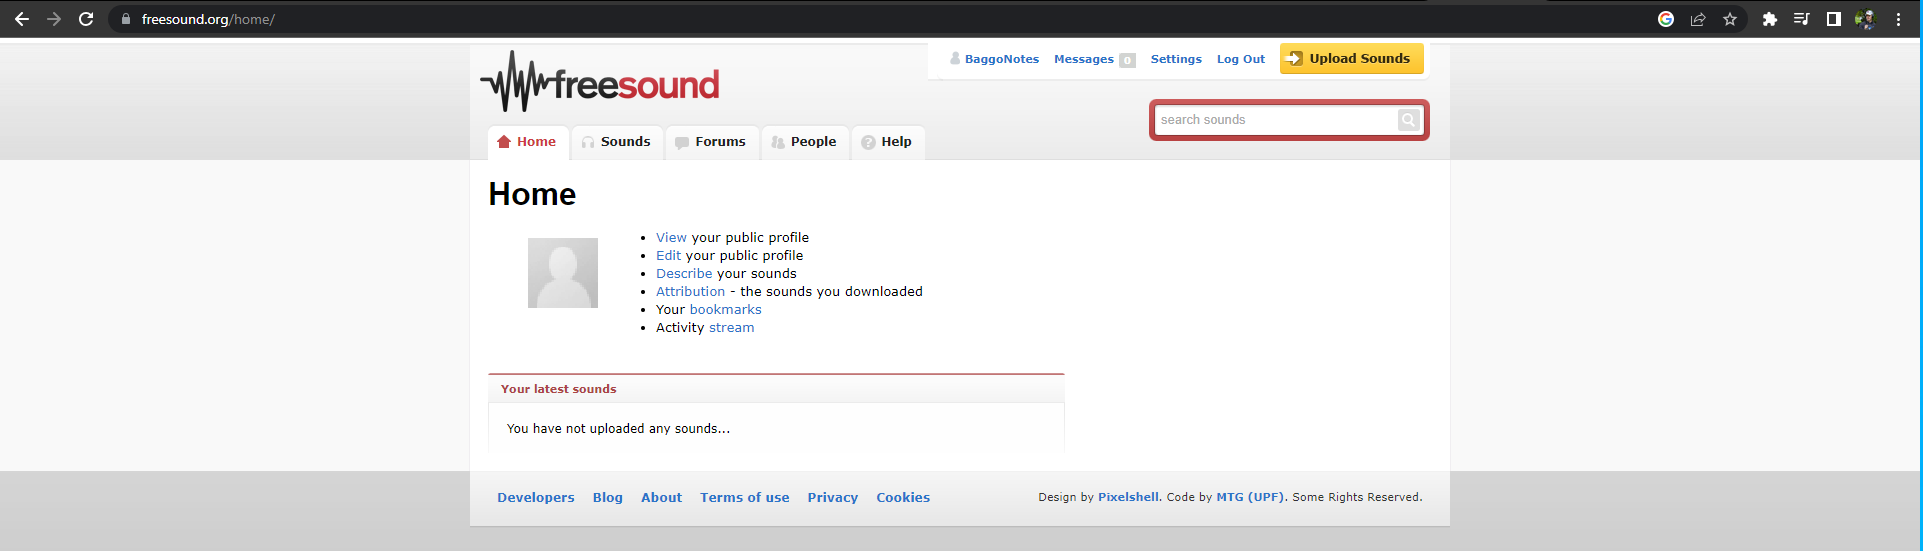](https://scil-wiki.su.edu/uploads/images/gallery/2023-11/free-sound.png) **LINK: [https://freesound.org/home/](https://freesound.org/home/)** freesound allows you to get mp3s for free, though requires you to set up an account for free. ### Zapsplat.com [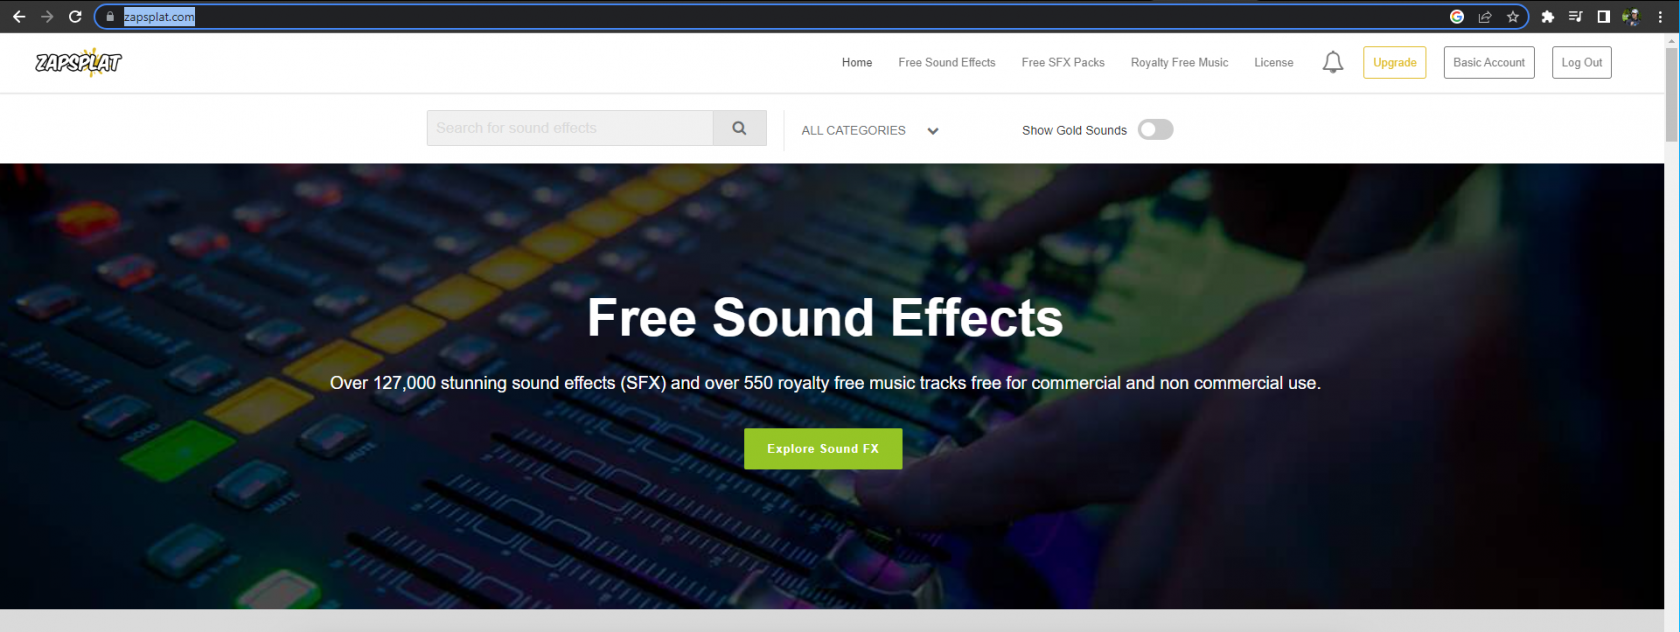](https://scil-wiki.su.edu/uploads/images/gallery/2023-11/zapsplat.png) **LINK: [https://www.zapsplat.com/](https://www.zapsplat.com/)** Zapsplat requires you create an account for free in order to access its sound library. The library is smaller than free freesounds.org, but is arguably higher quality. You can only download **3 mp3s every ten minutes**. ## mp3 to WAV Though WAVs are know for having more data and better sound quality, converting an mp3 to a WAV does not magically increase the quality. The sound file has to start as a WAV for that to happen. The reason you go through this process is because game engines or middle ware (i.e. Wwise, Fmod) require you to provide WAV files for an audio object and will not accept mp3s. Even if the mp3s are lower quality, there are many instances where this is acceptable and the sound does not need to take up so much data, so consider this smart budgeting. Below are some software you can use to convert an mp3 into a WAV. ### Adobe Audition [](https://scil-wiki.su.edu/uploads/images/gallery/2023-11/adobe-audition.png) If you have a creative cloud account, you can use Adobe audition to convert your file: **1.)** Drag and drop your mp3 into the upper left view, like in the image above where you can see the audio clip. **1a.)** You can also hover above the plus sign box icon on the file view's toolbar, which will pop up the text 'New File', then navigate through your file explorer and select the audio file. **2.)** Navigate to *File --> Save As* **3.)** Click *Format* in the window that pops up and at the bottom should be the WAV format. **4.)** Select it and click "OK", and you now have a WAV file! ### Audacity [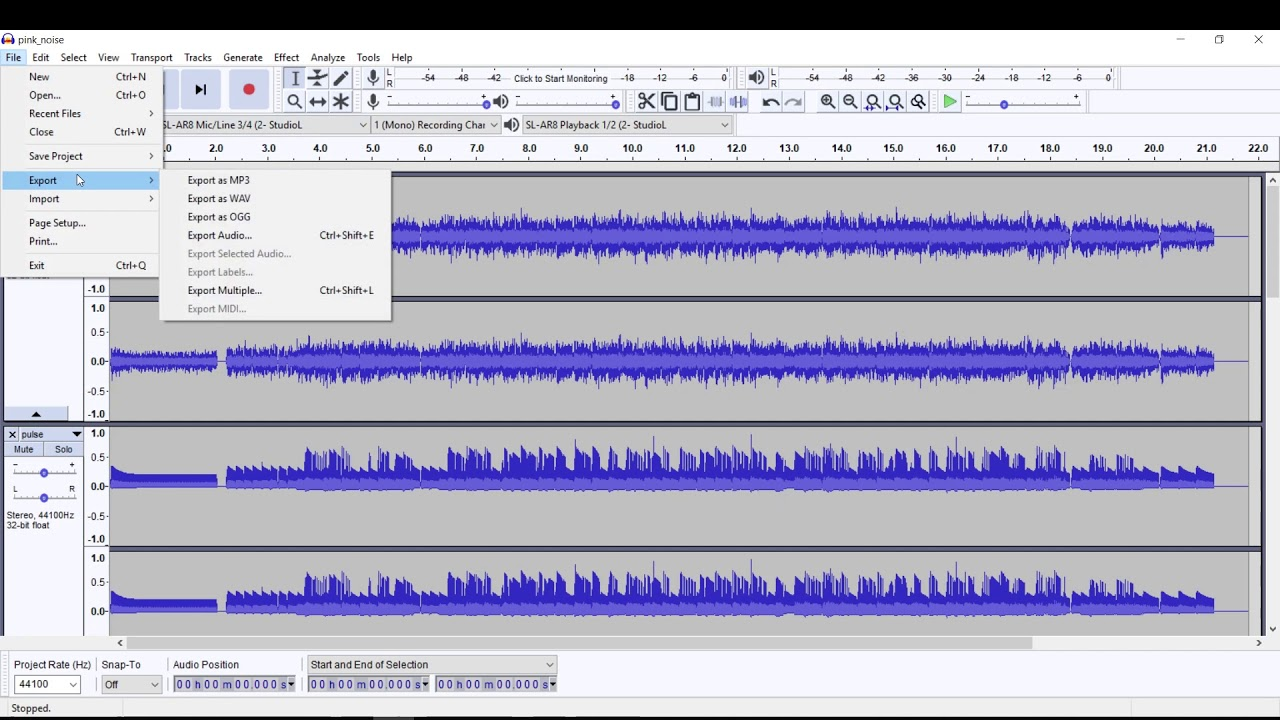](https://scil-wiki.su.edu/uploads/images/gallery/2023-11/shximage.png) **LINK: [https://www.audacityteam.org/download/](https://www.audacityteam.org/download/)** Audacity is a free to download tool for non-creative cloud users, and can easily convert an mp3 to a WAV: **1.)** Open the file you want to convert. **2.)** Select **File > Export > Export as WAV.** **3.)** Select a title, choose the location where you want to save the file, and set the file type to be *“WAV (Microsoft) Signed 16-bit PCM”.* **4.)** Save your file. Now you have a .WAV version of your audio file! ### Cloud Convert [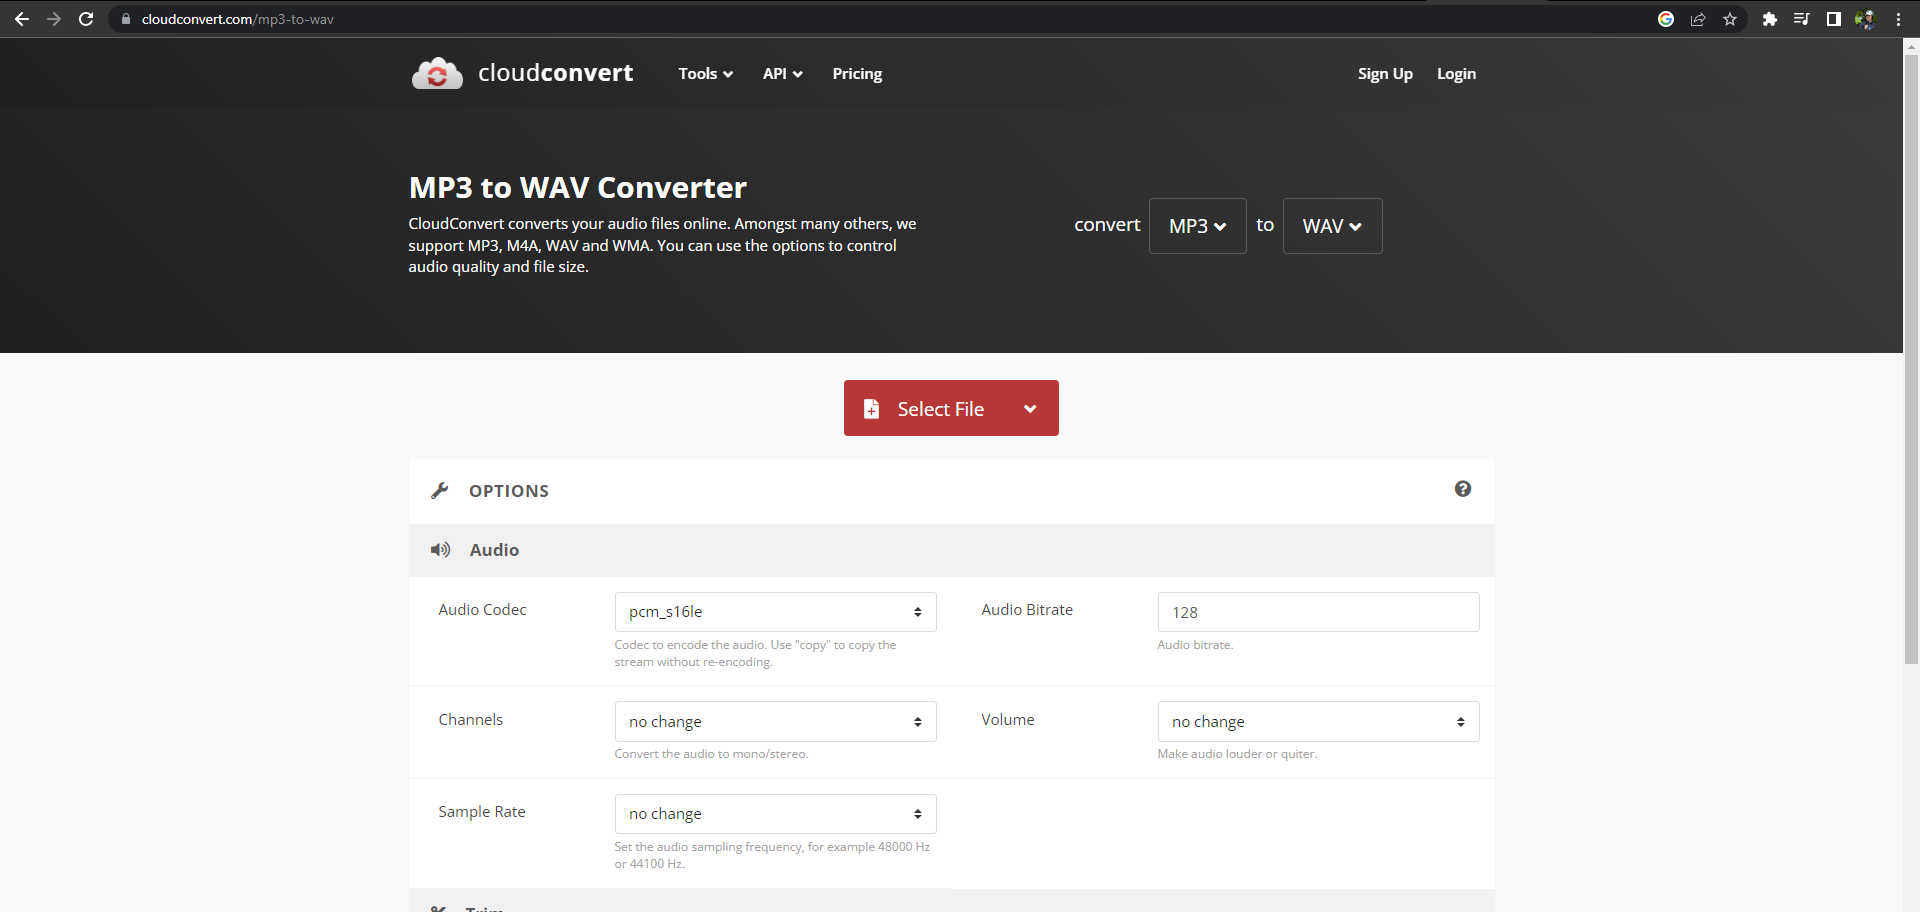](https://scil-wiki.su.edu/uploads/images/gallery/2023-11/r8wcloud-convert.png) Cloud Convert can be found on your browser and requires no download. As seen in the image, there are two drop boxes you can use to select the file type you have, and what you want it converted into. Below are more options for trimming or editing the conversion settings of your audio file. # Wwise: Getting Started Wwise is a sound-authoring middleware with an intuitive interface for audio engineers. It can integrate with almost any game engine and no matter which you use, yields a consistent toolbox that renders you flexible for creating meticulous soundscapes. # Required Downloads and InformationThis page will show the necessary downloads and provide insightful information for getting started with Wwise. The video below is a Unity project with Wwise integrated into it. It utilizes some basic components of the Wwise Authoring Tool.
[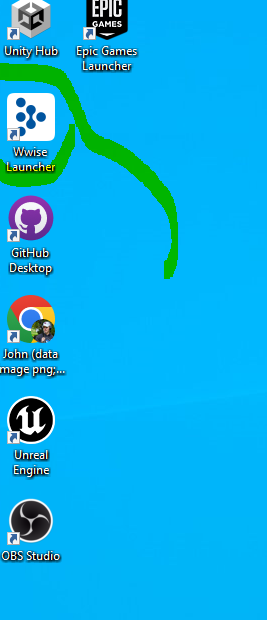](https://scil-wiki.su.edu/uploads/images/gallery/2023-11/s5zwwise-launcher.png) In order to get get started using Wwise, you will need to open up Audio Kinetic's website and download the Wwise Launcher application. The link to AudioKinetic's download page will be provided [here](https://www.audiokinetic.com/en/download/) , where you can choose the platform you wish to download it on. [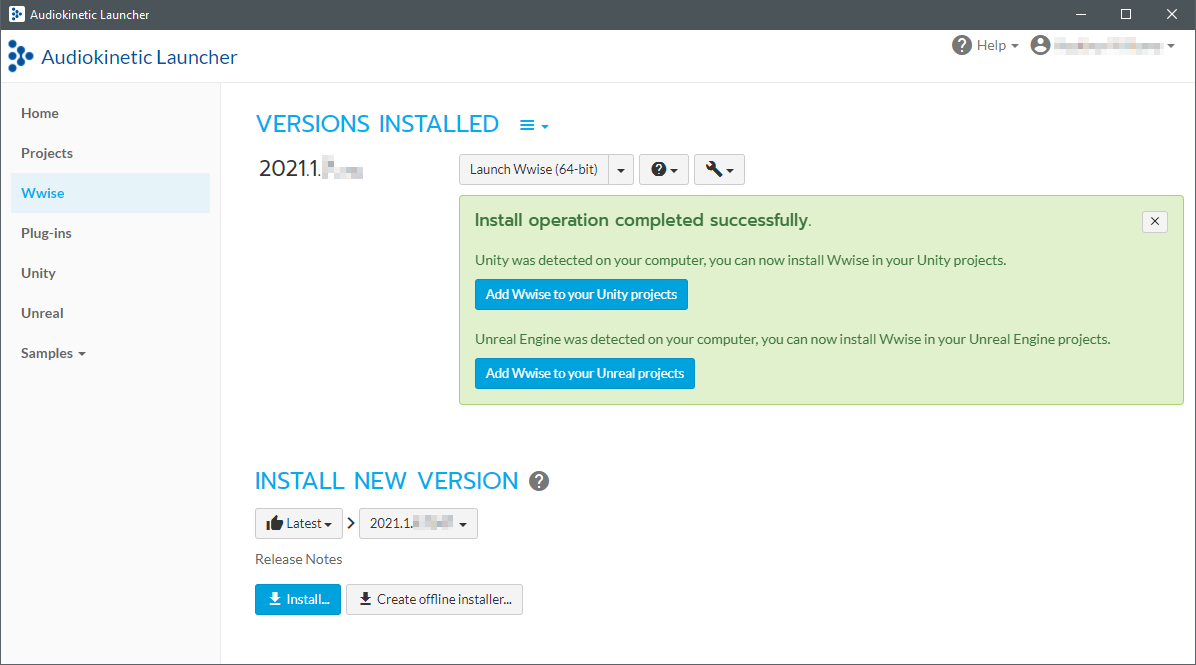](https://scil-wiki.su.edu/uploads/images/gallery/2023-11/ouuimage.png) With it installed and opened, there are a few tabs in the lefthand view you can navigate through. The **Home** tab showcases ongoing events related to Wwise, upcoming events, projects showcasing Wwise, and all sorts of cool content that will familiarize you with the ways in which the software is used. The **Projects** tab... The **Wwise** tab shows all versions of Wwise you currently have downloaded. When you decide to integrate Wwise into a game engine (i.e. Unity, Unreal), it is important to know WHAT versions of Wwise are compatible with WHAT versions of a game engine. You can find this information on the [Release Notes](https://www.audiokinetic.com/en/library/edge/?source=Unity&id=pg_releasenotes_2021_1_0_2069.html) page on AudioKinetic's website. [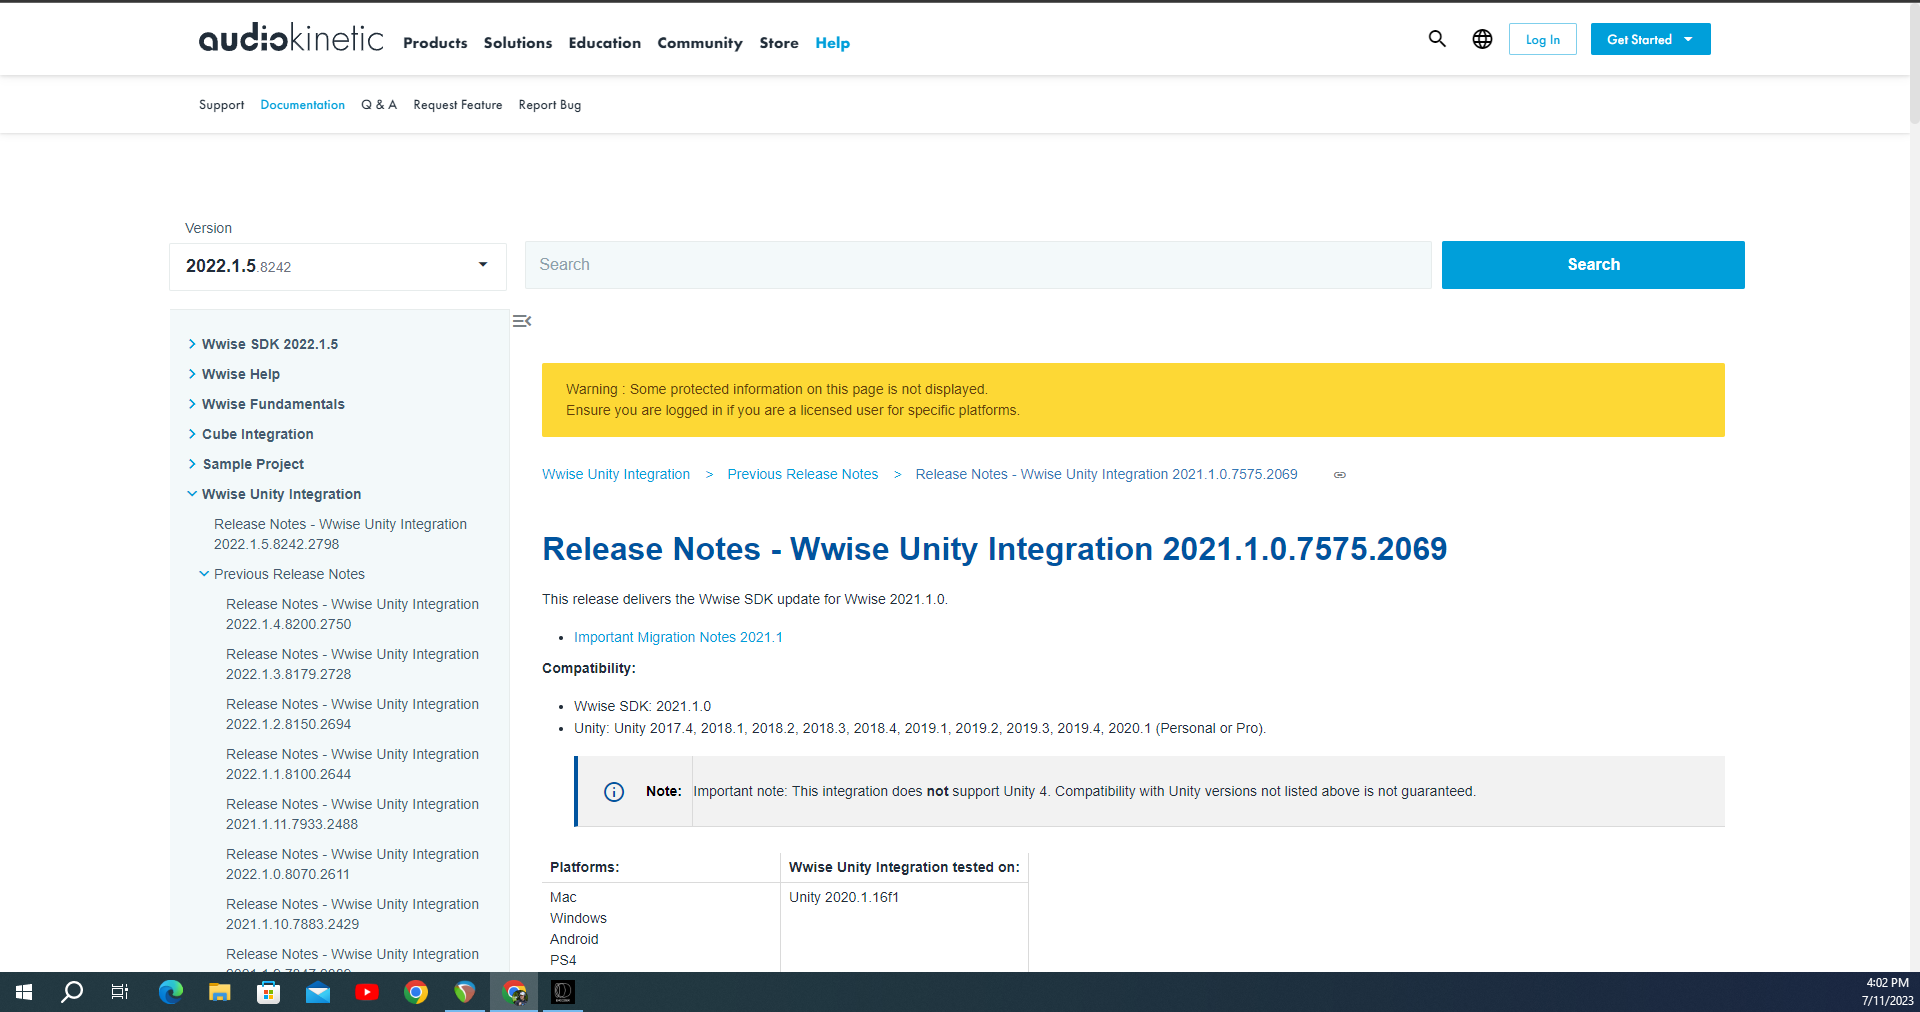](https://scil-wiki.su.edu/uploads/images/gallery/2023-11/wwise-release-notes.png) Use the dropdown menu in the top left to choose a version of Wwise, then check the release notes for the game engine you're interested in by navigating the left-hand menu and finding the game engine dropdown with each version's release notes. You will be provided with the what versions of the game engine compile with Wwise and what the Wwise version was tested with. The **Plug-Ins** tab provides a list of plug-ins that enhance Wwise's capabilities. Some of these plug-ins are not free or will require being crediting of some sort, so keep this in mind as you check them out. The **Unity** tab will display every Unity project that was located on the computer being used. If you recently unzipped a project file and are not seeing it in the view, make sure Unity Hub has located your project file first before expecting AudioKinetic Launcher to find it. The **Unreal** tab will display ever unreal project that was located on the computer being used. If you recently unzipped a project file and are not seeing it in the view, make sure Unreal has located your project file first before expecting AudioKinetic Launcher to find it. **Samples** contains projects that use Wwise, many of which are complimentary of the certification courses you can go through. They are very helpful for understanding Wwise's capabilities. The Wwise certifications are free, as are the downloads for any Sample game they provide. The exams, however, cost money and will get you two attempts at the exam. You can find the page with all of the certification courses [here](https://www.audiokinetic.com/en/education/learn-wwise/). the certifications include: \- **WWise 101 (Wwise Fundamentals)** \- **WWise 202 (Interactive Music)** \- **WWise 251 (Performance optimization & Mobile Considerations)** \- **Wwise 301 (Unity Integration)** ### Licensing [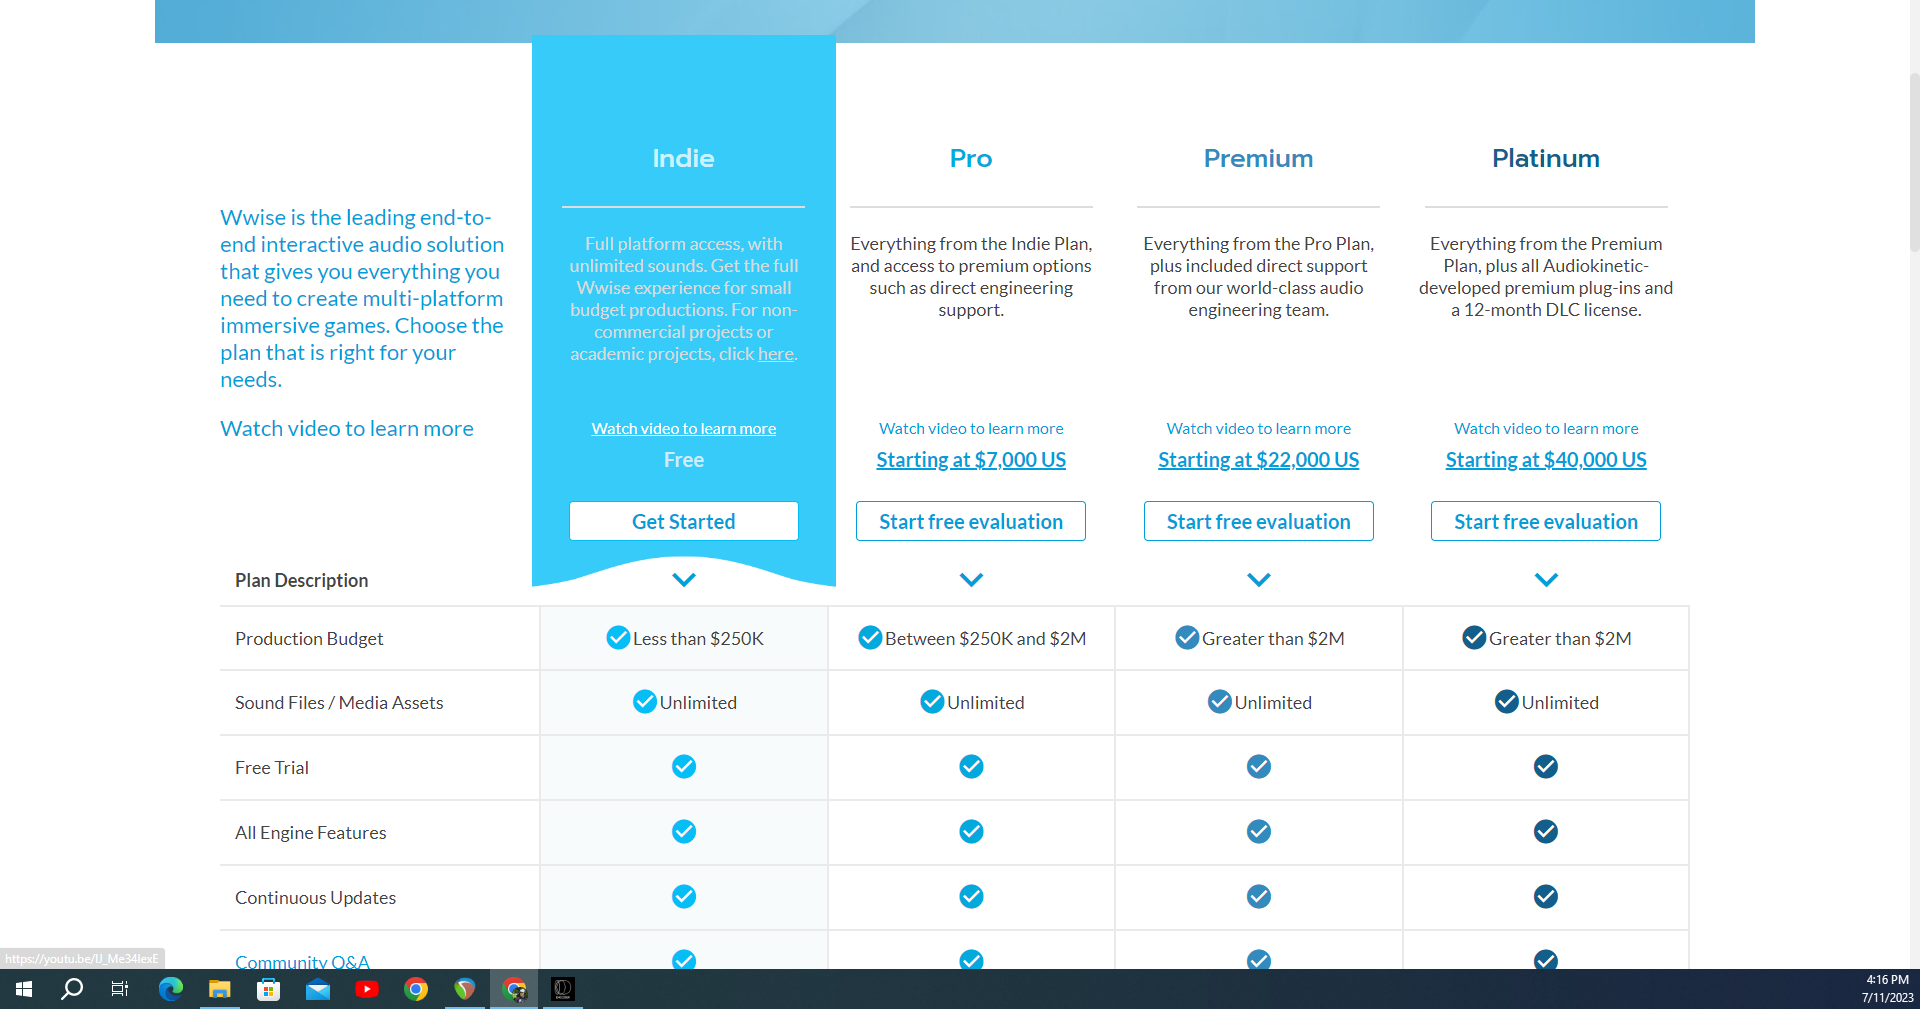](https://scil-wiki.su.edu/uploads/images/gallery/2023-11/wwise.png) Wwise has annual subscriptions for unlocking premium features, as well as direct support from the Audio Engineering Team. That being said, projects that are not game-related and are for non-commercial, education, or non-gaming purposes can be registered for licensing. As you can see above, I can happily say that there is an option for obtaining Wwise licensing through an Indie Game project. This is a recent advance made by AudioKinetic that has really opened Wwise up to the game development community and has made it more open-source. You can access this page for more info and video [here](https://www.audiokinetic.com/en/pricing/). ### YouTube Lastly, seeing other Audio Engineer creations, how-to videos, and blogs are a great way to familiarize yourself with some popular features in games achieved by Wwise. here are some sources below for you to explore: \- LIMBO Wwise Demo Reel ([Youtube](https://youtu.be/YCfBWI-HdbQ)) \- Cujo Sound ([YouTube](https://www.youtube.com/channel/UCDe59ZJaYVueCUH55POlW3g)) \- Coding versus Blueprints in UE ([Blogs Series](https://blog.audiokinetic.com/en/coding-wwise-in-ue-for-beginners/)) \- Using Wwise's Query Editor ([Blog](https://blog.audiokinetic.com/en/introducing-waql/)) \- Wwise & Reaper Implementation ([Youtube](https://youtu.be/wnJH022Z6Mg)) Great video on composition formatting in Reaper, and effective integration into Wwise. # Wwise Student Game Demo(s)The **Wwise Demo** is a Unity project purposed towards demonstrating some of Wwise's capabilities. It is recommended you play through this experience before reading the page. To determine version compatibility between Wwise and Unity, visit the [Release Notes Page](https://www.audiokinetic.com/en/library/edge/?source=UE4&id=releasenotes.html) on AudioKinetic's website.
You can access the doc made to compliment this experience, linked [**here**](https://docs.google.com/document/d/13UribFYThpadrrxLxn7CHPL3h-GHOPKgn1pTMwLi-GA/edit?usp=sharing).
The most recent version of Unreal that Wwise can integrate into is **Unreal 5.2** For updates and information on Wwise's compatibility, visit the [Release Notes Page](https://www.audiokinetic.com/en/library/edge/?source=UE4&id=releasenotes.html) on Audiokinetic's website.
[](https://scil-wiki.su.edu/uploads/images/gallery/2023-11/image-1.png) Integrating Wwise into Unreal is a simple process. As an alternative to a textual guide, a video series will be linked below that covers Wwise and Unreal setup and use cases. Below that video is a shorter video geared specifically towards the integration process. [Learning Wwise with Unreal | Video Series](https://youtu.be/l6twNaup1tI) [Integrating Wwise into Unreal | Short Video](https://youtu.be/l8R0OeaweGQ) It is assumed you have the Epic Games Launcher application for opening Unreal projects. If you do not, the link [here](https://store.epicgames.com/en-US/download) will take you to a download page. #### STEP 1: Selecting Your Unreal Project Whether your project is old or new, Wwise can integrate into the Unreal project. Just be sure to check you are using a version of Wwise that is compatible with the version of Unreal you choose to use. This can be determined using the 'Release Notes Page' link and navigating to the version of Unreal you are using. [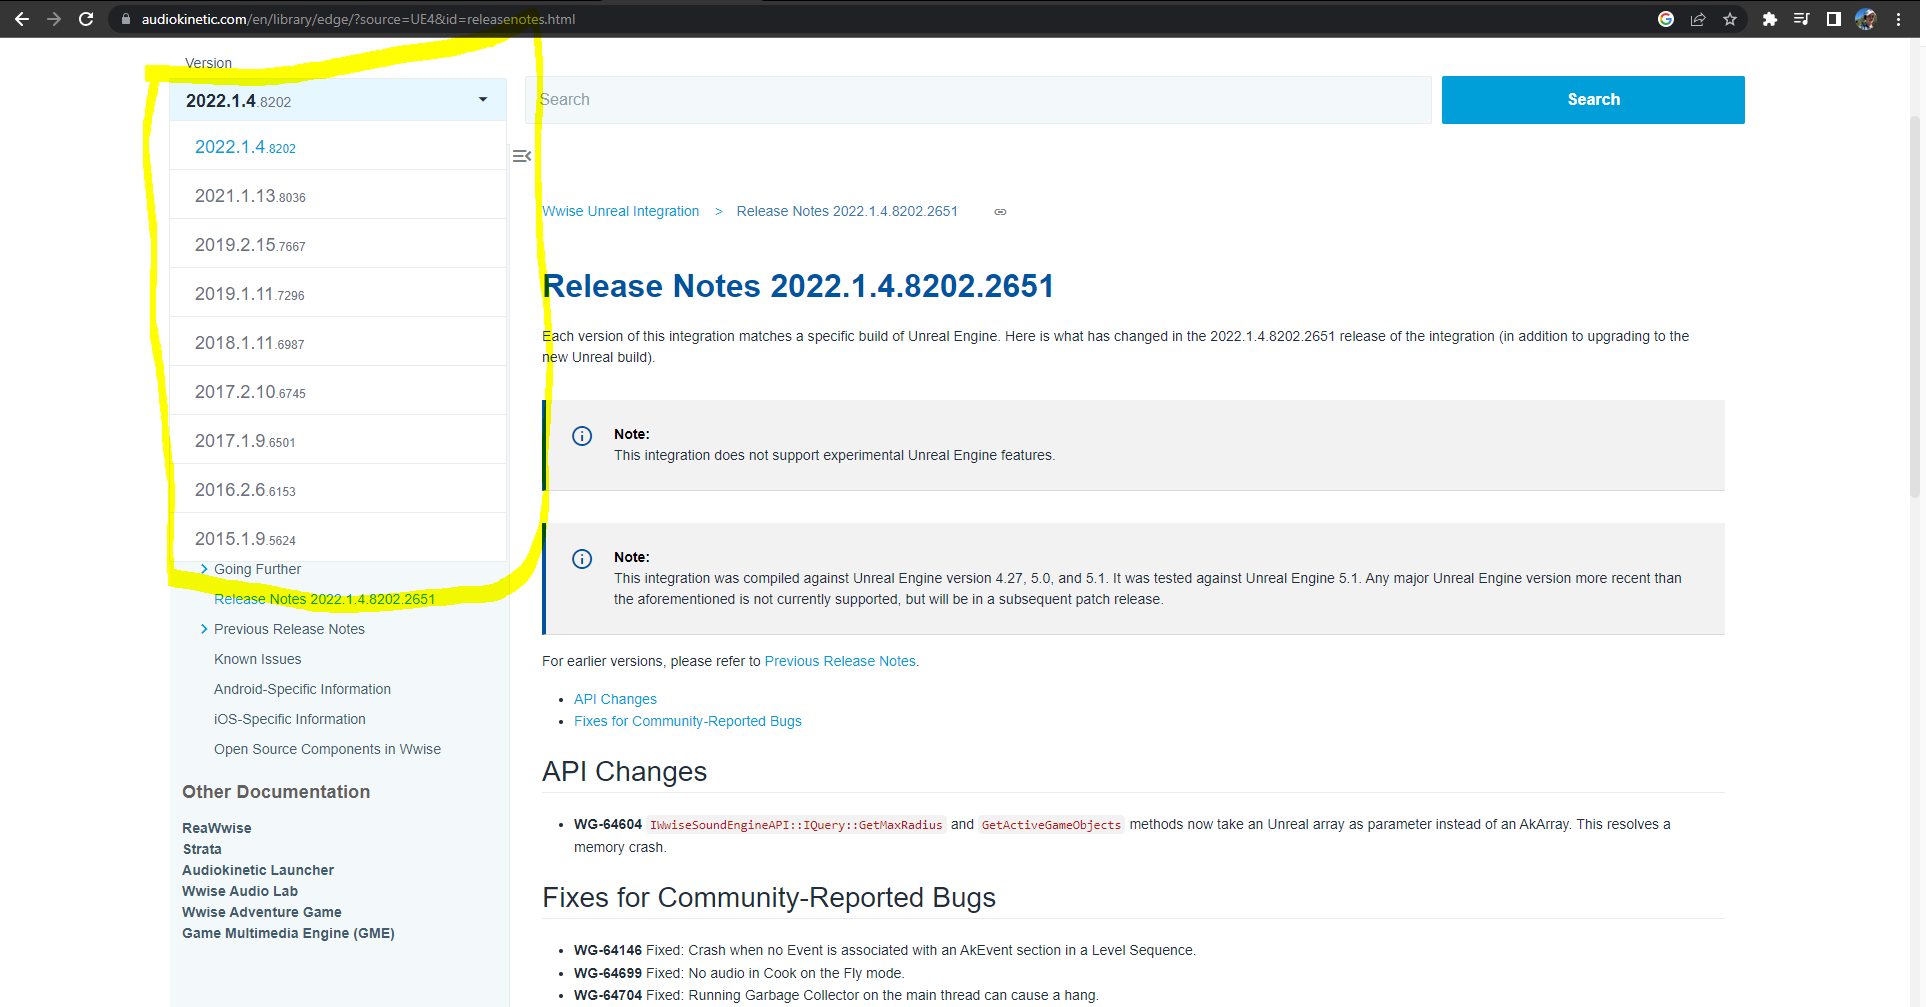](https://scil-wiki.su.edu/uploads/images/gallery/2023-11/2zna.png) [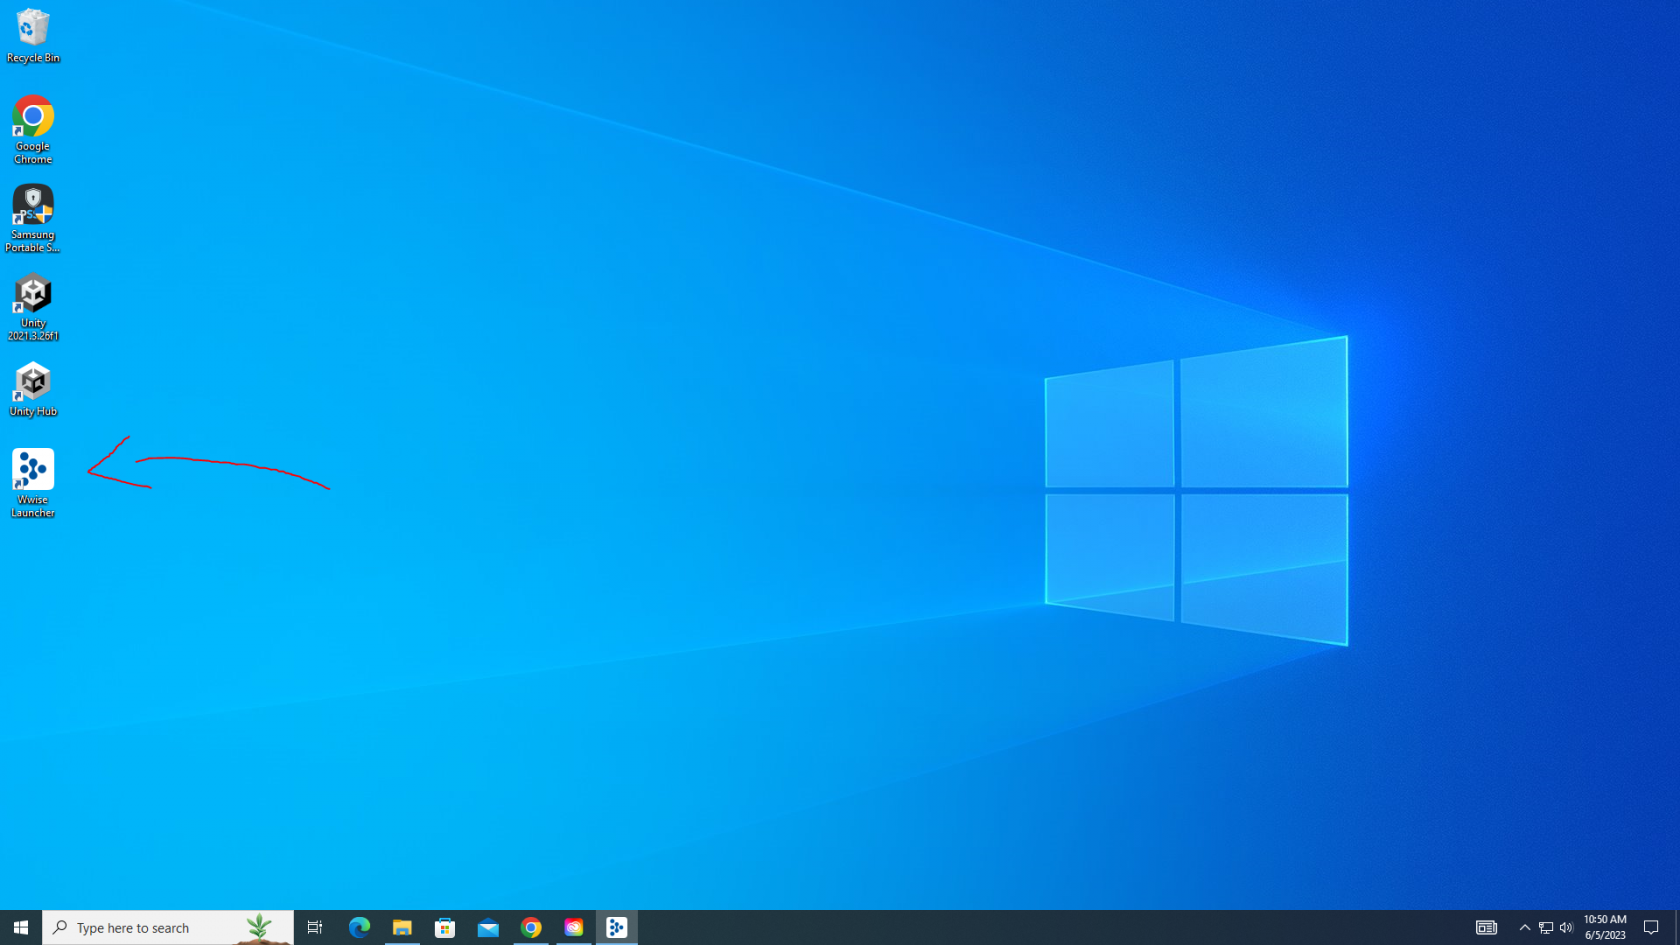](https://scil-wiki.su.edu/uploads/images/gallery/2023-11/b.png) When you've confirmed the versions of each software work together, go ahead and open the Wwise Launcher application. This can be found using the search bar or may be on your home screen. [](https://scil-wiki.su.edu/uploads/images/gallery/2023-11/w.png) This is the interface that should pop up. This is where you go to integrate Wwise into Unreal or Unity projects. Other game engines involve a different process and there are tutorials that are a search away for learning how. [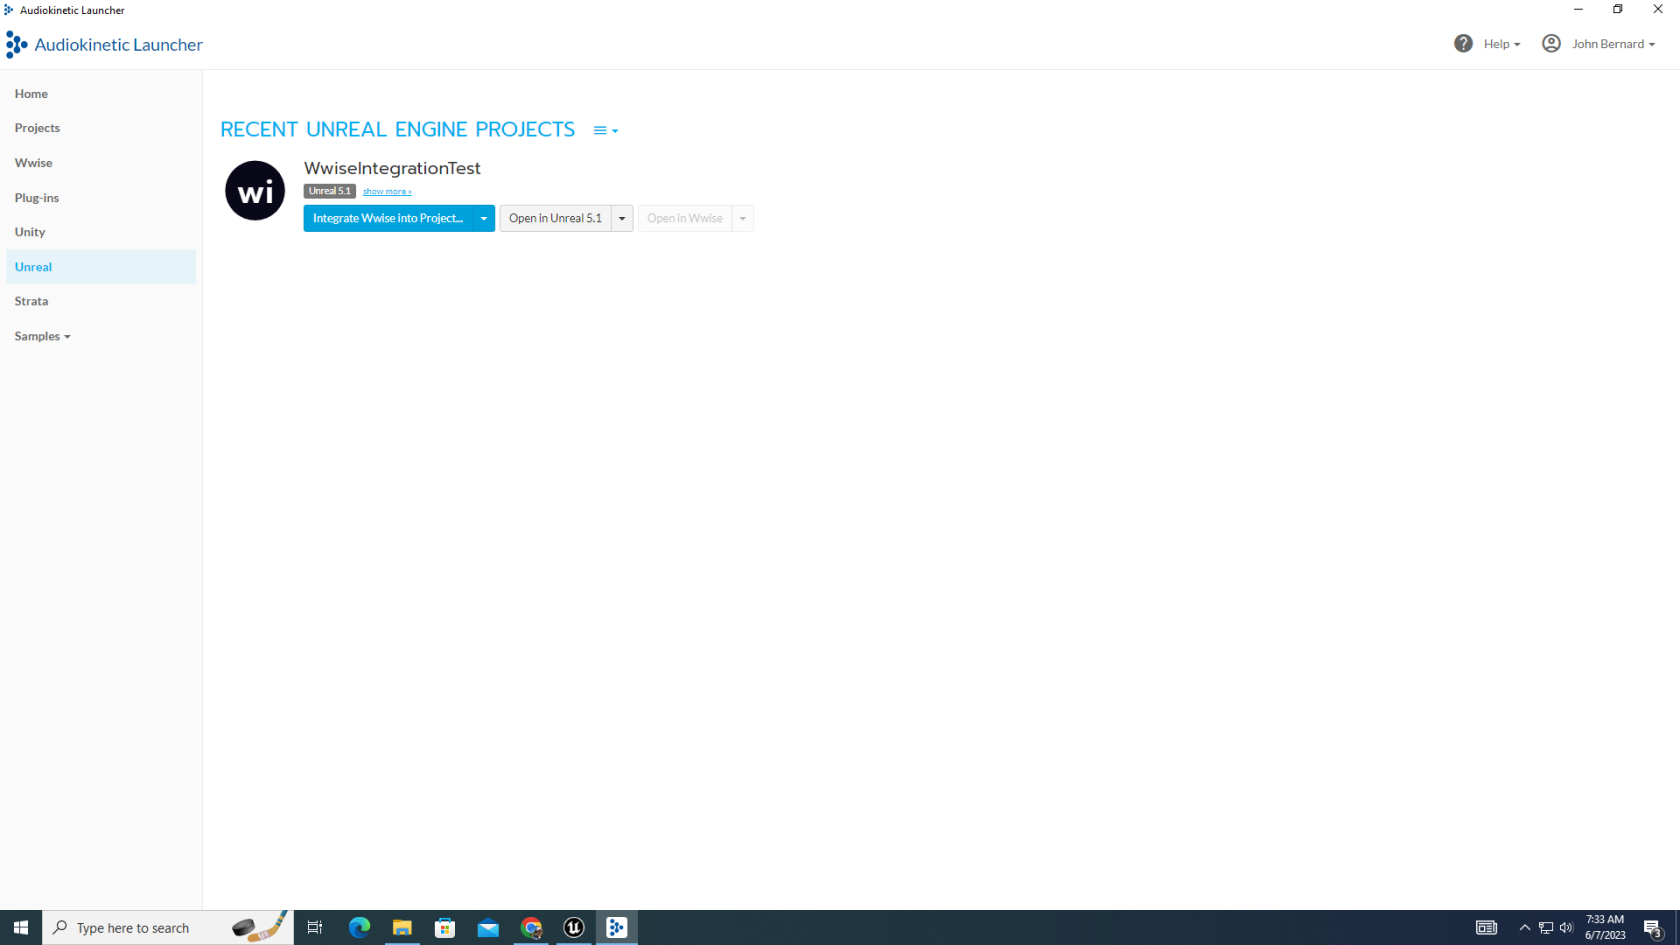](https://scil-wiki.su.edu/uploads/images/gallery/2023-11/e.png) On the left-hand menu, click Unreal. Any projects on your computer, whether on its drive or an SSD, will appear in this view. For the project you want Wwise integrated into, locate it and click the "Integrate Wwise Into Project..." button. [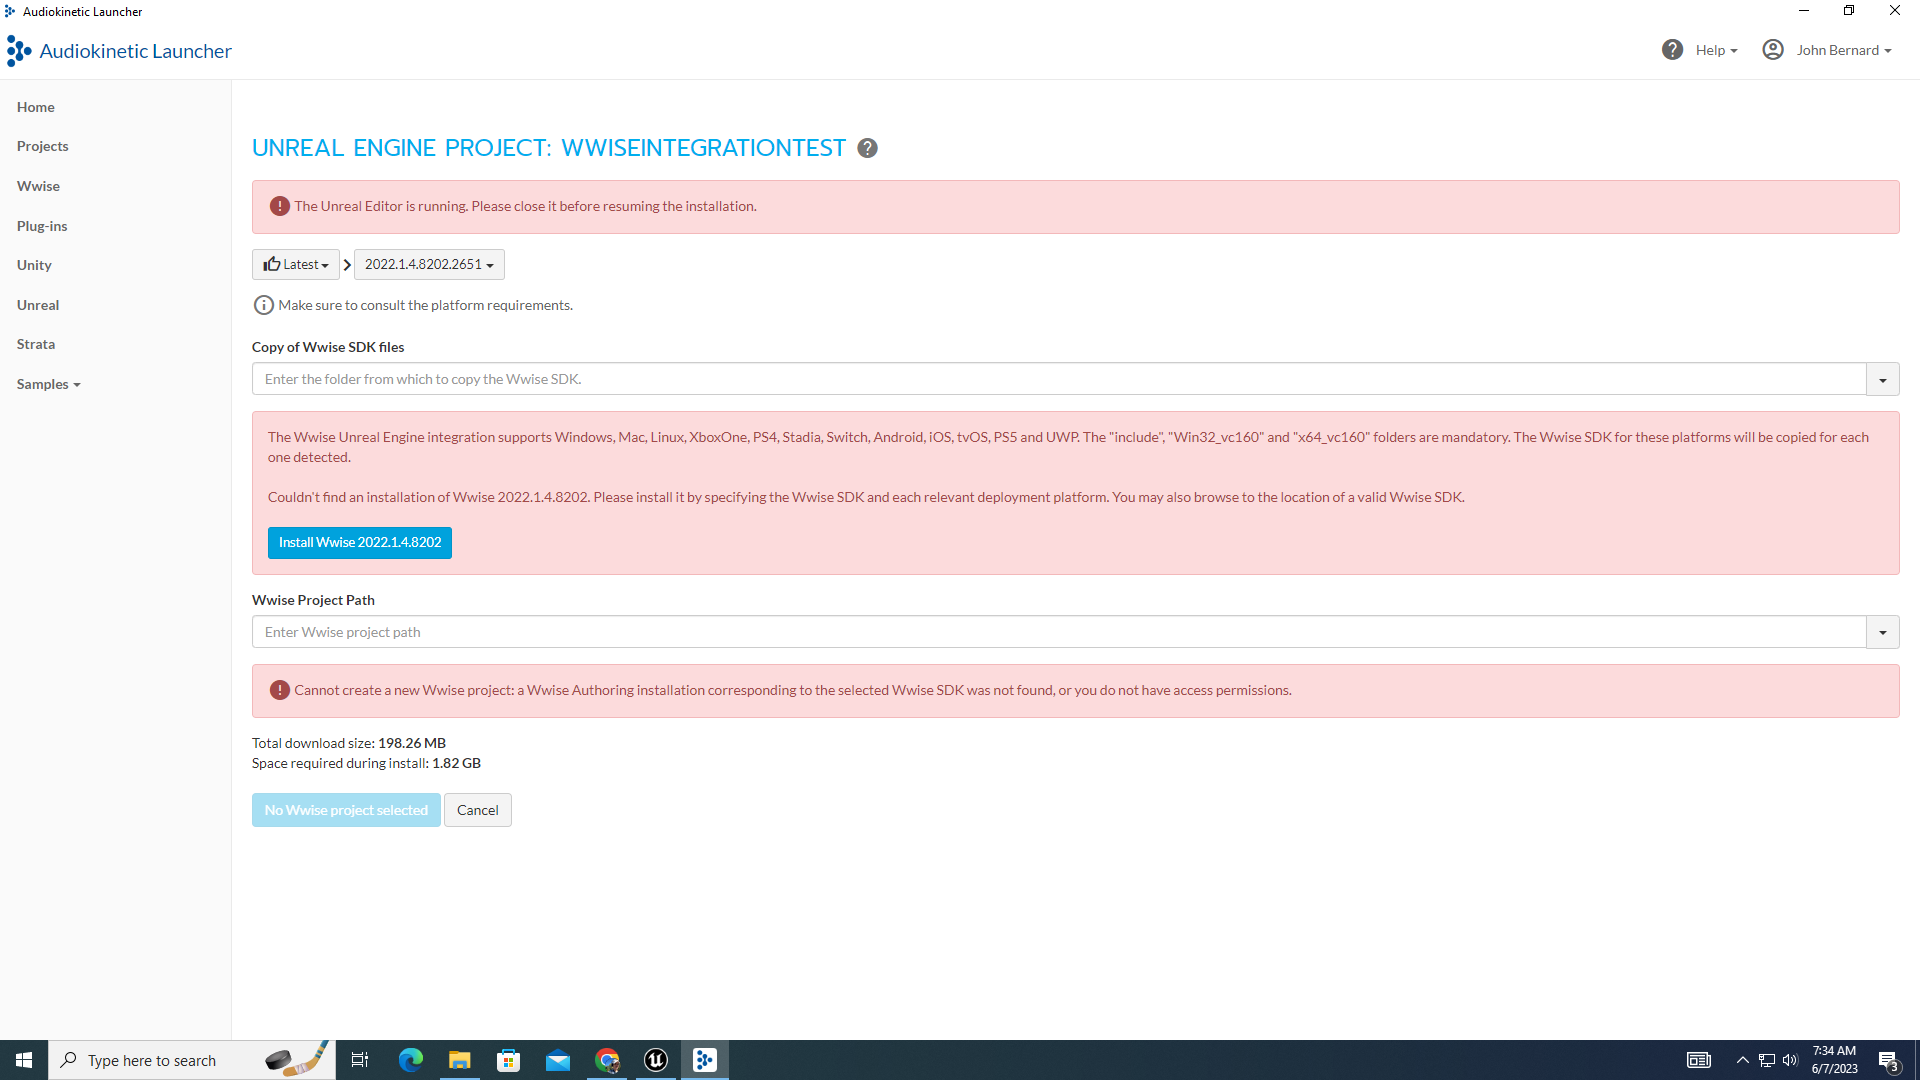](https://scil-wiki.su.edu/uploads/images/gallery/2023-11/h3iimage.png) You will be brought to this screen to configure integration properties. There are many potential error messages in the instance above, all of which I purposefully set myself to encounter for you to see. Starting at the top, you need to make sure Unreal is not running on your computer. Second, make sure you have the correct version of Wwise installed. If you don't it presents a button for downloading the correct version. Lastly, the launcher may get upset if an important add-on was not installed alongside with Wwise, leading to the error message on the bottom. [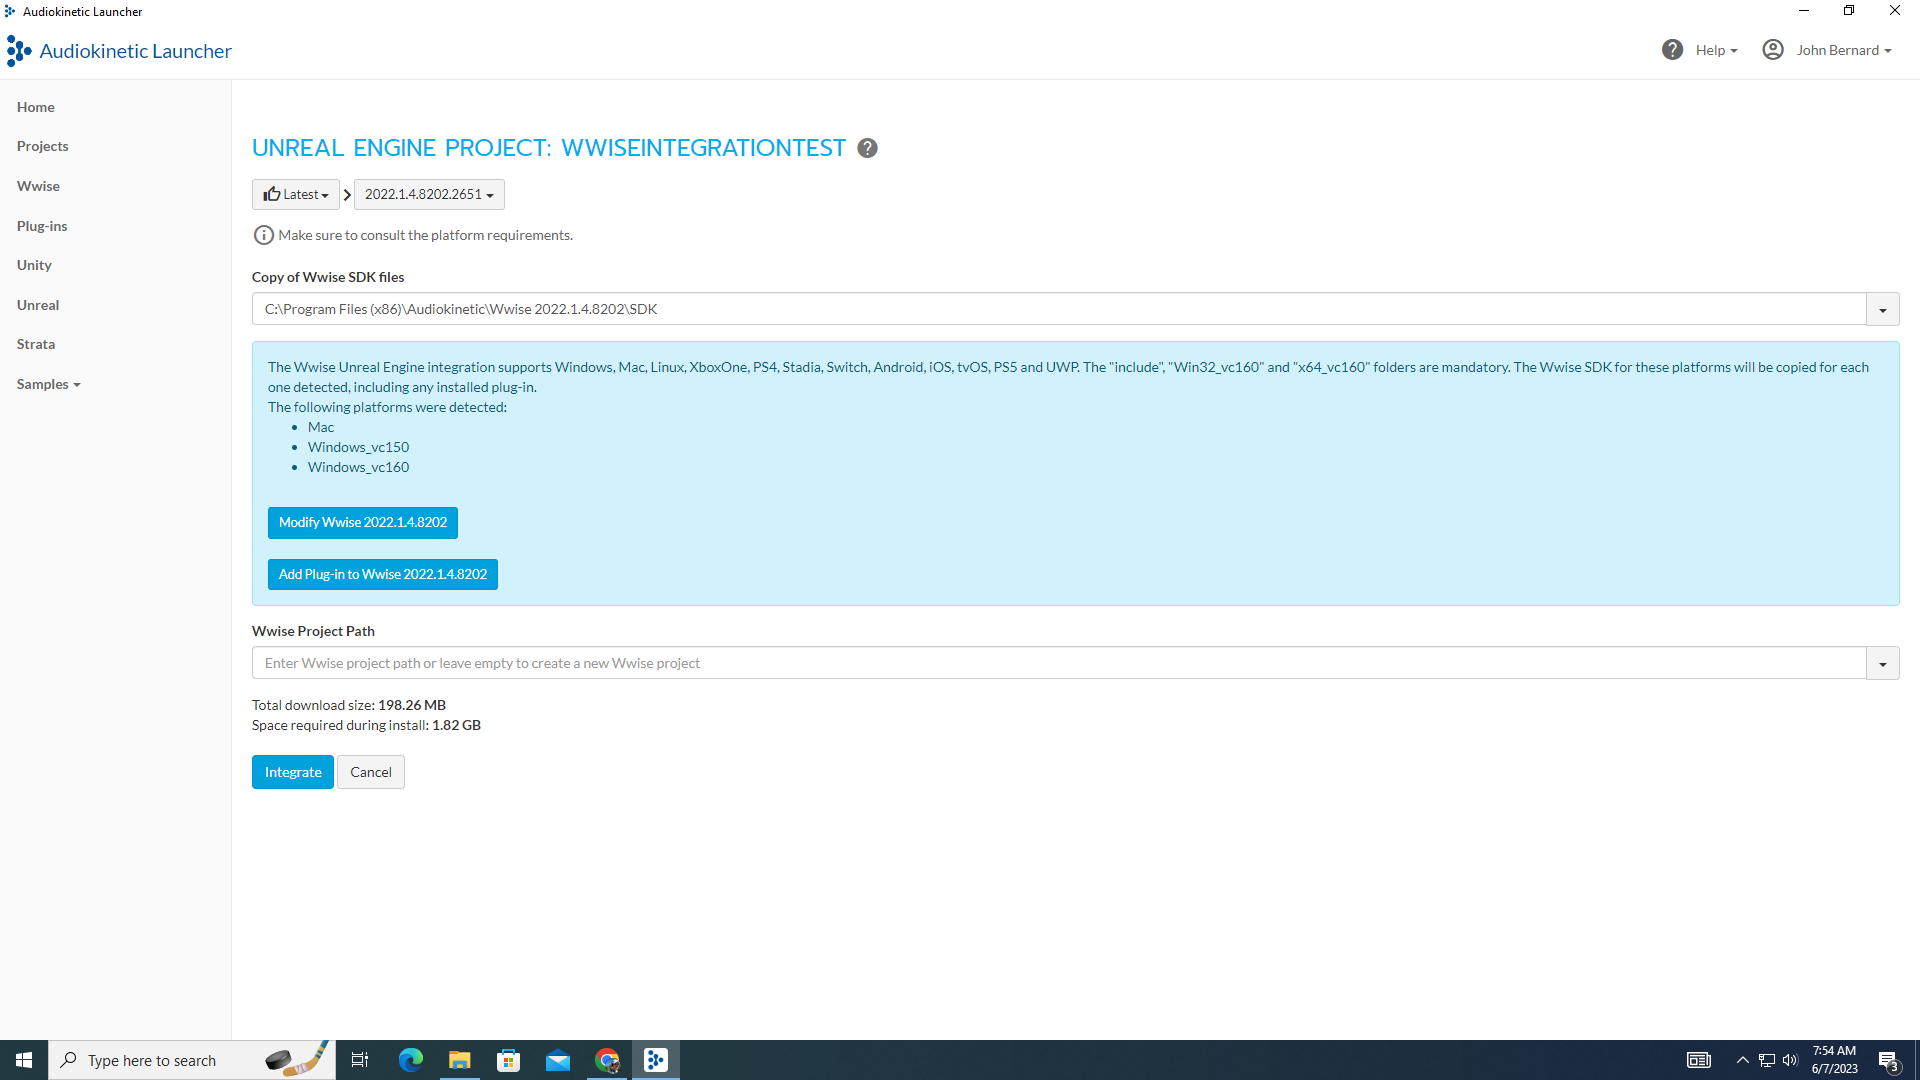](https://scil-wiki.su.edu/uploads/images/gallery/2023-11/747image.png) When you have accounted for all of these potential error, you will be able to click the "Integrate" button at the bottom. [](http://10.42.32.18/uploads/images/gallery/2023-06/5NHb.PNG) The integration will start after agreeing to whatever terms you must accept. The terms may vary depending on what partner plug-ins you choose to have in your Wwise project, but that will not change having to select the "Accept" button to start the integration. [](http://10.42.32.18/uploads/images/gallery/2023-06/Wd5c.PNG) You should get this message when the integration is complete. We can open Unreal and access Wwise through the Wwise launcher application. Simply click the "Open in UnrealX.X" button beneath your project. You can also open up the corresponding Wwise project from here. [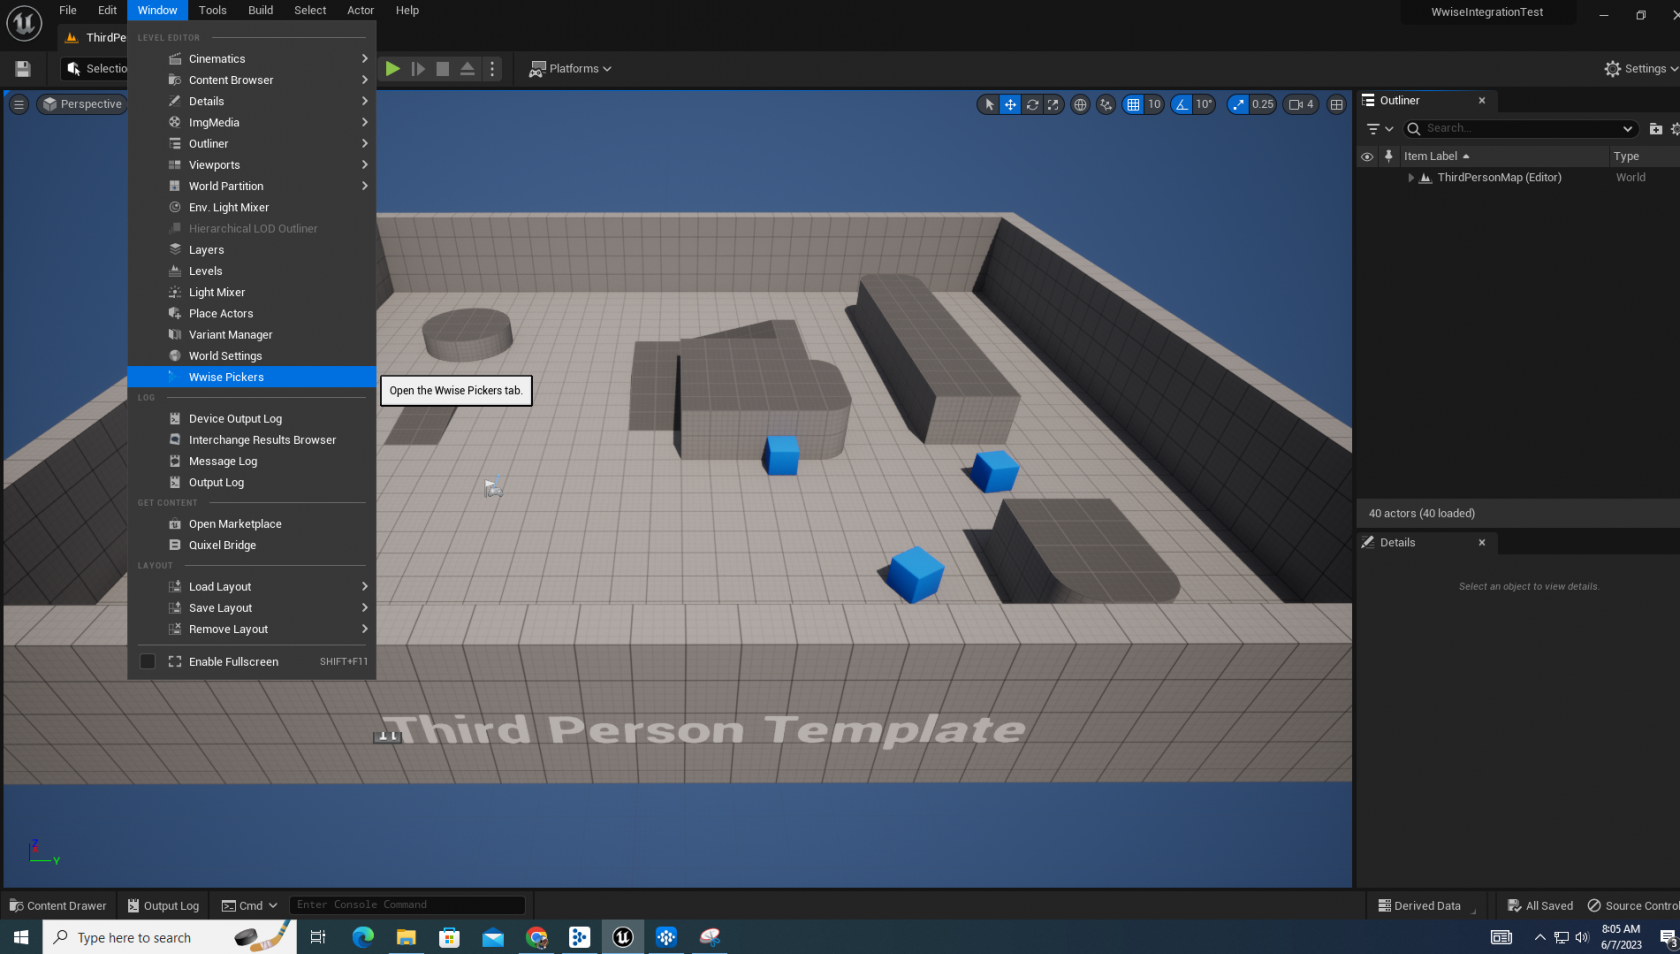](https://scil-wiki.su.edu/uploads/images/gallery/2023-11/w-1.png) This completes the integration process! To access your project hierarchy from the Wwise project, navigate to the **Window** tab on the Unreal toolbar, then click **Wwise Pickers** in the dropdown menu. [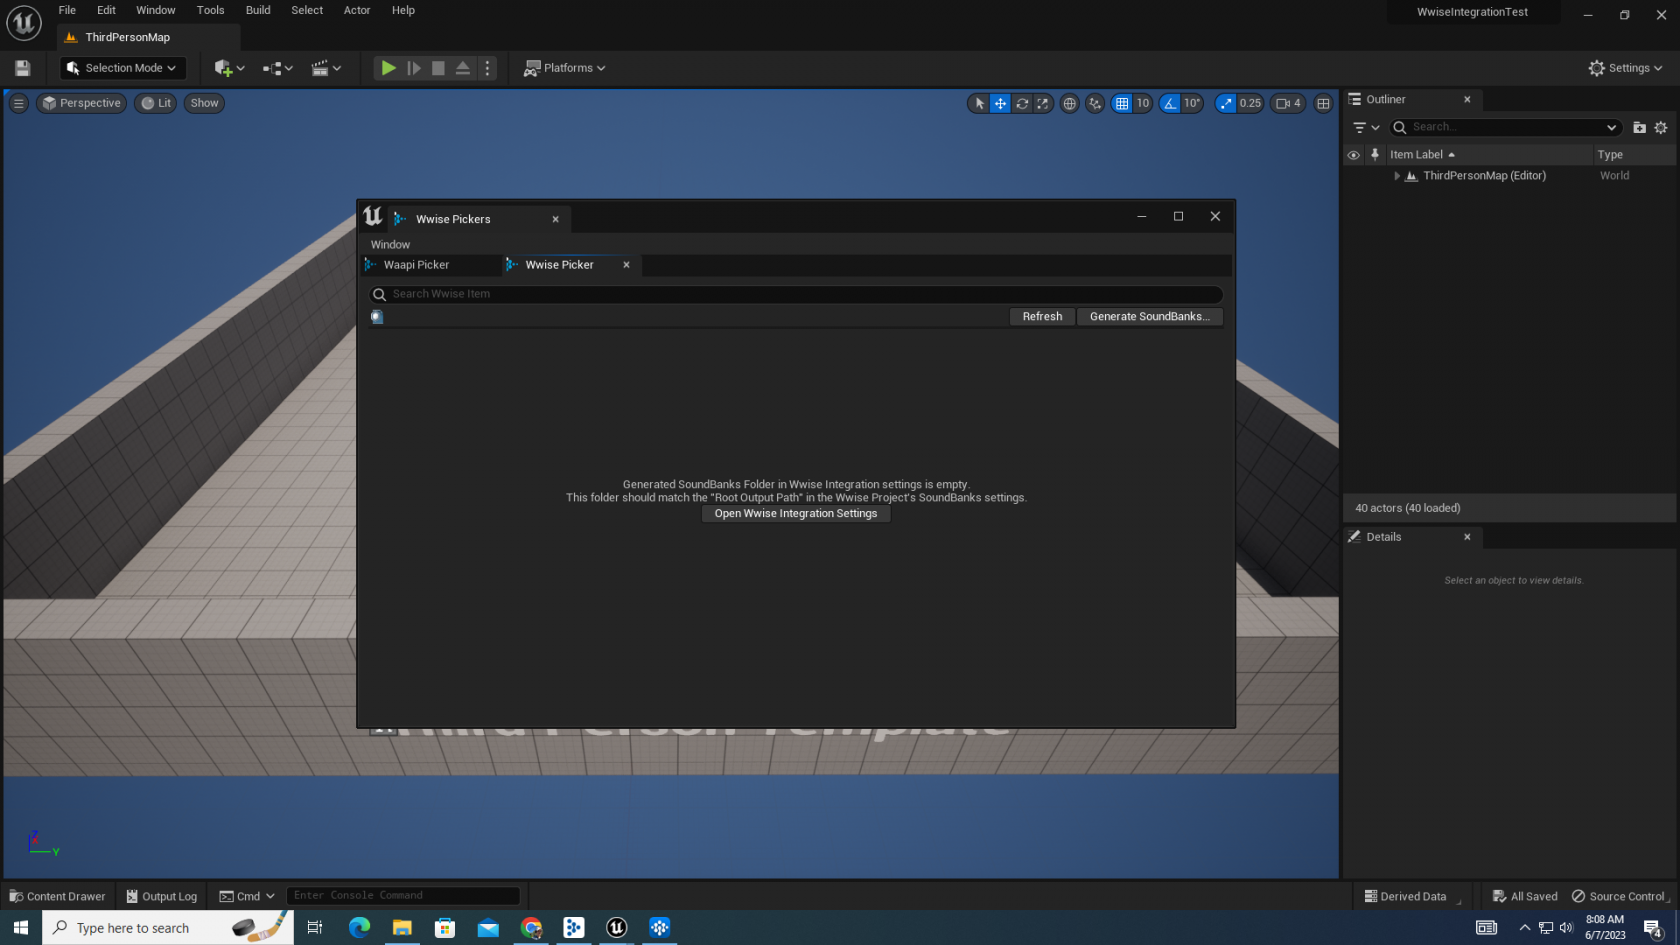](https://scil-wiki.su.edu/uploads/images/gallery/2023-11/q.png) Until you have created Events and generated a soundbank in Wwise, there will be nothing in this view. To learn more about Unreal, visit the SCiL Wiki Book on Unreal [here](http://10.42.32.18/books/unreal-engine). # Integrating Wwise into UnityThe most recent version of Unity compatible with Wwise is 2022.2.2f1 . For updates on compatibility with this game engine, visit the [Release Notes Page](https://www.audiokinetic.com/en/library/edge/?source=Unity&id=pg_releasenotes.html) for more information.
[](https://scil-wiki.su.edu/uploads/images/gallery/2023-11/c.png) Before starting, below is a video tutorial that goes through this process. [Integrating Wwise into Unity | Tutorial](https://youtu.be/2Aw4wCQ9eM8) Keep in mind that certain versions of Wwise compile with certain versions of Unity. When going through this process, refer to the 'Release Notes Page' linked above that tells you what versions of Wwise are compatible with specific versions of Unity. [](https://scil-wiki.su.edu/uploads/images/gallery/2023-11/ccgb.png) Assuming you have downloaded the Wwise Launcher, you can open it with the search bar or by clicking the icon on your home screen. [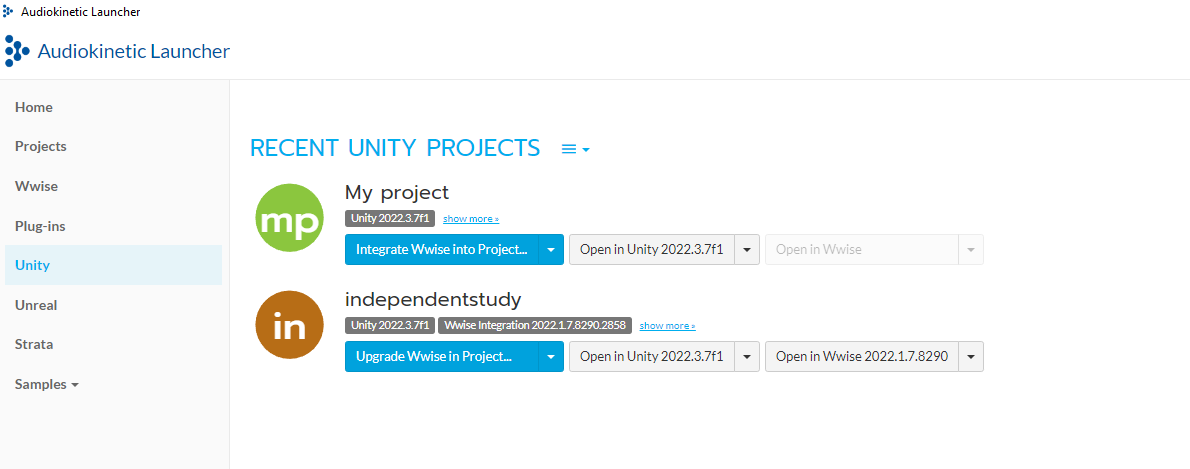](https://scil-wiki.su.edu/uploads/images/gallery/2023-11/mrz1.png) When you open the Wwise Launcher application, you will be brought to this screen. On the left-hand menu, click **Unity** to bring up a list of Unity projects that exist either on the computer's hard drive, or an SSD that is plugged in. [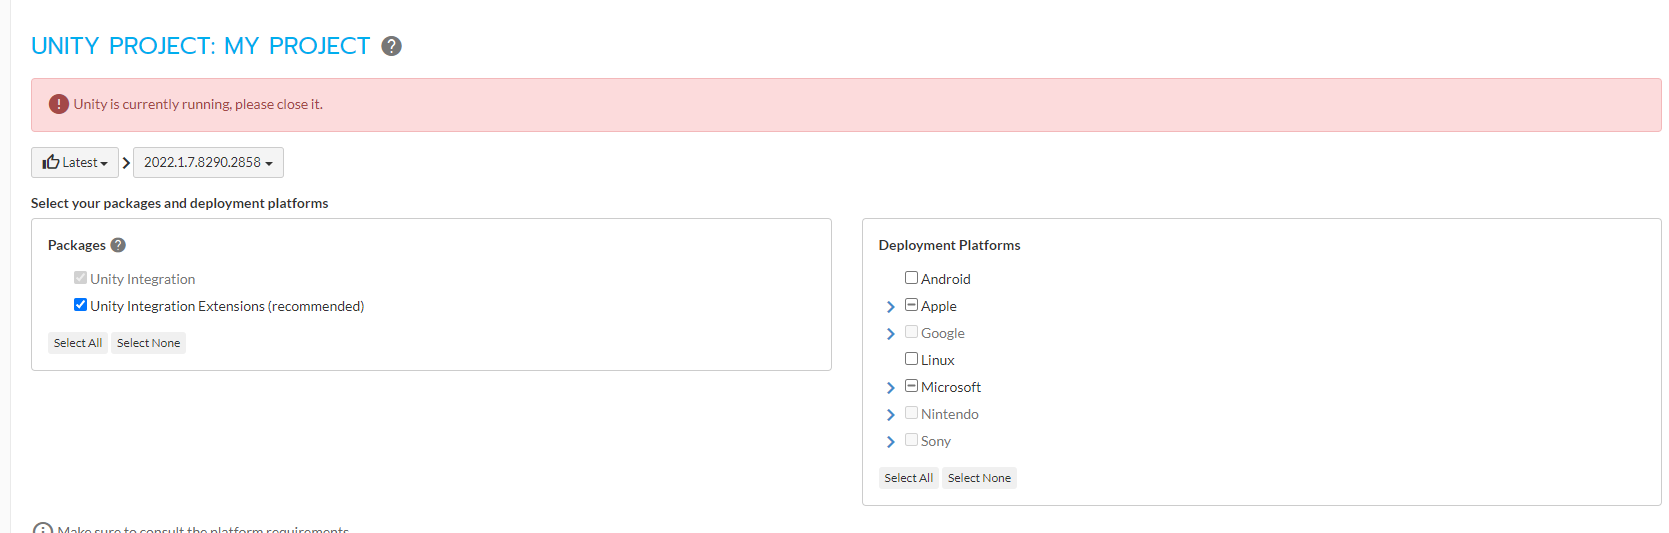](https://scil-wiki.su.edu/uploads/images/gallery/2023-11/dug2.png) You will be brought to an integration properties screen, where you can configure how you want Wwise to integrate into Unity. If your Unity project is running, you will get an error message like the above picture that prevents you from integrating Wwise. Make sure your Unity project is closed. [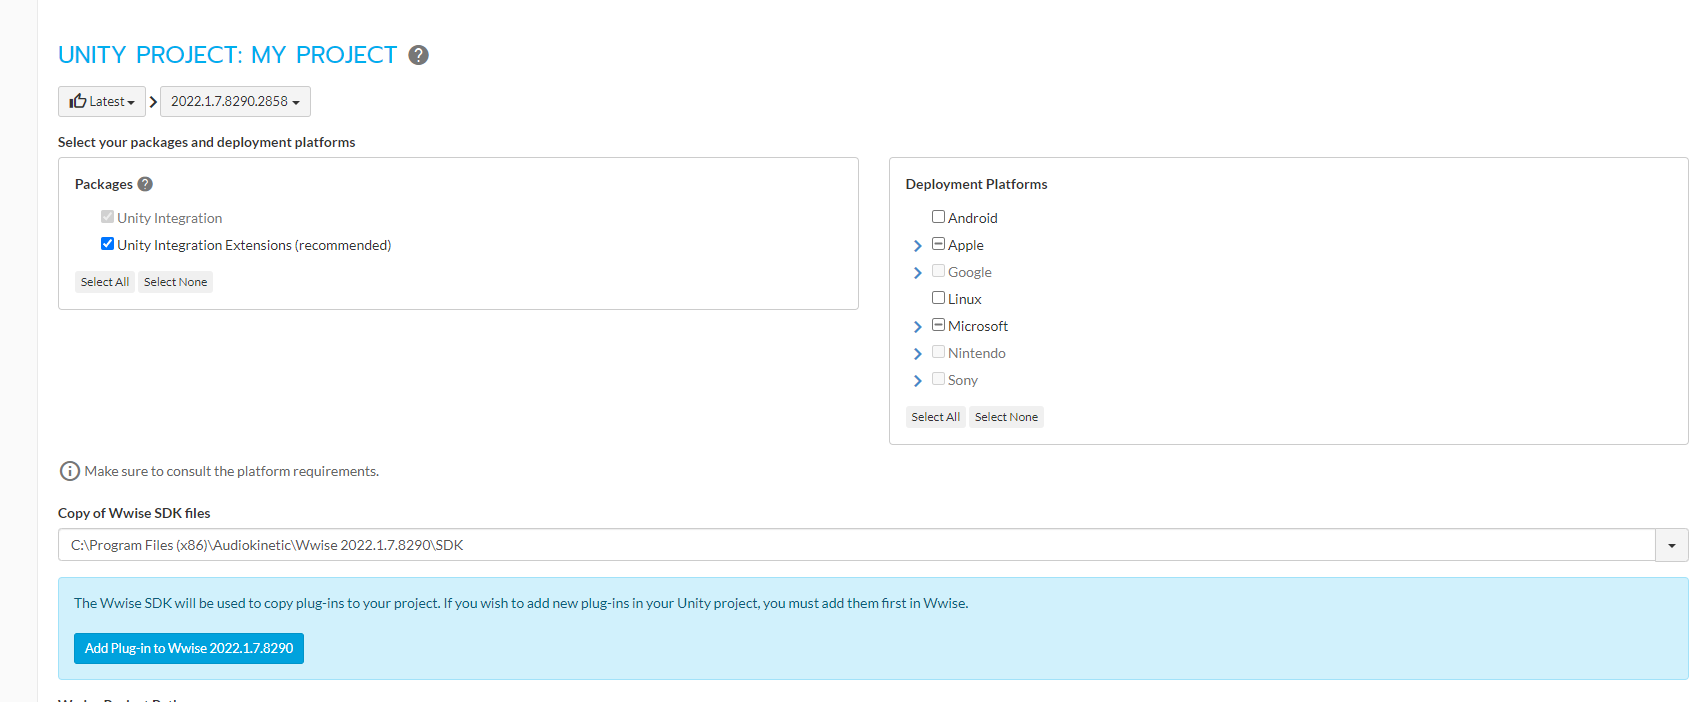](https://scil-wiki.su.edu/uploads/images/gallery/2023-11/3.png) If Unity is closed and you have a version of Wwise that supports your project, you should not have any errors in the integration settings. [](https://scil-wiki.su.edu/uploads/images/gallery/2023-11/4.png) Specify where the installation should happen under **Unity Installation**. If you have a Wwise project already created, you need to specify the **Wwise Project Path**, though I recommend letting the launcher create a fresh project for you. [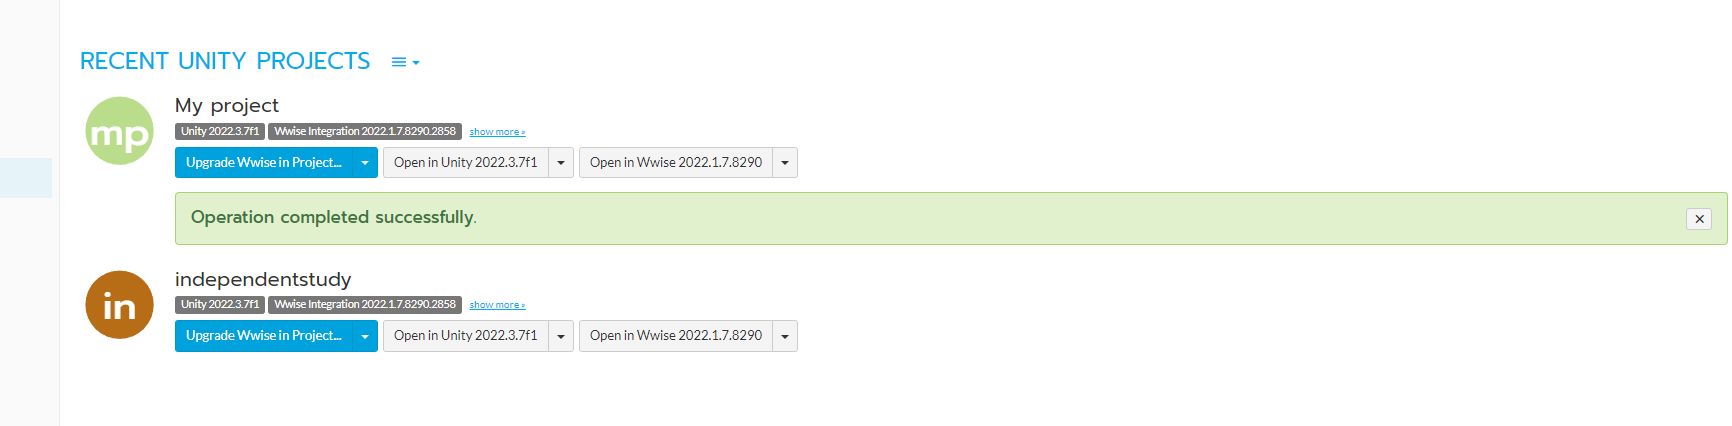](https://scil-wiki.su.edu/uploads/images/gallery/2023-11/xlv5.png) When the installation is complete, you will get a green message, like above, and can open your Unity project. Wwise is now connected to Unity! There is a lot you can do to quickly set up a soundscape, which you can learn about through the *Getting Started --> Wwise & Unity* Chapter. (Currently does not exist. You can refer to Audio Kiinetic's certification Lessons to learn more about using Wwise with Unity. [LINK](https://www.audiokinetic.com/en/courses/wwise101/)) If you have not learned Wwise's tools, I recommend going through lessons from the link above to get familiar with Wwise. Afterward, the lessons from the 301 certification will apply what you've learned to a game engine. [LINK](https://www.audiokinetic.com/en/courses/wwise301/) # Building a Project With Wwise # Getting Started: Wwise --> UnrealAssuming you know how to integrate Wwise into Unreal, this page will go over how to view your project hierarchy from Wwise in Unreal. In the case your Wwise Events are not appearing, troubleshooting methods and scenarios will be shared below.
[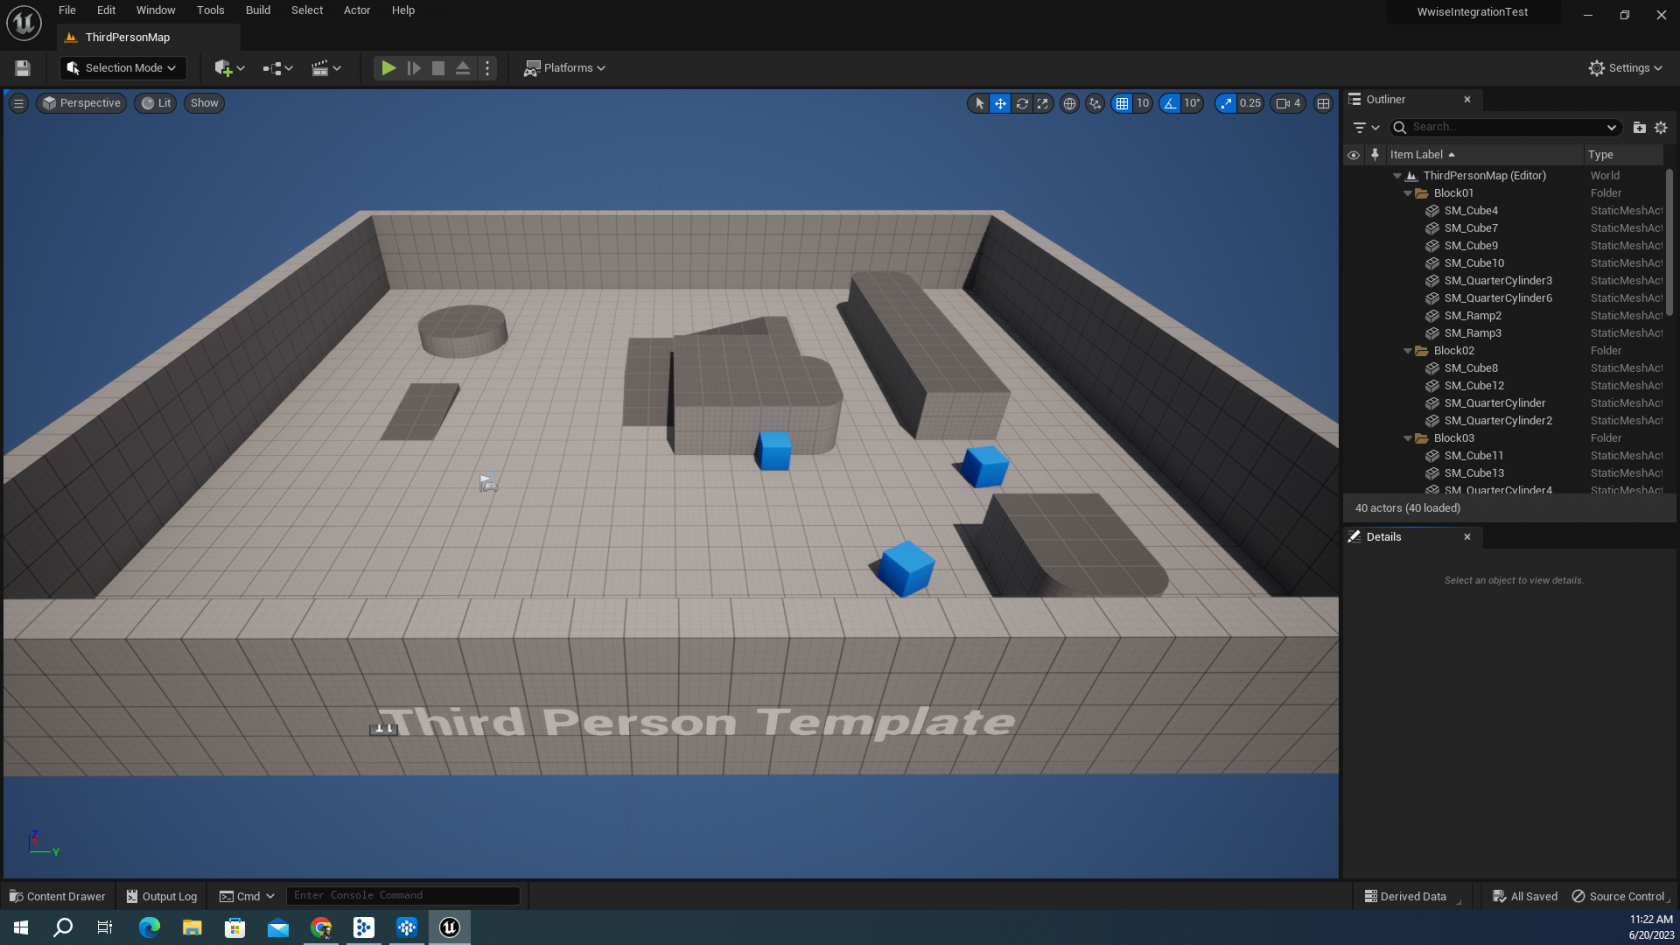](https://scil-wiki.su.edu/uploads/images/gallery/2023-11/lzha.png) The Third Person Template will be used for this tutorial, as well as a fresh Wwise Project. After reviewing how blueprints work and where Wwise comes into play, we will aim to do two things in this scene: post music at the start of play mode, and have footsteps be posted each step the player takes. [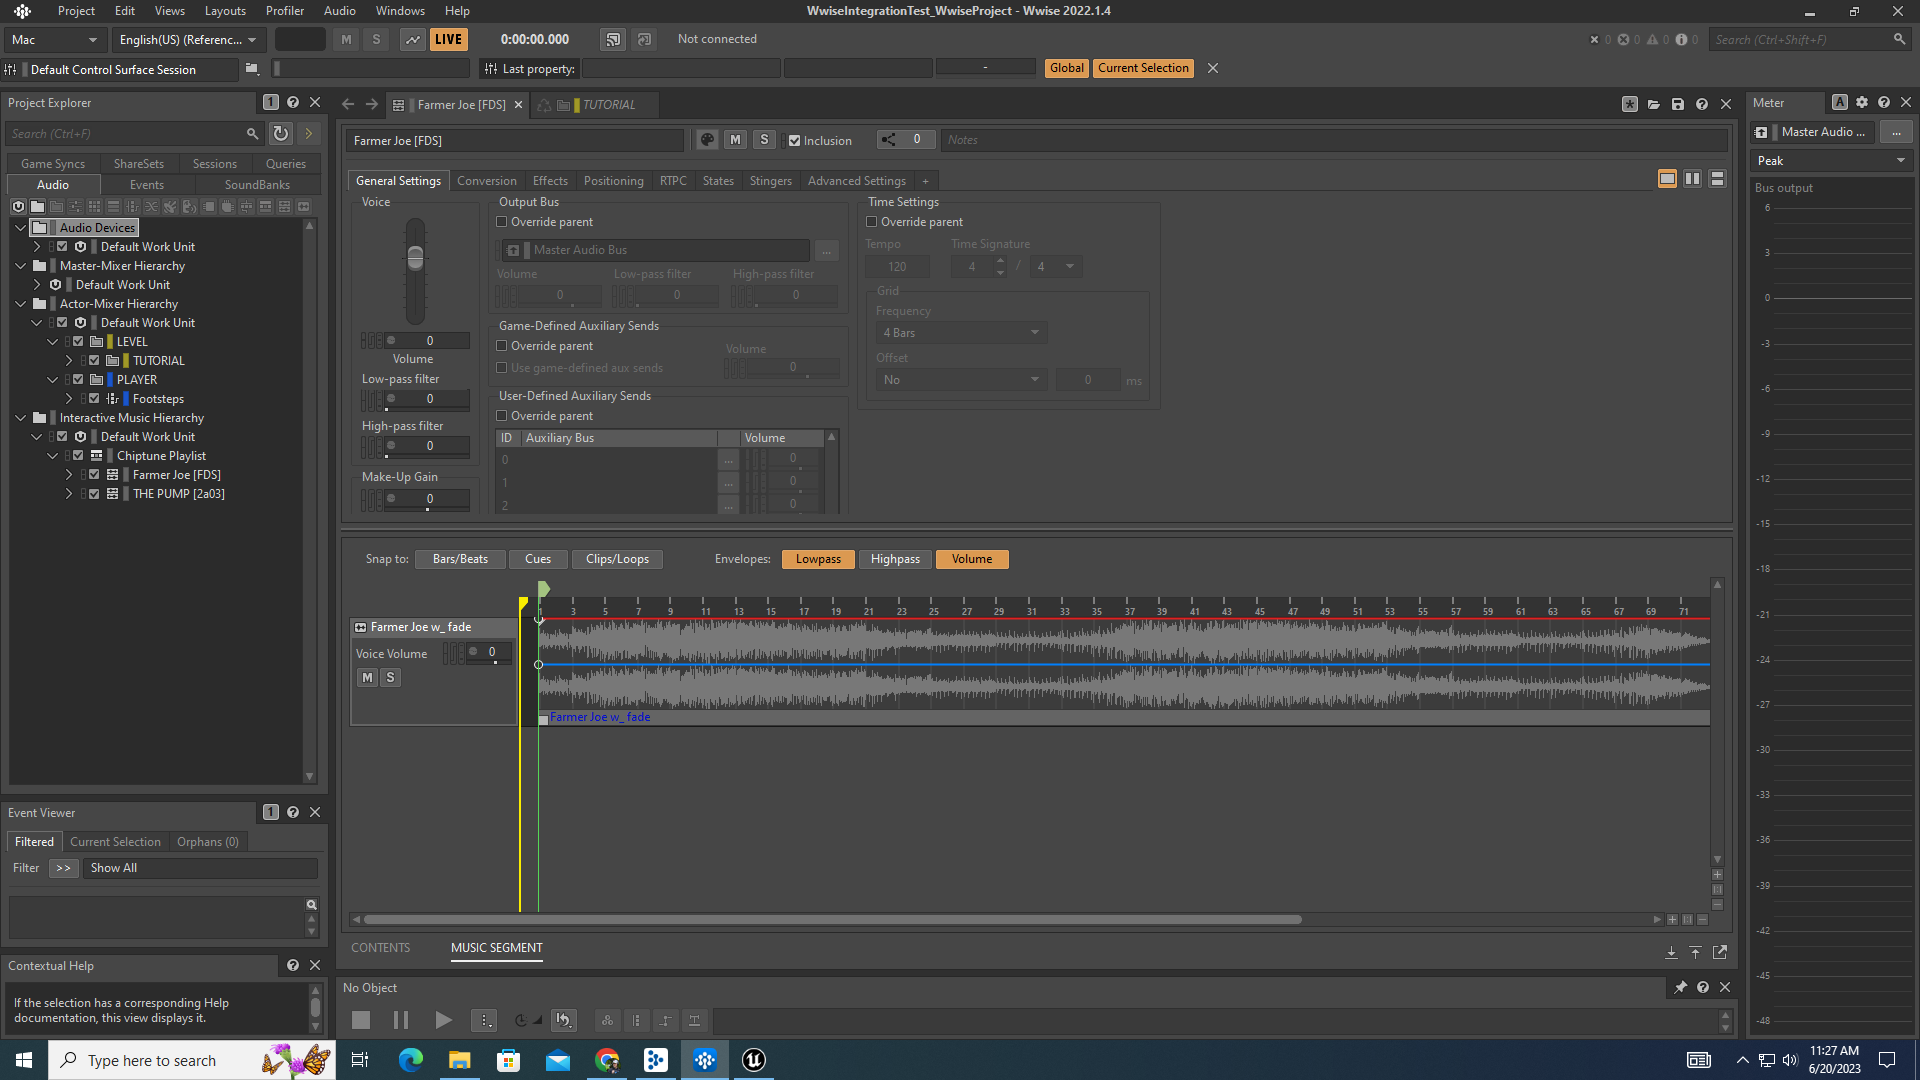](https://scil-wiki.su.edu/uploads/images/gallery/2023-11/wo7b.png) Above is a Wwise project with music and footstep objects tied to a Wwise event, which can be posted through an Action in Unreal. The footsteps are an open source WAV file created for SCiL using lab equipment. You can access the sound effects repository [here](https://sites.google.com/view/baggonotes/sound-library?authuser=1). [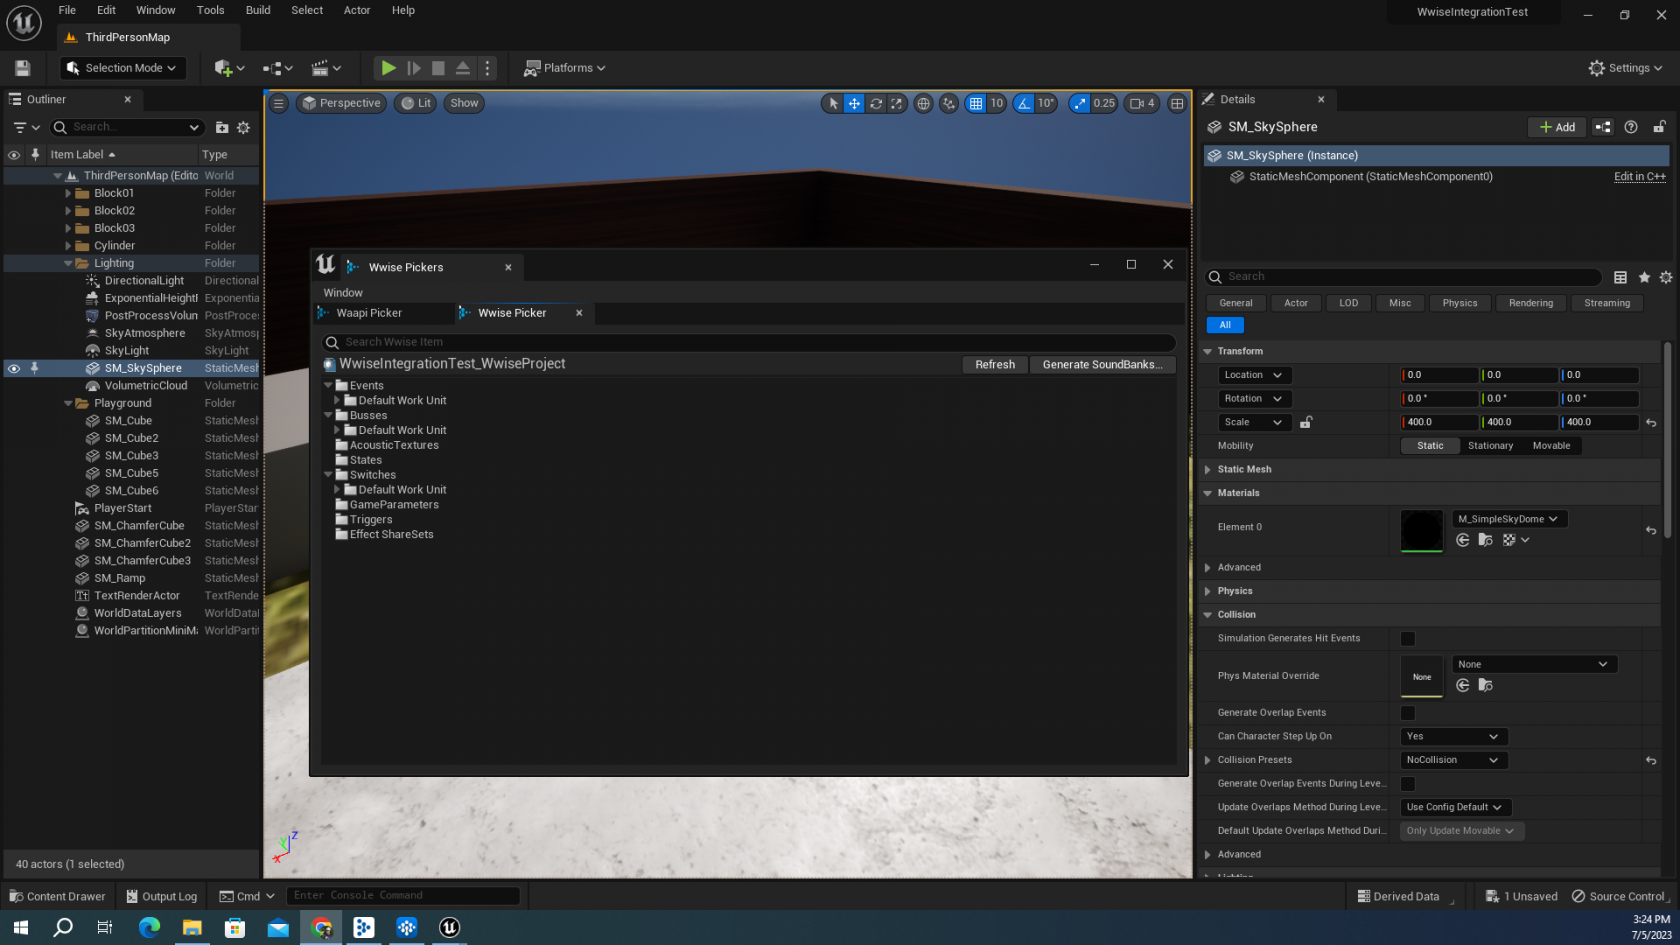](https://scil-wiki.su.edu/uploads/images/gallery/2023-11/c-1.png) To access your Wwise assets in Unreal, you need to open the *Wwise Picker Tab*. This can be found by navigating to **Window --> Wwise Pickers**. There are different tabs that pop up but the one we'll be focusing on is the Wwise Picker Tab. [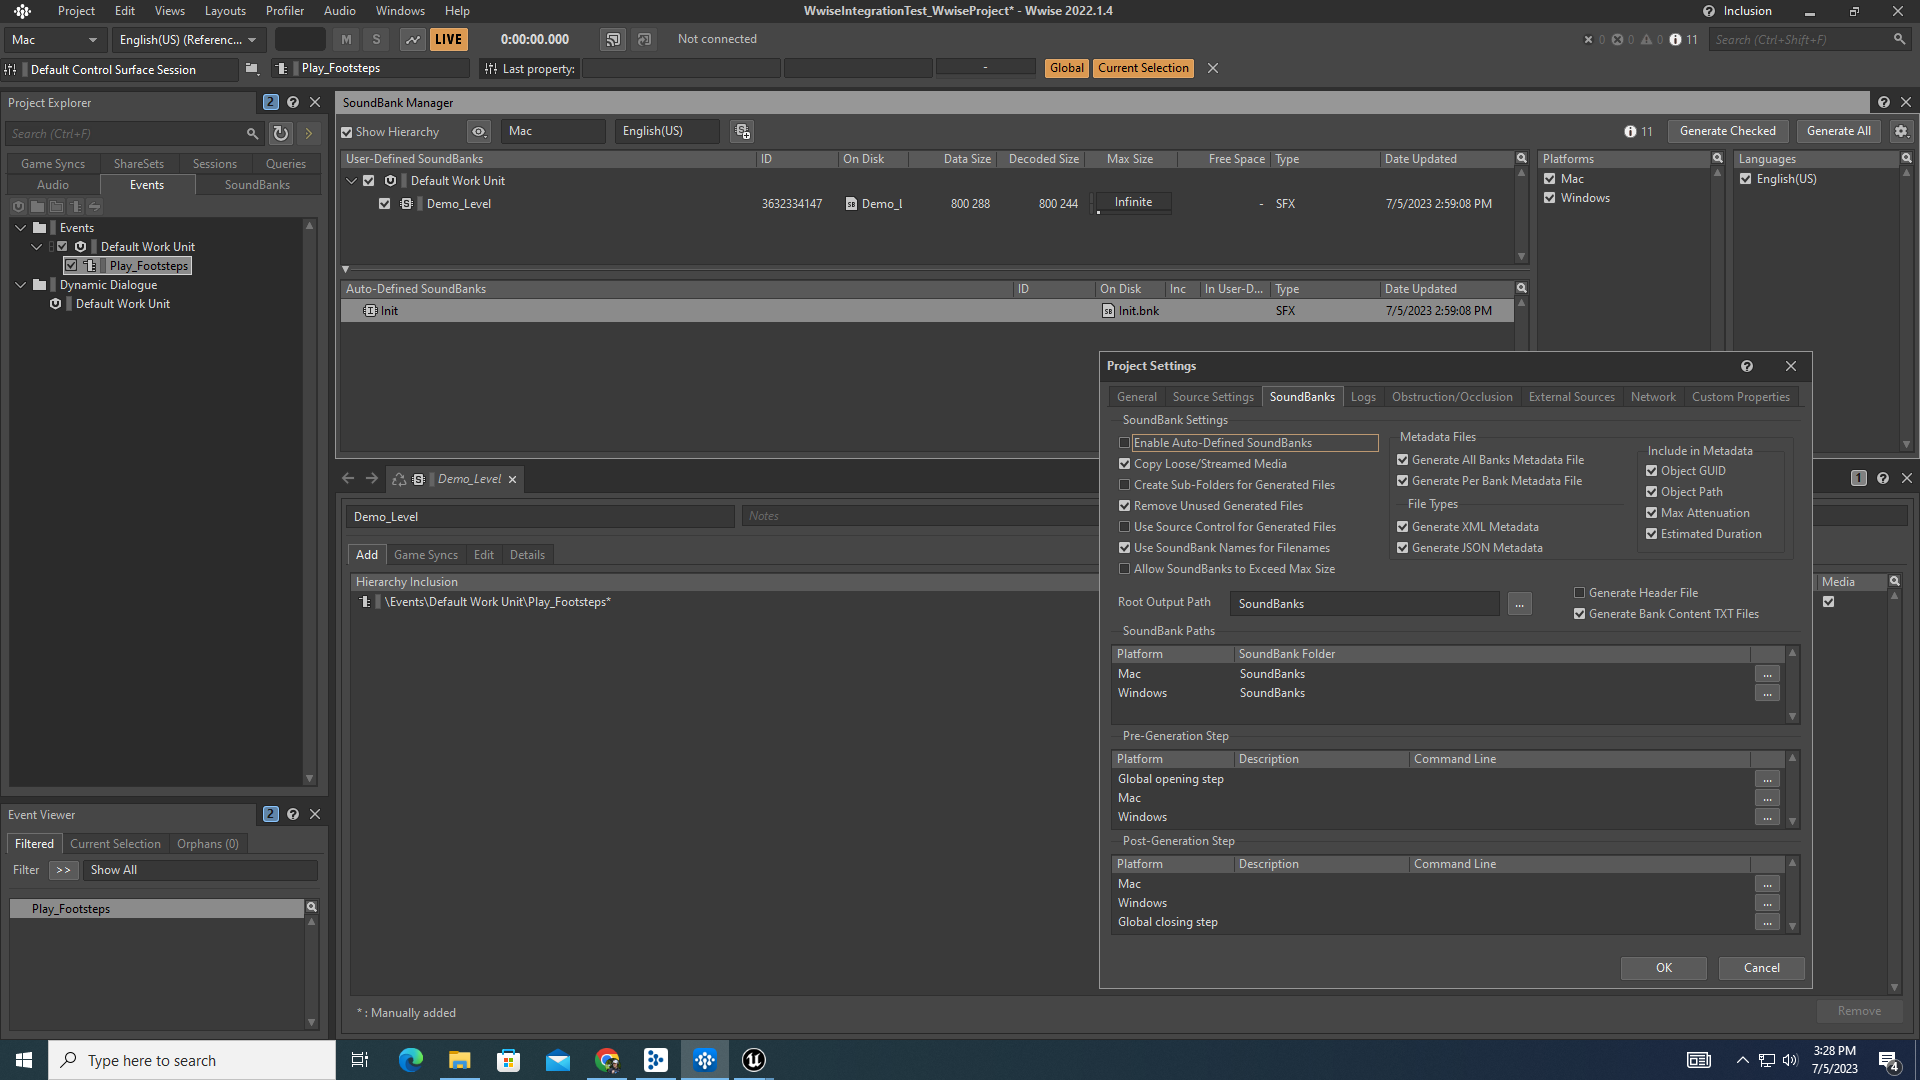](https://scil-wiki.su.edu/uploads/images/gallery/2023-11/d.png) If you have a new project open, chances are there is nothing appearing for you under the Wwise picker Tab. This is because you need to generate your sound banks in Wwise or Unreal and make sure the project file and generated sound bank file('s) directories are where Unreal is expecting them. If these are not configured properly, you will get an insightful message that says where Unreal is looking for something, and what you should check to determine if your designations are correct. In Wwise, make sure you have a sound bank with your events tied to the bank in the sound bank layout. You can get to the sound bank layout by navigating to **Layouts --> Sound Banks**. Your events should contain the audio objects you wish to be posted in Unreal. In the picture above, a switch container containing multiple sound objects has been dragged into the Demo\_Level sound bank. After doing this, I checked off all the boxes in the Soundbank Manager and clicked 'Generate All'. The Cog dropdown icon in the top right is where you can access your project settings and check for proper directories, as also seen above. If your directories are not properly configured, it will most likely be because your platform directories are incorrect, or the Root Output Path is incorrect. [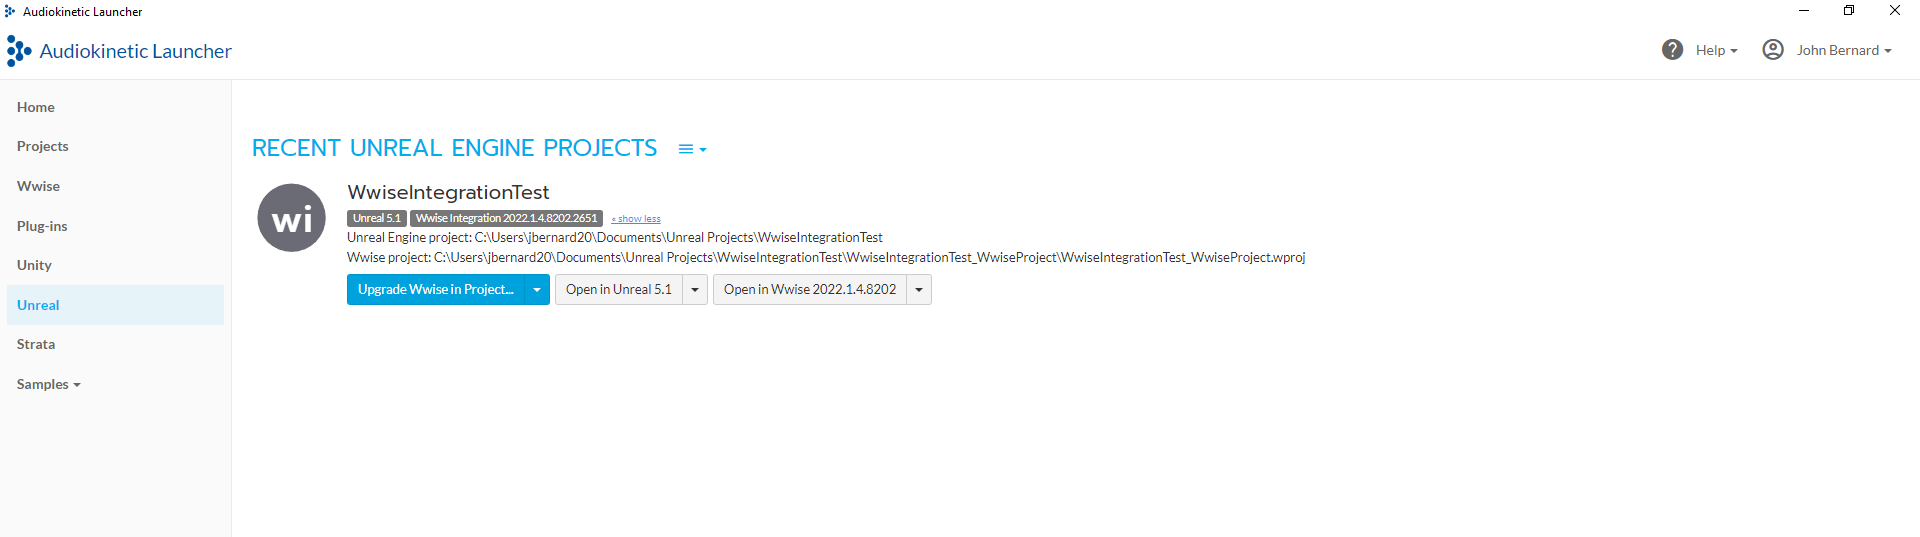](https://scil-wiki.su.edu/uploads/images/gallery/2023-11/e-1.png) If you ever become unsure of what your directories are for a Wwise project, you can access them on the Wwise Launcher application. When you go to the project you need the directories for, click the blue 'show more' icon next to the grey boxes with white text. Mine currently says 'show less' because the details of my project's directory are already showing. [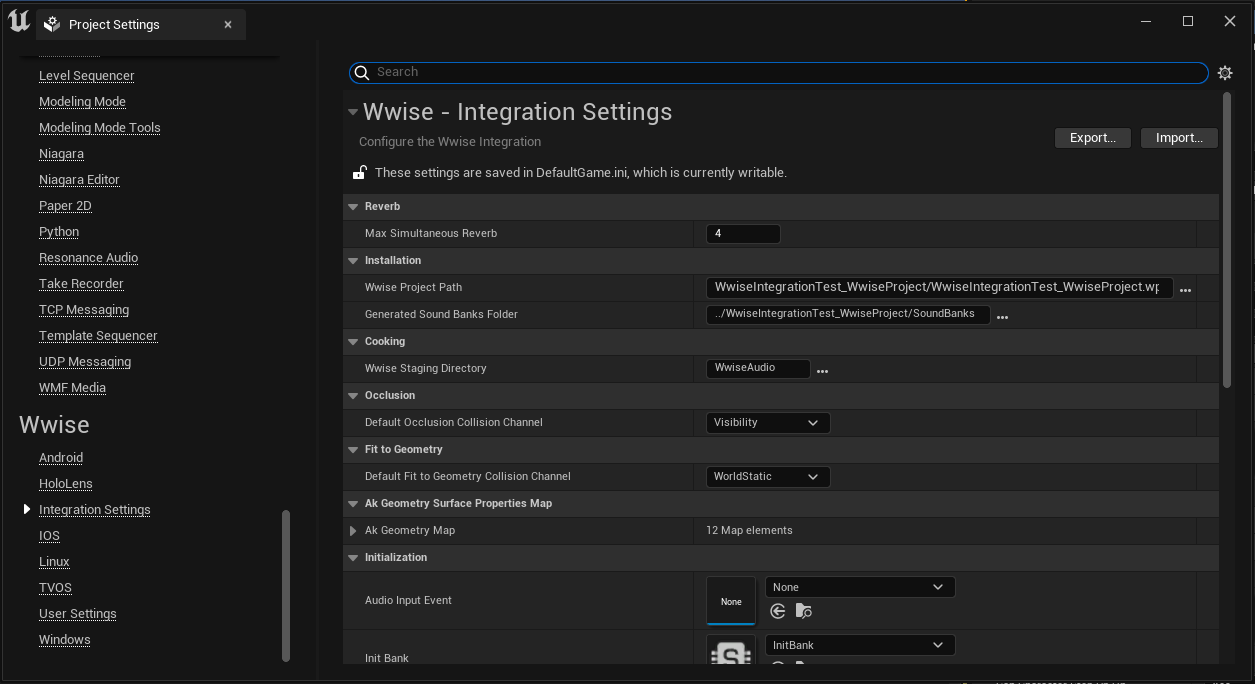](https://scil-wiki.su.edu/uploads/images/gallery/2023-11/f.png) Finally, we move into your Project Settings in Unreal. You can access these by navigating to **Edit --> Project Settings**. Once there, scroll down in the left-hand menu until you see the Wwise Header and click 'Integration Settings'. Under the *Installation Path* dropdown, you can see your 'Wwise Project Path' and 'Generated Sound banks Folder' directories. Depending on where your files are allocated in your file explorer, make sure these directories identify where the Wwise project file, and generated sound banks are located. # Wwise Tutorials If you're familiar enough with the "Wwise: Getting Started" chapter, it's time to learn ways this tool can be used. For each tutorial, the process will be covered for multiple game engines. If you see one missing, be the person to add a how-to, if ya know how! # Posting Sounds on CollisionThis tutorial will show how to post sounds upon a collider experiencing collision, both for Unity and Unreal (5.1).
## UNREAL (5.1) Collision can happen in many different ways: The harder you kick a soccer ball, the louder the impact should sound, and vice versa. Using Unreal's Physics System and Wwise RTPCs, we can create a collision detection system that will only post a sound event on collision if the impact reaches a certain threshold. Linked [here](https://www.audiokinetic.com/en/library/edge/?source=UE4&id=gs_physical_objects.html) is a web tutorial on Audio Kinetic's website for a reiterated breakdown on the process. [](http://10.42.32.18/uploads/images/gallery/2023-07/a.PNG) In Wwise, you need to create an RTPC in the Game Syncs tab of your Project Explorer window. I named mine *Collision\_Velocity* and upon making it, went to the sound SFX object in my audio tab that I am using for our collision scenario: *Cube\_Collision*. By clicking this SFX object and navigating to RTPC tab in the Property Editor, I can add effects onto a Y Axis and on the X axis, define the RTPC these effects should be tied to. I used two effects, Lo-pass and Volume, and tied both of these to my *Collision\_Velocity* RTPC. \*If you right click the line curves, you can change the type of curve an effect undergoes!\* [](http://10.42.32.18/uploads/images/gallery/2023-07/b.PNG) When your sound if configured how you want it and the RTPC is created and connected to the SFX object, you need to create a Wwise Event to drop your sound into, enabling us to post this event in Unreal upon regenerating our sound bank(s). I named my event *Impact\_Cube*, dragging and dropping the *Cube\_Collision* SFX object into the empty space near the top. [](http://10.42.32.18/uploads/images/gallery/2023-07/BoJc.PNG) Next, we'll create a blueprint for posting the sound upon collision with our desired object. In the scenario above, it will be one of these blue cubes. If you want to quickly test out this Wwise configuration, I am using the 3rd Person Demo scene that Unreal provides its users for free as a starting template for project creation. [](http://10.42.32.18/uploads/images/gallery/2023-07/e8Fd.PNG) In the right view, I have the details panel open. By clicking the blueprint icon in the top right, the window in the middle opens up with options for creating a blueprint. We want to create a new subclass and for this blueprint to be tied to the StaticMeshActor, since the mesh is what the player can collide with. For clarity's sake in a developing project, I prefer to start the names of blueprints or scripts that are related to Wwise with "Wwise", alowing me to easily distinguish which components are for audio purposes. I named my Blueprint *Wwise\_CubeCollision.* The next thing to do is open the details panel and check for the following options to be selected: \- Physics > **Simulate Physics** \- Collision > **Simulation Generates Hit Events** [](http://10.42.32.18/uploads/images/gallery/2023-07/RFbe.PNG) If you're in the view above and do not see the components tab, go to the top toolbar and Click **Window --> Components** to open the Components tab. [](http://10.42.32.18/uploads/images/gallery/2023-07/cxBf.PNG) Right click the Static Mesh Component in the Components View and click **Add Event --> On Component Hit**. This will open up the Blueprint Editor, showing you the added component. [](http://10.42.32.18/uploads/images/gallery/2023-07/image.png) By right-clicking empty spaces in this view, adding and connecting components to one another, you need to configure the setup above. If you're having trouble finding certain components, here are some tips: \- The grey box, a greater than or equal to if statement, is found by typing ">=" in your search for a new component to add. \- If you cannot find your RTPC in the Wwise drop down, try opening the Picker Tab window, then dragging and dropping your RTPC from the Game Parameters Folder. If you do not see the RTPC in your Game Parameters folder in Unity, save your project in Wwise, make sure the event was dragged into the sound bank upon generating it in the sound banks view, then save your project again and allow Unreal to reparse before checking to see if the RTPC is now showing up. \- You can use the drag and drop method from the Wwise picker tab into any component asking for a reference to an object in Wwise that is needed. This goes for the Post Event Component! To Summarize what this Blueprint is doing, I will be echoing what the linked website at the beginning tells us: 1.) It detects when the object collides with another. 2.) It sets the value of the RTPC based on the Vector Length of the Component Velocity, and ensures that the value exceeds a minimum threshold of 40, which ensures that minor contacts do not cause impact sounds. 3.) It posts the Event to Wwise with the RTPC value, so that Wwise plays the impact sound at the appropriate volume. [](http://10.42.32.18/uploads/images/gallery/2023-07/g.PNG) The blueprint is complete and you can now click Compile in the top left. [](http://10.42.32.18/uploads/images/gallery/2023-07/GTAimage.png) A more fun way to test the collision effect is by giving you the ability to spawn cubes during playmode! Here are some tips for finding these components during your search. You can reference a quick 1 minute video tutorial, linked [here](https://youtu.be/8kDl8w0TwJ8). \- The grey x, our multiplication component, can be found by typing Multiply and selecting *Multiply* under the Operators section. You can find the addition component by typing '+'. \- The dot in the grey box is a converter. It will convert a value from 'this' to 'that' and there are many types of conversions that can be made. To know what type of conversion you're doing, the pins are colored and represent a type of value. In this case, the conversion is from a Vector to a Transform value. You can make this box appear by dragging the orange pin next to 'Spawn Transform' to the upper right yellow pin in the + node, or you can look up 'Vector to Transform' and should find the component. \- F is a *keyboard event*, so when you type F in your search, look for the keyboard event section and select the one that says 'F'. \- You may have noticed the pin in the bottom left of the x component is green, whereas yours starts off yellow. You can convert this pin by right clicking it and selecting **Convert --> Float (Double-Precision)**. \- "SpawnActor Wwise Object" is not what you should type, when searching for this component. You only need SpawnActor because what comes next is the name of the gameObject that will be spawned. # Creating Audio Reactive ObjectsIt is assumed you know how to obtain and integrate Wwise in this tutorial. If you do not, refer to the chapters in the "Wwise: Getting Started" chapter.
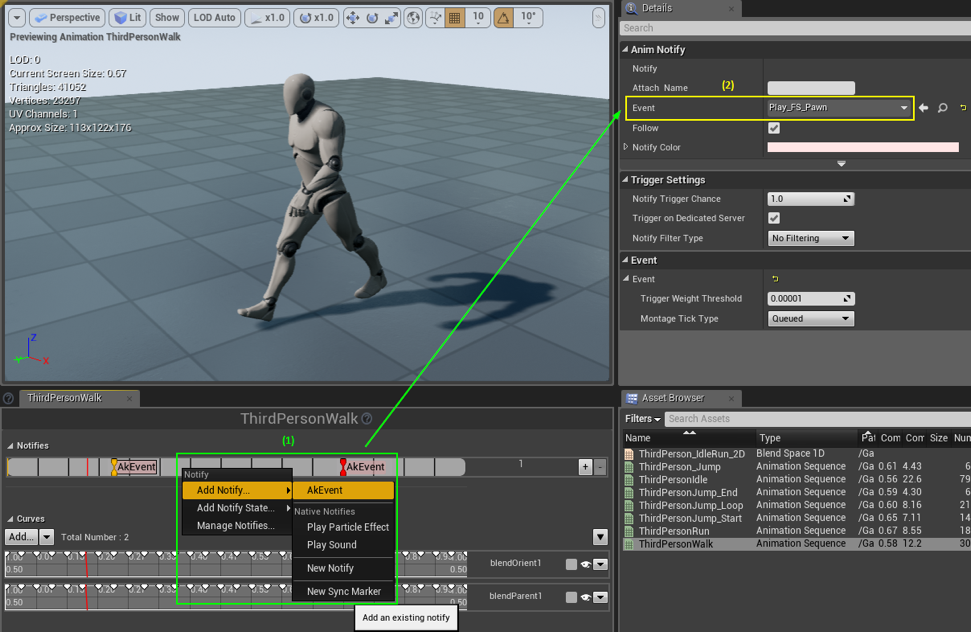
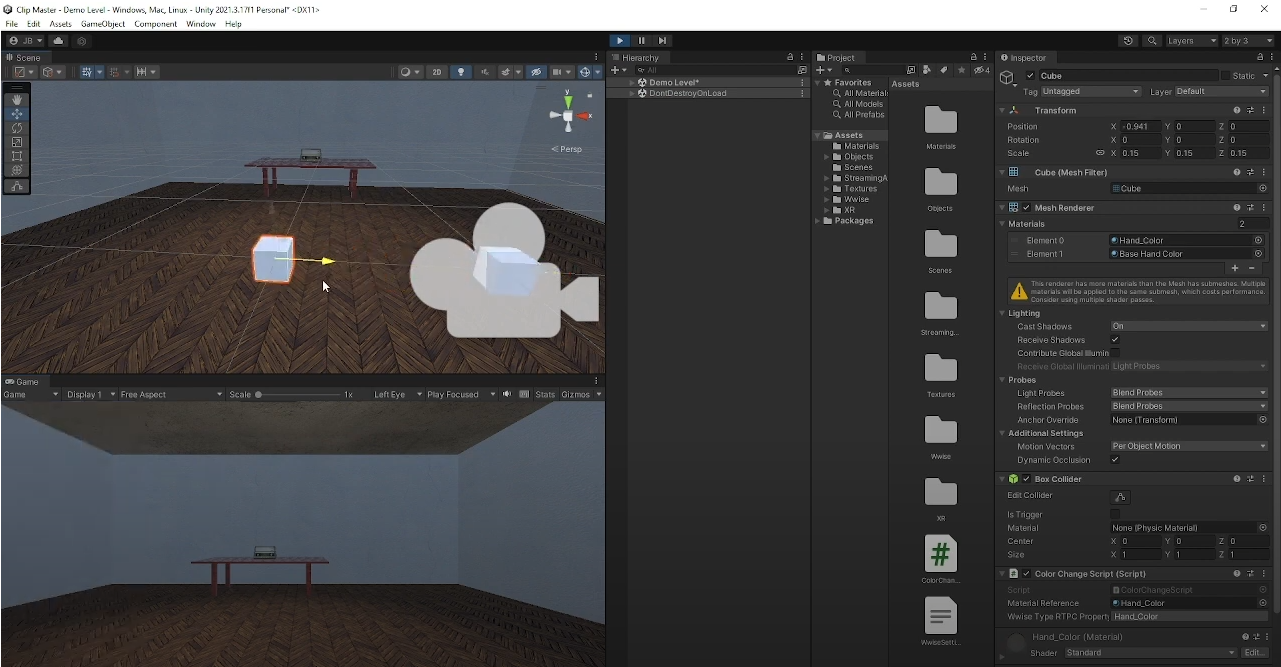
Multiple ways exist to influence an object's behavior from audio events posted by Wwise. We are going to explore some ways of configuring audio-reactive objects in Unity. Remember, no matter the game engine, this setup relies on tools in Wwise and Wwise-type references in scripting, meaning these concepts should be able to translate into other game engines pretty seamlessly. ## Color Changing Objects ## Size Changing Objects [Topic Related Blog LINK](https://medium.com/@cloud_canvas/using-wwise-meter-to-track-loudness-in-unity-52e3c118c6c0 "Topic Related Blog Link") ## Objects Moving Rhythmically [Wwise 301 | Callbacks Lesson](https://www.audiokinetic.com/en/courses/wwise301/?source=wwise301&id=Callbacks#read) >>Picture of AkEvent Component, highlighting "Use Callback" checkbox<< Rather than post sound events in an AkEvent component, Wwise has a checkbox in this component called "Use Callback". This feature relies on your use of Callback Flags in a Wwise project, which can be assigned to Music Segments. These flags serve as notifications for when to call a function in your game engine. What we are going to do is assign callback flags to a music segment, then use those in an AkEvent component that calls forth a custom script for affecting an object" 's scale. By Doing so, we can make an object look as if it's breathing in rhythm with a song. ## Doppler Effect [Related Article LINK](https://blog.audiokinetic.com/en/create-a-doppler-effect-with-wwise/#:~:text=To%20create%20a%20Doppler%20effect%20in%2Dgame%20with%20Wwise%2C%20you,values%20to%20control%20the%20pitch.) A car approaches you, rising in pitch as it nears. When it passes, it begins to fade out and its mechanical whirr lowers in pitch. We want to recreate this effect, known as the Doppler effect. To do so, we'll need to configure RTPCs in Wwise, and make a custom script referencing them # Using StatesUse cases for States in both Wwise and Unreal will be shown on this page.
States are a type of game sync in Wwise that are useful for applying immediate or gradual transitions in your soundscape. This tutorial will show the process of setting up States in Wwise, applying them to your sound, and implementing the effect in your game engine. ### Unreal #### Setting Up In Wwise [](http://10.42.32.18/uploads/images/gallery/2023-08/vr-slider.PNG) *Here is the scenario*: In the French75 scene, you have a bunch of ambient sounds that complement the void-like setting and are echoes of the past. When the player has loaded the shell, pulls the cable, and fires, you want all ambient sounds to immediately duck out so that the firing sound is fully embraced. As the firing sound fades off, the ambient sounds can slowly creep back in. To achieve this effect, we are going to use States, so let's start in Wwise and see how this is set up. [](http://10.42.32.18/uploads/images/gallery/2023-08/ambiances.PNG) In my Wwise project, I have my Ambiances as children objects under the INTRO\_LEVEL Folder, for organizational purposes. In the first scene of the French75 experience, this is where the sounds first come into play, which are later reused in the French75 scene. I decided to separate sounds specific to the French75 scene in a different folder. [](http://10.42.32.18/uploads/images/gallery/2023-08/ambient-sounds.PNG) The only sounds I am worried about are my ambient sounds, which have been color-coded yellow. These are what will duck out when the cannon is fired, so we're going to set up states for them in the Game Syncs tab. [](http://10.42.32.18/uploads/images/gallery/2023-08/states.PNG) Under the States hierarchy in the Game Syncs tab, I selected the default work Unit and created a State Group called "Cannon\_FireAmbience". The state group object is what will hold our states, I have created two states: **Fired**, and **Not\_Fired**. [](http://10.42.32.18/uploads/images/gallery/2023-08/property-editor.PNG) The State Group object is what you will select in order to set up transition times from one state to the other. My vision for this state group's usage is that transitioning from Not\_Fired to Fired should immediately fade out the audio, whereas, after firing, the Not\_Fired state will be reapplied and provide a short fade-in of the ambient sounds. I set up the aimed-for transitioning system by clicking insert at the beginning of the property editor and defining my states under the **From** and **To** properties. The transitions can now happen but as of right now, have not been applied to any of the sound objects, nor have we said what should change during the transition: Volume? Lo Pass? Pitch? [](http://10.42.32.18/uploads/images/gallery/2023-08/bus-state.PNG) Rather than apply the state transition to however many Ambient parent objects would need it, I can filter my ambient sounds to an audio bus so that I can apply states to that Audio bus and it collectively affects all the ambient sounds I have routed to it. You can create an Audio Bus in the Master-Mixer-Hierarchy in the property editor. Click the default work unit and then select the icon that identifies as Audio Bus. (Shortcut: Ctrl + Shift + Alt + B) I named my Audio Bus "Ambience\_Compressor" This is because I have a compressor effect being applied to all sounds that pass through this bus, and I wanted to also identify that any sounds filtered to this bus are solely ambient sounds. [](http://10.42.32.18/uploads/images/gallery/2023-08/bus-routing.PNG) To route your sounds to a different bus, click the object you want to route and in the Property Editor's General Settings tab, go to the Output Bus section and find your desired bus in the directory pulled up by the three dots button. I have my ambient sounds linked to an Actor Mixer object as the parent. Because of this, I am able to route all sounds at once to the Ambience\_Compressor bus, simply by pulling up the General Settings for the Actor Mixer object and routing that to the Ambience\_Compressor Bus. (I did this for 3D\_Weaponry and Ambience) [](http://10.42.32.18/uploads/images/gallery/2023-08/wthatever.PNG) Whatever you decide to do, click the object you need to apply the State transitions into. In the Property Editor, click the States tab. Click **Add State Group>>** and find the State Group you want and select it. It will appear in the view with the states that are connected to it. My sounds are being influenced by effects, so you might notice that I have checked the **Bypass Effects** checkbox, in order for the transition to do what I want. As for what I want, I have specified in the Fire State's properties that the volume should be lower and that a Lo Pass filter should be applied. Under the **Change Occurs at** Property, I have specified that it should be Immediate. THIS DOES NOT MEAN AN IMMEDIATE CHANGE IN DYNAMICS, rather it means the state transition should happen immediately though the time we specified in the Game Syncs time will still be however long you set it. For example, in my transition from Fired to Not\_Fired, I told the State Group to take 7 seconds to transition into Not\_Fired. When the state is called in the game it will be immediate, but the change from Fired to Not\_Fired will take seven seconds, dynamically speaking. [](http://10.42.32.18/uploads/images/gallery/2023-08/test.PNG) You can test if your system works with the transport control view at the bottom of your project. Click the State Group Icon, which is the orange Icon in the image above, and the state group for the sound you selected and wish to test should appear. If it hasn't make sure you gave it a state group. Now play your sound and in the dropdown menu that says none, select one of your states. The transition should begin immediately, and at the speed you gave it in your State Group's editor. [](http://10.42.32.18/uploads/images/gallery/2023-08/events.PNG) If you're happy with your configurations, go to the **Events** tab in the Property Editor. Create an event with whatever naming convention works for you. I have my ambiances as children objects under a separate work unit, for organization purposes. Keep the view for your event open after selecting and navigating to the **Audio** tab to locate the sound you want applied to this event. Be sure not to click any audio objects during this process, or else the view you need to drag it into will disappear. Drag your audio object into the event view area and it should appear in the view with some information. Alternatively, you can click the **Add>>** button at the bottom of the Event View, then find the sound object you want to add. [](http://10.42.32.18/uploads/images/gallery/2023-08/event-viewer.PNG) Finally, go to **Layouts -->** **Soundbanks** , and find the soundbank you want to put your event into. Once selected, navigate to the **Event Viewer** in the bottom left and locate the Event(s) you want to drag and drop into your soundbank. Once you do that, it should appear in the **Hierarchy Inclusion** view. Click **Generate All** in the top right, or you can do **Generate Checked** if you only want to update specific things. Save your project and you're now ready to move to Unreal! #### Setting Up In Unreal # Audio QuickStart Guide (DRAFT: WORK IN PROGRESS) ## Studio/Mixer Settings Checklist 1. Turn on the Mixer with the switch on the back 2. Make sure the cable is plugged into the Microphone and the pop filter is placed in front of the mic 3. Make sure mic is plugged into correct wall sockets 4. Make sure the XLR cable from the wall is plugged into Channel 1 and the other cable from the wall is plugged into 1-2 SUB OUT 5. Make sure the USB cable on the back of the mixer is plugged into the computer 6. Make sure the Talk back mic is plugged into Channel 9/10 7. Make sure the cable connected to the speakers is plugged into control room L-R matching the corresponding speaker 8. Press the USB 3-4 button on Channel 11/12 9. Set Gain knob on channel 11/12 to U 10. Once everything is plugged in press the 48V button 11. Press the 1-2 button next to the fader on Channel 1 12. Press the L-R button next to the fader on Channel 1. 13. Pull the Main, SUB 1-2, Channel 1, Channel 9/10, and Channel 11/12 up to U 14. Press the PFL SOLO button on channel 11/12 15. Press the dial on the speaker until the light is green 16. Open Reaper on the Computer 17. In Reaper go to the Options menu and press Preferences 18. Scroll until you see Device and click it 19. Set Audio System to ASIO 20. Set ASIO Driver to Mackie ASIO Driver 21. Set Inputs to Analog 1 for first and Analog 2 for last 22. Set Outputs to Analog 3 for first and Analog 4 for last 23. Press OK in that menu 24. Press the Plus to make a track 25. Press the red record button on the track 26. Use the GAIN knob on channel 1 to set the gain to a level that is before peaking 27. Once ready press red record button at the bottom of the screen 28. Once finished recording press the red record button at the bottom of the screen again 29. Click on the top of the timeline and drag the full amount of the clip 30. Select the Channel in Reaper and press file then Render 31. Name your file in "File Name" and click Browse then Browse for Directory to pick where it will be stored 32. Make the Format WAV , WAV bit depth : 24 bit PCM, Sample Rate 48000 then click render 33. Click the red record button on the channel up top 34. Once finished with recording pull all faders down and press 48v 35. Turn off the mixer from the switch on the back ## Common Pitfalls #### Things to check if you can't hear audio 1. Make sure all cables are plugged in securely 2. Make sure the cable connecting the mixer to the computer is plugged in securely 3. ONLY AFTER ALL MICS ARE PLUGGED IN: make sure that phantom power (48V) is enabled 4. Make sure no MUTE buttons are enabled. (They are enabled is the button is glowing red) 5. Make sure the Break Button (This button is right above the MAIN Fader) is not enabled (If the red light is on that means it is enabled) 6. Make sure the USB 3-4 Button is enabled on Channel 11/12. ( This is above the Gain knob on Channel 11/12) 7. Make sure the channel the microphone is going into has the fader up. 8. Make sure the MAIN fader is up 9. Make sure the L-R button to the right of the Fader on the channel you are using is enabled. 10. Make sure that PFL SOLO is only enabled on channel 11/12 (This makes it so that you are listening to what is being recorded in Reaper) #### Things to check if the person in the booth can't hear audio. 1. Make sure the SUB 1-2 Fader is pushed up to U 2. Make sure the 1-2 button is enabled on the channel you want them to hear (Channel 9/10 is for talkback and 11/12 is for PC audio.)