Godot
- Getting Started with Godot
- Godot C# for Beginners
- Getting Started with VR
- VR Settings in Godot
- VR Controller Input in Godot
- Basic Grab
- Teleport Part 1
- Teleport Part 2
- Common 3D Features
Getting Started with Godot
Before jumping into VR, you should get yourself acquainted with the engine and how things work. Godot utilizes a node-based design for its objects, similar to Unity's game objects, except everything is its own node.
Godot also has its own scripting language, GDScript, which is similar to python. Most of the tutorials, guides, and resources you find online will make use of GDScript.
There is also support for C# which I recommend for speed, design-scripting, similarities to Unity, and access to the .NET ecosystem. The C# community within Godot is growing fast as well. Many tutorials here on the wiki utilize C#.
Documentation
https://docs.godotengine.org/en/stable/index.html
Overview of Godot's key concepts
Your first 3D game
https://docs.godotengine.org/en/stable/getting_started/first_3d_game/index.html
Additional Resources
How to make a Video Game - Brackeys
Godot C# for Beginners
Getting Started with VR
Prerequisites
If you are new to Godot, I HIGHLY recommend checking out the resources here to get started to familiarize yourself with the engine or find a short mini series on YouTube.
Godot offers C# as well as their own GDScript and if you are looking to use C#, I would familiarize yourself with the engine first. possibly doing a GDScript to C# conversion for practice.
I recommend having a default "World" scene (Node3D) ready to go, with both a WorldEnvironment and DirectionalLight3D as children.
The SCiL lab staff is always happy to provide guidance on getting started!
A Simple Rig
To set up a basic VR rig, follow the official guide here:
https://docs.godotengine.org/en/stable/tutorials/xr/setting_up_xr.html
A Better VR Rig Configuration
I highly recommend updating your VR rig with the following from the official documentation. You will be better suited in the long run:
https://docs.godotengine.org/en/stable/tutorials/xr/a_better_xr_start_script.html
Deploying to Android
Again, follow the documentation here: https://docs.godotengine.org/en/stable/tutorials/xr/deploying_to_android.html
Read through available options and always fix warnings as they appear!
Caution Against Using Godot XR Tools
You may find the following two articles: Introduction to XR Tools and Basic XR Locomotion. These articles are valid and are great for prototyping but I would caution against using them and consider designing your own implementation and use these articles for reference only.
In my experience, the Unreal VR template and Godot XR Tools provide resources to get started quickly but are often difficult/time consuming when overriding or creating custom functionality.
Where to go from here?
My suggestion is implement input for your hands/controllers. You can then begin with a basic grab interaction.
I would then look at considering teleport for locomotion. You can always use smooth locomotion, but there are some considerations when implemented.
VR Settings in Godot
Before getting started with settings, at the top, go to Project -> Project Settings and choose Advanced Settings.
Project Settings
- OpenXR Enabled: On
- Reference Space: Local Floor
- Physics -> Common -> Physics Ticks per Second: 72/80/90 (Set this to your desired headset FPS to avoid stuttering with physics)
- Rendering -> Anti Aliasing -> Quality -> MSAA 3D: 4x (Slow)
- Editor -> Manage Export Templates (installed)
- Installed the OpenXR Vendors plugin: https://docs.godotengine.org/en/stable/tutorials/xr/deploying_to_android.html#installing-the-vendors-plugin
- Project Settings -> Rendering -> Occlusion Culling -> Use Occlusion Culling: On (Must add an OccluderInstance3D to scene!)
Nodes
- World Environment: Disable Fog and any other effects. Set Tonemap to Linear.
- DirectionalLight3D -> Light ->Bake Mode: Static
- DirectionalLight3D -> Light ->Shadow: OFF
- LightmapGI added to the scene. Click Bake Lightmaps to bake lighting
- OccluderInstance3D added to the scene. All 3D models placed as children of this node. Click Bake Occluders
Model Settings
With a model selected in the FileSystem tab, set:
- Meshes -> Light Baking to Static Lightmaps
- Materials -> Extract -> Extract Once
- Preset Button at top -> Set as 'Default' for Scene
Android (Meta)
Ensure everything above is installed.
Android tools configured: https://docs.godotengine.org/en/stable/tutorials/export/exporting_for_android.html#doc-exporting-for-android
If you are in the SCiL lab, you can use the Unity's bundled Android SDK located:
C:\Program Files\Unity\Hub\Editor\UNITY_VERSION_NUMBER\Editor\Data\PlaybackEngines\AndroidPlayer
Project set to Mobile or Compatibility
Project - > Install Android Build Template
Project Settings
- Rendering/Textures/VRAM Compression/Import ETC2 ASTC: On
- XR/OpenXR/Color Space/Starting Color Space: REC709
Project/Export
- Use Gradle Build: On
- Min SDK: 34
- Target SDK: 34
- Package -> Unique Name: use a reverse URL, e.g. com.CompanyName.YourAppName
- XR Features/XR Mode: OpenXR
- Enable Meta Plugin: On
- There may be more if submitting your app through production
VR Controller Input in Godot
Preface
For more information about C# in Godot:
https://docs.godotengine.org/en/stable/tutorials/scripting/c_sharp/c_sharp_basics.html
Getting up to speed with C# in Godot: our wiki page.
Getting Started
Assuming you have followed the previous tutorial and confirmed VR is working with controller visuals (even cubes) and OpenXR, you can get started.
By default, after installing OpenXR within Godot enables a default OpenXR Action Map. Typically, I leave these defaults alone. There is a good article in the documentation that reviews how to create your own custom inputs, but these work great.
The event structure on how you process this input is up to you! Below is an EXAMPLE but should be structured!
1. Create subscription events for ButtonPressed and ButtonReleased.
Create a script on your XRController3D node (the VR controller) and the script should inherit from XRController3D.
Inside the script, create two Godot methods: EnterTree() and Exit Tree(). Add ButtonPressed and ButtonReleased and subscribe to a new method. Here is the layout:
C#
public override void _EnterTree()
{
ButtonPressed += OnButtonPressed;
ButtonReleased += OnButtonReleased;
}GDScript
func _enter_tree() -> void:
button_pressed.connect(on_button_pressed)
button_released.connect(on_button_released)Now, implement the two methods, OnButtonPressed and OnButtonReleased:
C#
void OnButtonPressed(string name)
{
}
void OnButtonReleased(string name)
{
}GDScript
func on_button_pressed(btn_name: String) -> void:
pass
func on_button_released(btn_name: String) -> void:
pass2. Process events
You will notice on the methods created above that there is a parameter called string name. This string is what is received from your OpenXR Action Map (or anything else with a button). For me, I have added a switch statement to process these inputs and invoke methods:
C#
void OnButtonPressed(string name)
{
switch (name)
{
case "grip_click":
OnGripPressed();
break;
case "trigger_click":
OnTriggerPressed();
break;
case "ax_button":
OnAXPressed();
break;
case "by_button":
OnBYPressed();
break;
}
}
void OnButtonReleased(string name)
{
switch (name)
{
case "grip_click":
OnGripReleased();
break;
case "trigger_click":
OnTriggerReleased();
break;
case "ax_button":
OnAXReleased();
break;
case "by_button":
OnBYReleased();
break;
}
}GDScript
func on_button_pressed(btn_name: String) -> void:
match btn_name:
"grip_click":
on_grip_pressed()
"trigger_click":
on_trigger_pressed()
"ax_button":
on_ax_pressed()
"by_button":
on_by_pressed()
func on_button_released(btn_name: String) -> void:
match btn_name:
"grip_click":
on_grip_released()
"trigger_click":
on_trigger_released()
"ax_button":
on_ax_released()
"by_button":
on_by_released()I'm not including every single method, but you can see that I now have a system to process input!
3. Expand (with some Object Oriented Programming)!!
Obviously, this script would be a pain to copy for both hands and alter the names of the methods slightly. You can do this if you wish to keep it simple.
Object Oriented Programming (OOP):
For me, I created a parent script called something like XRHand. Then, I created two scripts called LeftHand and RightHandthat are children of XRHand. Using the methods above, I made them virtual so in my LeftHand script for example, I can configure special implementation.
Here is the final script for XRHand:
C#
using Godot;
using System;
public partial class XRHand : XRController3D
{
public override void _EnterTree()
{
ButtonPressed += OnButtonPressed;
ButtonReleased += OnButtonReleased;
InputFloatChanged += OnInputFloatChanged;
InputVector2Changed += OnInputVector2Changed;
}
public override void _ExitTree()
{
ButtonPressed -= OnButtonPressed;
ButtonReleased -= OnButtonReleased;
InputFloatChanged -= OnInputFloatChanged;
InputVector2Changed -= OnInputVector2Changed;
}
void OnButtonPressed(string name)
{
switch (name)
{
case "grip_click":
OnGripPressed();
break;
case "trigger_click":
OnTriggerPressed();
break;
case "ax_button":
OnAXPressed();
break;
case "by_button":
OnBYPressed();
break;
}
}
void OnButtonReleased(string name)
{
switch (name)
{
case "grip_click":
OnGripReleased();
break;
case "trigger_click":
OnTriggerReleased();
break;
case "ax_button":
OnAXReleased();
break;
case "by_button":
OnBYReleased();
break;
}
}
void OnInputFloatChanged(string name, double value)
{
}
void OnInputVector2Changed(string name, Vector2 value)
{
switch (name)
{
case "primary":
OnThumbstickMoved(value);
break;
}
}
// Digital Input
public virtual void OnGripPressed() { }
public virtual void OnGripReleased() { }
public virtual void OnTriggerPressed() { }
public virtual void OnTriggerReleased() { }
public virtual void OnAXPressed() { }
public virtual void OnAXReleased() { }
public virtual void OnBYPressed() { }
public virtual void OnBYReleased() { }
// Axial-1D Input
// Axial-2D Input
public virtual void OnThumbstickMoved(Vector2 value) { }
// Signals
}GDScript
class_name XRHand
extends XRController3D
func _enter_tree() -> void:
button_pressed.connect(on_button_pressed)
button_released.connect(on_button_released)
func on_button_pressed(btn_name: String) -> void:
match btn_name:
"grip_click":
on_grip_pressed()
"trigger_click":
on_trigger_pressed()
"ax_button":
on_ax_pressed()
"by_button":
on_by_pressed()
func on_button_released(btn_name: String) -> void:
match btn_name:
"grip_click":
on_grip_released()
"trigger_click":
on_trigger_released()
"ax_button":
on_ax_released()
"by_button":
on_by_released()
func on_grip_pressed():
pass
func on_trigger_pressed():
pass
func on_ax_pressed():
pass
func on_by_pressed():
pass
func on_grip_released():
pass
func on_trigger_released():
pass
func on_ax_released():
pass
func on_by_released():
pass
And as for LeftHand or RightHand, I would just override a button that I would need:
C#
using Godot;
using System;
public partial class LeftHand : XRHand
{
public override void OnGripPressed()
{
GD.Print("Left grip released!");
}
public override void OnGripReleased()
{
GD.Print("Left grip released!");
}
}GDScript
extends XRHand
func on_grip_pressed():
print("Left grip pressed!")
func on_grip_released():
print("Left grip released")
The LeftHand and RightHand would now go on their respective XRController3D nodes, in the scene.
Basic Grab
Prerequisites:
- Basic familiarity with nodes in Godot
- XRRig
- Controller Input
- Ensure you have a ready LeftHand and RightHand script for input.
Setup for XR Rig
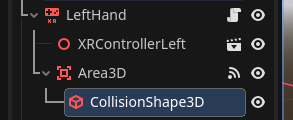
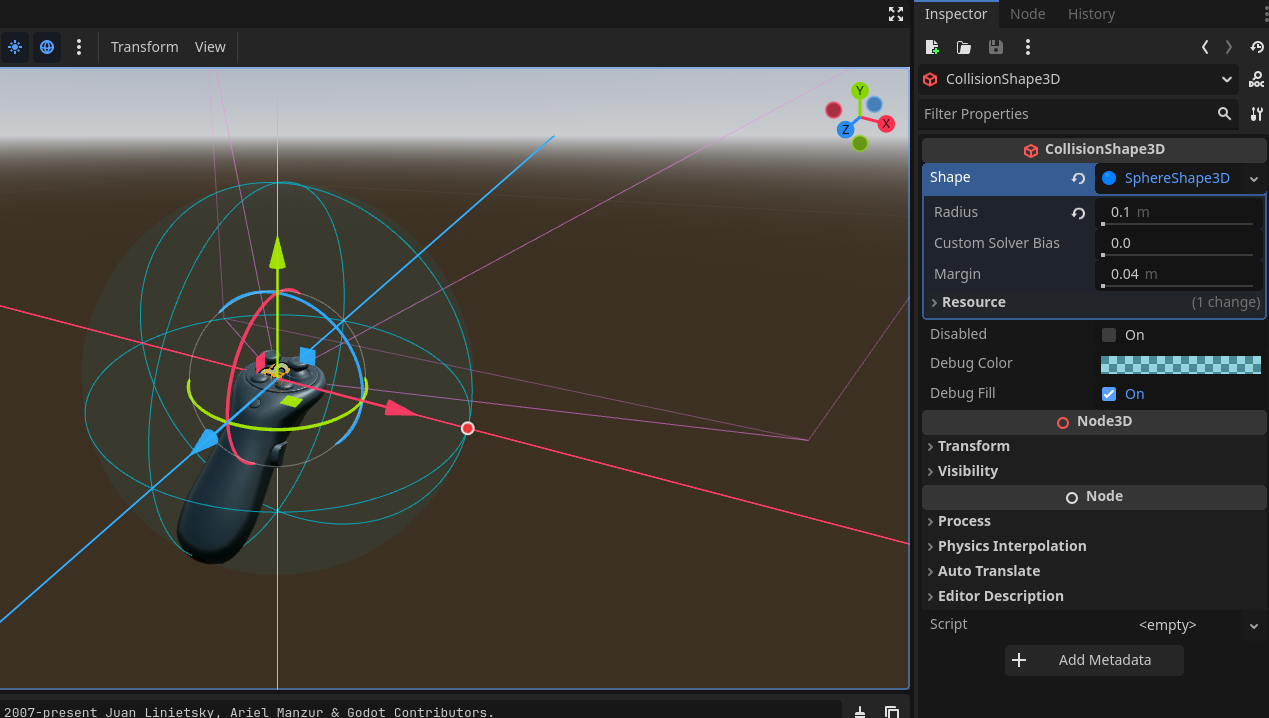
For each XRController3D node (VR hands), add an Area3D node as a child. You should get a warning about the Area node needing a collision shape, so add a new CollisionShape3D node as a child of the Area3D node. For my Shape type, I chose a new SphereShape3D and gave it a radius of 0.1m. Do this for all XRController3D nodes if you are using pickup interactions.
Setup basic grabbing
In your "world" scene, add a RigidBody3D node to your scene and add a CollisionShape3D and MeshInstance3D node as children, as well as any setup needed for those nodes. In the RigidBody3D node, create a new script called Grippable and ensure the script is attached. Now, let's add some code:
C#
using Godot;
using System;
public partial class Grippable : RigidBody3D
{
Node3D parentNode;
public override void _Ready()
{
parentNode = (Node3D)this.GetParent();
}
public void PickUp(Node3D receivedController)
{
Freeze = true;
Reparent(receivedController, true);
}
public void Drop(Vector3 receivedVelocity)
{
Reparent(parentNode);
CallDeferred("RestorePhysics", receivedVelocity);
}
void RestorePhysics(Vector3 receivedVelocity)
{
Freeze = false;
SetAxisVelocity(receivedVelocity);
LinearVelocity = receivedVelocity;
}
}GDScript
class_name Grippable
extends RigidBody3D
var parent_node: Node3D
func _ready() -> void:
parent_node = get_parent()
func pick_up(received_controller: Node3D):
freeze = true
reparent(received_controller, true)
func drop(received_velocity: Vector3):
reparent(parent_node)
call_deferred("restore_physics", received_velocity)
func restore_physics(received_velocity: Vector3):
freeze = false
set_axis_velocity(received_velocity)
linear_velocity = received_velocity
Let's review what's happening here:
- The parentNode is a variable used to cache where we need to re-parent this object when it is dropped, which is usually back to the world. In our _Ready method, we just get the current parent.
- The Pickup method and its reference to the controller doing the interaction is done here. We freeze physics while we are holding this object and parent it to our controller. The true parameter in Reparent is passed to keep the global transform before parenting so the pickup looks like we are grabbing an intended point.
- The Drop method will reparent the object back to the original parent. For Godot, we are going to restore physics using CallDeferred, which is used to delay the execution of a function until the current frame finishes and the engine is in a safe, idle state. This calls RestorePhysics.
- RestorePhysics is the method called after CallDeferred is completed. Physics is restored by setting freeze to false and applying velocity so the object leaves our hand naturally.
Add functionality to our hand (each)
Assuming you have completed all necessary prerequisites, you should have a LeftHand and a RightHand with some possible functionality. Here is additional code to add to each hand:
C#
Vector3 velocity;
Vector3 previousPosition;
Area3D area;
Grippable grippable;
public override void _Ready()
{
area = GetNode<Area3D>("Area3D");
}
public override void _Process(double delta)
{
velocity = (Position - previousPosition) / (float)delta;
previousPosition = Position;
}
public override void OnGripPressed()
{
var bodies = area.GetOverlappingBodies();
foreach (var body in bodies)
{
if (body is Grippable _)
{
grippable = body as Grippable;
grippable.PickUp(this);
return;
}
}
}
public override void OnGripReleased()
{
if (grippable != null)
{
grippable.Drop(velocity);
}
grippable = null;
}GDScript
extends XRHand
var velocity: Vector3
var previous_position: Vector3
var grippable: Grippable
@onready var area = $Area3D
func _process(delta: float) -> void:
velocity = (position - previous_position) / delta
previous_position = position
func on_grip_pressed():
var bodies = area.get_overlapping_bodies()
for body in bodies:
if body is Grippable:
grippable = body as Grippable
grippable.pick_up(self)
return
func on_grip_released():
if grippable != null:
grippable.drop(velocity)
grippable = null;
Let's review what this code achieves:
- A variable, velocity, is added for when we need to let to drop an object and give it velocity. The benefit is this calculation does not involve a physics node or other physics calculations that are not needed. You may optionally add a boolean flag in the _Process method if you do not wish to calculate velocity every frame except for when you are actually holding something.
- In OnGrippedPressed, we use our Area3D node to check all overlapping bodies. If one of these bodies is a Grippable type, then we attempt to pick it up and return out of the method.
- For OnGrippedReleased, we do a check to see if we are actually holding a grippable object and, if we are, we drop the object and pass along our hand's velocity. Finally, we indicate we are no longer holding anything in this hand.
Testing
If you have reached this stage, go ahead and test functionality with both hands.
Where to go from here?
If you are looking to add advanced interactions like sliders and dials, you may wish to keep these methods for grabbing types, but add new classes that track the controller's movement instead of parenting when picked up or dropped, possibly a refactor.
Teleport Part 1
Prequisites
- Completed Getting Started with VR for Godot and have a working world.
- Completed VR Controller Input for Godot
Setup
Let's make sure we are on the same page with our player. I like to use a general Node3D as my root node and place my VR rig inside it, this way I can add other nodes as components and nothing will be dependent on VR. If your player root is an XROrigin, you can open the scene, right-click and choose Change Type... and rearrange your nodes as needed (or rebuild your player entirely is you wish).
Here is my layout:
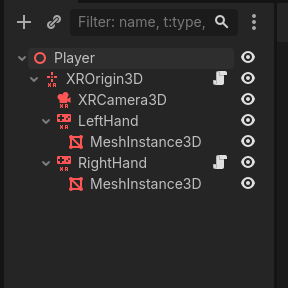
You also must have completed the page for VR Controller Input. For this guide, we will focus on the right hand. You may have more code, but here is the bare-bones for my Right Hand:
C#
using Godot;
using System;
public partial class RightHand : XRHand
{
public override void OnTriggerPressed()
{
GD.Print("Right Trigger pressed...");
}
public override void OnTriggerReleased()
{
GD.Print("Right Trigger released...");
}
}
GDScript
extends XRHand
func on_trigger_pressed():
print("Right Trigger pressed...")
func on_trigger_released():
print("Right Trigger released...")
Please TEST IN VR and make sure we are on the same page before proceeding!
Raycasting
Our goal will be to teleport our entire object by pressing a button on our right controller (trigger in this case), aim an area in our level, and if that area is found to be a teleport area, releasing that button will move our player to that position.
First, create a new script in your FileSystem window, choose your language, inherit from Node3D, leave Template unchecked, and set the path in an appropriate place, named TeleportArea (or teleport_area for GDScript). If you are using C#, a class will be created for the script.
If you are using GDScript, be sure to add class_name TeleportArea at the top:
class_name TeleportArea
extends Node3D
This class can be left empty for now, it will be useful later as any object in the level that holds this script will make the area a valid teleport area.
Select your RightHand (XRController3D) and add a new child node called Raycast3D. You may rename it if you wish, but for now edit the following properties:
- Target Position: x: 0.0, y: 0.00, z: -100 (note the Z is in the NEGATIVE. This is the distance your teleport area will emit)
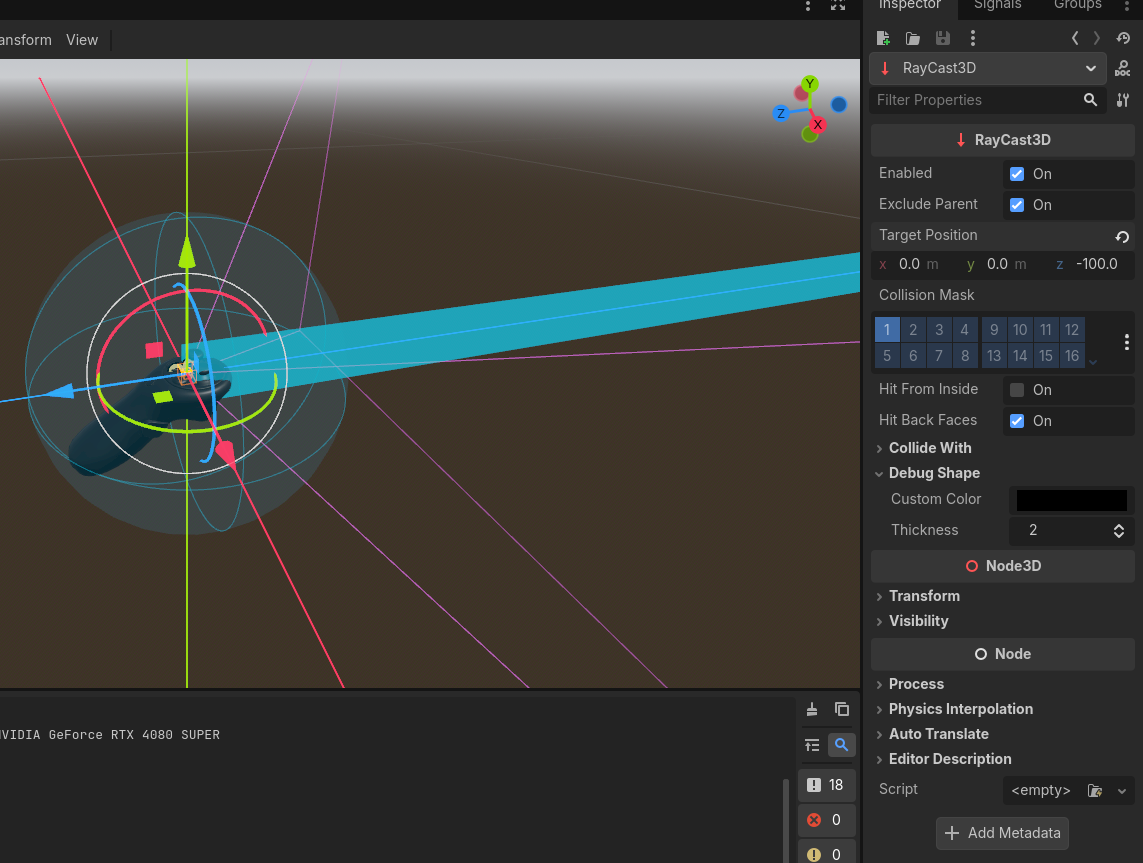
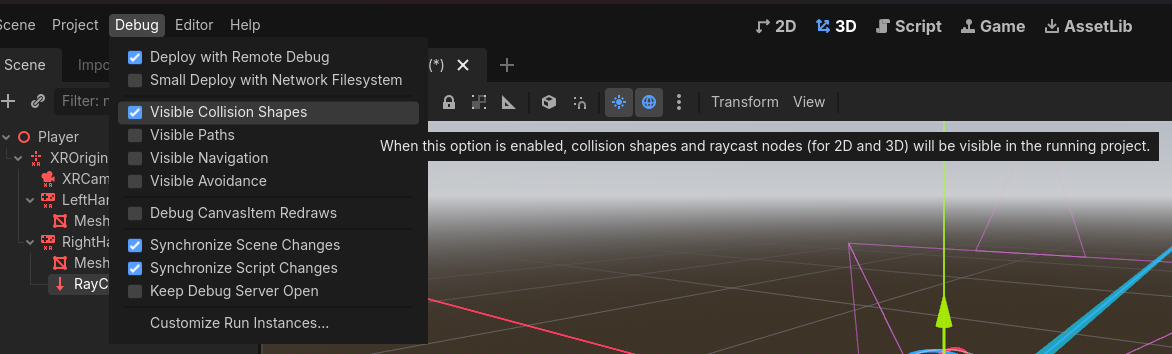
Finally, in the Debug menu at the top of the editor, go to Debug and check Visible Collision Shapes. This allows you to see active collision shapes and raycasts during play. This is for TESTING purposes only! Uncheck this feature after you are satisfied.
If you hit play now, you should be able to see your Raycast3D emitting from your controller. I would suggest here placing a CSGBox3D, check Use Collision, set the Size to something meaningful, like x: 5.0, y: 0.01, z: 5.0, and assign the script TeleportArea to the Script entry.

The inspector has Script set to TeleportArea.cs / teleport_area.gd which was beyond the scrollbar.
Now we can start editing our RightHand script.
Raycasting Code
For our Right Hand class, we need some properties:
C#
[Export] Raycast3D raycast3D;
[Export] Node3D playerRig;
TeleportArea validTeleportArea;
bool teleportButtonPressed;
Vector3 teleportLocation;GDScript
@export var raycast3D: RayCast3D
@export var player_rig: Node3D
var valid_teleport_area: TeleportArea
var teleport_button_pressed: bool
var teleport_location: Vector3The first two properties will allow us to assign these nodes in the editor's inspector. Raycast3D is the node attached to our hand and what we will use to access the hit data, and the other is the Player Rig. I typically will assign this to the root of my Player scene.
The property validTeleportArea is what will be cached when our raycast detects an object that is the correct type. The other two properties will help us execute the teleport.
Create a new Process method
C#
public override void _Process(double delta) {} GDScript
func _process(delta: float) -> void:
passand in here add the following code:
C#
if (!teleportButtonPressed) { return; }
var target = rayCast3D.GetCollider();
if (target is TeleportArea area)
{
validTeleportArea = area;
teleportLocation = rayCast3D.GetCollisionPoint();
}
else
{
validTeleportArea = null;
teleportLocation = Vector3.Zero;
}GDScript
if !teleport_button_pressed:
return
var target = raycast3D.get_collider()
if target is TeleportArea:
valid_teleport_area = target
teleport_location = raycast3D.get_collision_point()
else:
valid_teleport_area = null
teleport_location = Vector3.ZERO- Line 1: let's ignore everything if we are not pressing our teleport button
- Line 3: Create a variable called target that is collecting the collider that the raycast is hitting
- Line 5: If our target is the type TeleportArea and not a regular collision, let's set our valid teleport area to what we are hitting and set the teleport location to the current POINT our raycast is hitting (the point on the collision).
- Line 10: Reset everything if nothing is valid.
Next, let's make our boolean teleportButtonPressed meaningful. Our process method will only run if our button is pressed (which saves performance) so let's design our teleport execution to activate when pressed (and held) and on releasing the button will commit the teleport execution. Add
C#
teleportButtonPressed = true;GDScript
teleport_button_pressed = trueto our OnTriggerPressed() method.
For OnTriggerReleased() method, add the following code:
C#
public override void OnTriggerReleased()
{
teleportButtonPressed = false;
if (validTeleportArea != null)
{
playerRig.GlobalPosition = teleportLocation;
}
}GDScript
func on_trigger_released():
teleport_button_pressed = false
if valid_teleport_area != null:
player_rig.global_position = teleport_locationEssentially, if our valid teleport area is, well, valid we will set our player's global position to be the teleport location point we cached earlier. Finally, on line 3, we always set our button pressed back to false to prevent the code above to continue running.
Test!
Save all your code. Return to the editor and click the build button. Be sure to assign Raycast3D and PlayerRig in the editor!!
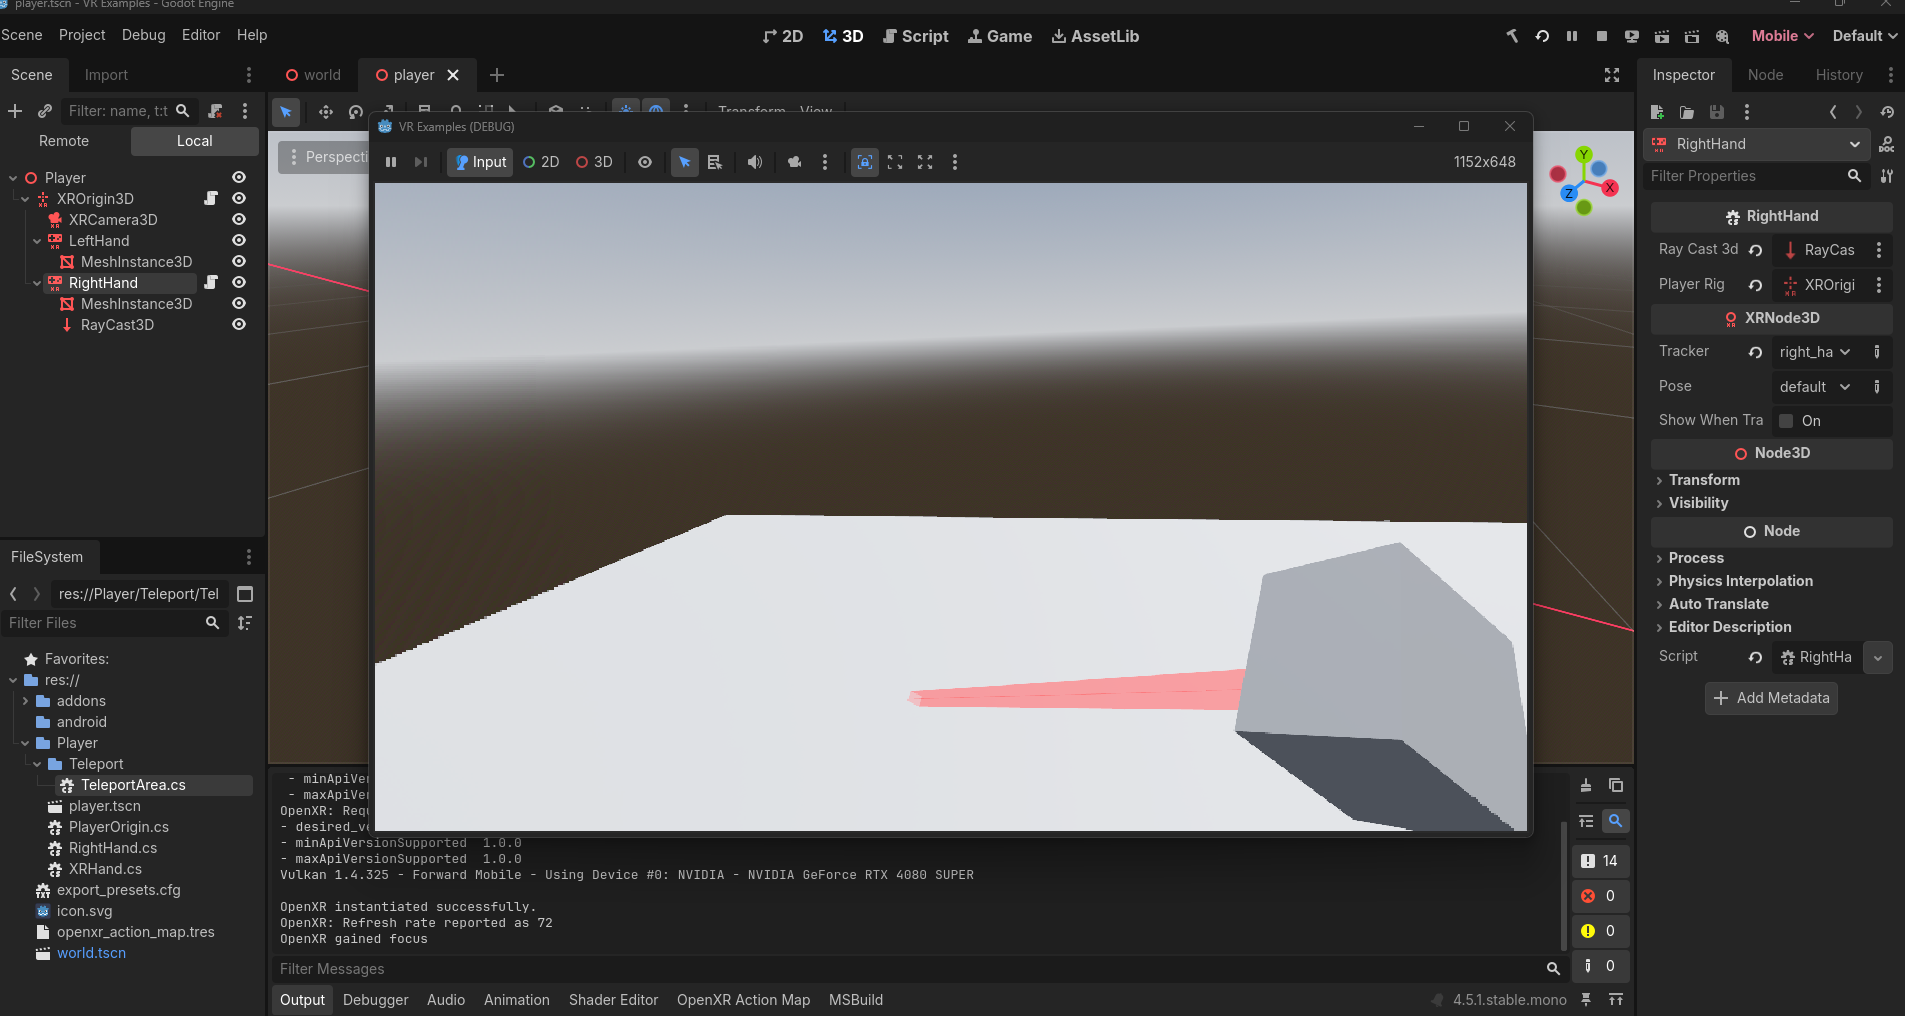
From here you should be able to teleport around. Our big issue currently is that we are using a Debug layer in our editor to show our raycast and without this debug there is no way to indicate to our player where they are looking to go. We will fix this in Part 2 along with the final code.
Teleport Part 2
Setup
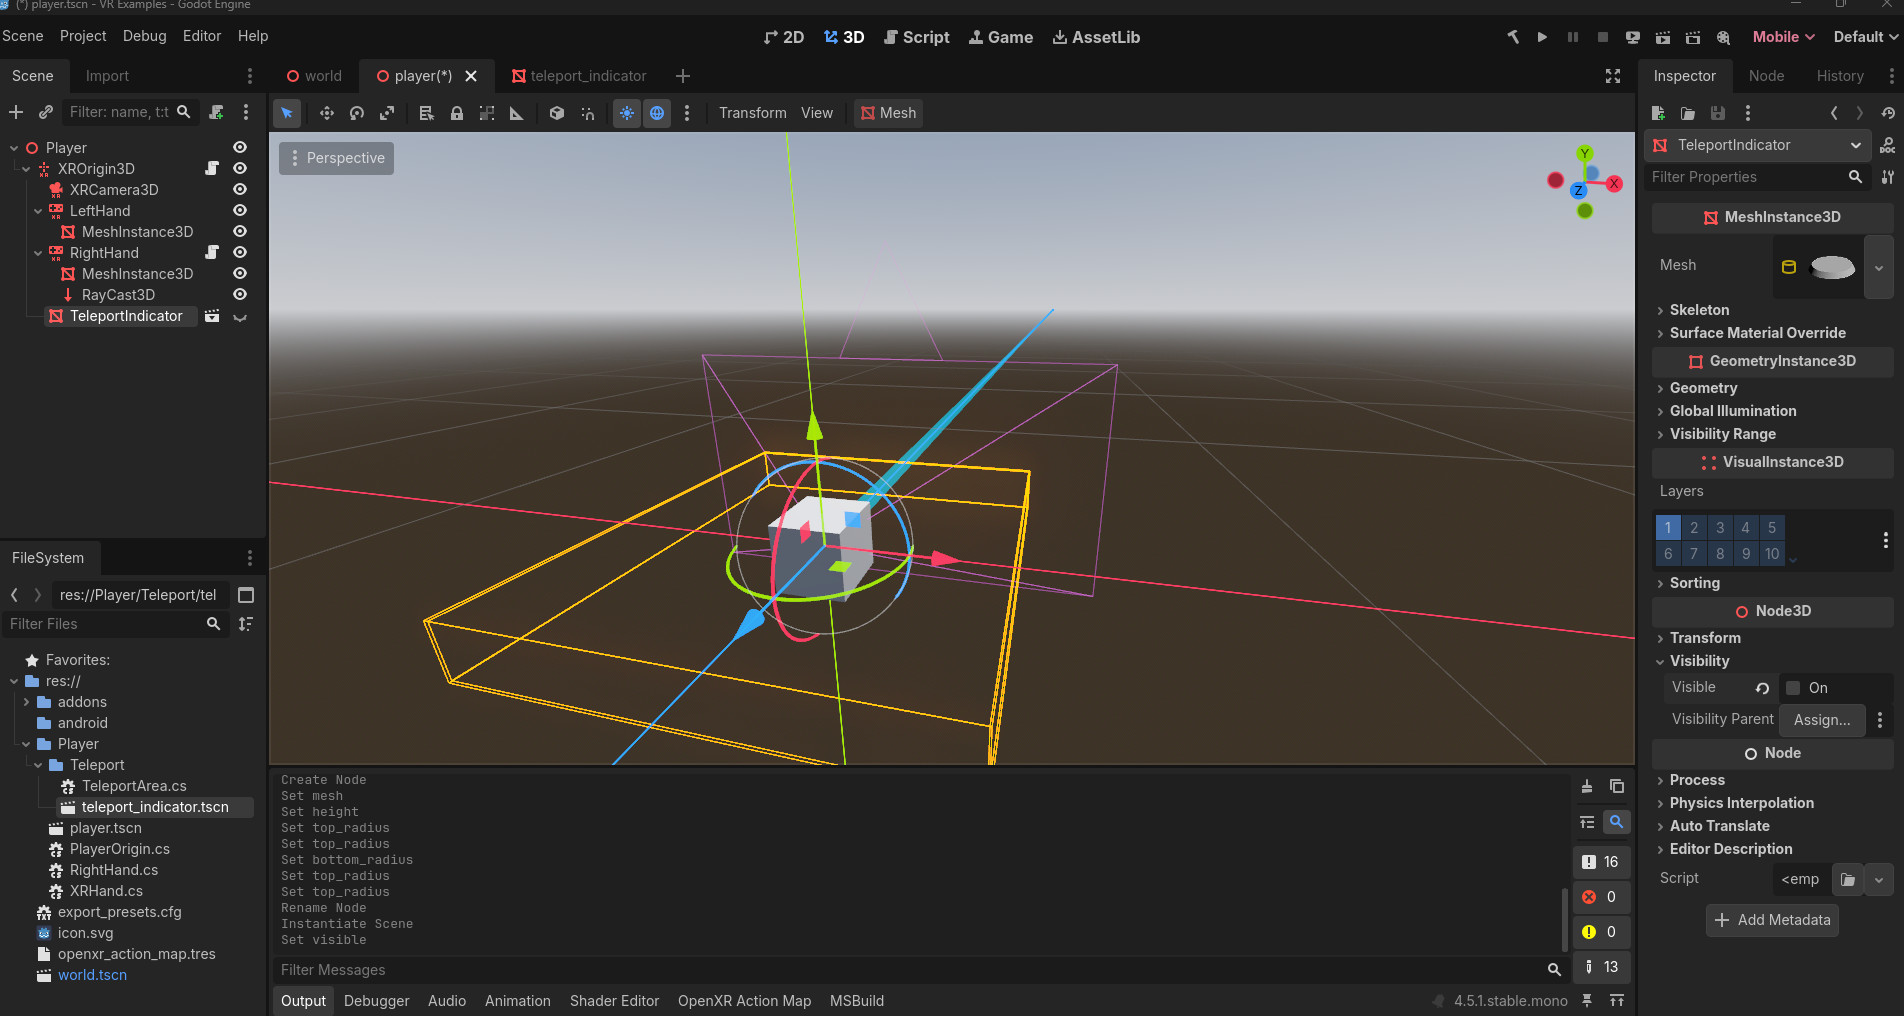
Let's start part 2 with creating an indicator for the player to see when they activate teleporting with the controller button. Along the tabs near the top of the editor in the middle, click the (+) button to Add a new scene. Choose Other Node, choose MeshInstance3D, and press Create. For this tutorial, select a new Mesh by clicking the drop down arrow and choose CylinderMesh. Click on the actual Mesh image to load the mesh properties and use the following:
- Top Radius: 0.35
- Bottom Radius: 0.4
- Height: 0.1
Rename MeshInstance3D to TeleportIndicator. Save the scene with your player scenes as TeleportIndicator.

Back in your Player scene, add TeleportIndicator as a child of your XROrigin3D node. Because we don't want this visible on load, in the Inspector, uncheck On for Visible.
We are now ready to implement the functionality with code.
Coding the Teleport Indicator
Open up RightHand.cs if it not already opened. Begin by adding a new Export property:
C#
[Export] Node3D teleportDestIndicator;GDScript
@export var teleport_dest_indicator: Node3DNow move to your _Process method. Inside the if statement where you are checking if the target is the type TeleportArea is true, add the following lines underneath where you set teleportLocation:
C#
teleportDestIndicator.Visible = true;
teleportDestIndicator.GlobalPosition = teleportLocation;GDScript
teleport_dest_indicator.visible = true
teleport_dest_indicator.global_position = teleport_locationSince we have found a valid teleportArea as before, the teleportIndicator will become visible for the player and its position will be updated.
Now add the following in the else statement, below where we set the teleportLocation to Vector3.Zero:
C#
teleportDestIndicator.Visible = false;
teleportDestIndicator.GlobalPosition = Vector3.Zero;GDScript
teleport_dest_indicator.visible = false
teleport_dest_indicator.global_position = Vector3.ZEROAs before, we reset our teleportIndicator to not be visible because our location was invalid and for good measure we will reset its position to be all zeroes.
The last thing to do is to make sure when we execute our teleport, the teleportIndicator node becomes not visible as well. Copy the following and paste inside your OnTriggerReleased() method, inside the if statement:
C#
teleportDestIndicator.Visible = false;GDScript
teleport_dest_indicator.visible = falseTesting
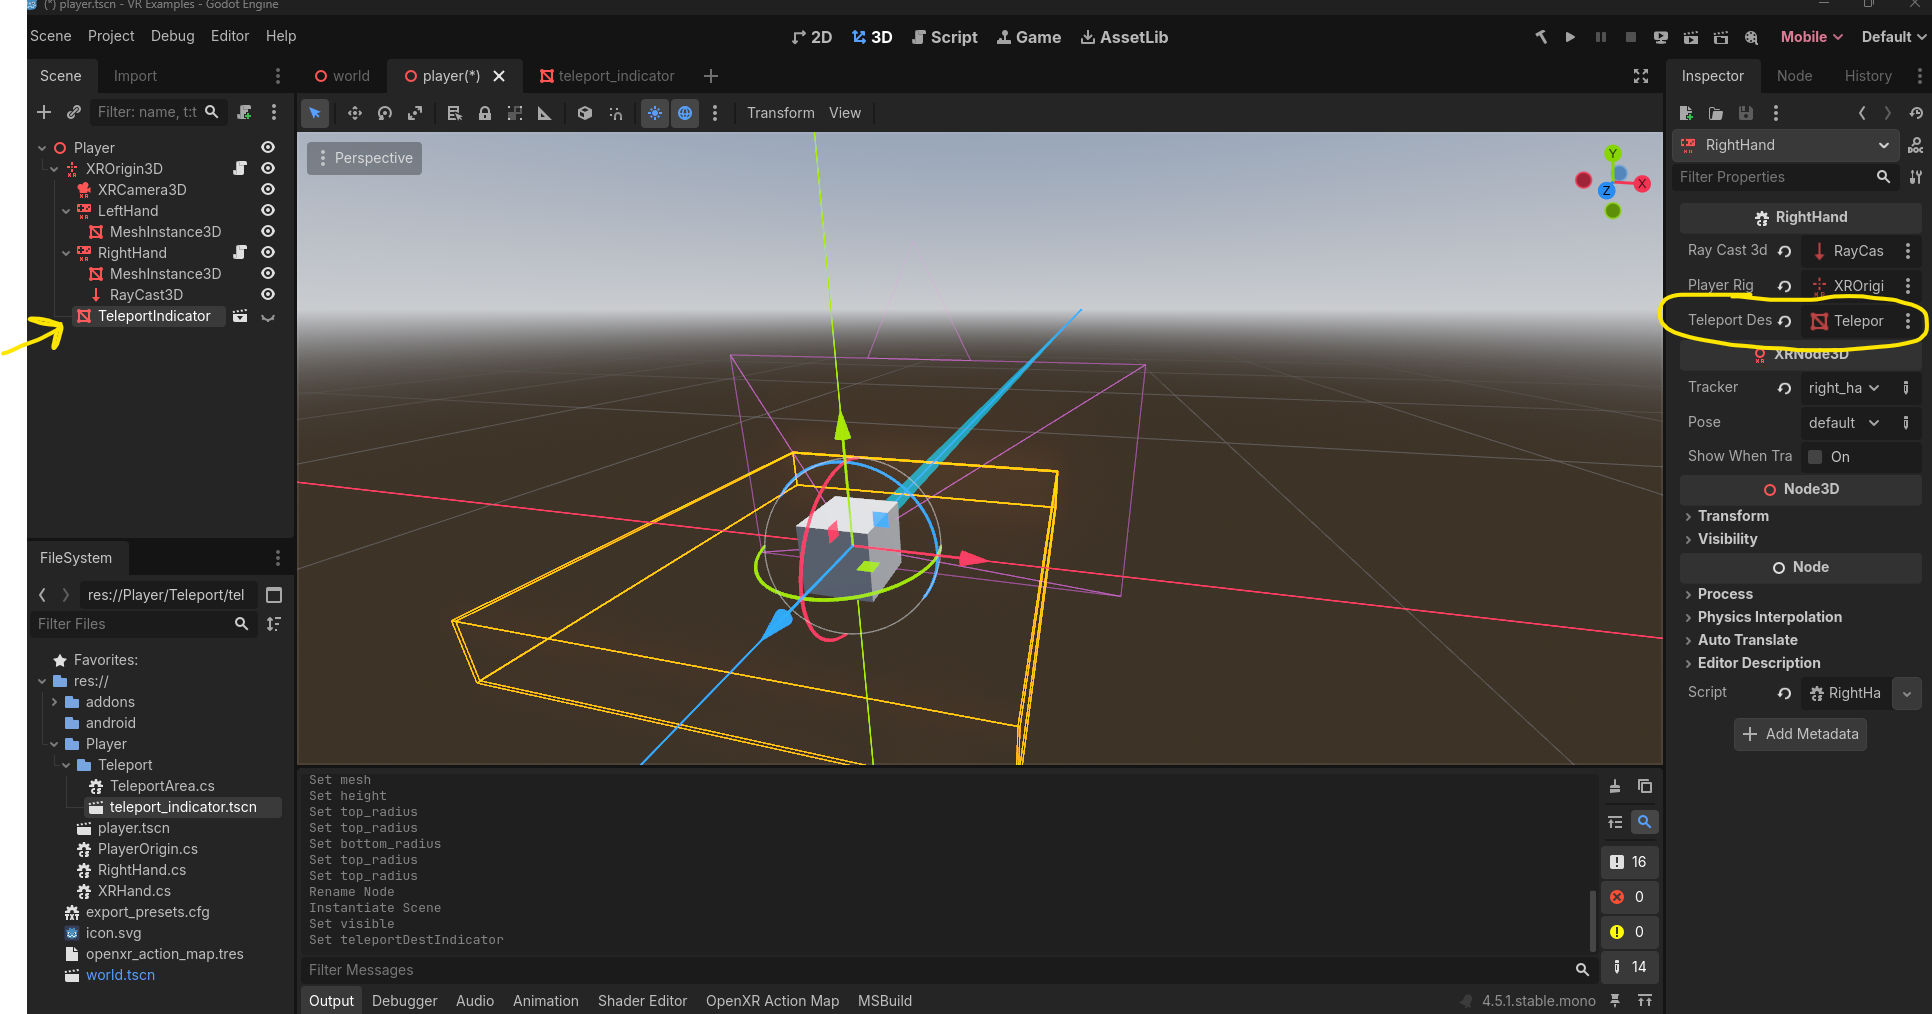
Save all your code. Save all your scenes. Click the build icon at the top as before if you are using C#. Be sure to UNCHECK Visible Collision Shapes in the Debug menu at the top. Remember to assign the TeleportIndicator node to your RightHand in your VR rig:
Hit play and test out your scene!
Where to go from here
From here, you may wish to change the material of the teleport indicator or even use a different mesh entirely. Since you have a class called TeleportArea, you can also send it events like OnTeleportAreaFound or OnTeleportExecuted if you want to make your project more event driven. Finally, adding audio effects are a nice touch.
Final Code for RightHand.cs
using Godot;
using System;
public partial class RightHand : XRHand
{
[Export] RayCast3D rayCast3D;
[Export] Node3D playerRig;
[Export] Node3D teleportDestIndicator;
TeleportArea validTeleportArea;
bool teleportButtonPressed;
Vector3 teleportLocation;
public override void OnTriggerPressed()
{
teleportButtonPressed = true;
}
public override void OnTriggerReleased()
{
teleportButtonPressed = false;
if (validTeleportArea != null)
{
playerRig.GlobalPosition = teleportLocation;
teleportDestIndicator.Visible = false;
}
}
public override void _Process(double delta)
{
if (!teleportButtonPressed) { return; }
var target = rayCast3D.GetCollider();
if (target is TeleportArea area)
{
validTeleportArea = area;
teleportLocation = rayCast3D.GetCollisionPoint();
teleportDestIndicator.Visible = true;
teleportDestIndicator.GlobalPosition = teleportLocation;
}
else
{
validTeleportArea = null;
teleportLocation = Vector3.Zero;
teleportDestIndicator.Visible = false;
teleportDestIndicator.GlobalPosition = Vector3.Zero;
}
}
}
Final Code for right_hand.gd
extends XRHand
@export var raycast3D: RayCast3D
@export var player_rig: Node3D
@export var teleport_dest_indicator: Node3D
var valid_teleport_area: TeleportArea
var teleport_button_pressed: bool
var teleport_location: Vector3
func _process(delta: float) -> void:
if !teleport_button_pressed:
return
var target = raycast3D.get_collider()
if target is TeleportArea:
valid_teleport_area = target
teleport_location = raycast3D.get_collision_point()
teleport_dest_indicator.visible = true
teleport_dest_indicator.global_position = teleport_location
else:
valid_teleport_area = null
teleport_location = Vector3.ZERO
teleport_dest_indicator.visible = false
teleport_dest_indicator.global_position = Vector3.ZERO
func on_trigger_pressed():
teleport_button_pressed = true
func on_trigger_released():
teleport_button_pressed = false
if valid_teleport_area != null:
player_rig.global_position = teleport_location
teleport_dest_indicator.visible = false
Again, you may have additional code to in your RIghtHand script to support things like grabbing!
Common 3D Features
This page consists of the culmination of the Brackeys video: How to make 3D Games in Godot. The video is not a tutorial, but a guide to common engine features like lighting, physics, materials, animations, and more. For convenience, video link and its times stamps are below:
How to make 3D Games in Godot (video)
- 3:35 3D Space
- 6:13 Greyboxing
- 9:31 Terrain
- 10:01 Playing the Game
- 11:11 Character Controller
- 14:15 3D Physics
- 16:10 Graphics
- 17:44 3D Assets in 1 min
- 18:45 Assets in Godot
- 22:38 StandardMaterial3D
- 26:53 Scene Workflows
- 30:53 Collision
- 32:57 Replace Greybox
- 35:43 Animated Characters
- 38:33 Speed up Workflow
- 39:24 Environment
- 42:00 Lighting
- 45:38 Tonemap
- 47:18 Camera
- 48:45 Render Quality