Motion Capture
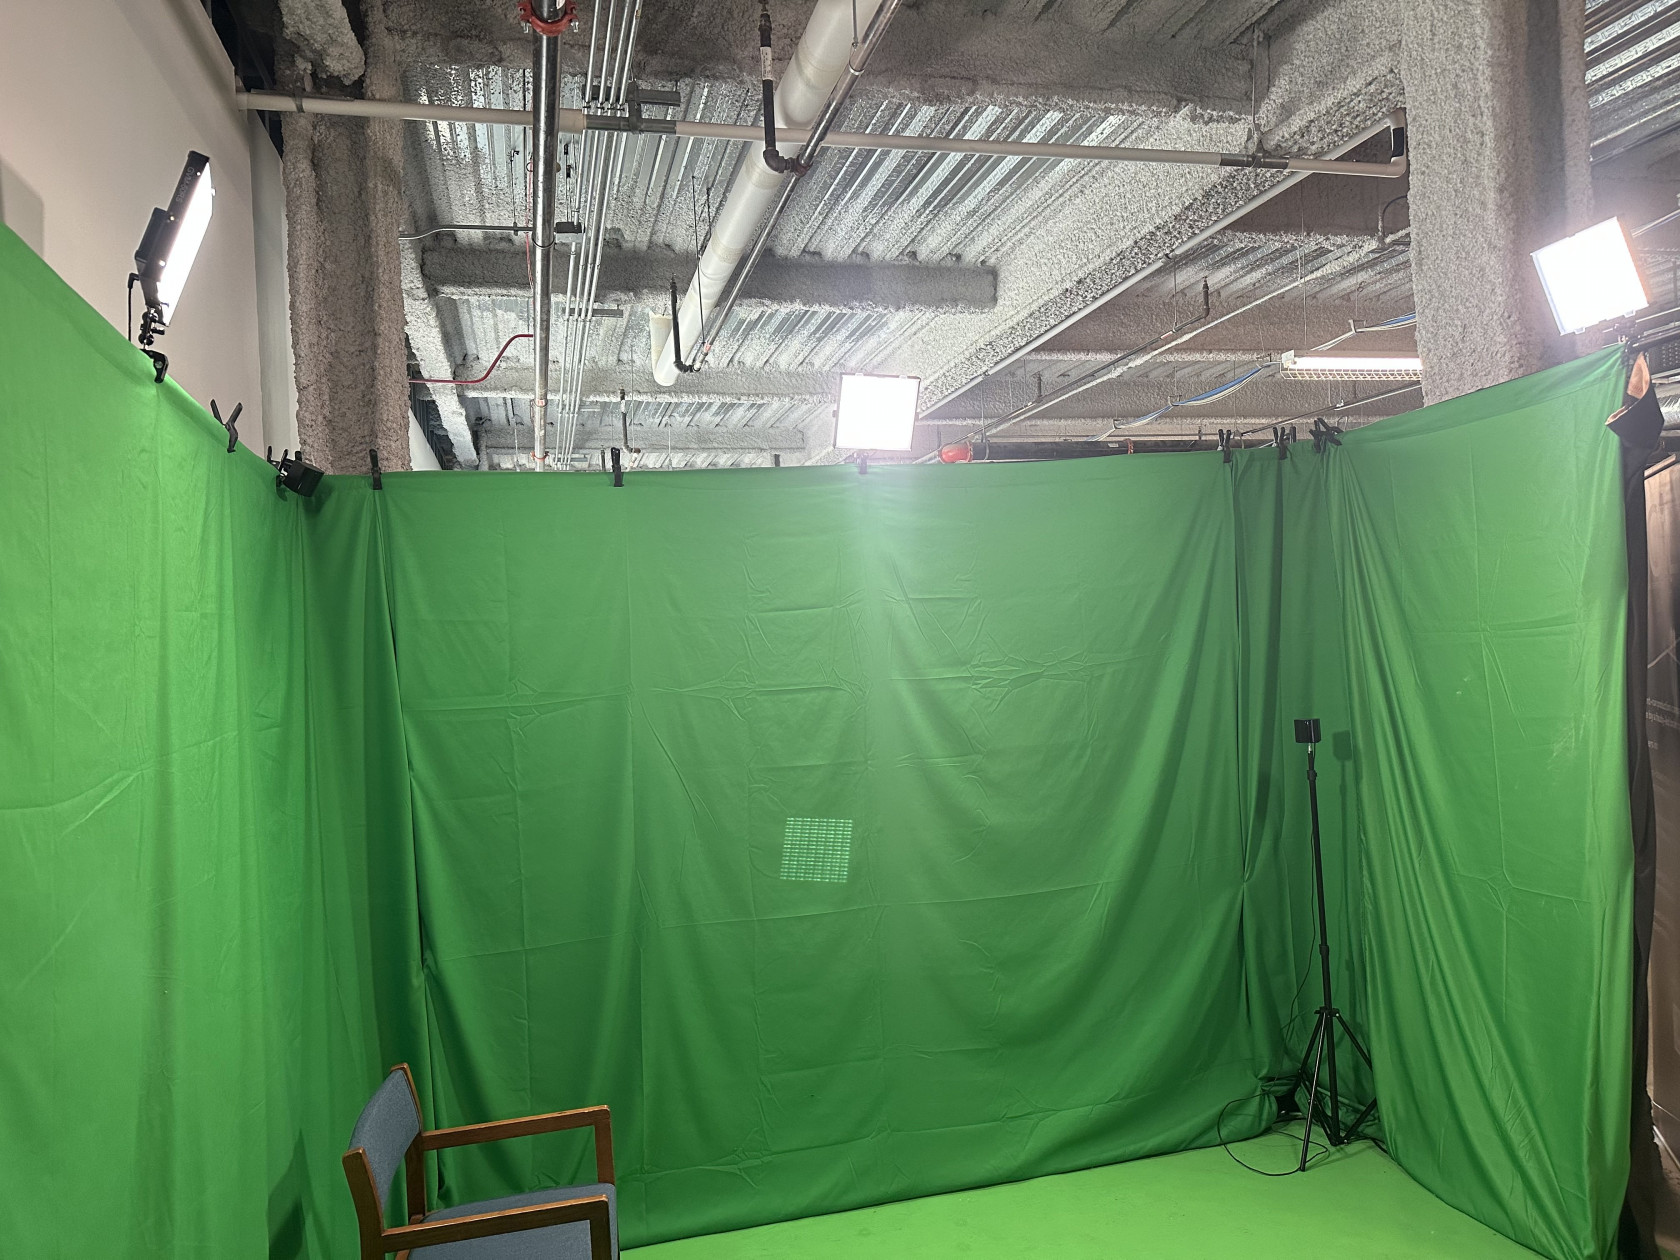
The SCiL Lab's MoCap studio is located in the outer area at the last curtain cubicle.
- MANUS Core
- Hardware Setup
- Mocap Post Production
- UE Facial Capture (Setup)
- UE Facial Capture (Recording)
- LIV VR Mixed Reality
- Faceware (Unavailable)
MANUS Core
MANUS Core Setup
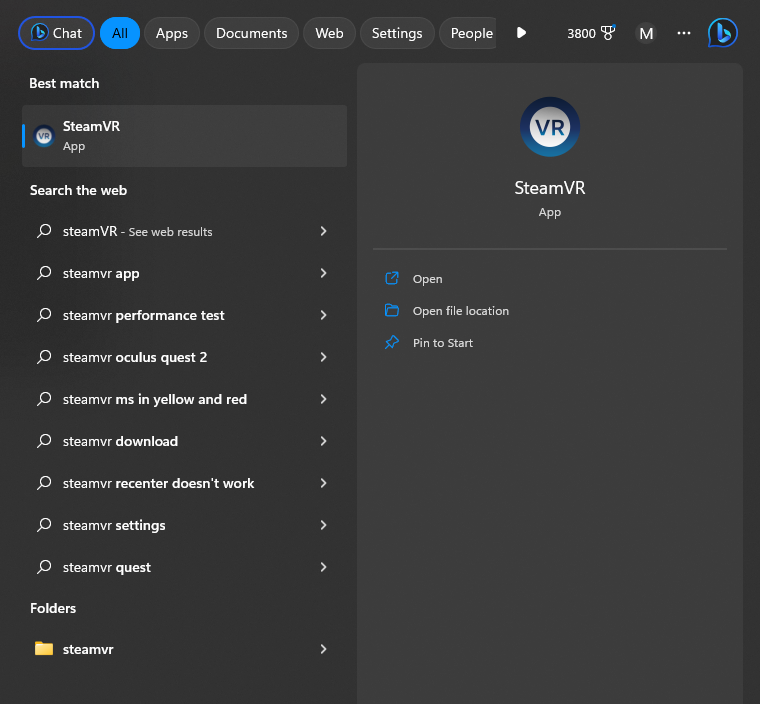
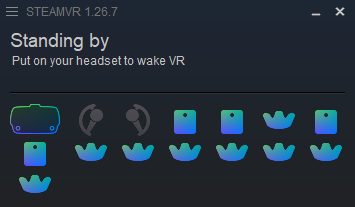
1. Launch the MANUS Core and SteamVR applications. These can be accessed either by searching for them or by finding the shortcuts on the desktop.

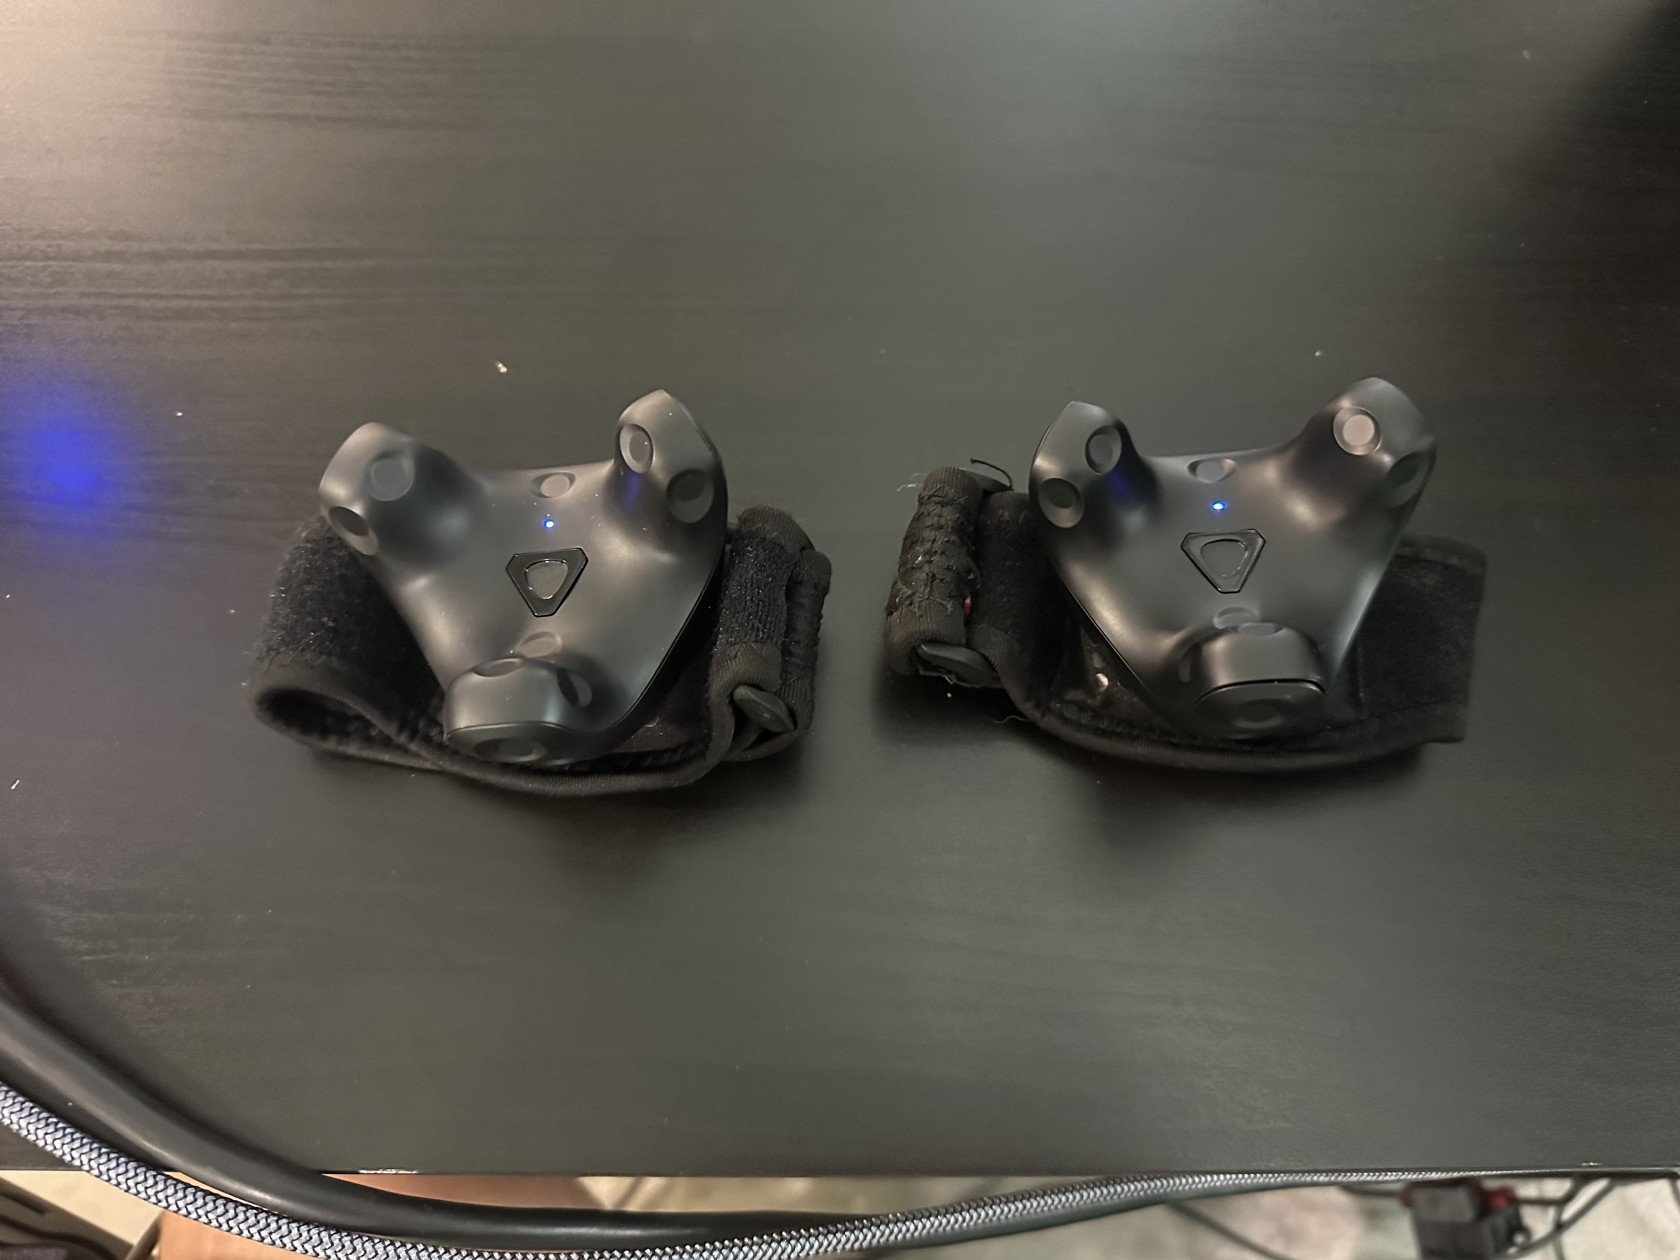
2. Approach the actor and activate all eight VIVE trackers along with both gloves. The VIVE trackers are equipped with a triangular button on their face; press this for one second and then release. A white light should blink, followed by a steady green light, signaling a successful pairing. Confirmation of this can also be observed in the SteamVR mini window, where the outline of the added tracker will be displayed. Regarding the gloves, an on-off switch is situated near the wrist. Slide this button to the on position, and a white and blue light should flash from the glove's LED. Once the flashing ceases and a solid blue light appears, the glove is successfully connected.
Note: In the event of any connection issues, please refer to the troubleshooting page for assistance.
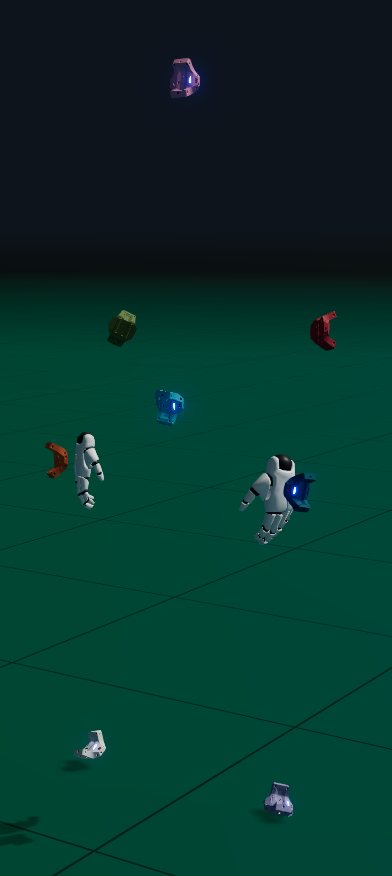
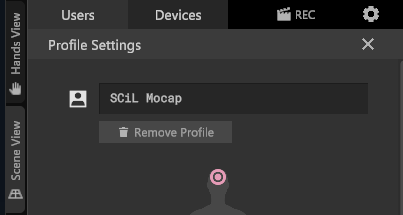
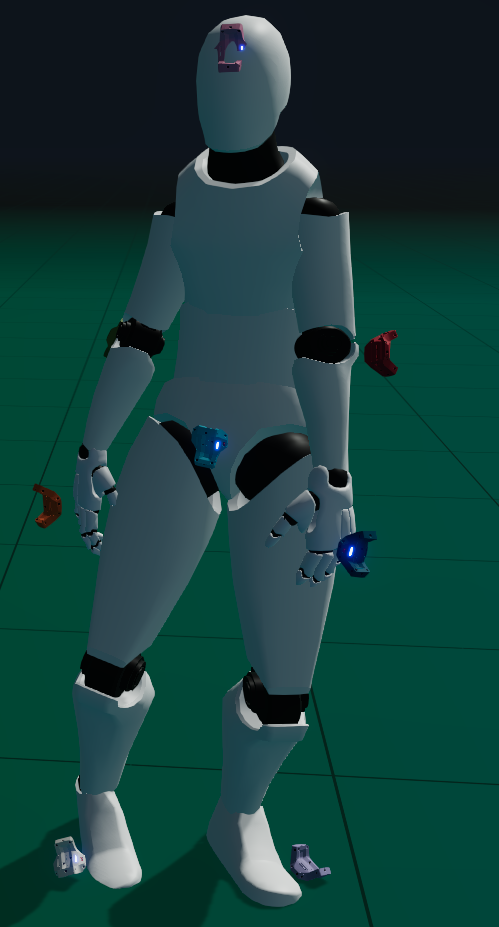
3. Once all devices are connected, navigate to the profile settings tab next to the user's tab in the MANUS Core software, where you will assign the trackers to the corresponding body parts. Each tracker possesses a unique color and is represented in the scene view. Communicate with the actor, asking them to raise or move specific body parts to facilitate tracker assignment. Upon correct assignment of all trackers, a 3D mesh should materialize on the actor within the scene view.
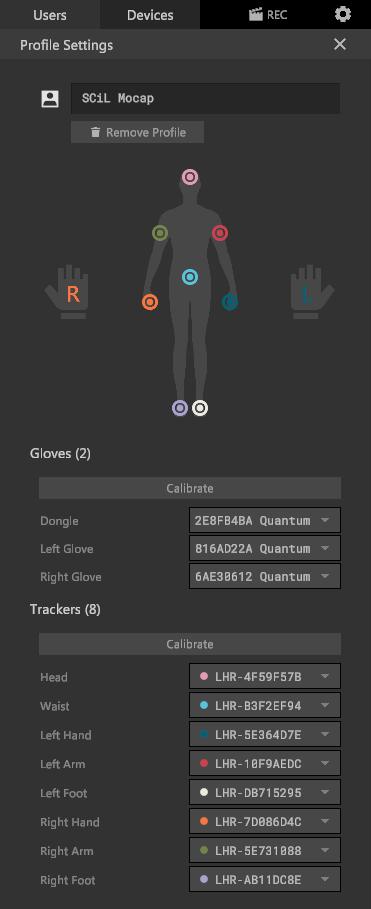
Different views: The MANUS Core software features two different views - hands view and scene view. These options are situated on the right-hand side of the page, adjacent to the Users tab.
Note: While the mesh skeleton may not appear perfect, it is important that the arms and legs are not crossed. If they are, this suggests that the trackers have been assigned incorrectly to the opposite body part.
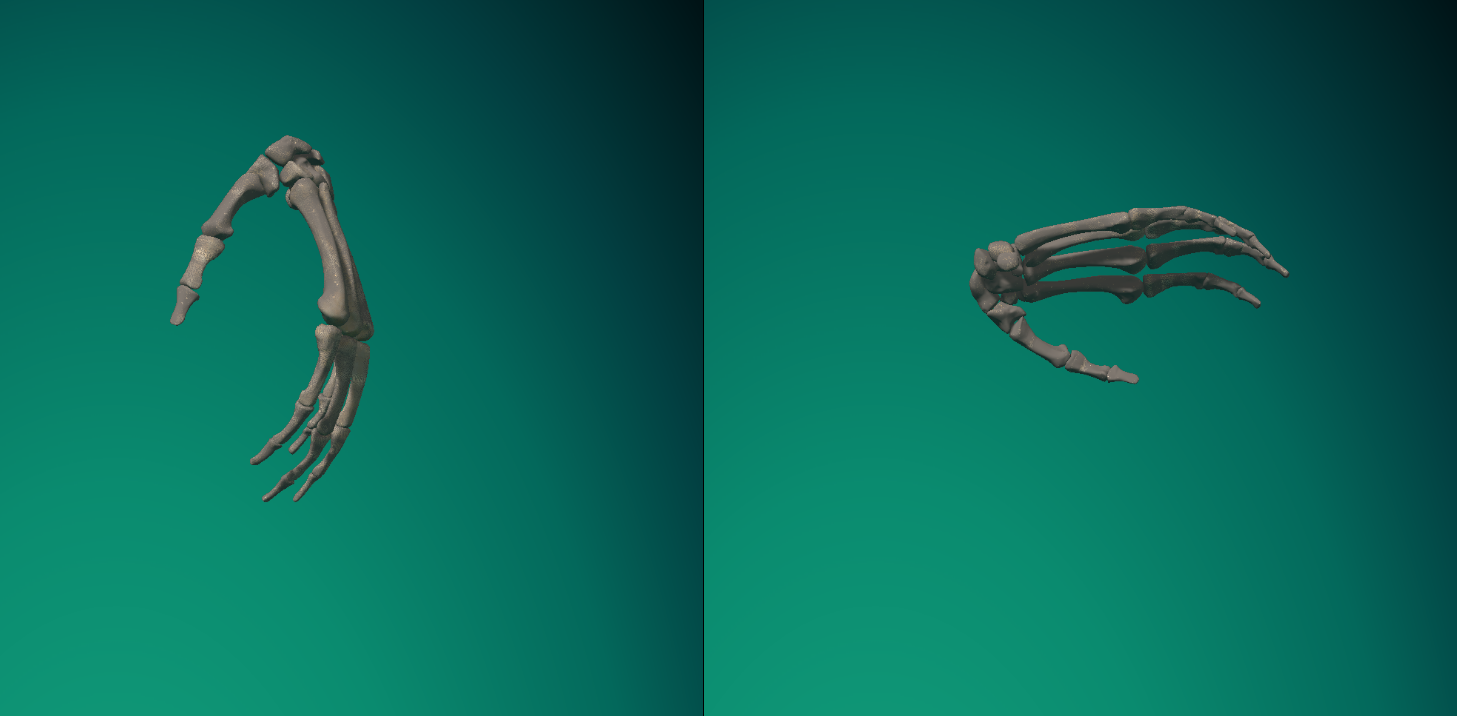
4. Transition to the hands view and verify that both hands are visible as a 3D skeletal hand. If both are not present, consult the troubleshooting page for assistance.
Note: The skeletal hands/fingers should mimic the actor's movements. However, if certain fingers appear bent incorrectly and are unresponsive, do not be alarmed. The hands have yet to be calibrated.
5. Once everything is connected and assigned correctly, you may proceed to calibrate the hands and body trackers. Refer to the MANUS Core Calibration page for step-by-step instructions.
MANUS Core Recording
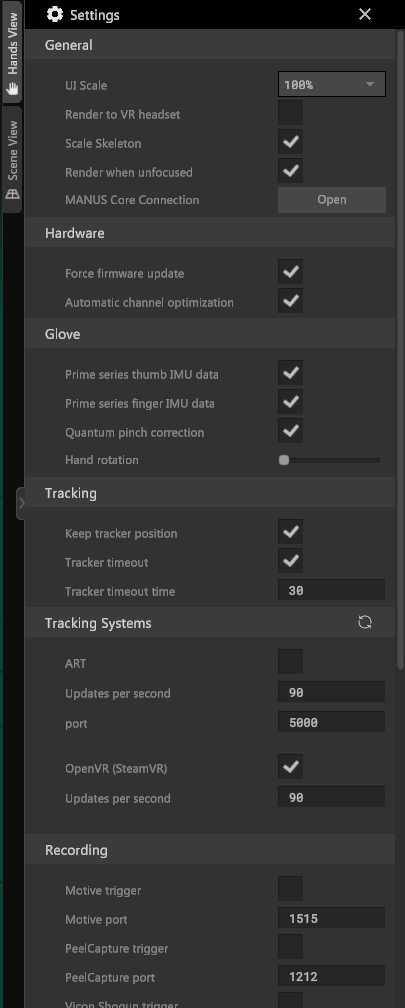
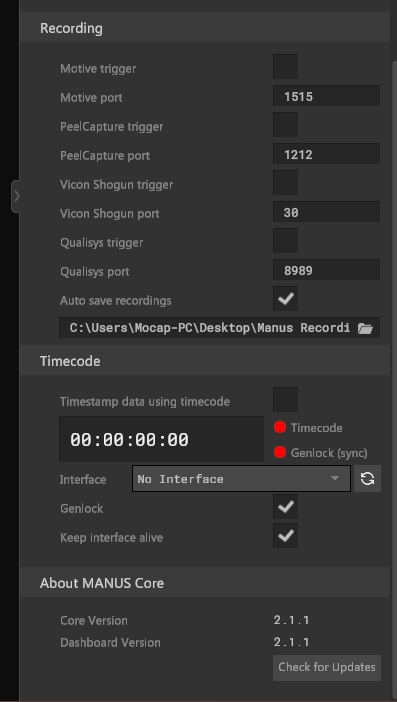
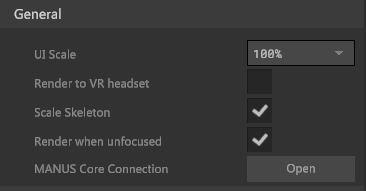
1. At this time, please ensure your settings correspond to the images provided below unless instructed otherwise. These default settings are typically the ones to use.
2. Having confirmed that your settings are accurate, navigate to the upper right of the tabs and click on 'REC'. Following this action, a recording menu set should emerge at the bottom of your scene view.

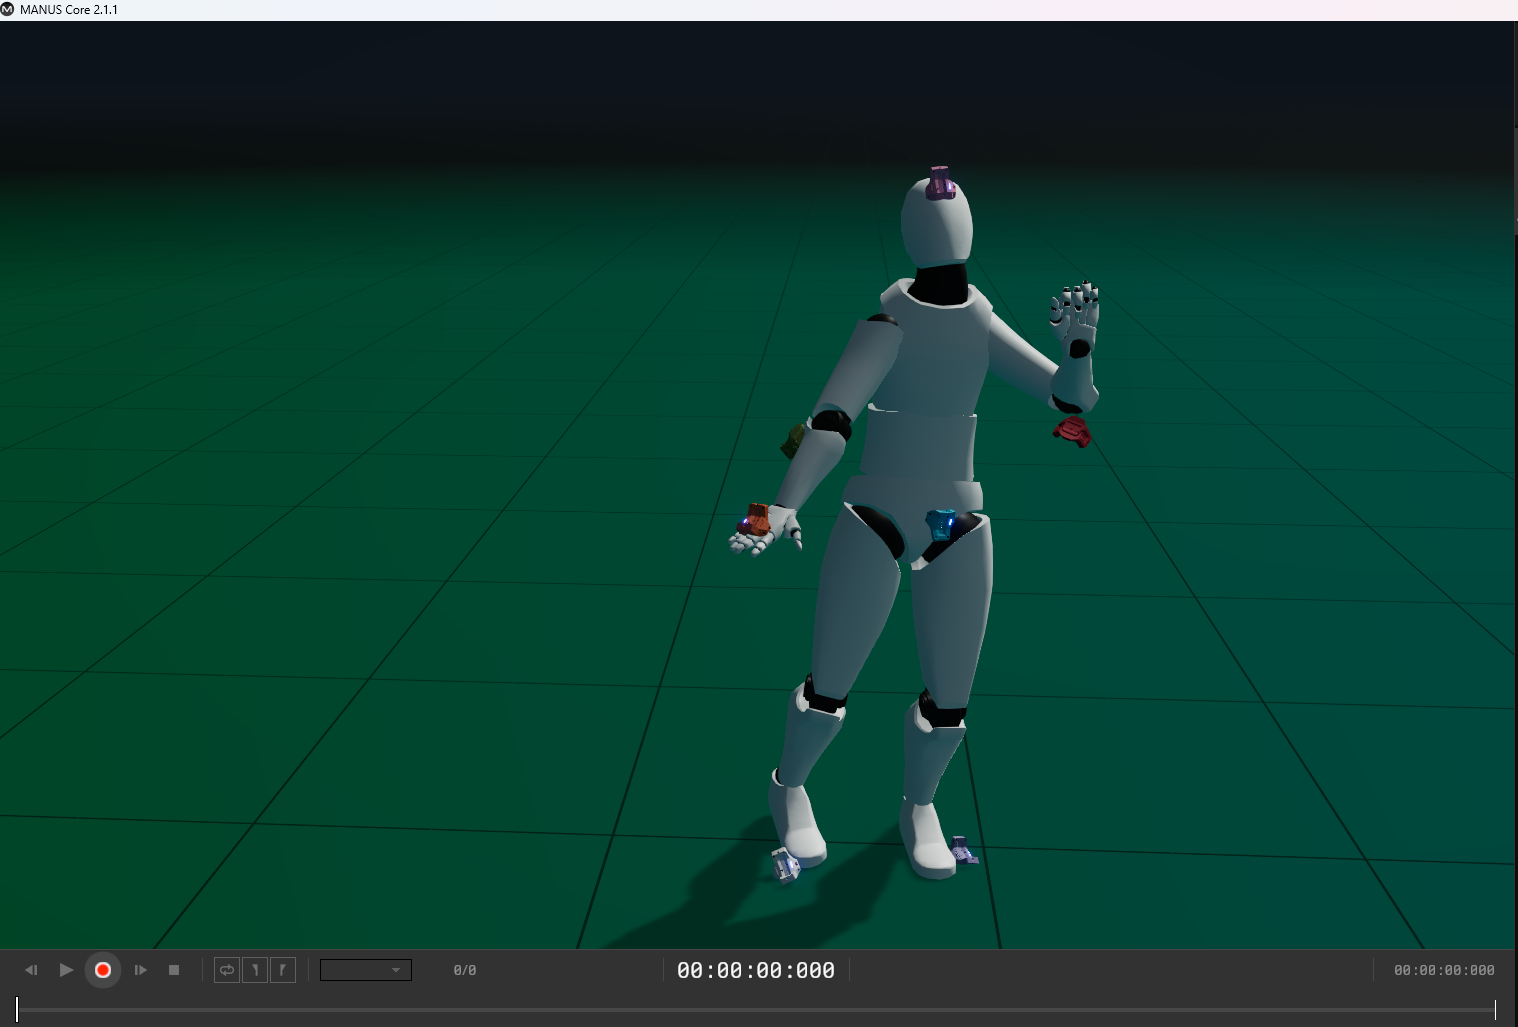
3. To commence the recording of the actor's performance, click on the red 'Record' button
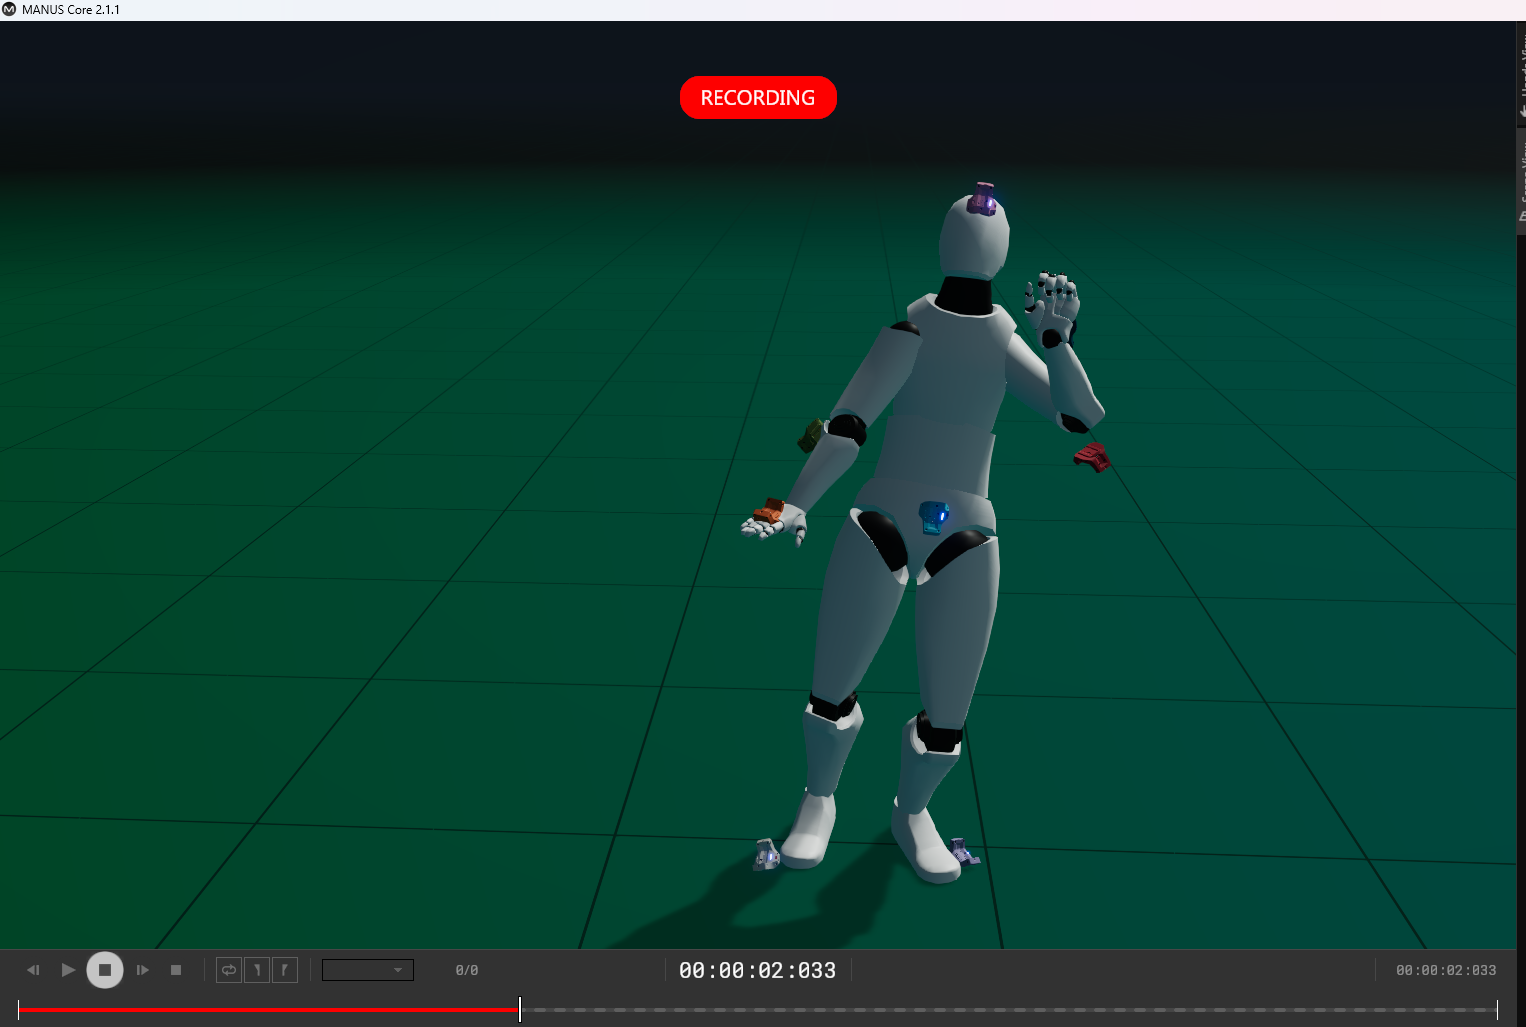
5. Once the recording concludes, click the 'Record' button again to halt the process. Post-recording, you have the option to review the clip and adjust the beginning or end as necessary by moving the two yellow indicators on the timeline.
Note: The software will only display the animation clip and not the live actions of the actor until the clip is cleared for another recording.
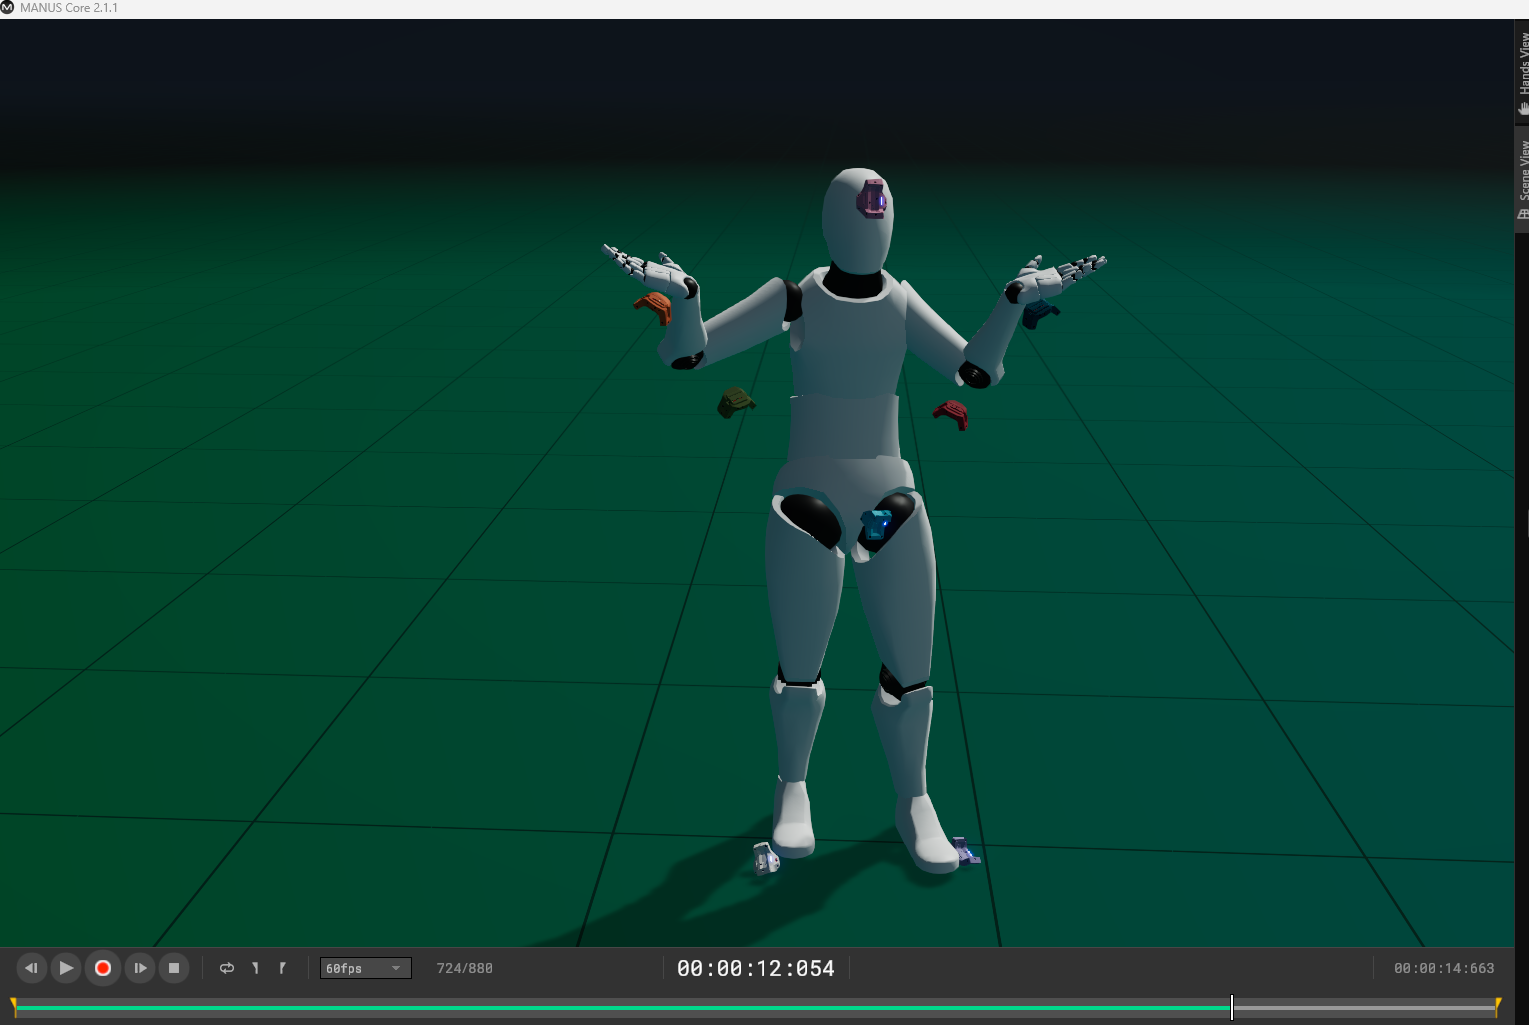
You can also adjust the framerate at which the performance is viewed

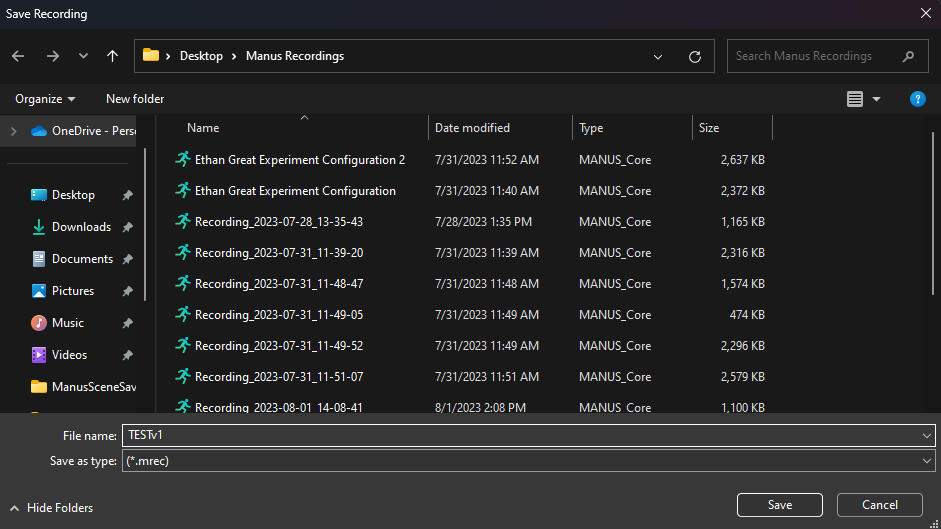
6. To save the animation clip, navigate to the lower right-hand side of the software and select 'Save'.
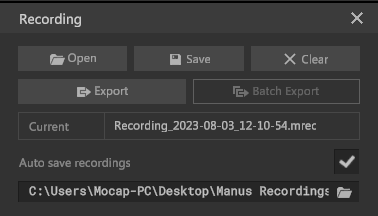
7. At this point, you're preserving the MANUS Core scene, and it is generally advised to consistently save your scenes. You will be prompted to designate a name and location for the scene. Once satisfied with the details, click 'Save'.
8. After you saved the scene select the export button. Here you will rename and assign a location too. Then for the skeleton select Mixamo and then X Bot.
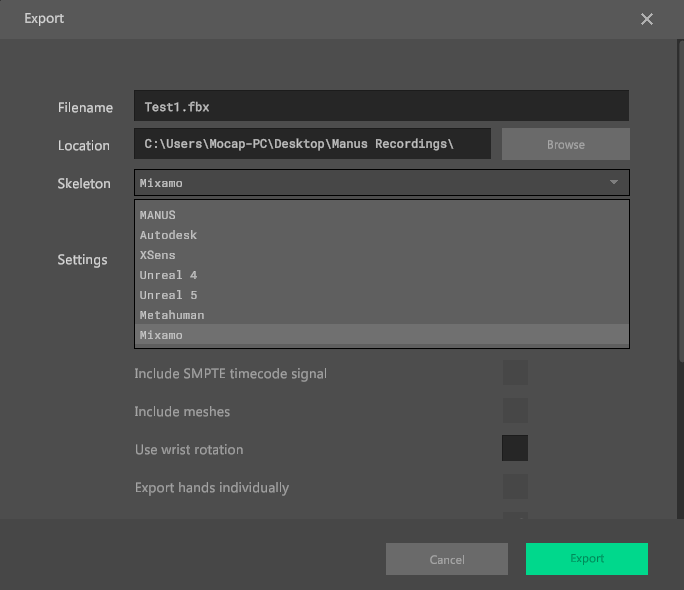
The following are the additional settings that I've found to yield the best results.
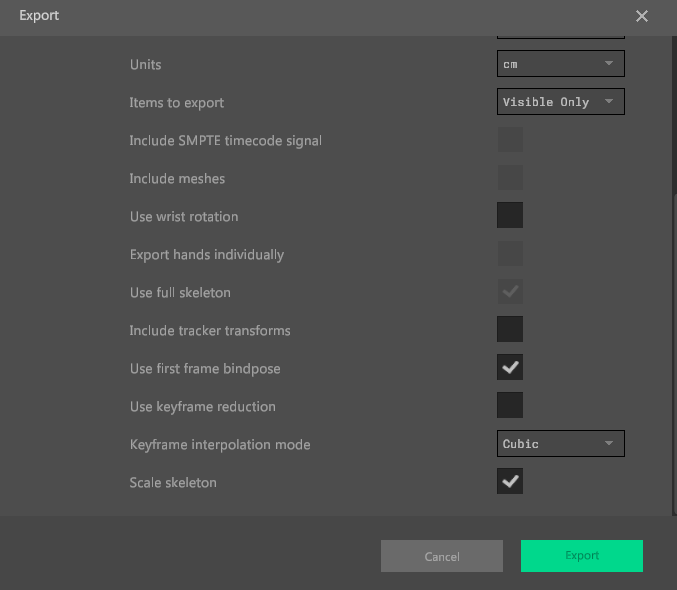
9. Now, a file of type FBX should be present in the location you specified.
MANUS Core Calibration
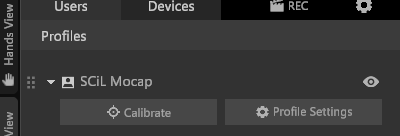
1. To initiate calibration, click on the 'Calibrate' button located in the 'Users' tab on the right-hand side of the page.
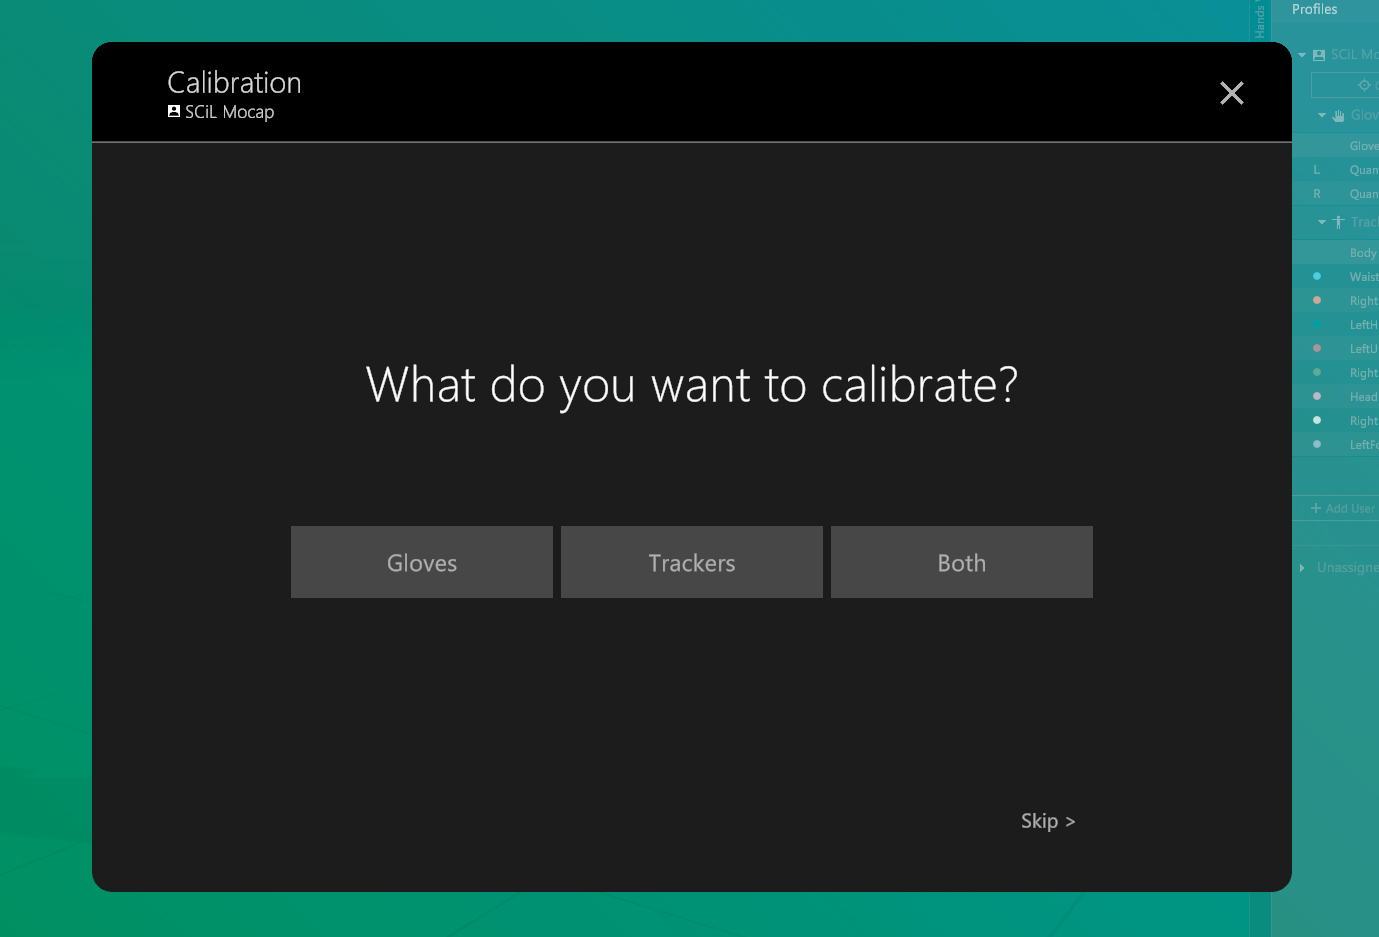
2. Upon selection, you will encounter three options, the first of which is 'Gloves'. Choose this option to proceed.
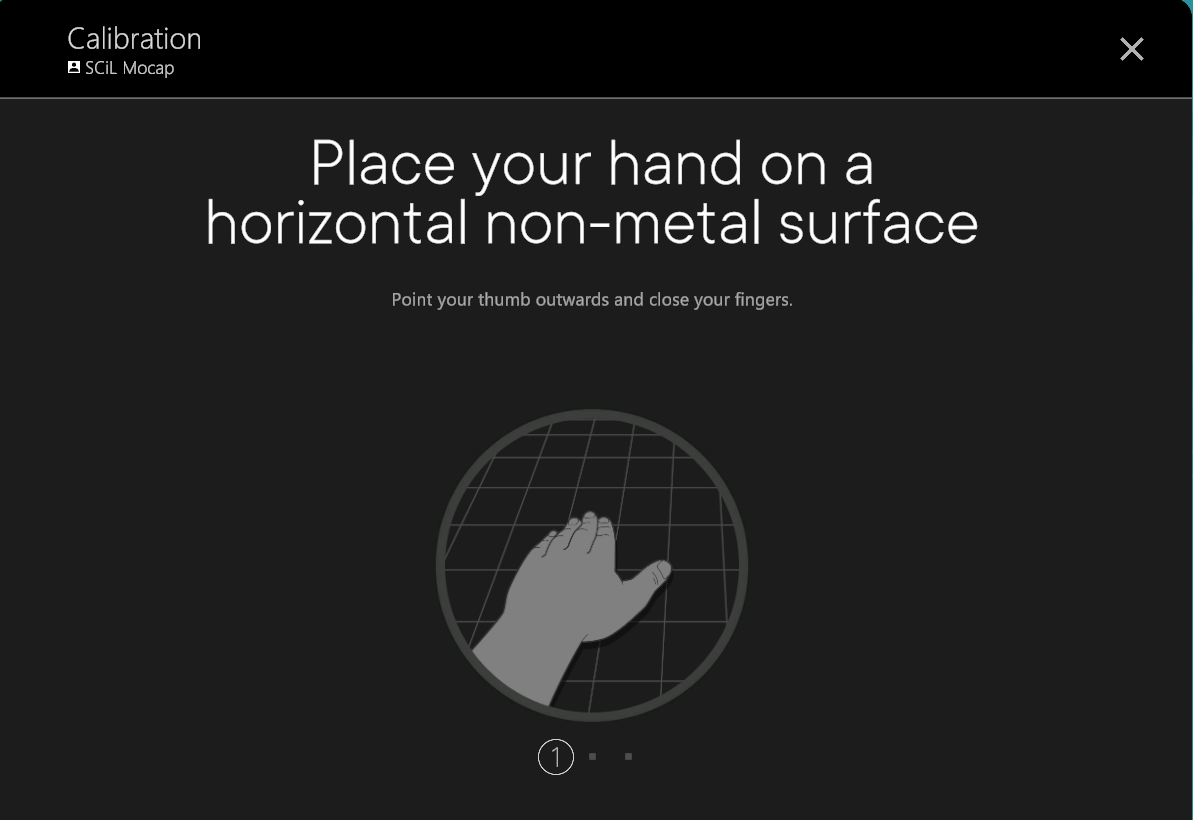
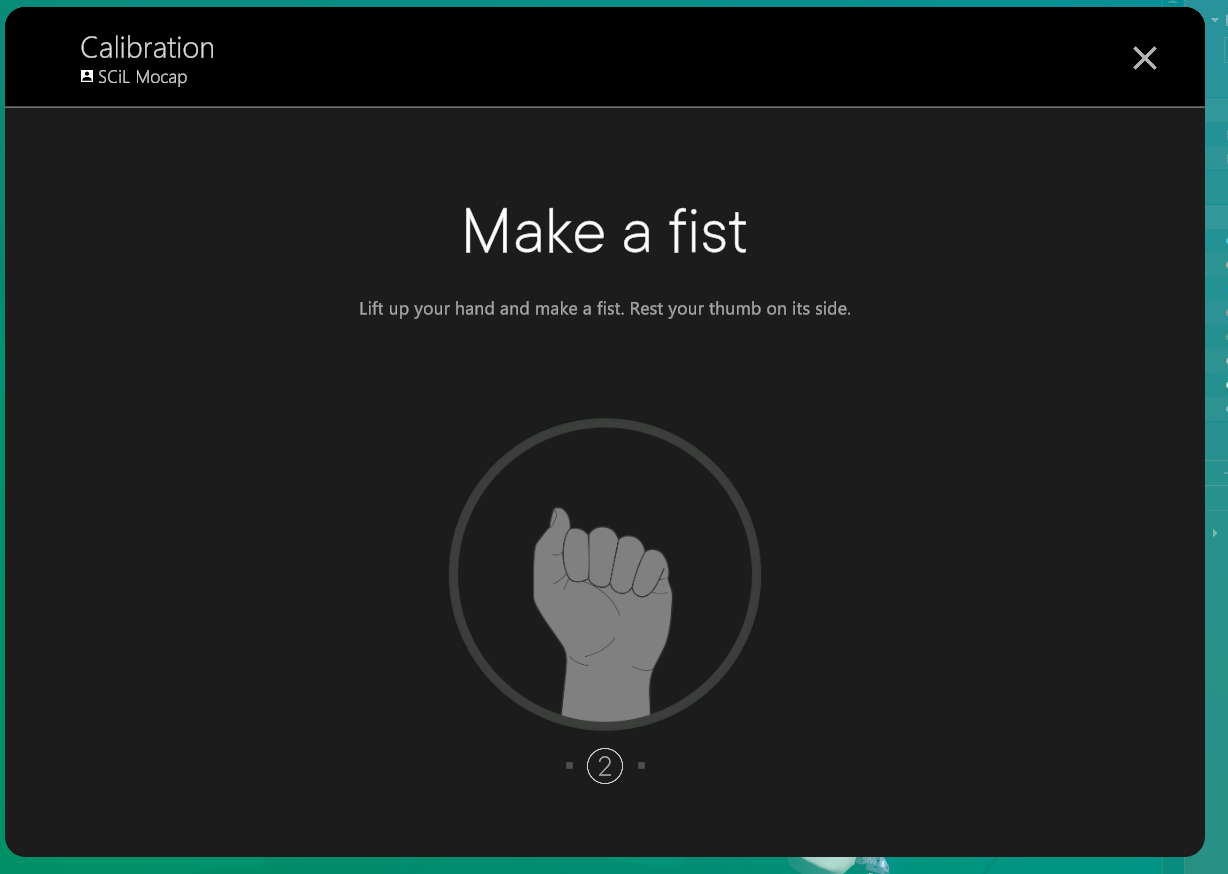
3. A prompt requesting confirmation to begin the process will appear. Instruct the actor to prepare their hands and follow the on-screen directions.
Note: At the time of writing this guide, a third monitor, capable of being angled towards the actor in the studio, is located on the right-hand side of the desk. This monitor mirrors the second monitor, so displaying the Manus software on this screen is crucial for the actor to follow along.
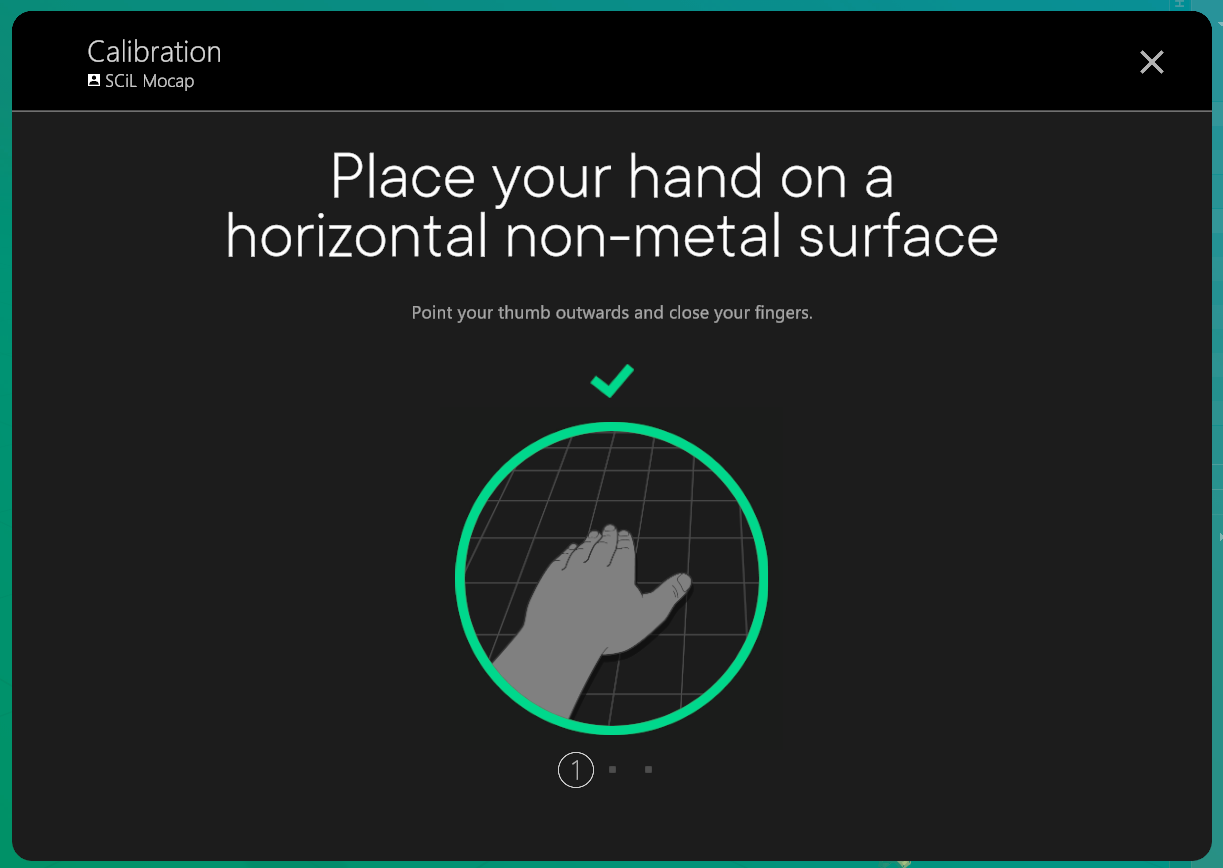
Upon completion of the calibration for each pose, a green checkmark should appear. If a red 'X' mark materializes with a message stating 'Calibration Failed', simply repeat the step. Should calibration for a specific pose persistently fail, consult the troubleshooting page for assistance.
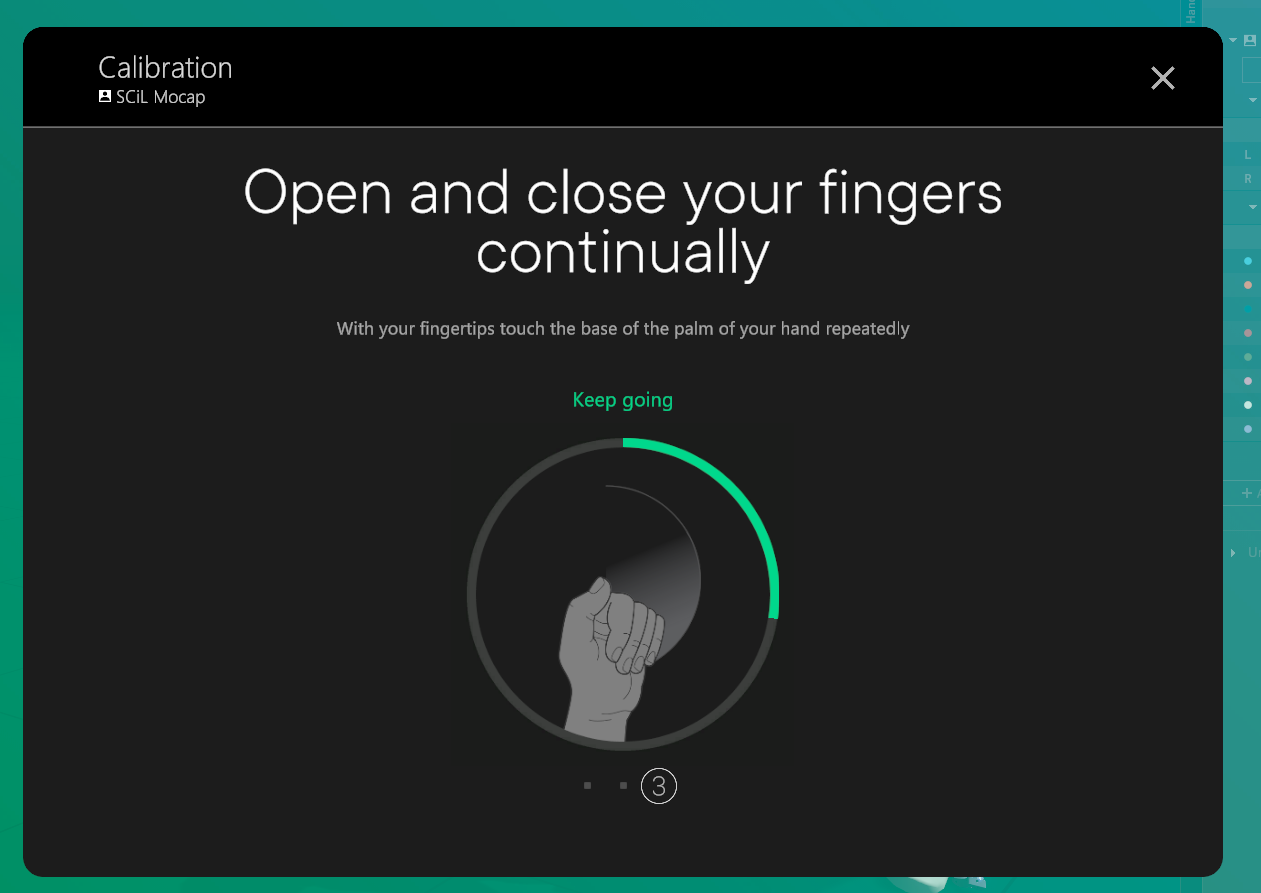
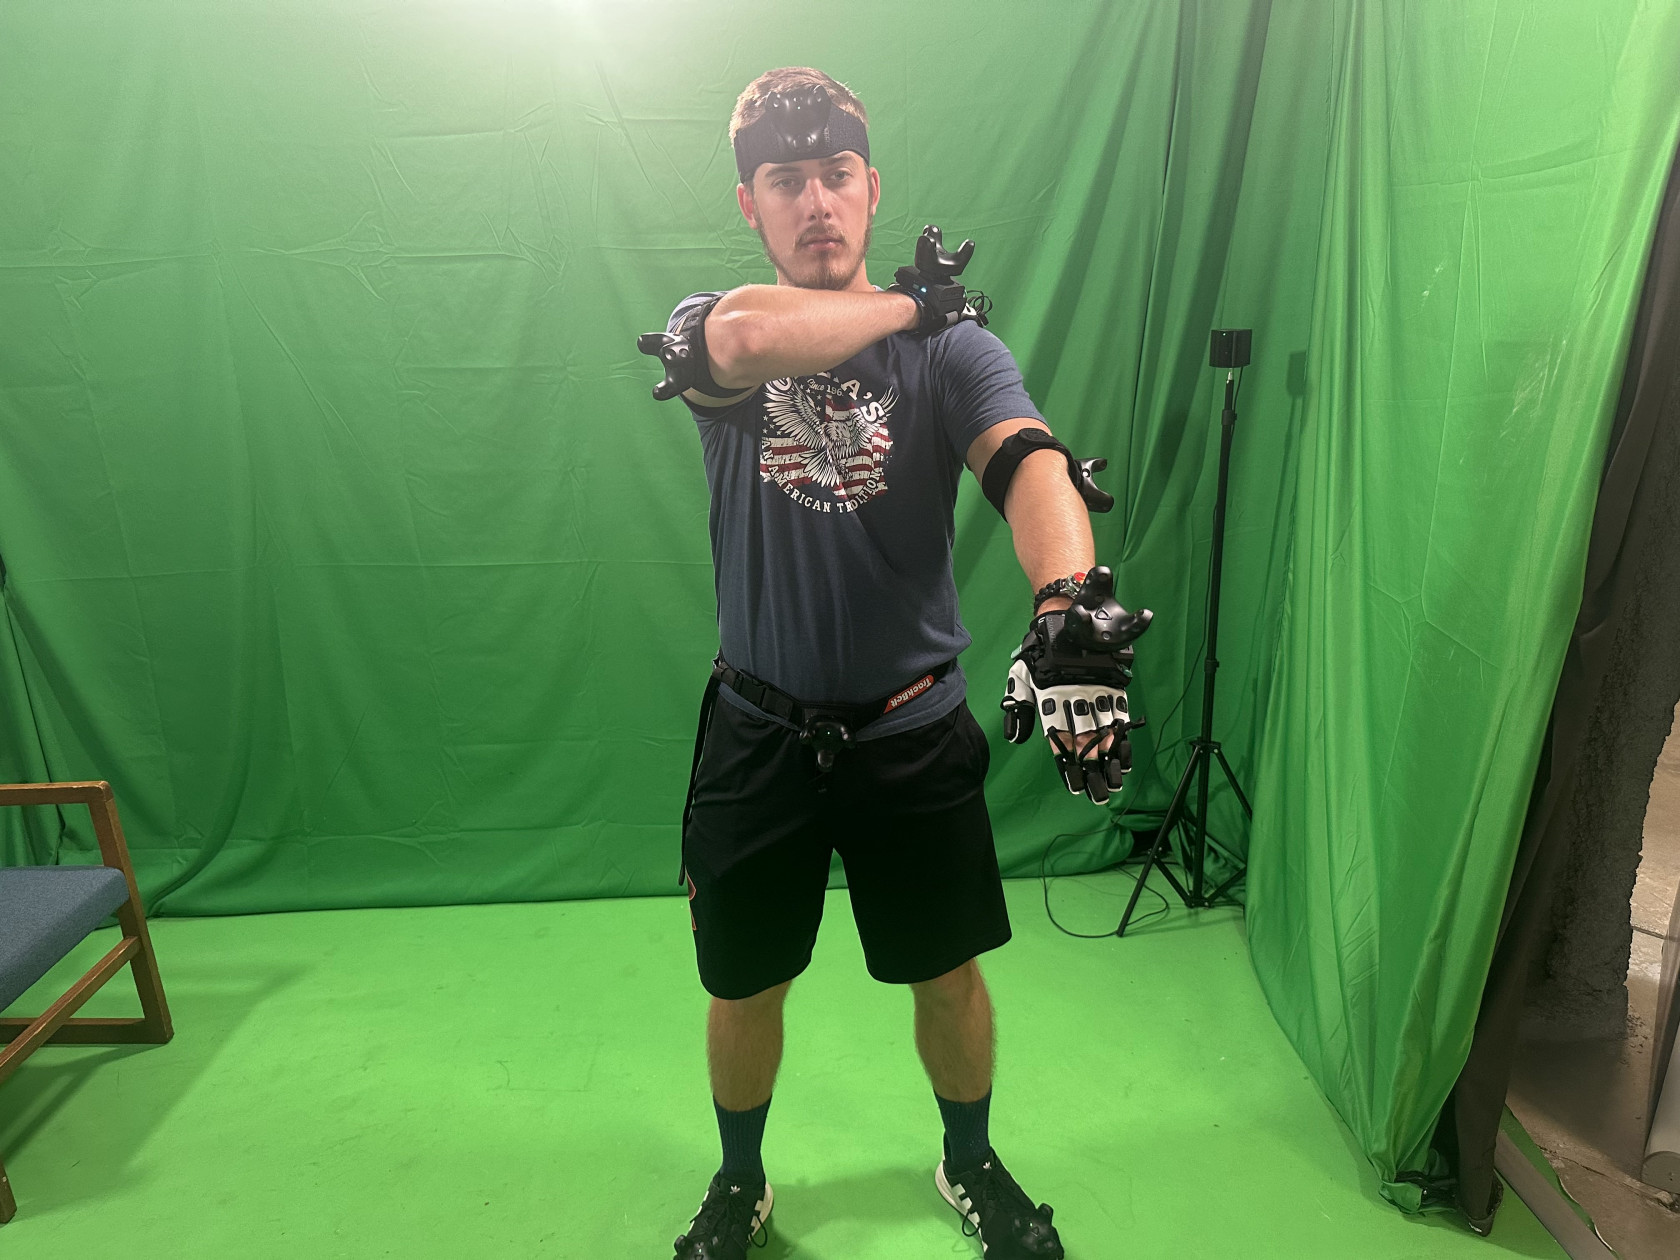
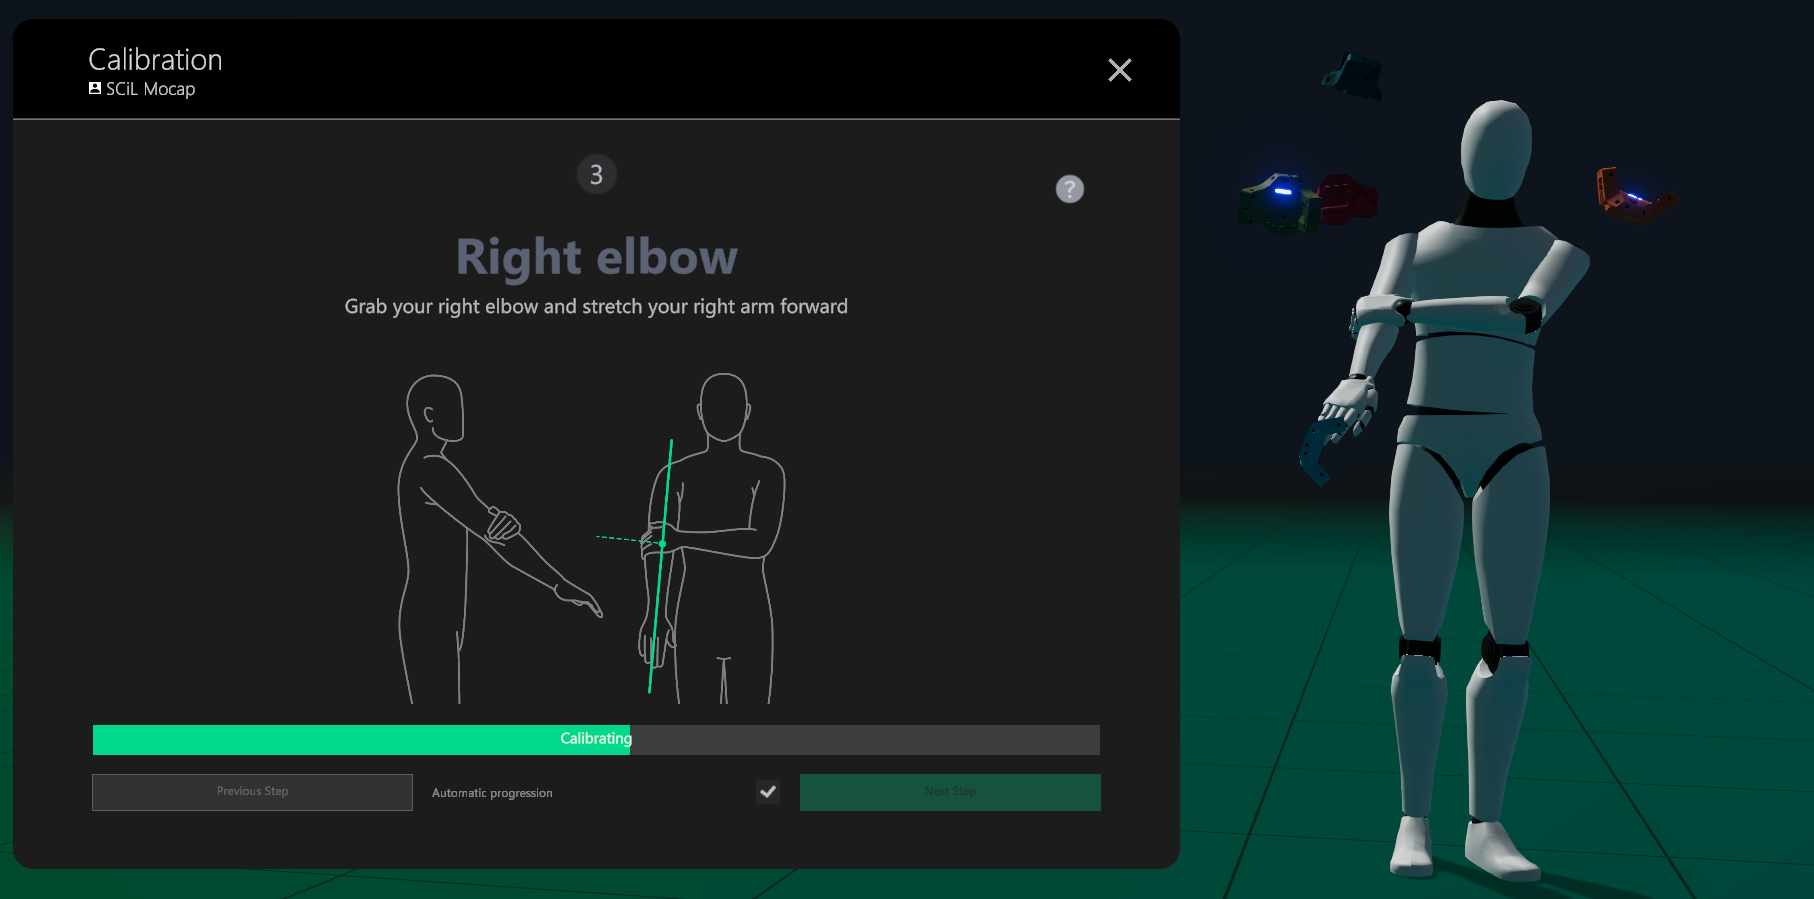
Continue with the calibration sequence, referring to the images on this page for guidance in assisting the actor. After calibrating the left hand, the process will transition to the right hand (the steps remain the same).


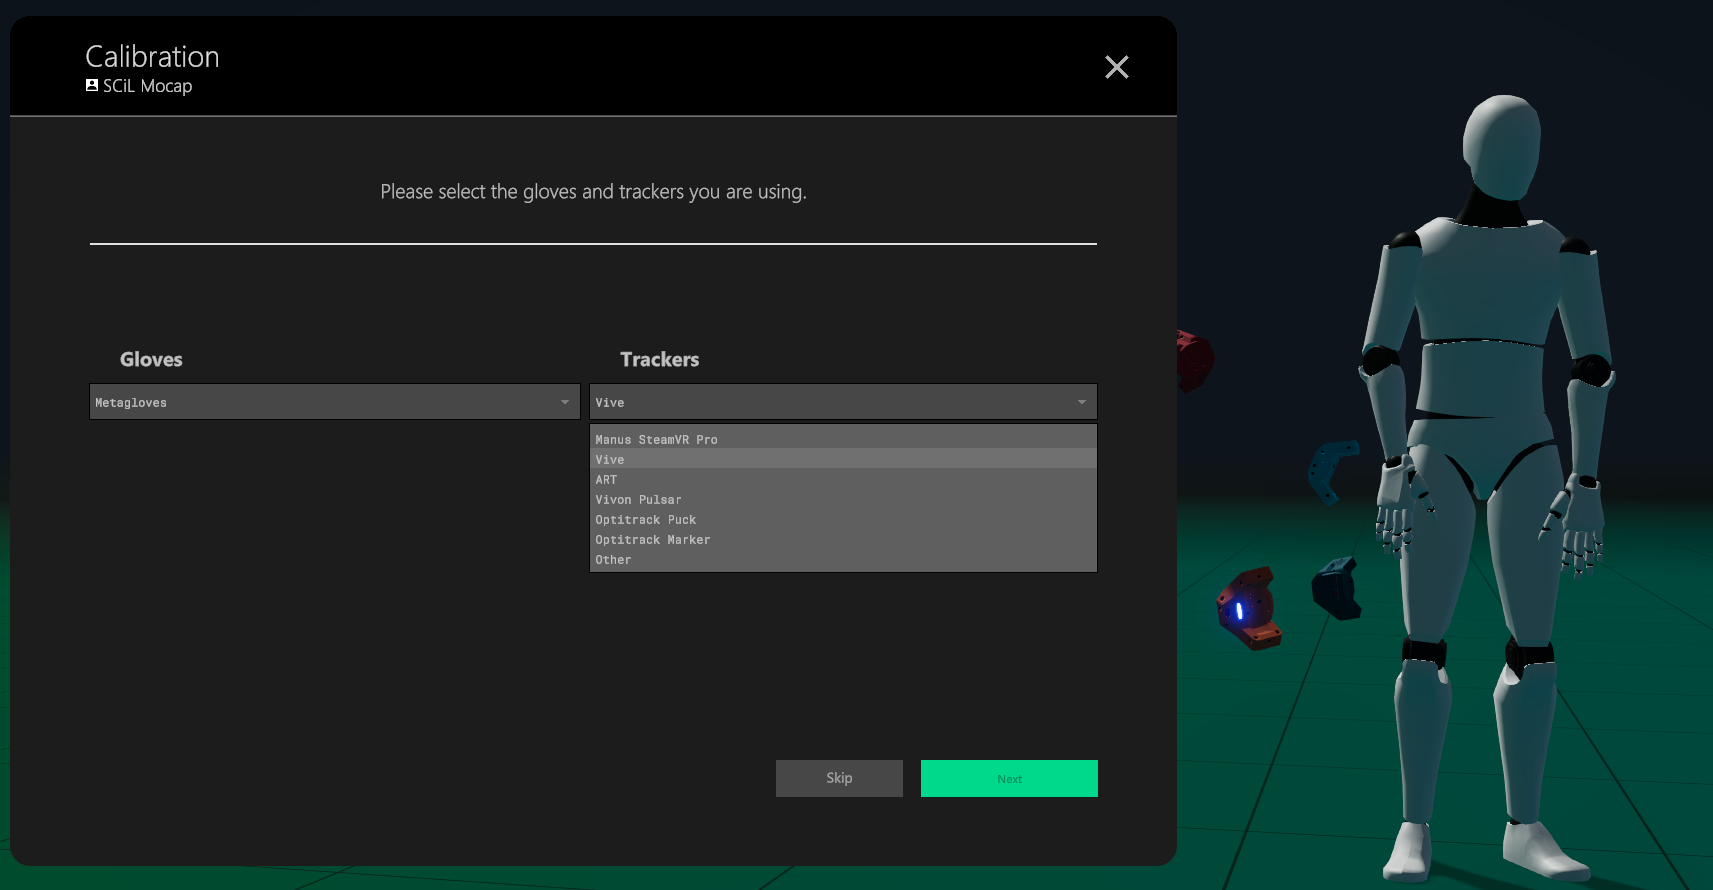
4. Once calibration for both hands is complete, the subsequent step involves calibrating the trackers. Select 'Trackers' from the calibration menu. Proceed by clicking 'Next' until you're asked to choose the gloves and trackers you're using.
For Gloves, select 'Metagloves', and for Trackers, choose 'Vive'. After making your selections, click 'Next' to continue.
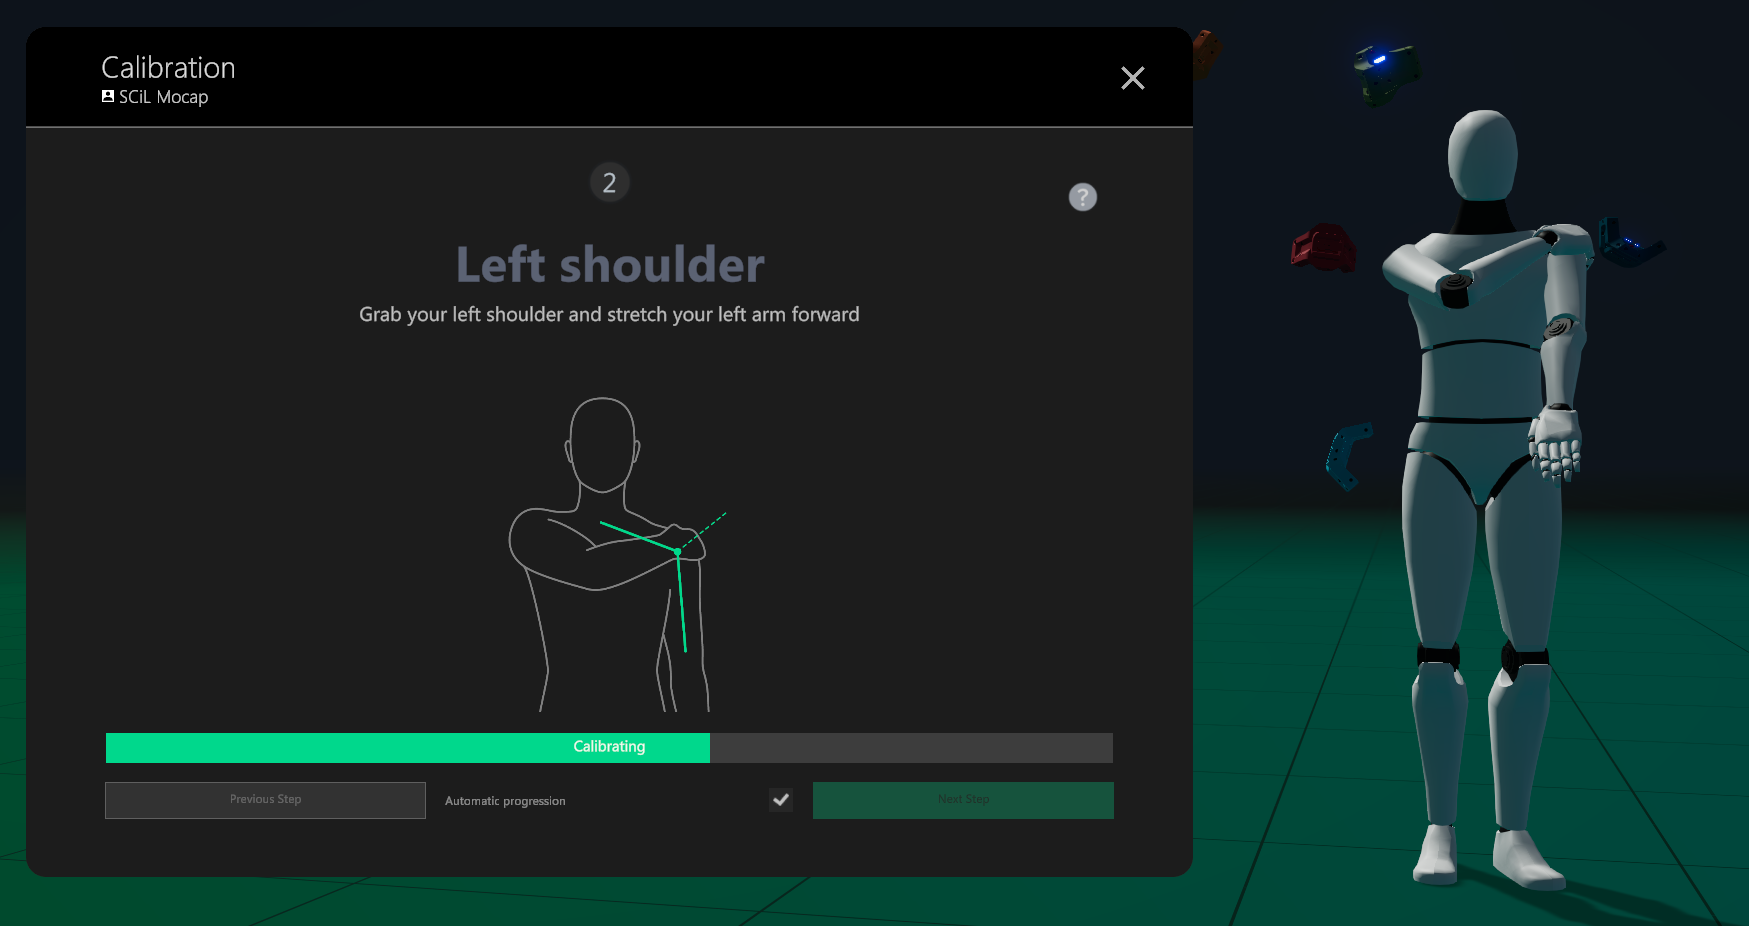
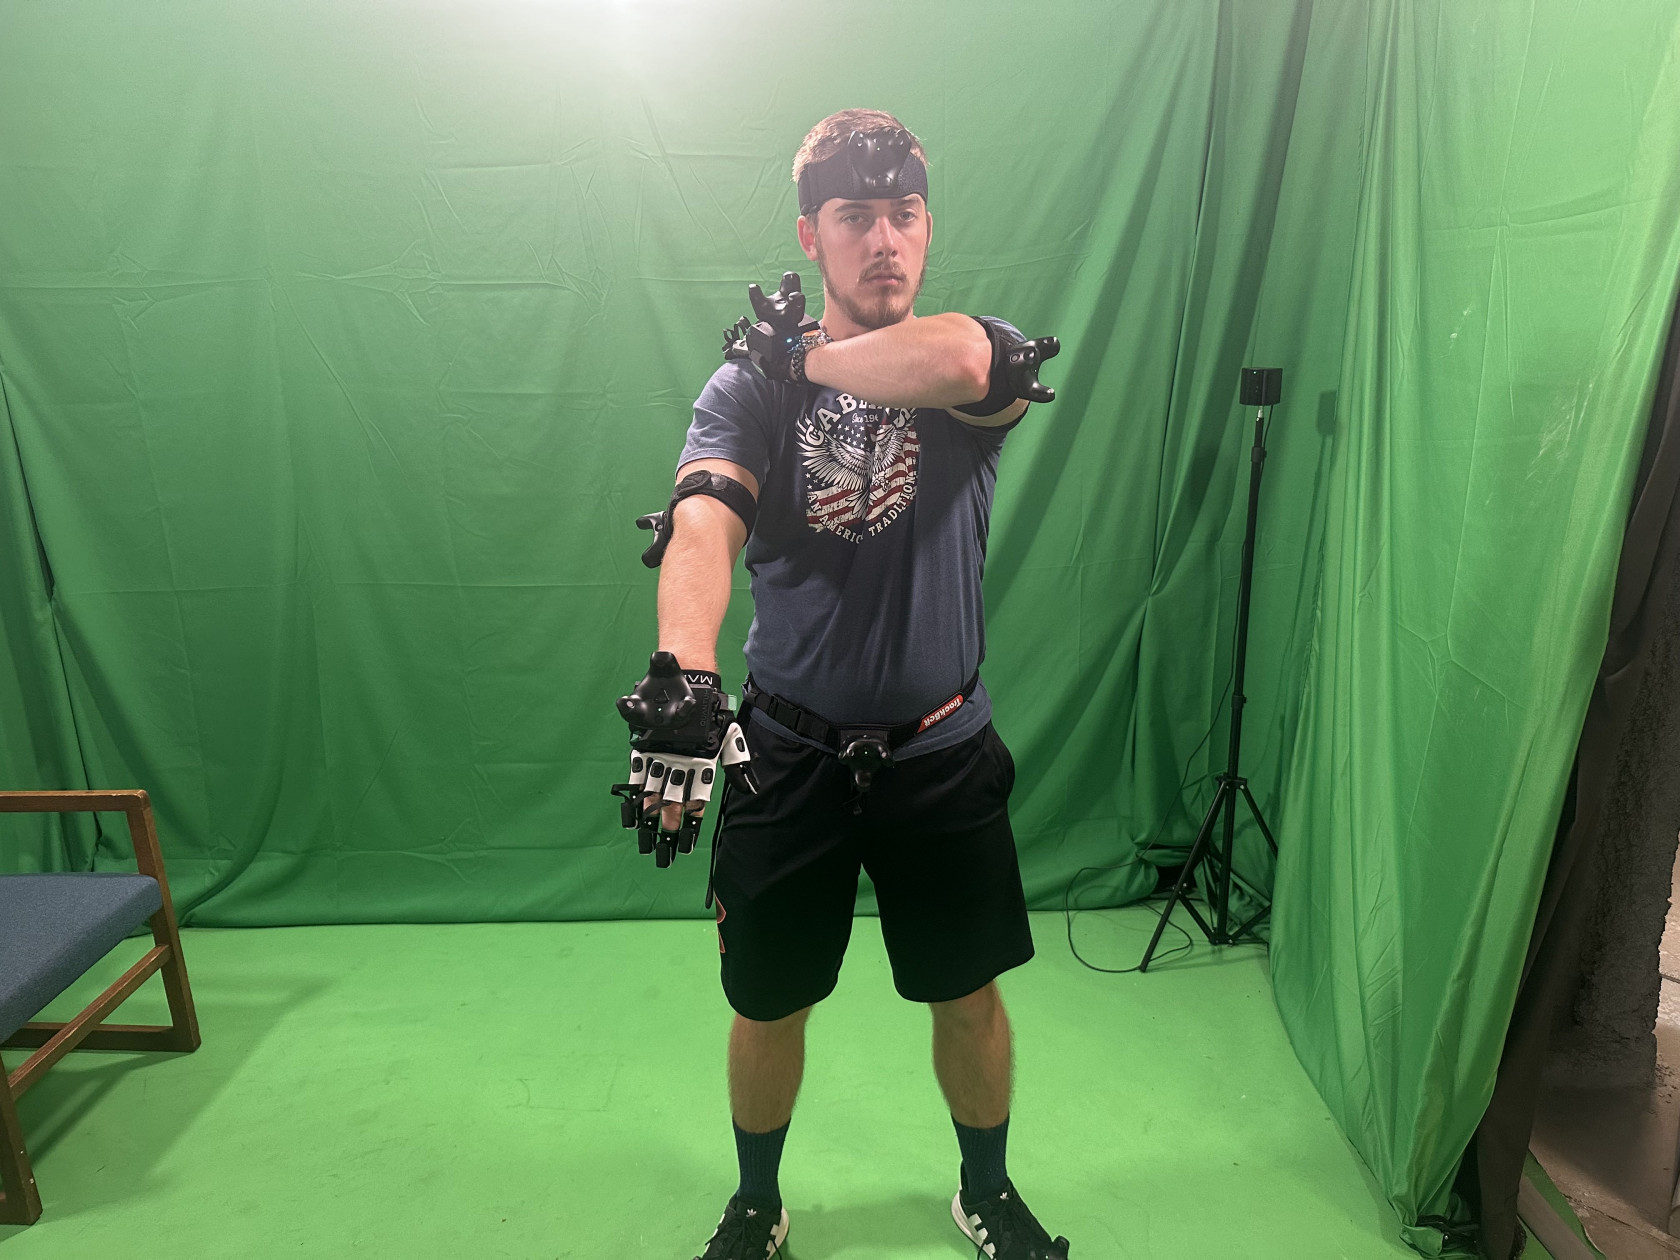
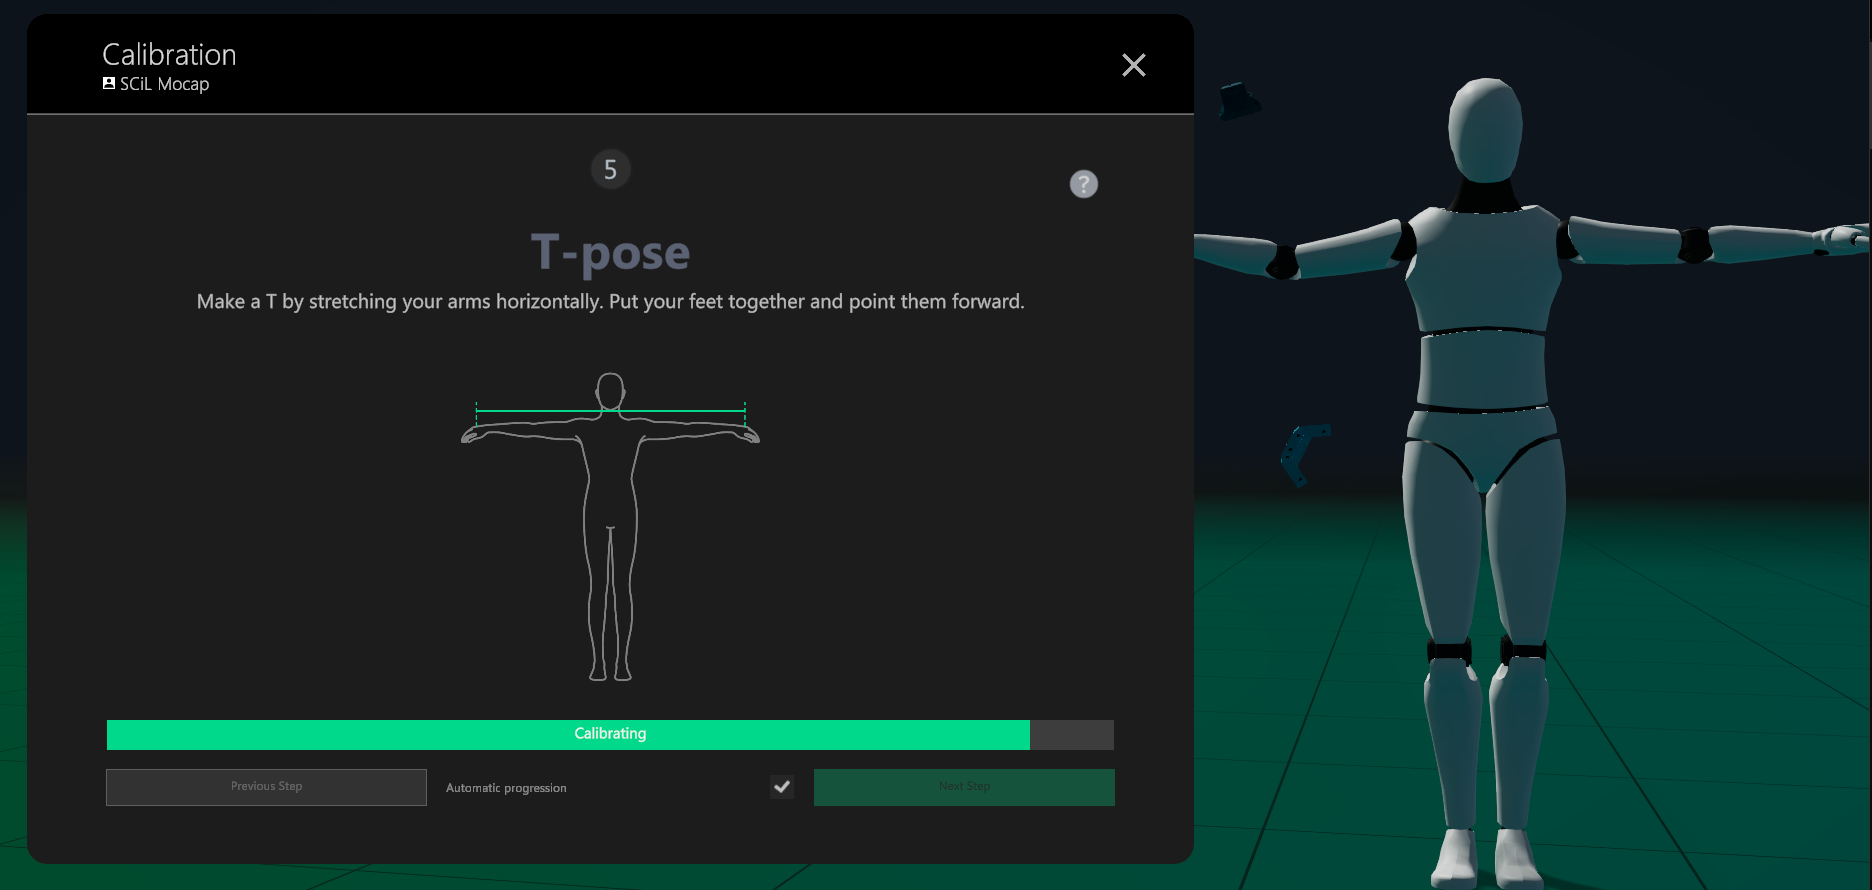
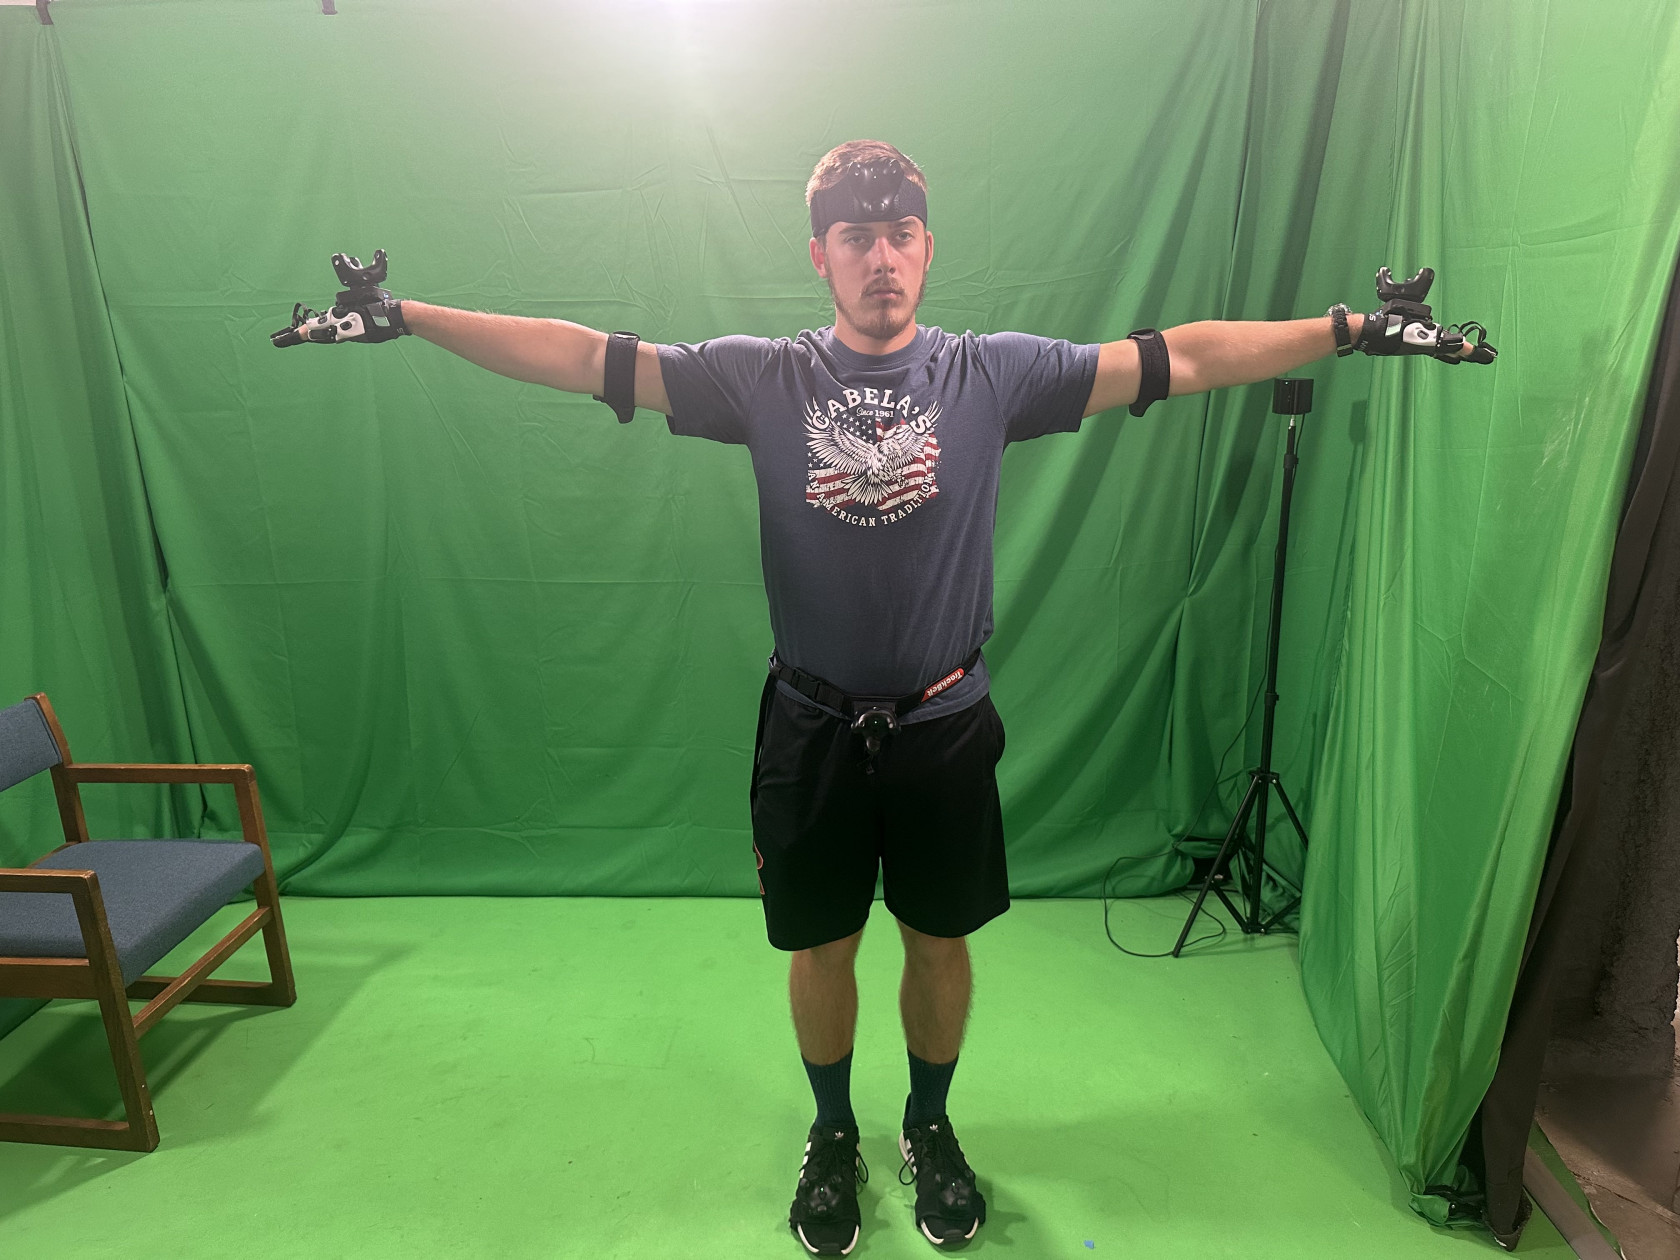
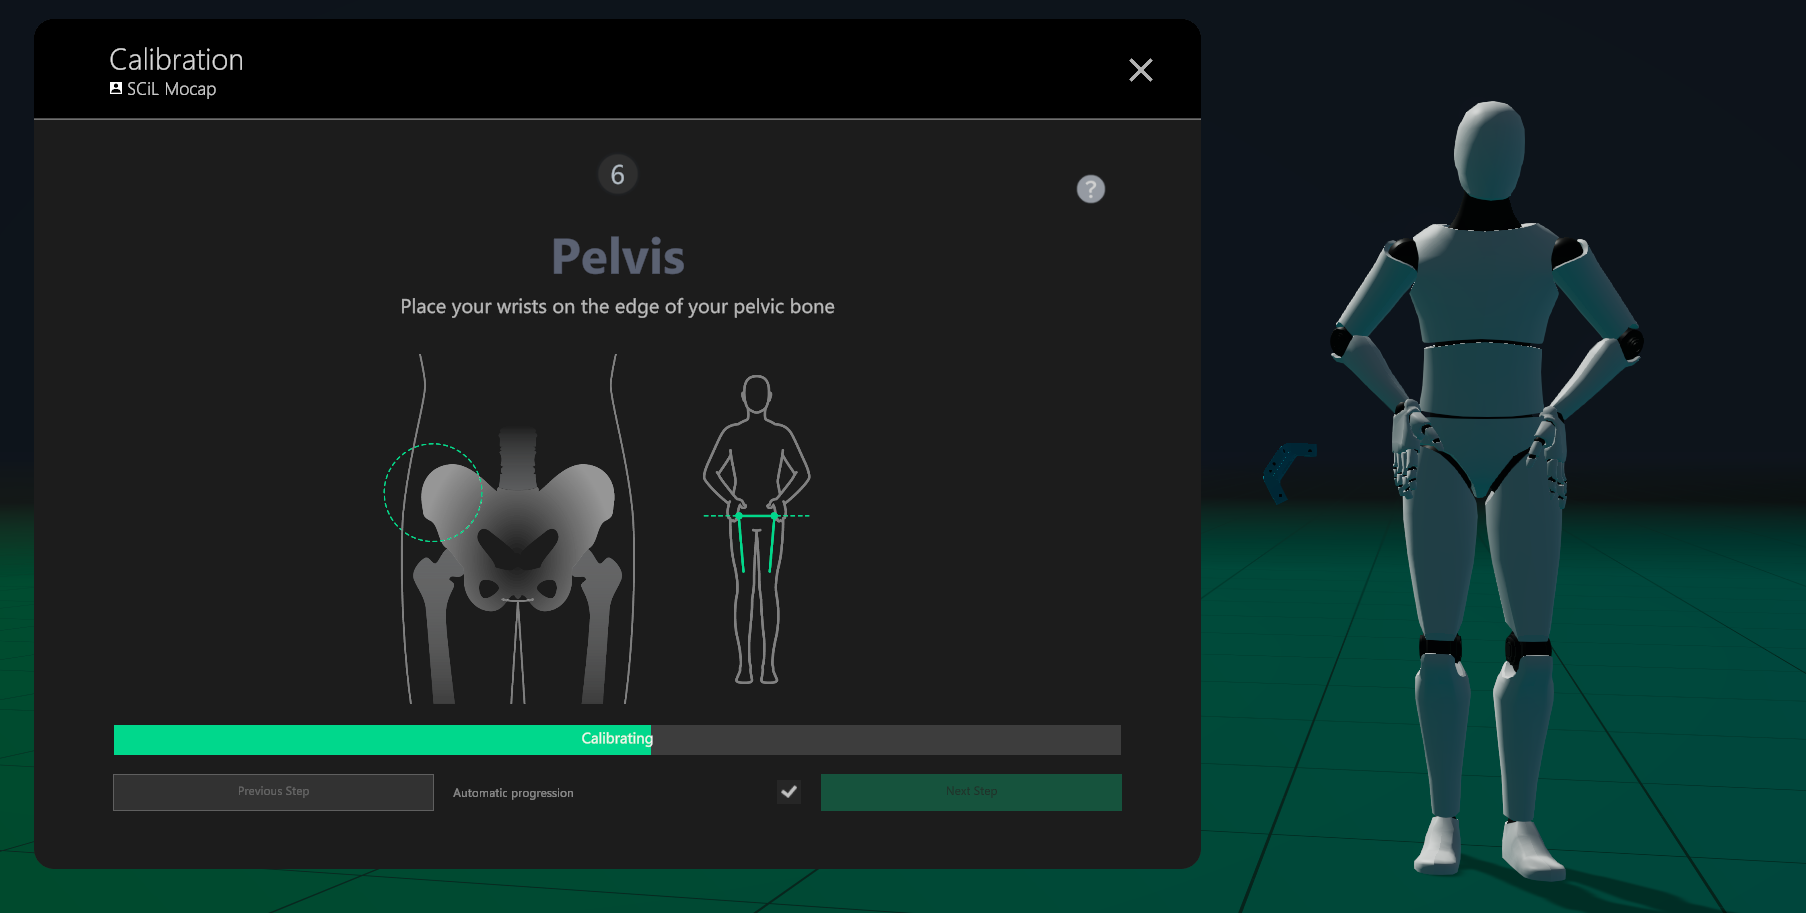
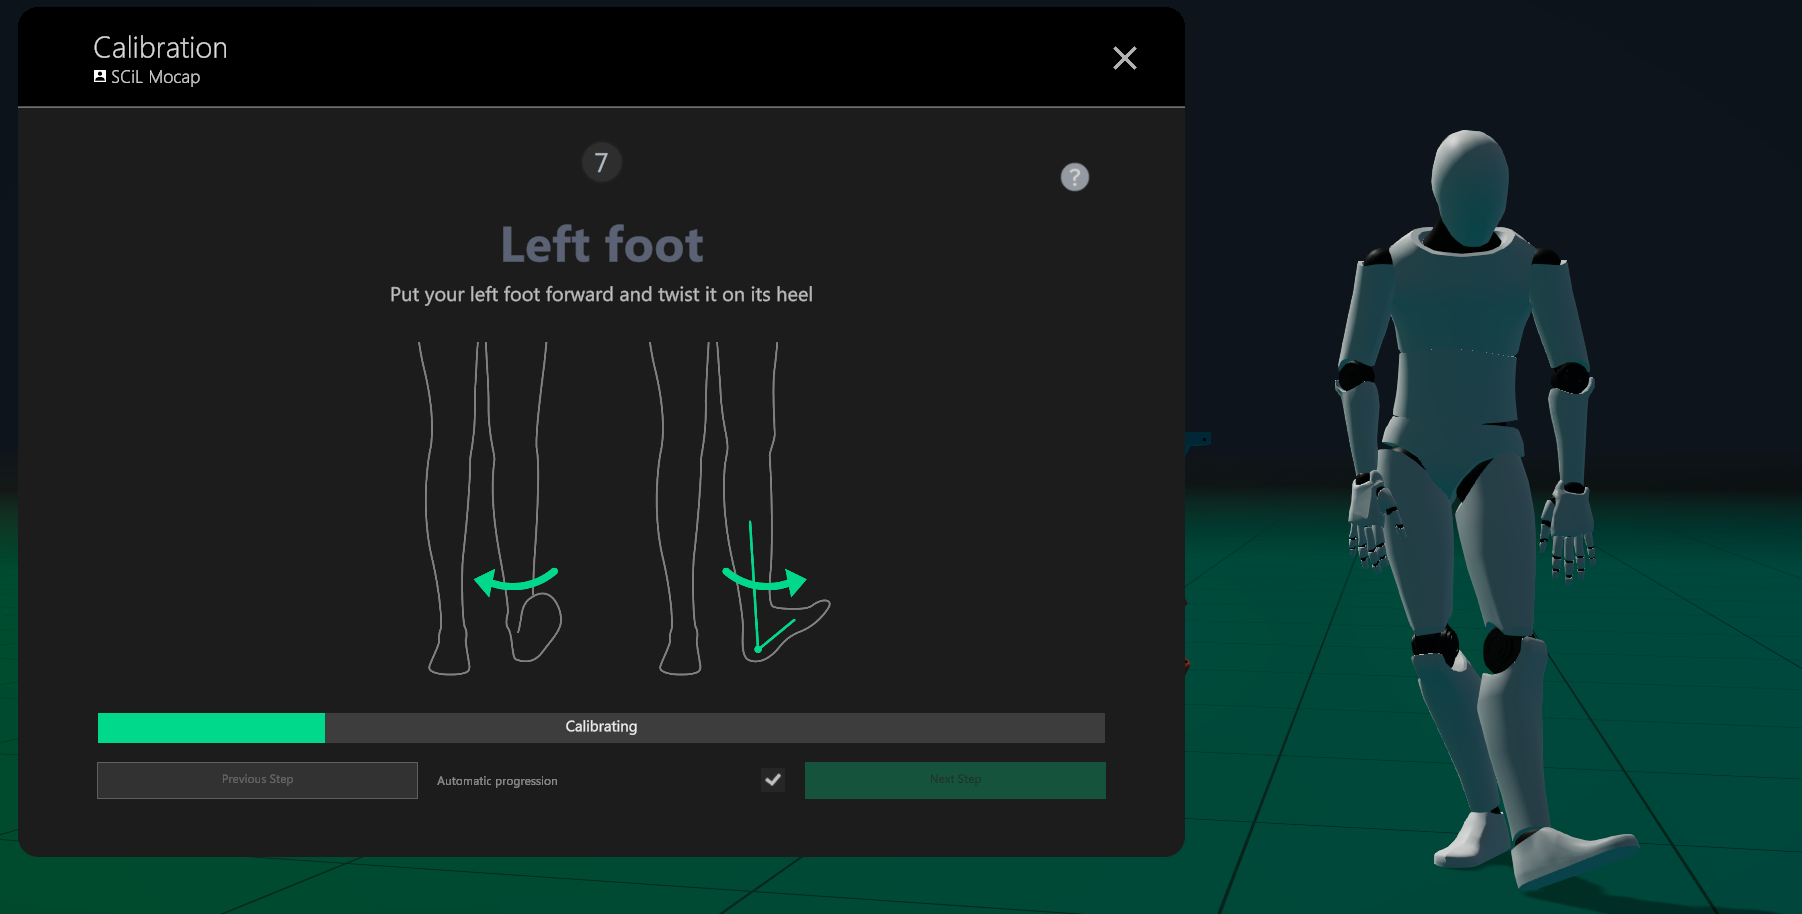
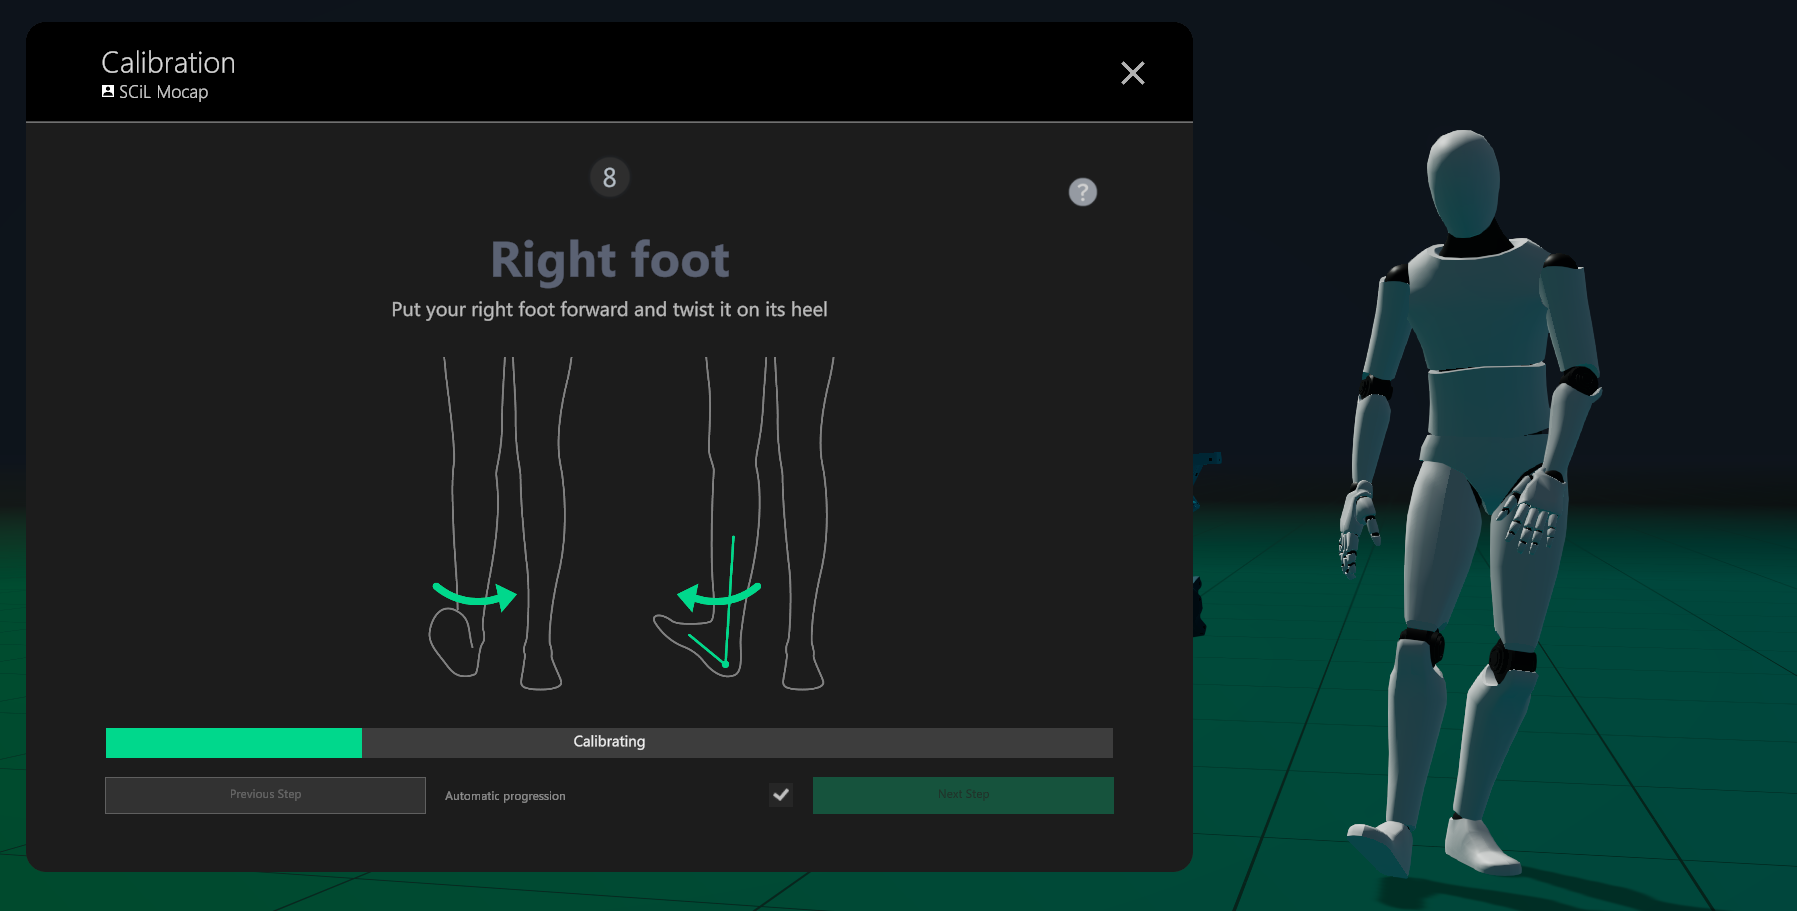
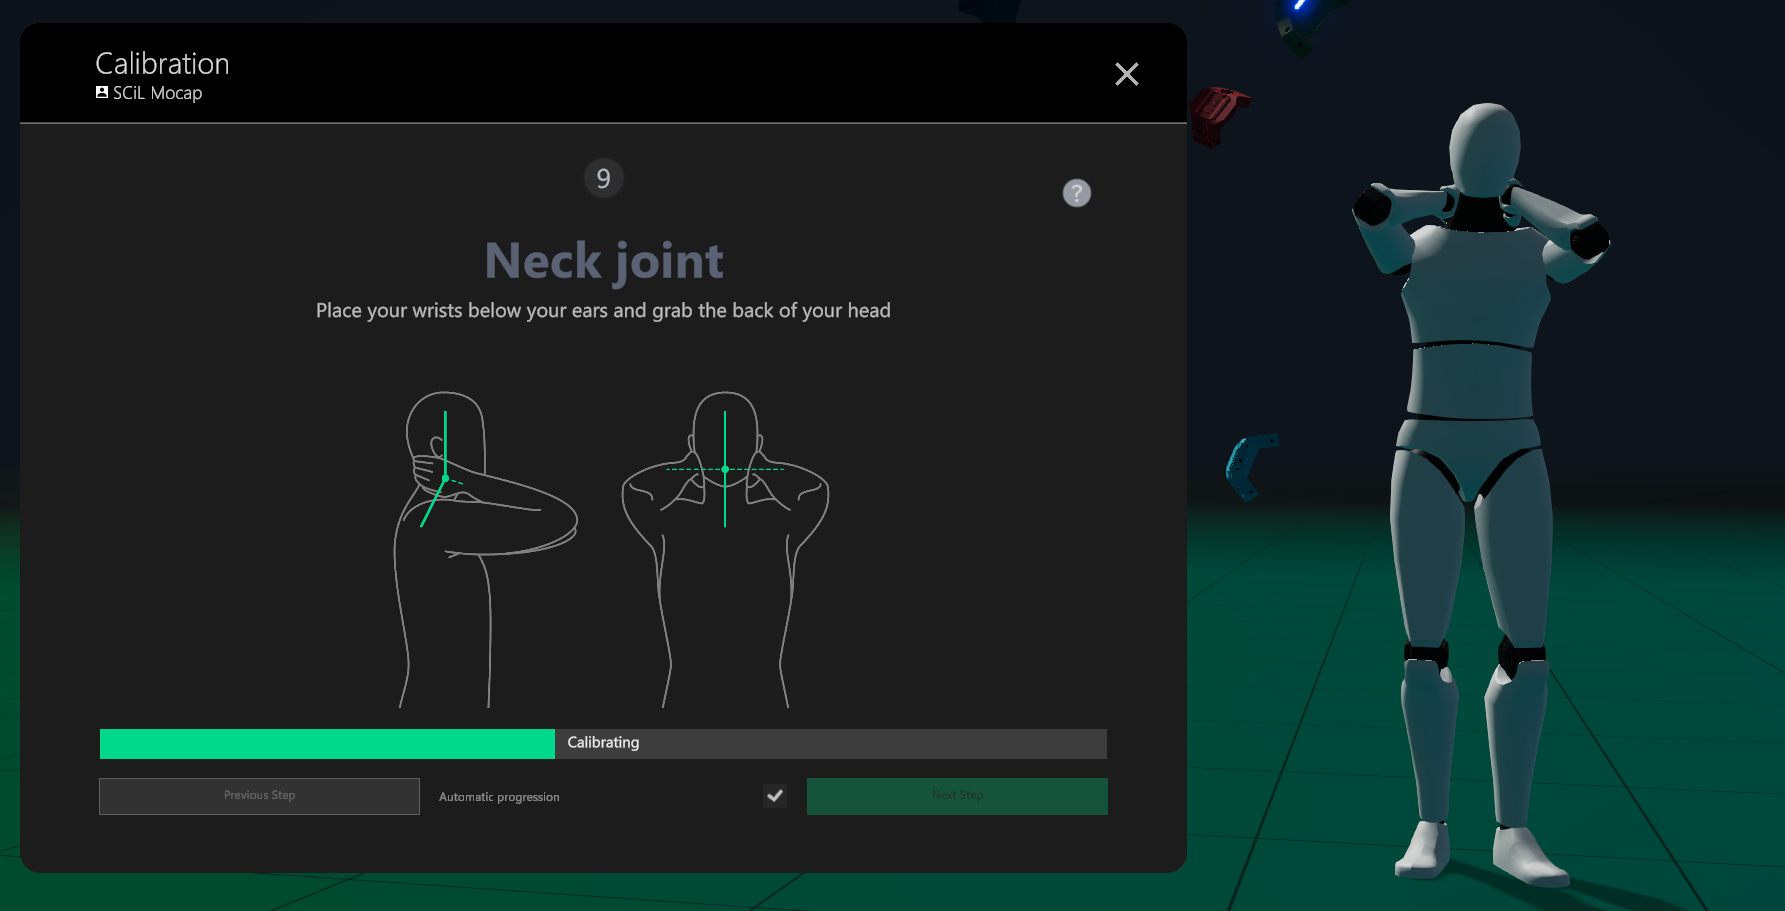
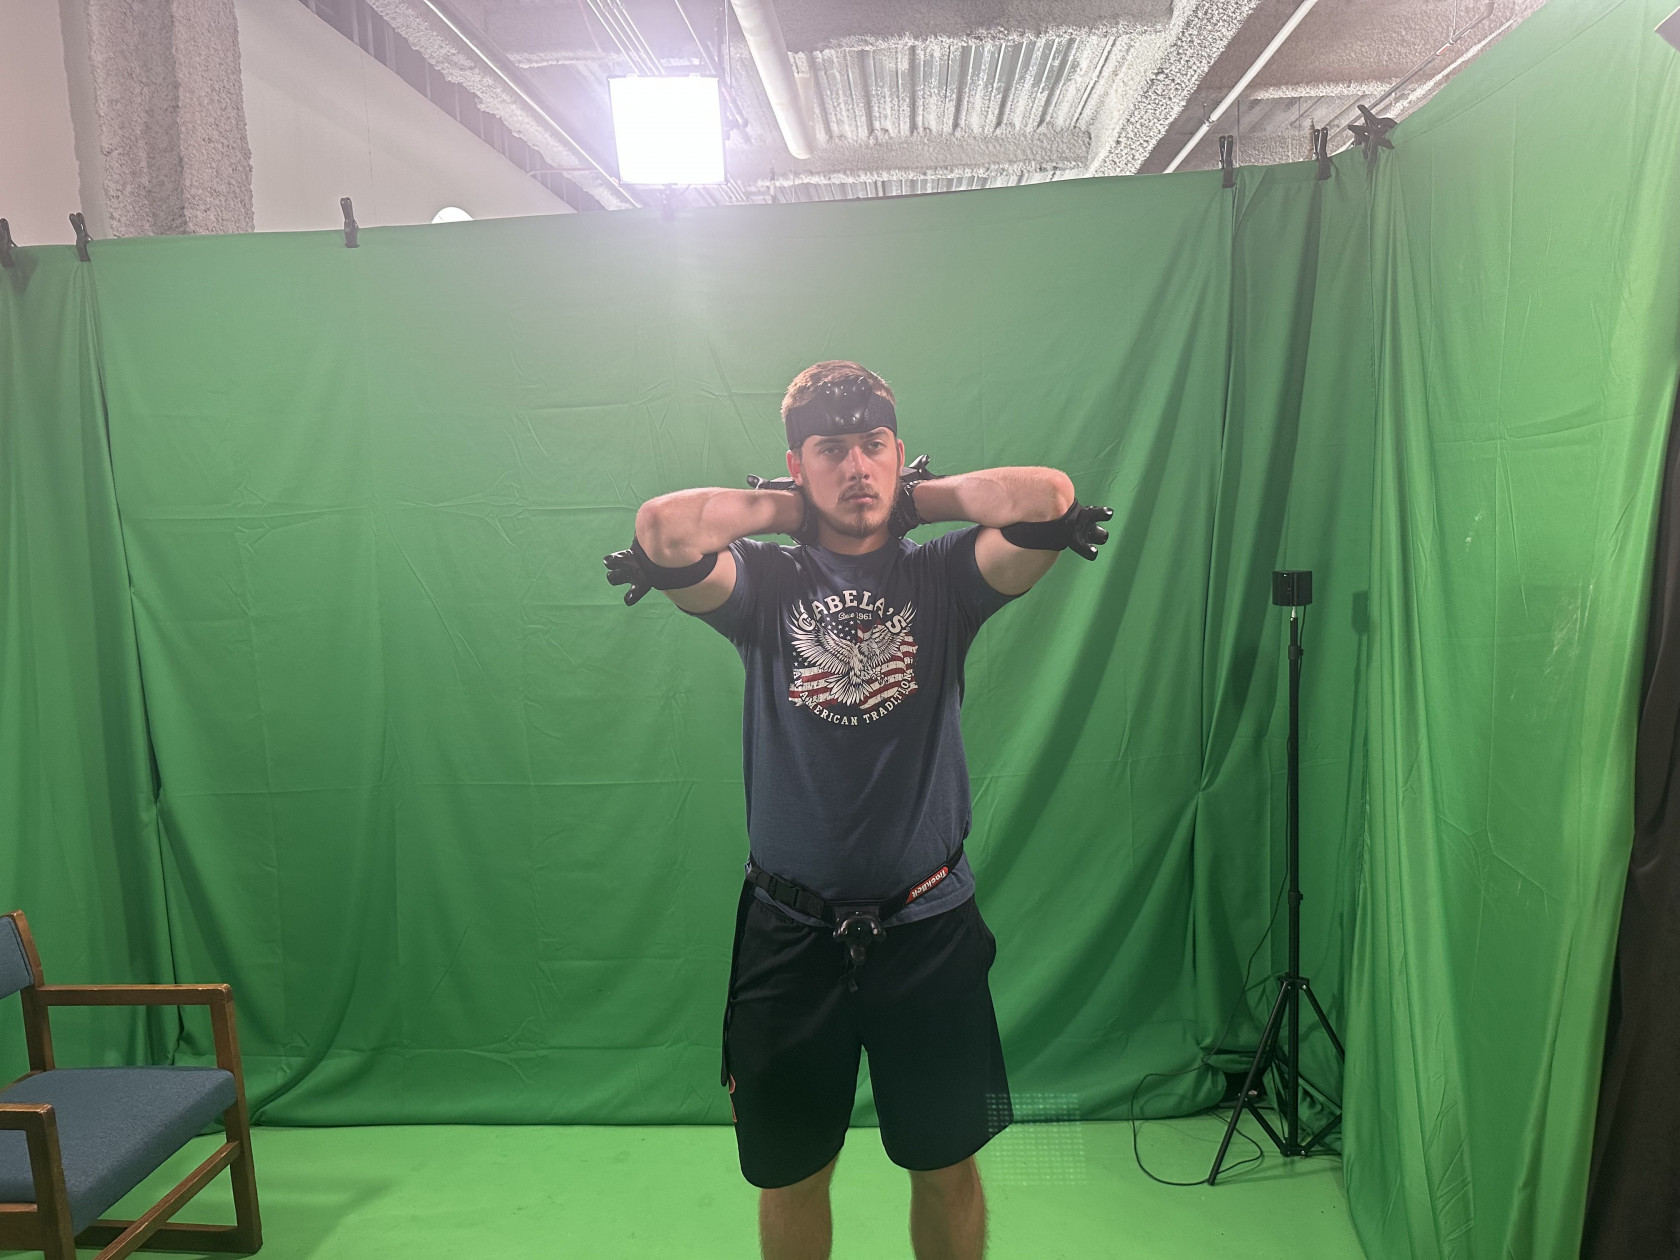
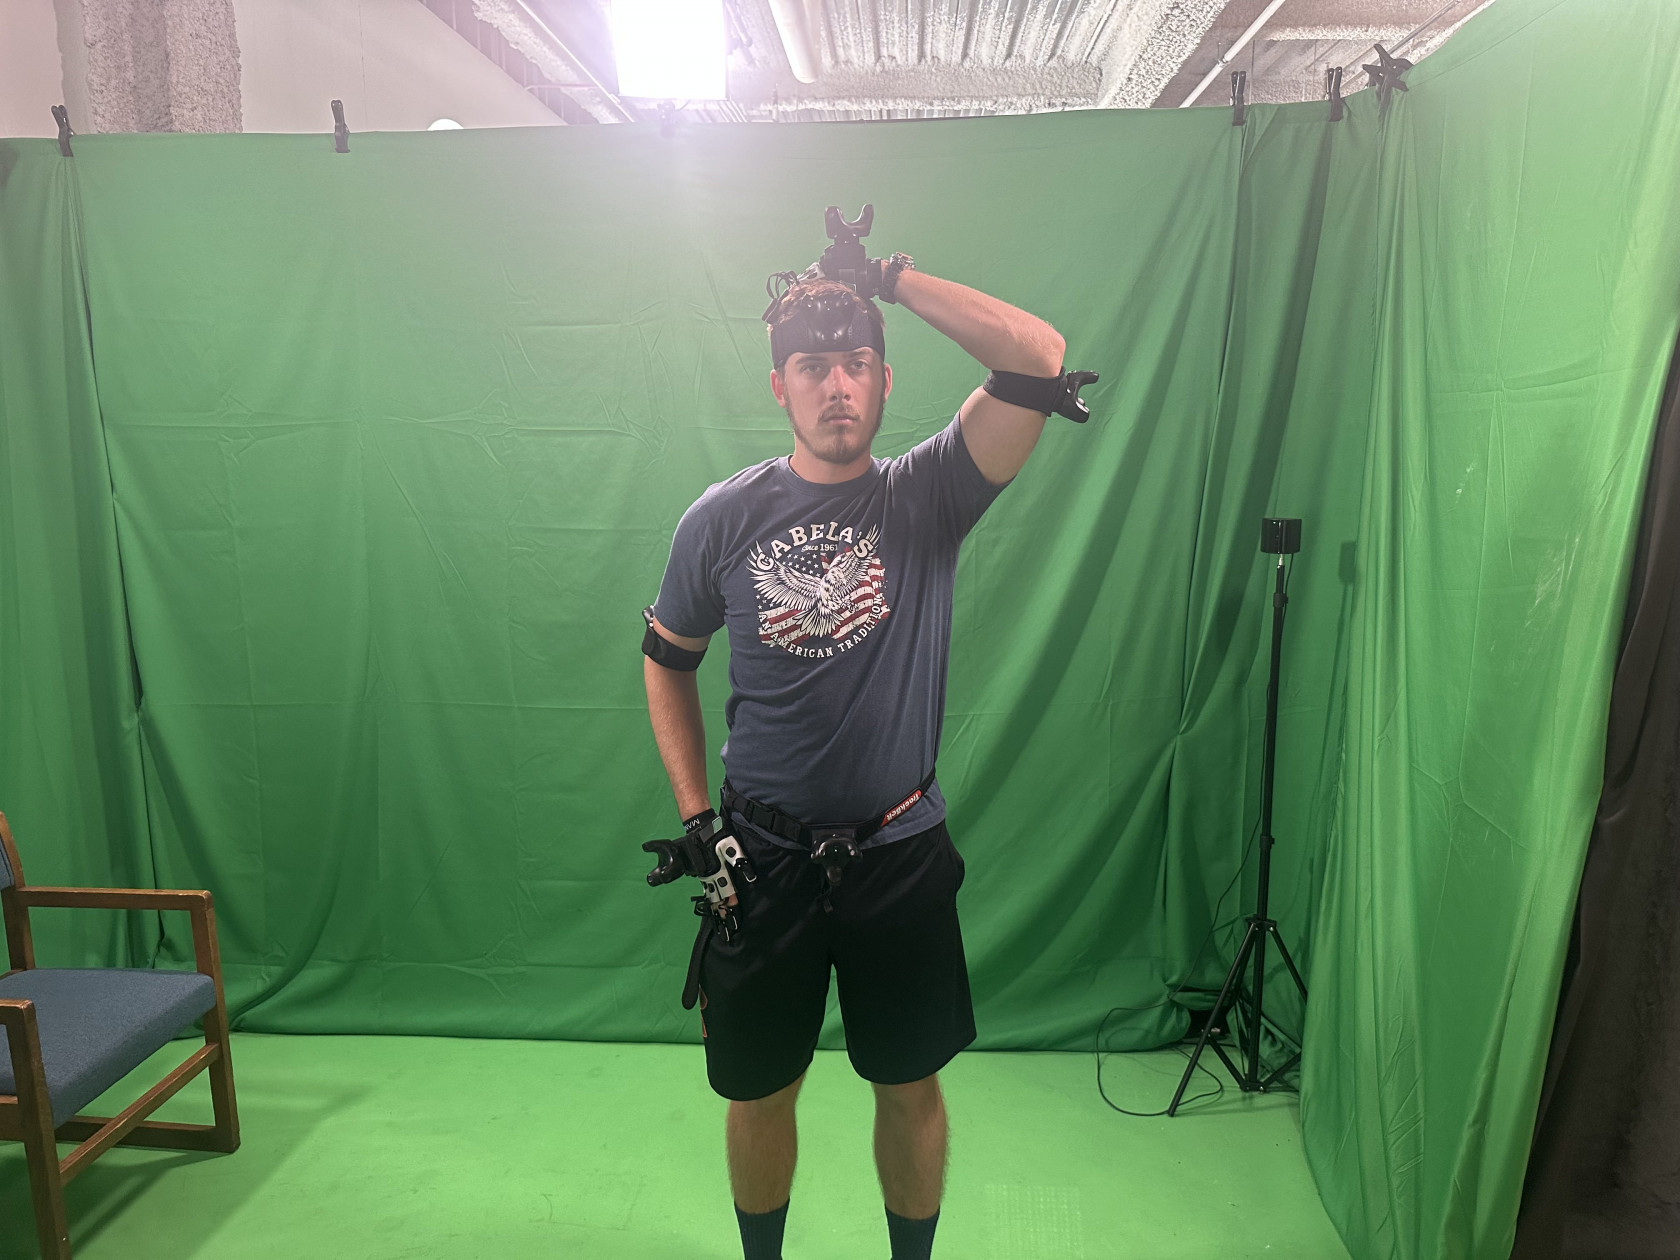
5. Again, the actor should be able to view the MANUS software via the third monitor and emulate the instructions provided by the 3D mesh character. You may enable automatic progression if it's comfortable, but first-time calibrators are advised to manually continue through the calibration to ensure the actor correctly follows the steps. The calibration process includes three review sections to verify proper tracking.
During the arm review section, you may notice a hand depicted upside down - disregard this as it will correct itself upon conclusion.
Note: If a calibration step fails, retry the step until successful. If continuous issues arise, consult the troubleshooting page for support.
Progress through the calibration sequence, using the images provided on this page to aid in guiding the actor.

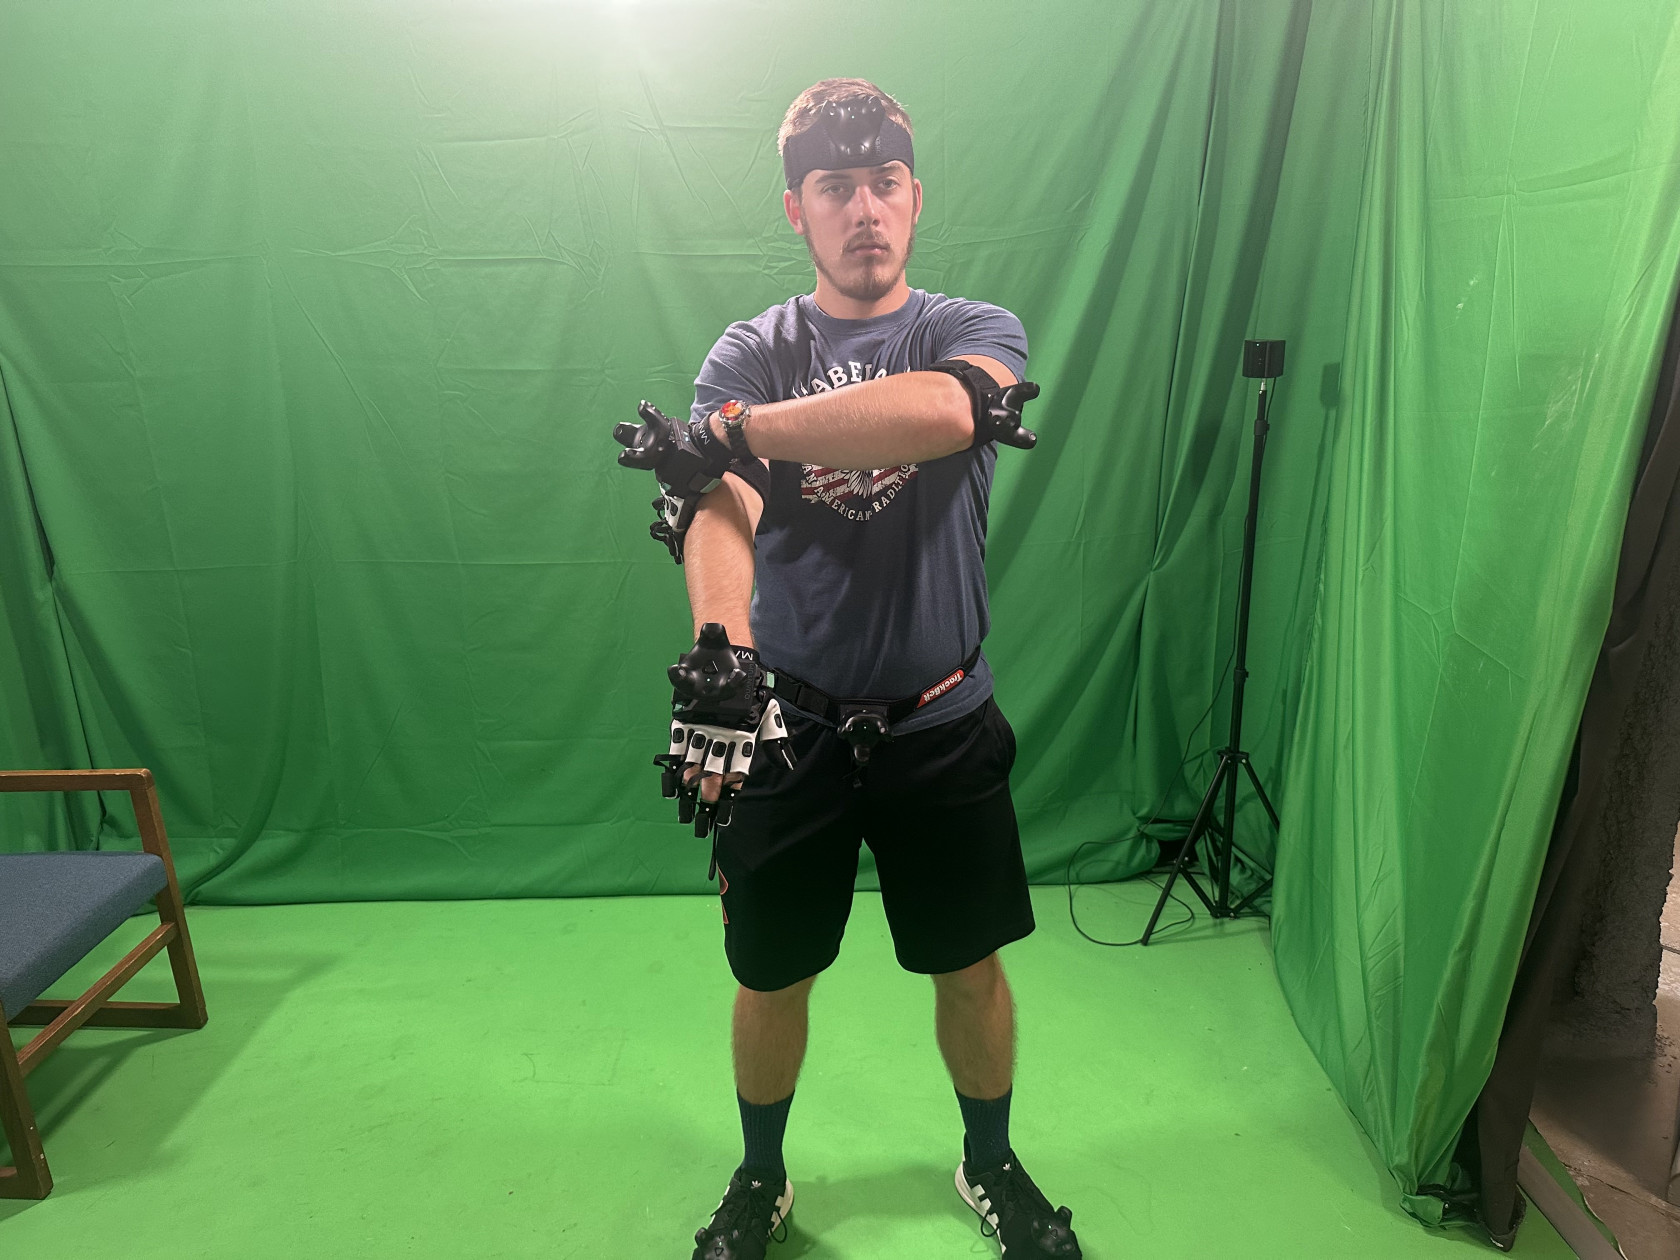
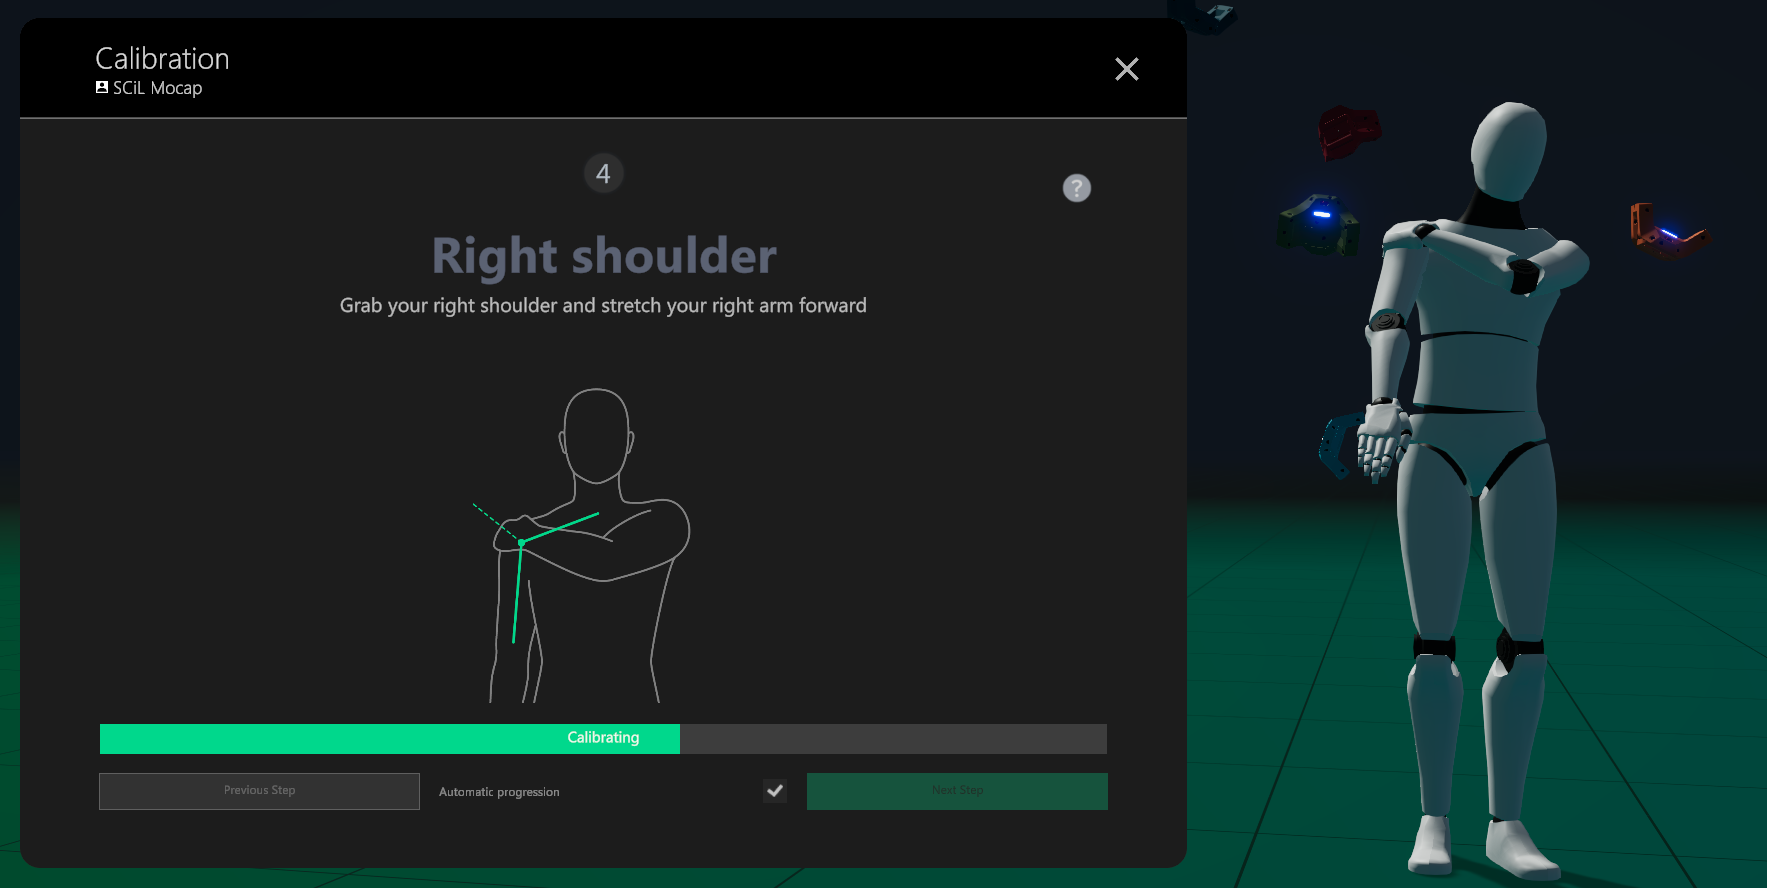

6. Upon completion, the fully calibrated mesh character will be responsive to the actor's movements. It's common that the actor requires fine-tuning, so navigate to the profile setting in the user tab to facilitate this.

7. Select the user's tab and then the profile settings. Scroll down until you see the 'Body Measurements' section. This area allows for the adjustment of measurements, with real-time visualization of the impact each change has on the actor's body mesh. While making adjustments, it's strongly recommended to have 'Scale to Skeleton' checked in the settings tab. If unchecked, the model may display visual glitches when the arms are in close proximity.
Tip: When adjusting the measurements, start from the hips and work your way up and down the actor's body, as the hips serve as the foundational point for the rest of the measurements.
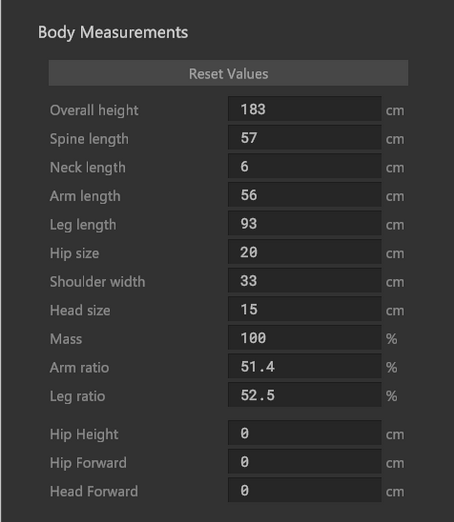
8. Once satisfied with the measurements click on Apply& Close under the Body Measurements section. Then refer to the MANUS Core Recording page for guidance on recording performances.
Troubleshooting
Helpful Links:
MANUS Knowledge Center: https://www.manus-meta.com/resources/knowledge-center-quantum-metagloves
How to pair/troubleshoot VIVE trackers: https://www.vive.com/us/support/tracker3/category_howto/pairing-vive-tracker.html
Troubleshooting MANUS Gloves Pairing Issues:
Should you encounter difficulties with the pairing of the MANUS Quantum Metagloves, please follow the steps outlined below:
- Locate the MANUS glove Bluetooth emitter plugged into the computer's back.
- Detach the USB device, wait for a duration of five seconds, and then reinsert it into the computer.
- Reactivate the gloves by moving the on/off switch completely to the right, past the 'On' indication, to the Wi-Fi symbol. This action will prompt the gloves to reenter the pairing mode
This should ideally resolve the issue and allow for the successful connection of the gloves with the software.
Body Tracker Calibration issues:
If you are encountering calibration issues, particularly concerning the shoulders or arms, it is recommended to attempt the following troubleshooting steps:
- Recalibration: Start with recalibrating the system once again.
- Software Restart: If the issues persist, restarting the MANUS Core software can often resolve them. To do this, navigate to the bottom right of the Windows taskbar and click on 'Show Hidden Icons' (represented by an upward-pointing caret '^' next to the Wi-Fi/internet icon). From there, find the MANUS Core application and click 'Restart'. This action will completely reboot the software.
Hardware Setup
VIVE Tracker Actor Setup
1. Activate the LED lights and VIVE lighthouses by locating and turning on the surge protector power strip positioned nearest to the window.
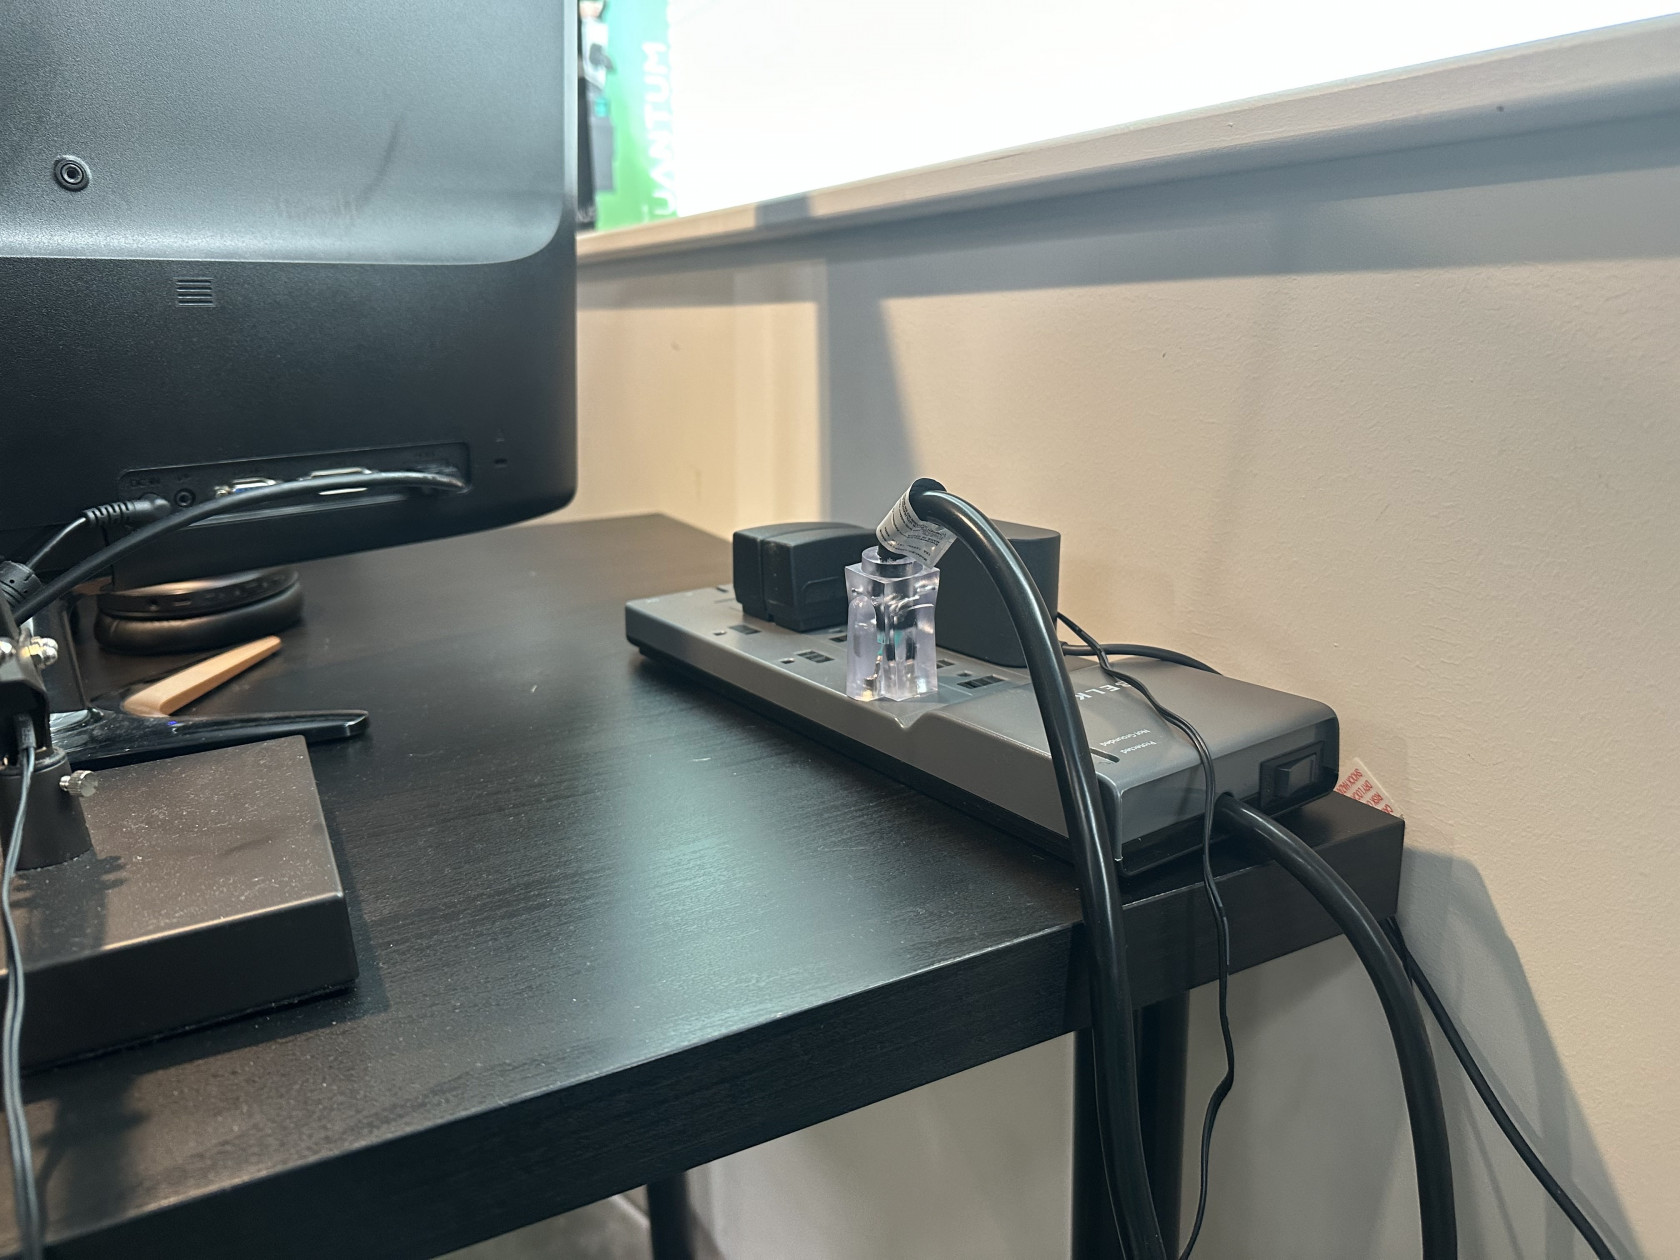
Before:

After:
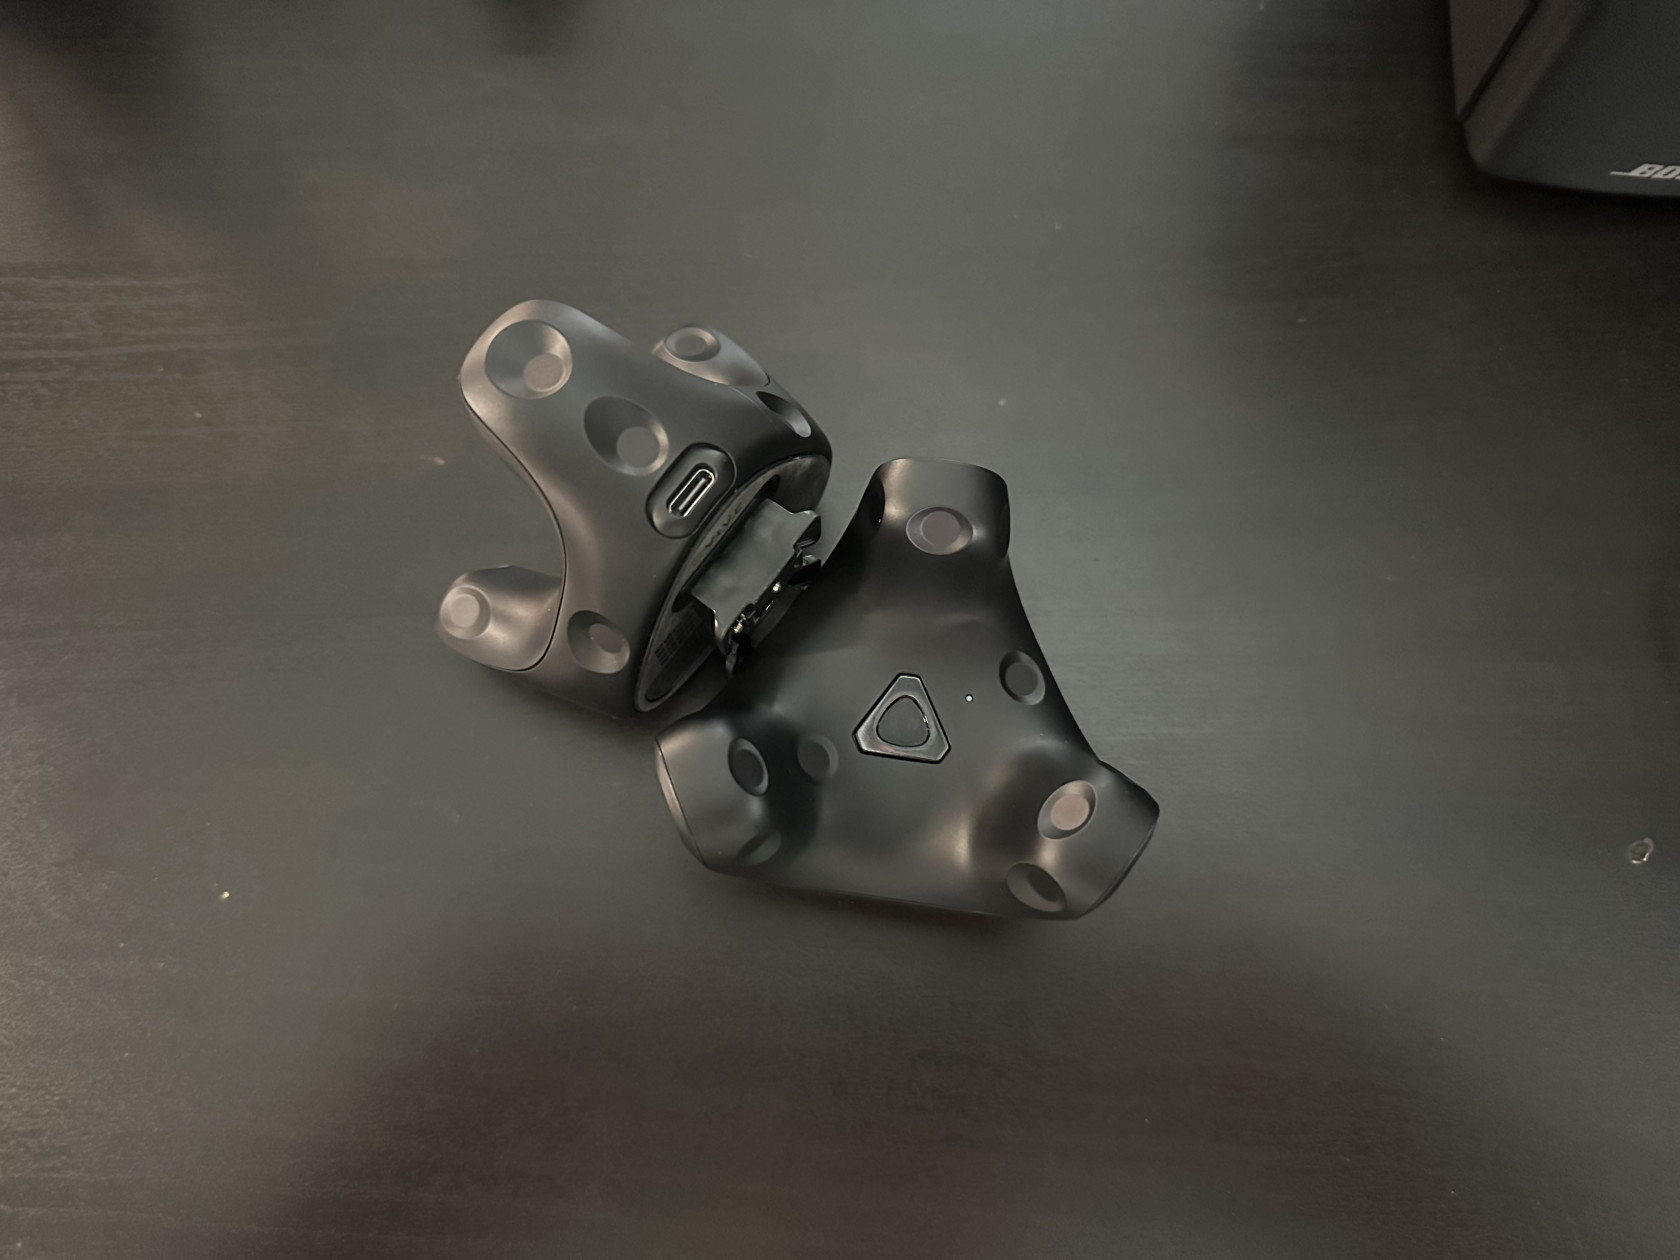
2. Identify the eight VIVE trackers situated in the charging station beneath the table.
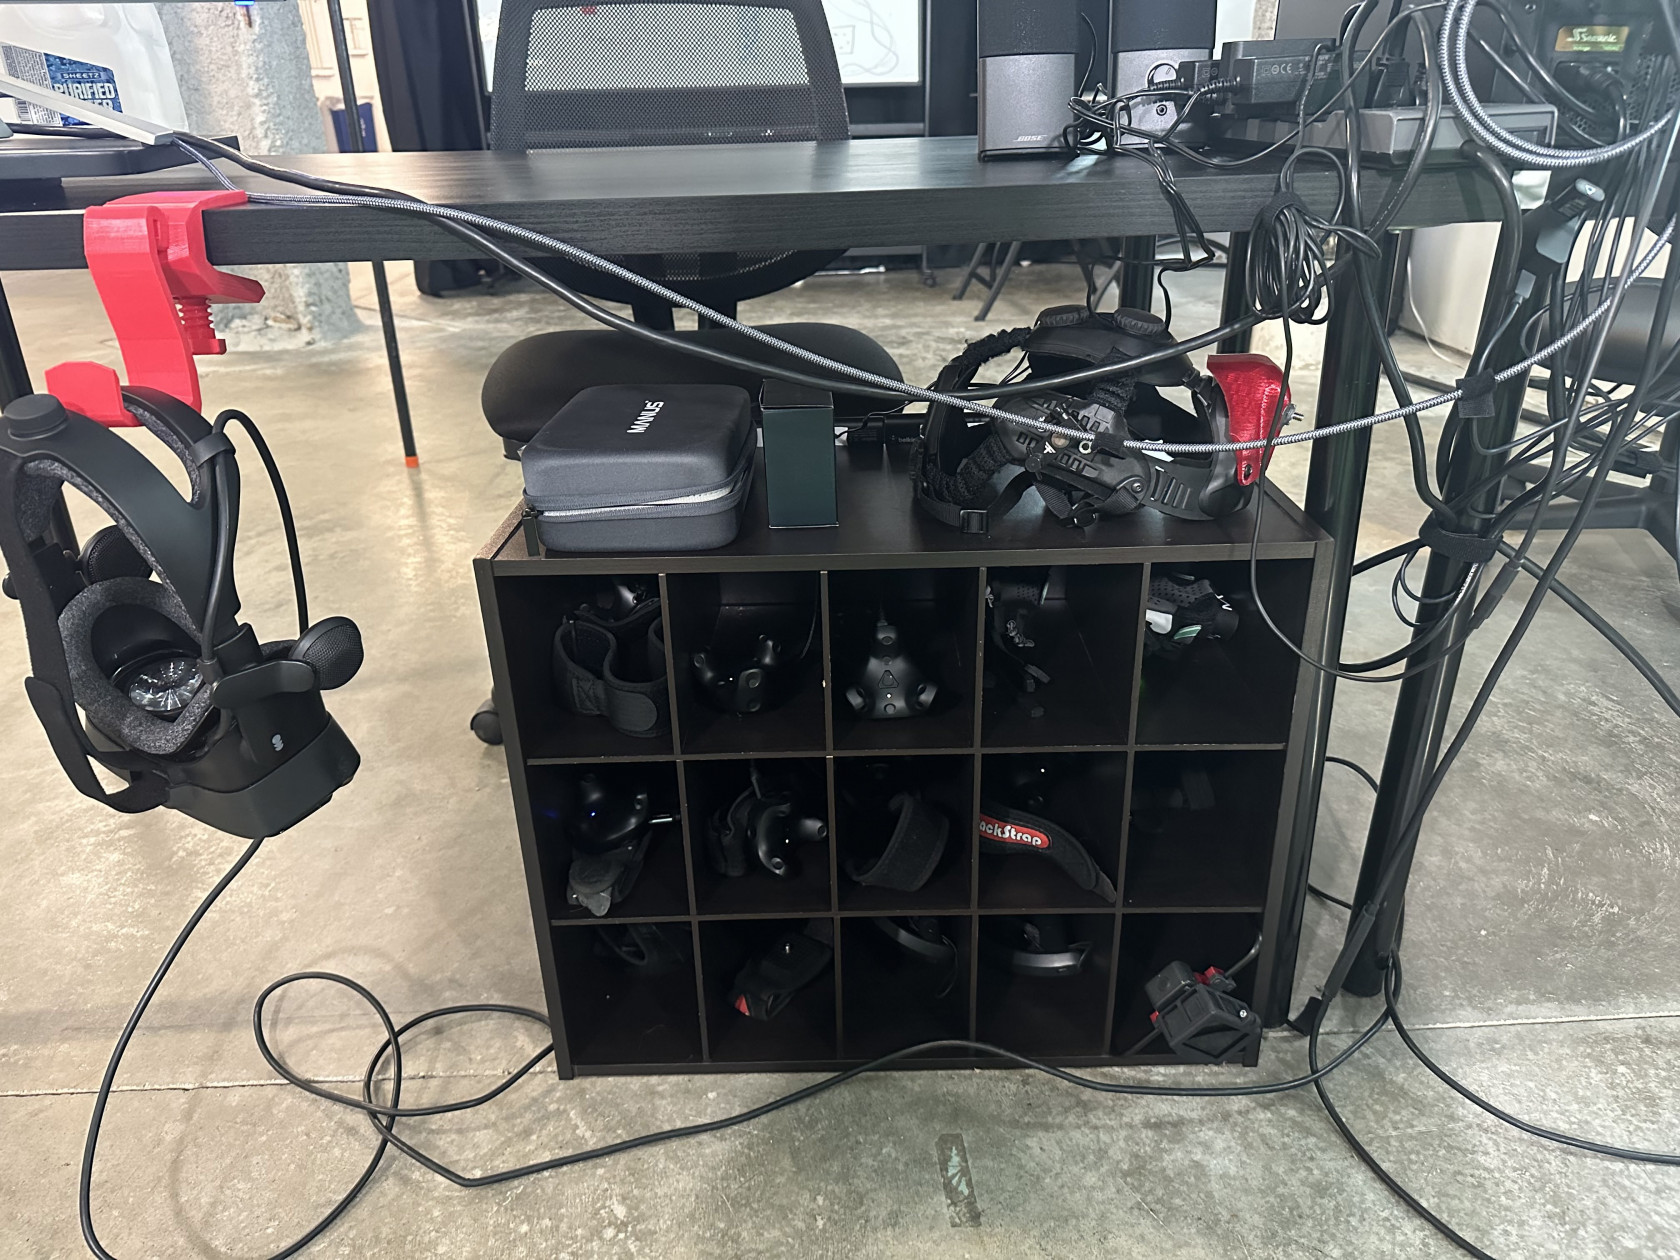
The set comprises:
2 hand trackers
2 upper arm trackers
1 waist tracker
1 head tracker
2 foot trackers
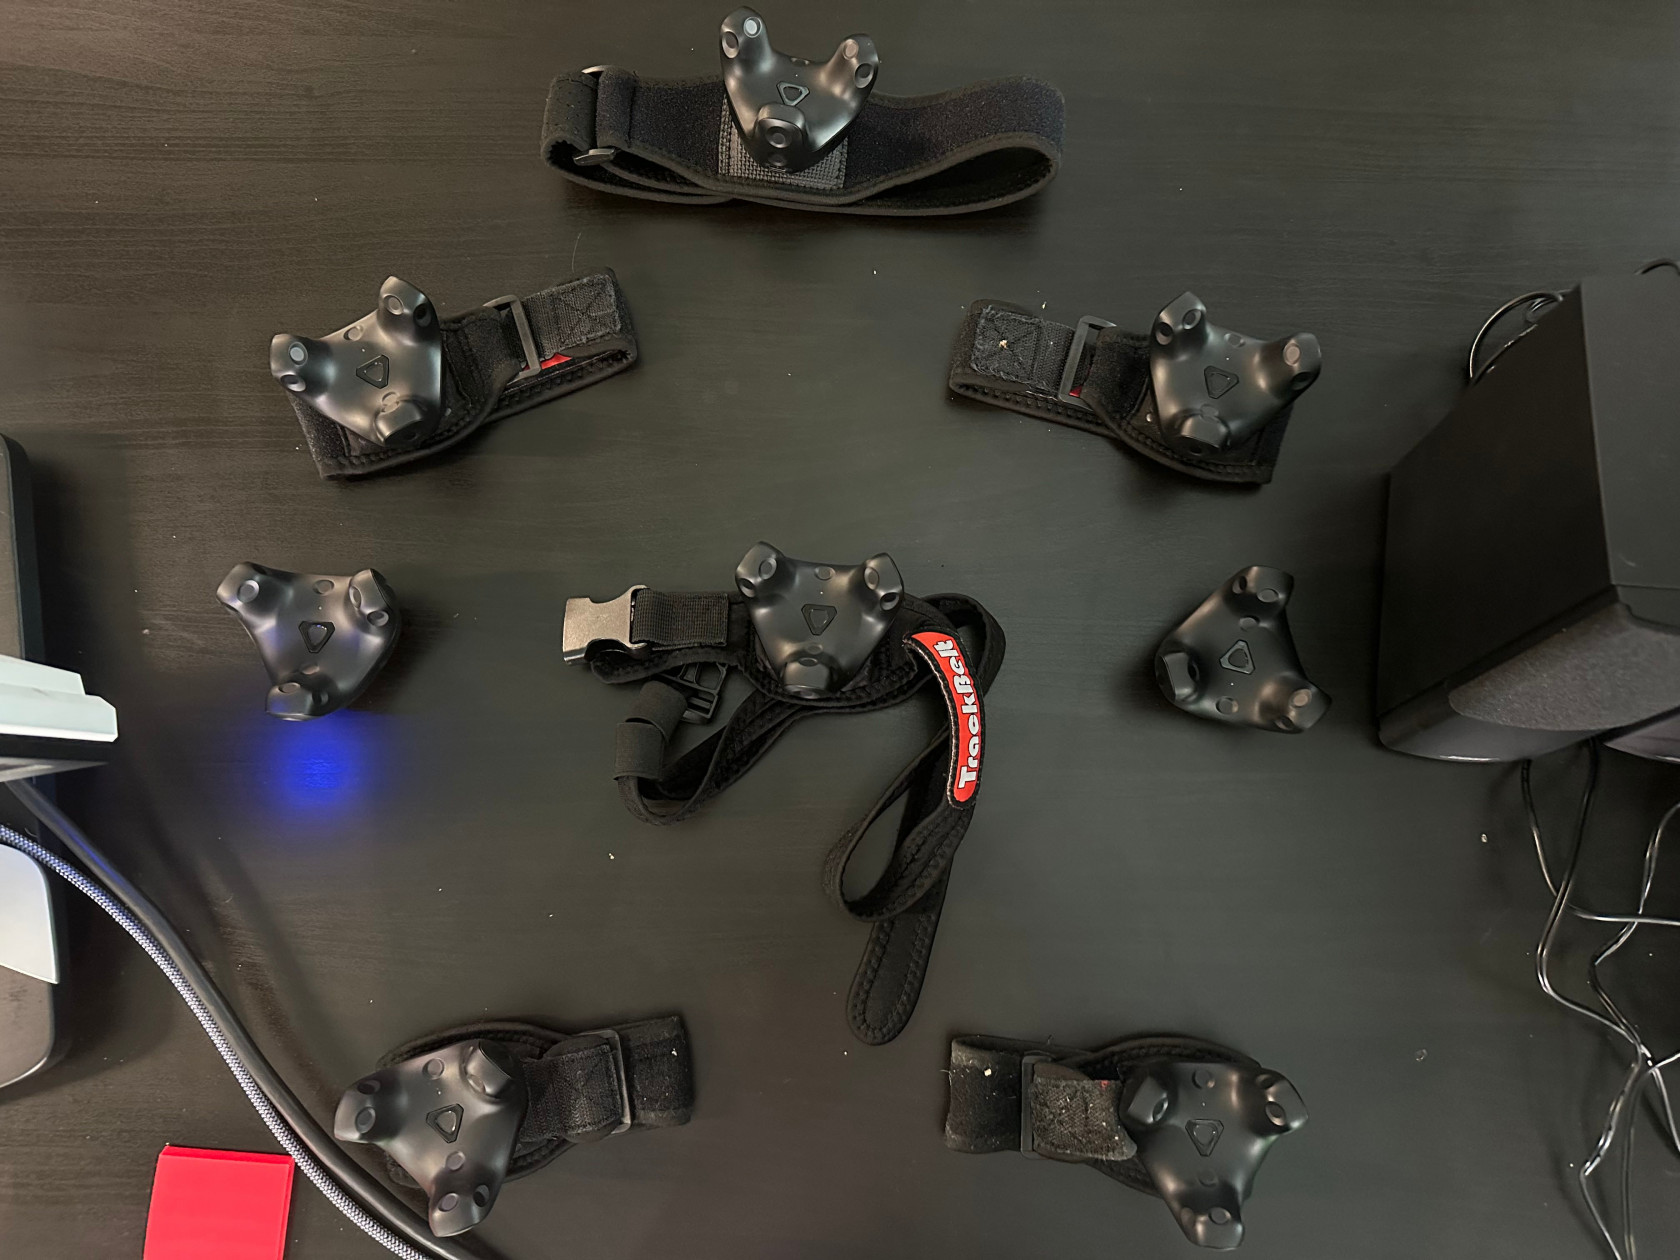
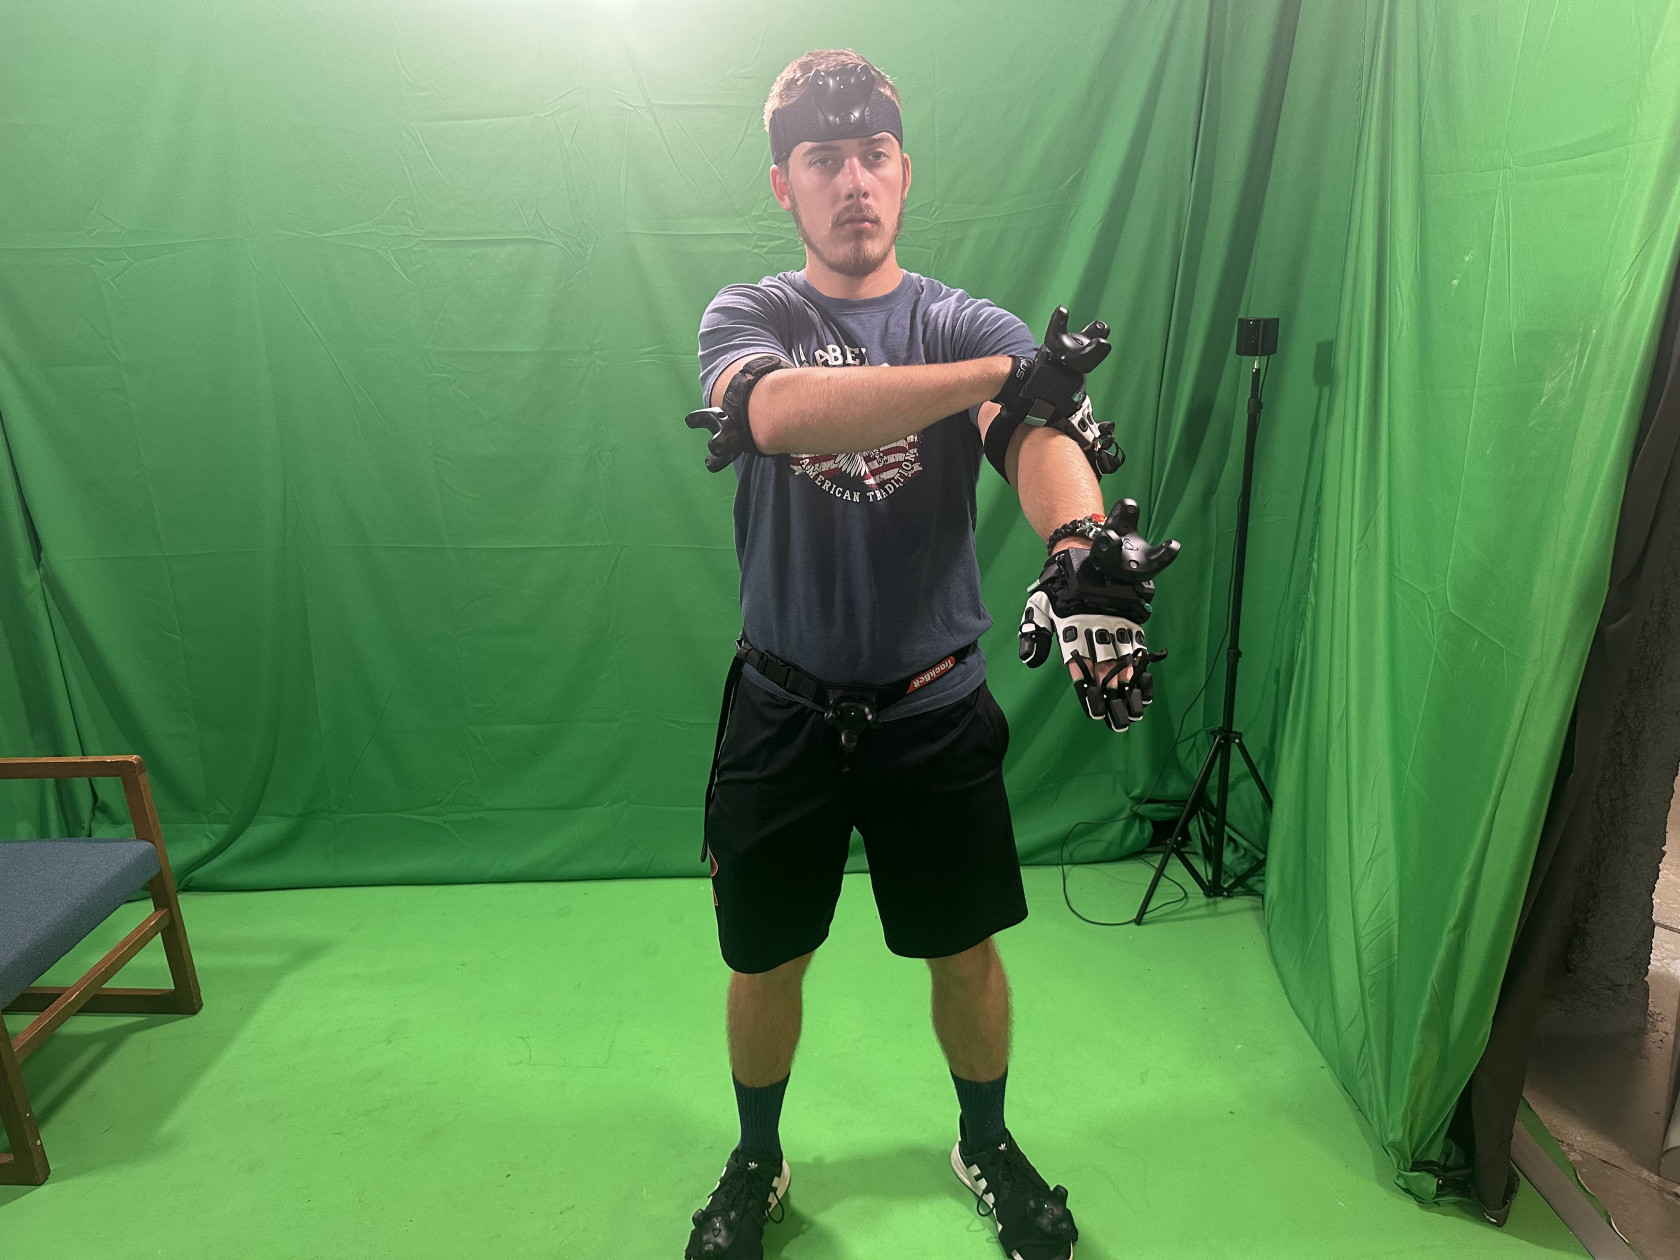
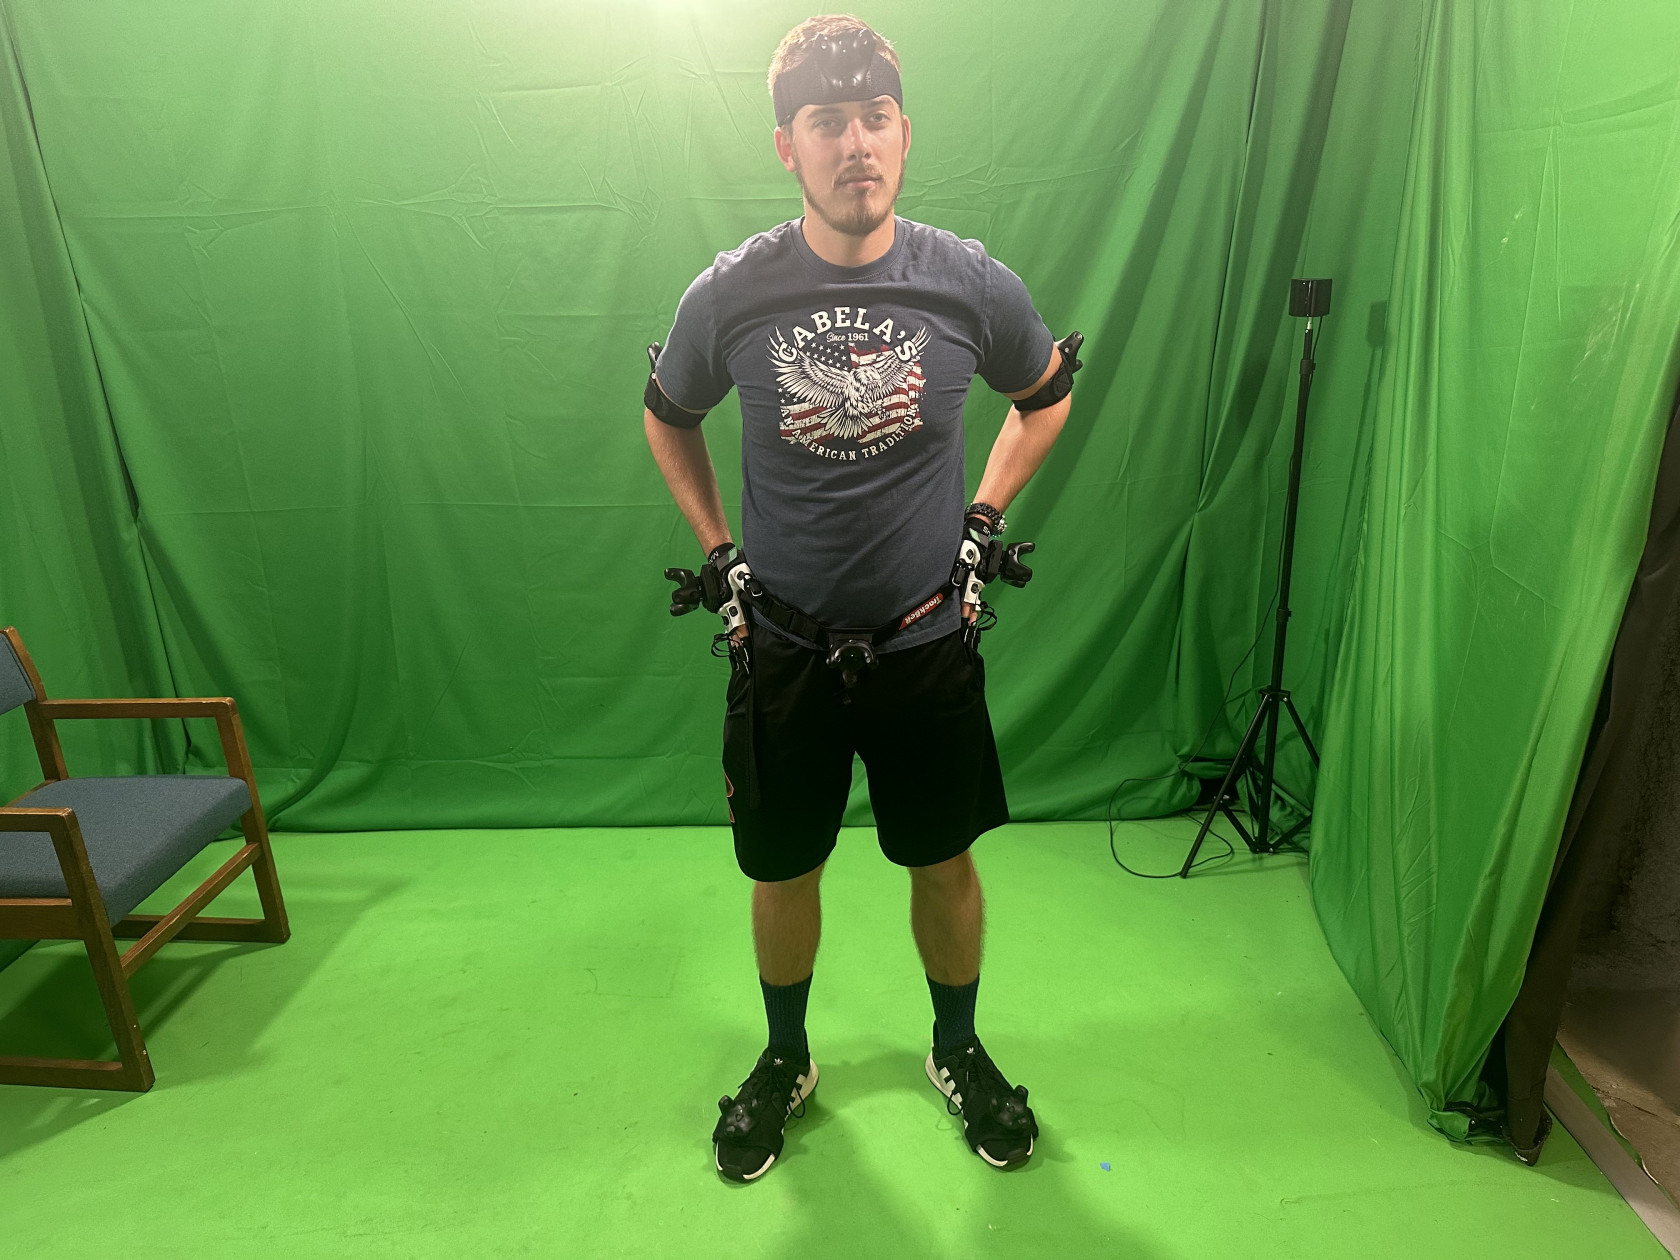
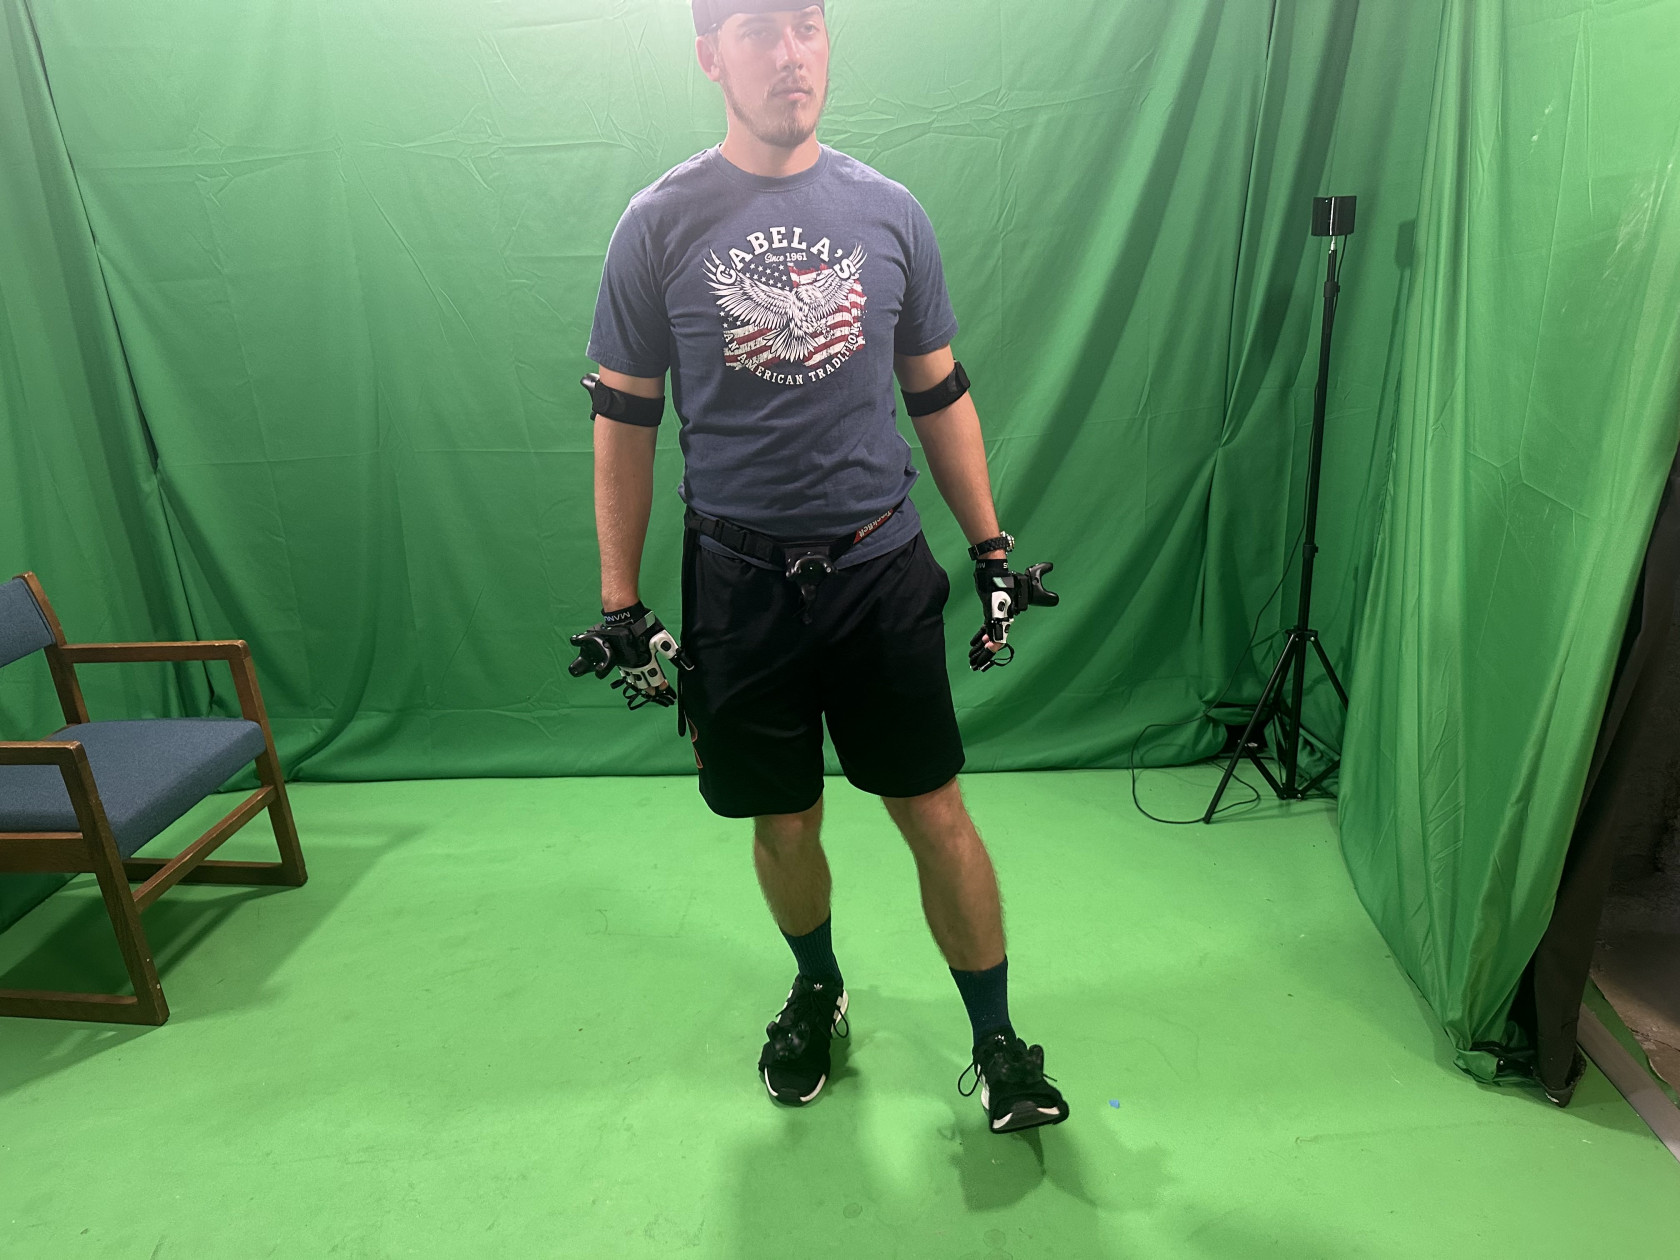
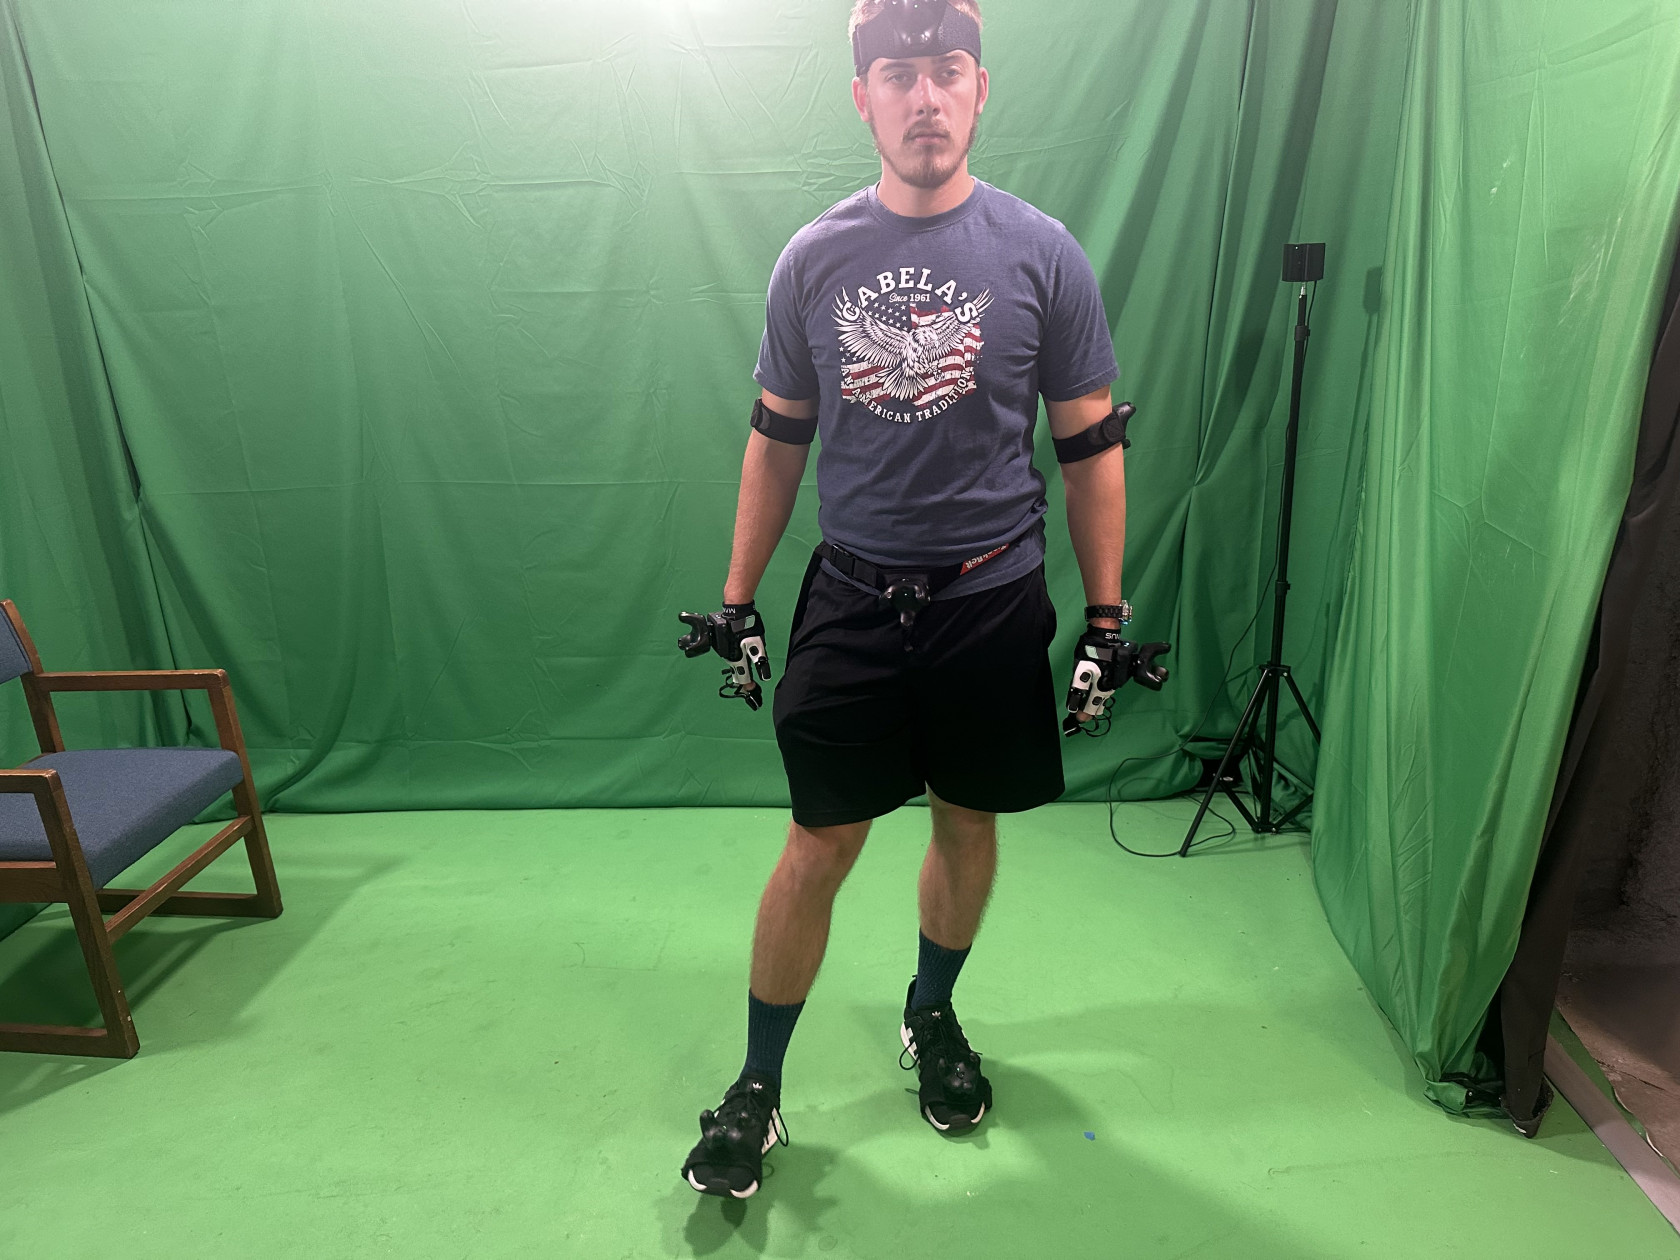
3. When affixing the trackers to the actor, ensure the LED light on each of the VIVE trackers that form a pair (such as the 2 upper arm trackers) aligns in the same direction as its corresponding device.
Refer to the appended images for a visual guide on the appropriate placement of the trackers.

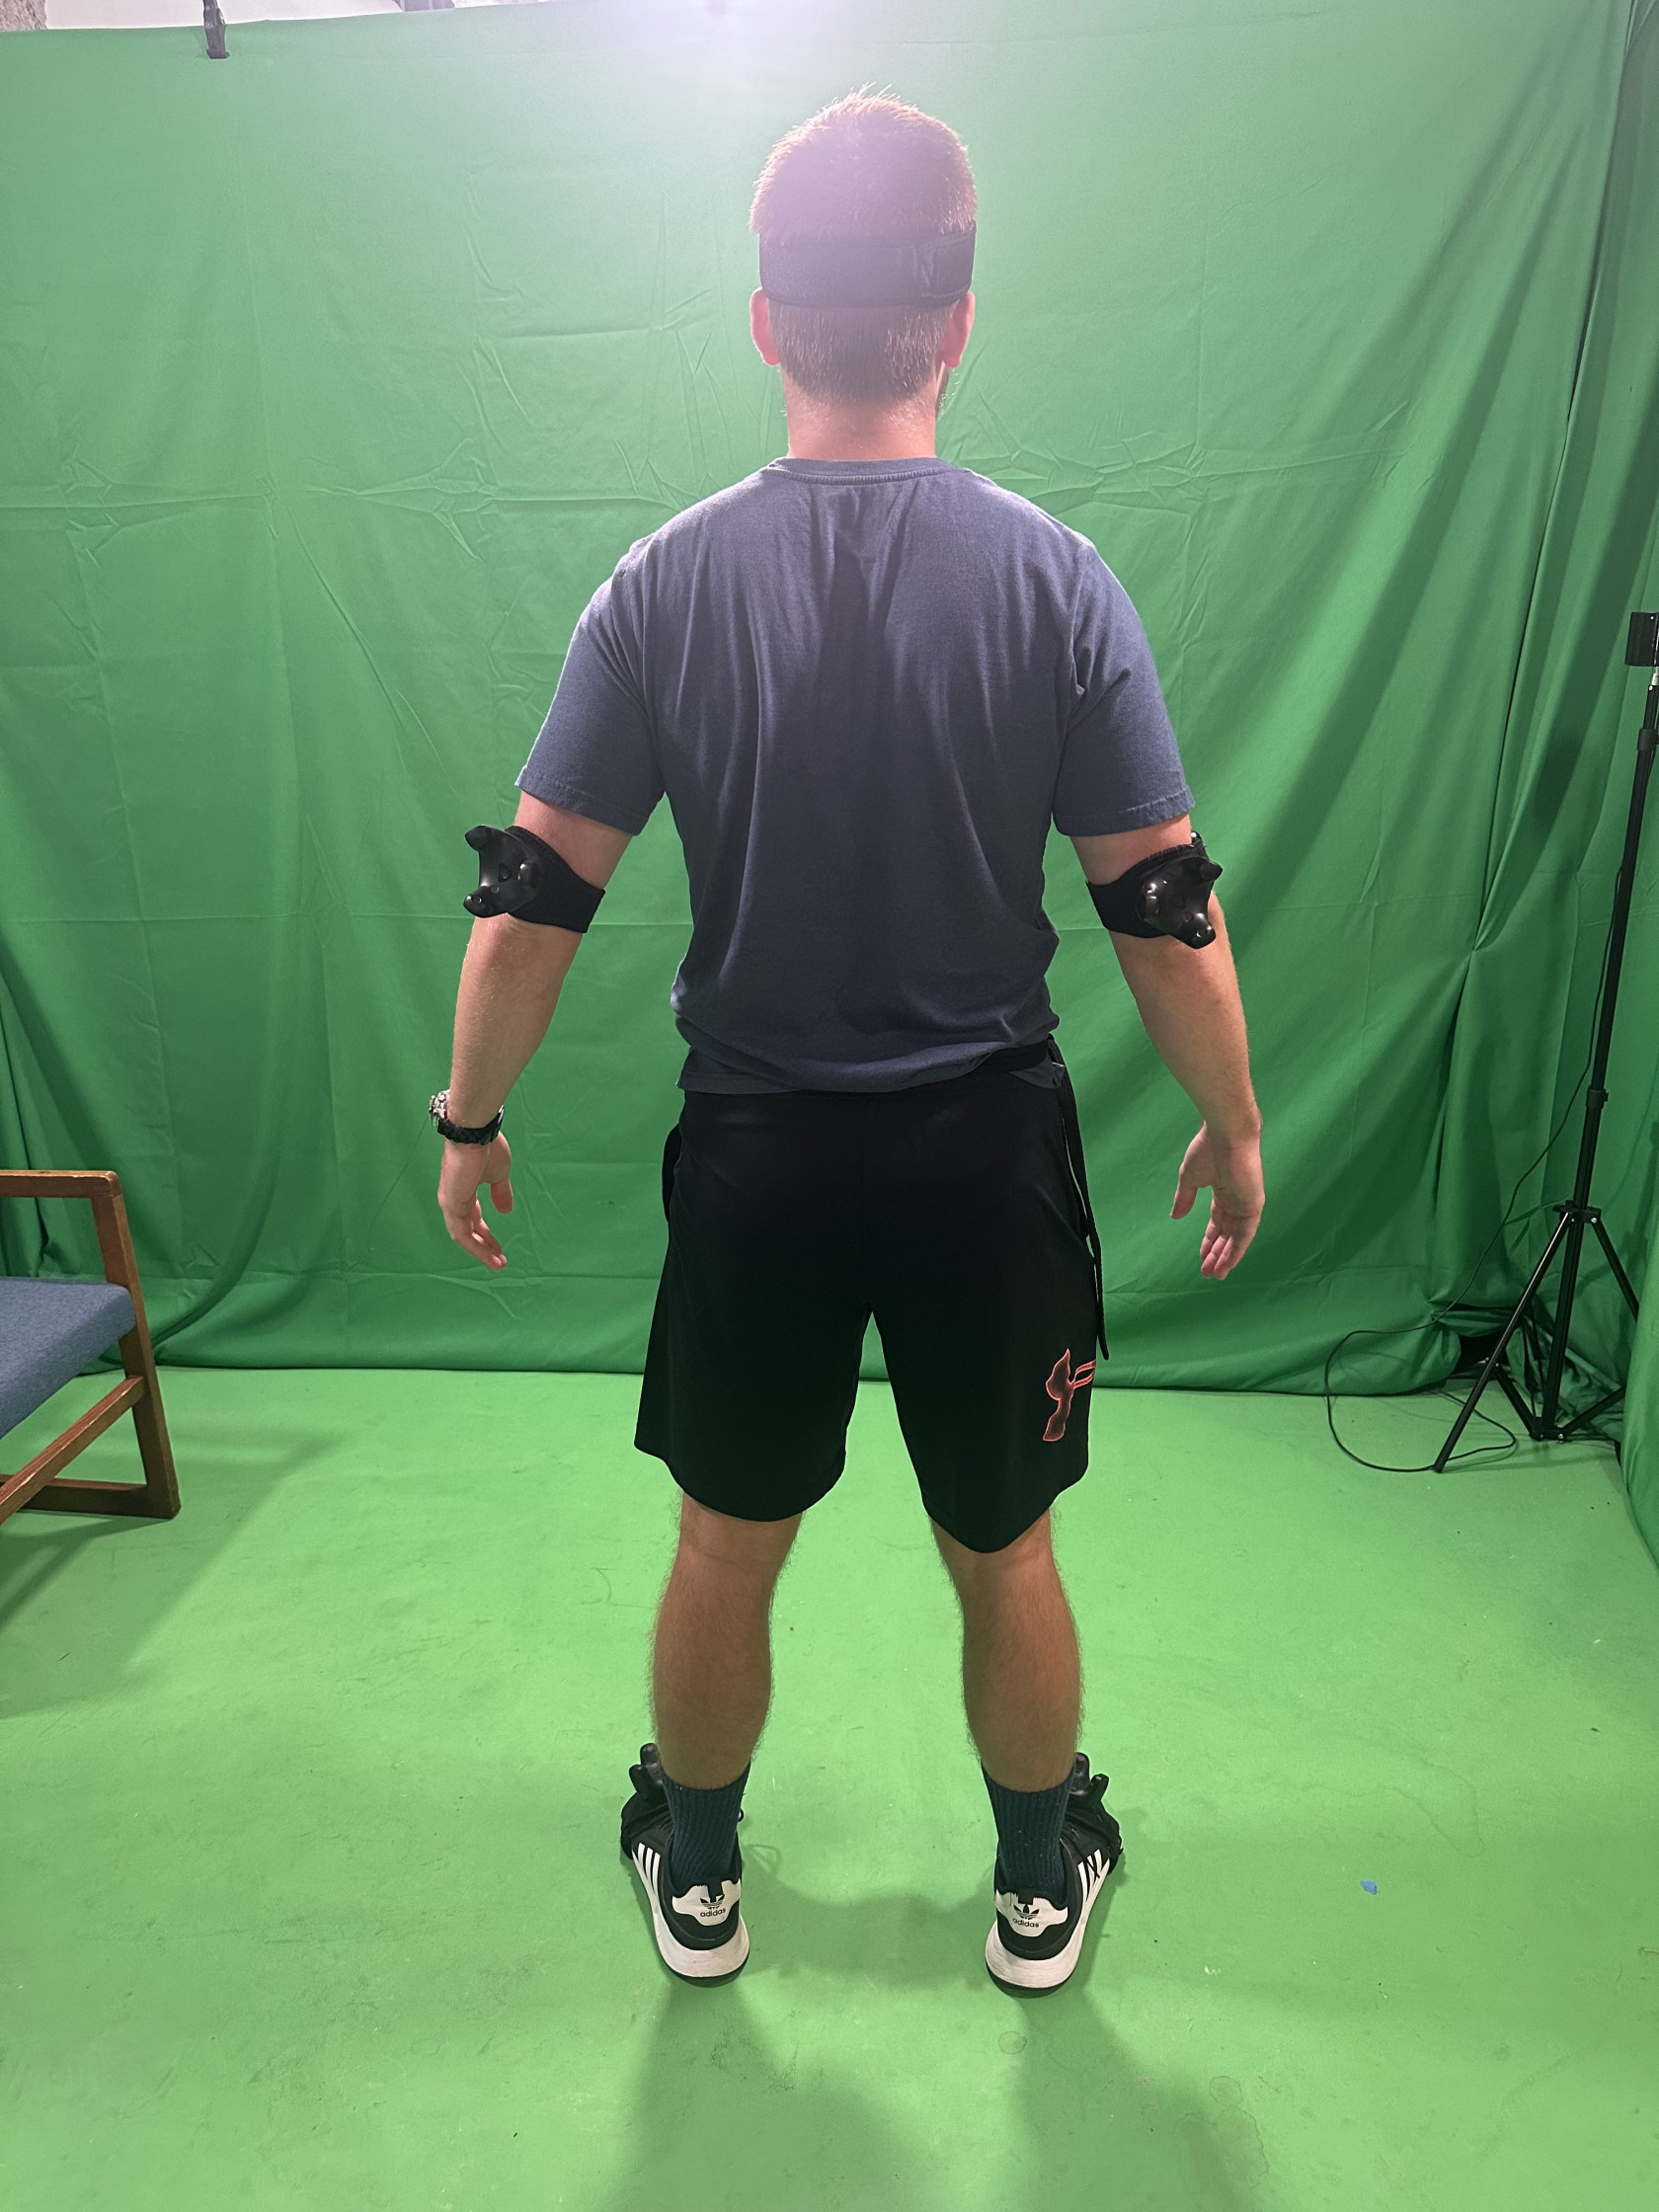
Please note: There are two trackers that lack straps; these are designated for the hands. They will be incorporated in the glove fitting stage. Consequently, the actor should be equipped with all of the trackers, excluding those for the hands.
MANUS Quantum Metagloves Actor Setup
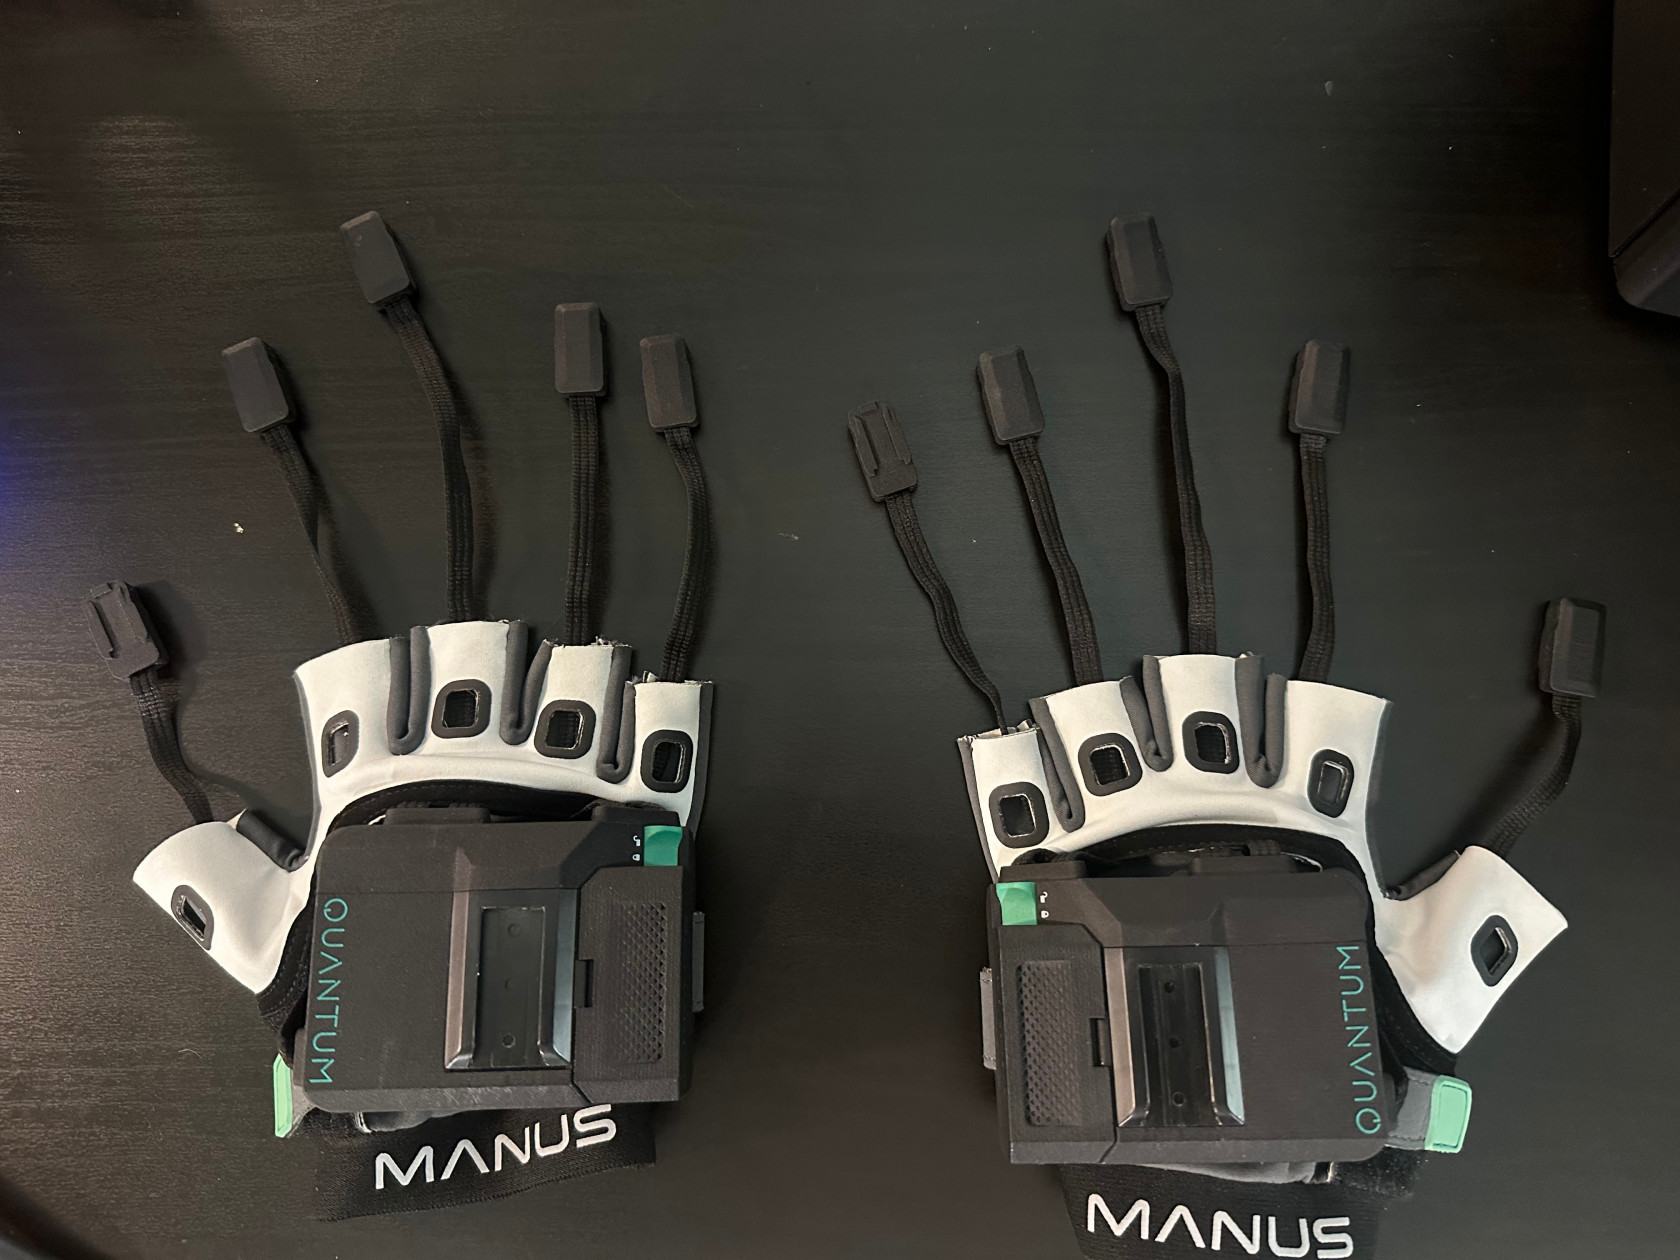
1. Locate the pair of MANUS Quantum Meta gloves. They can be found either within their storage case atop the charging station or within two of the compartments in the charging station.
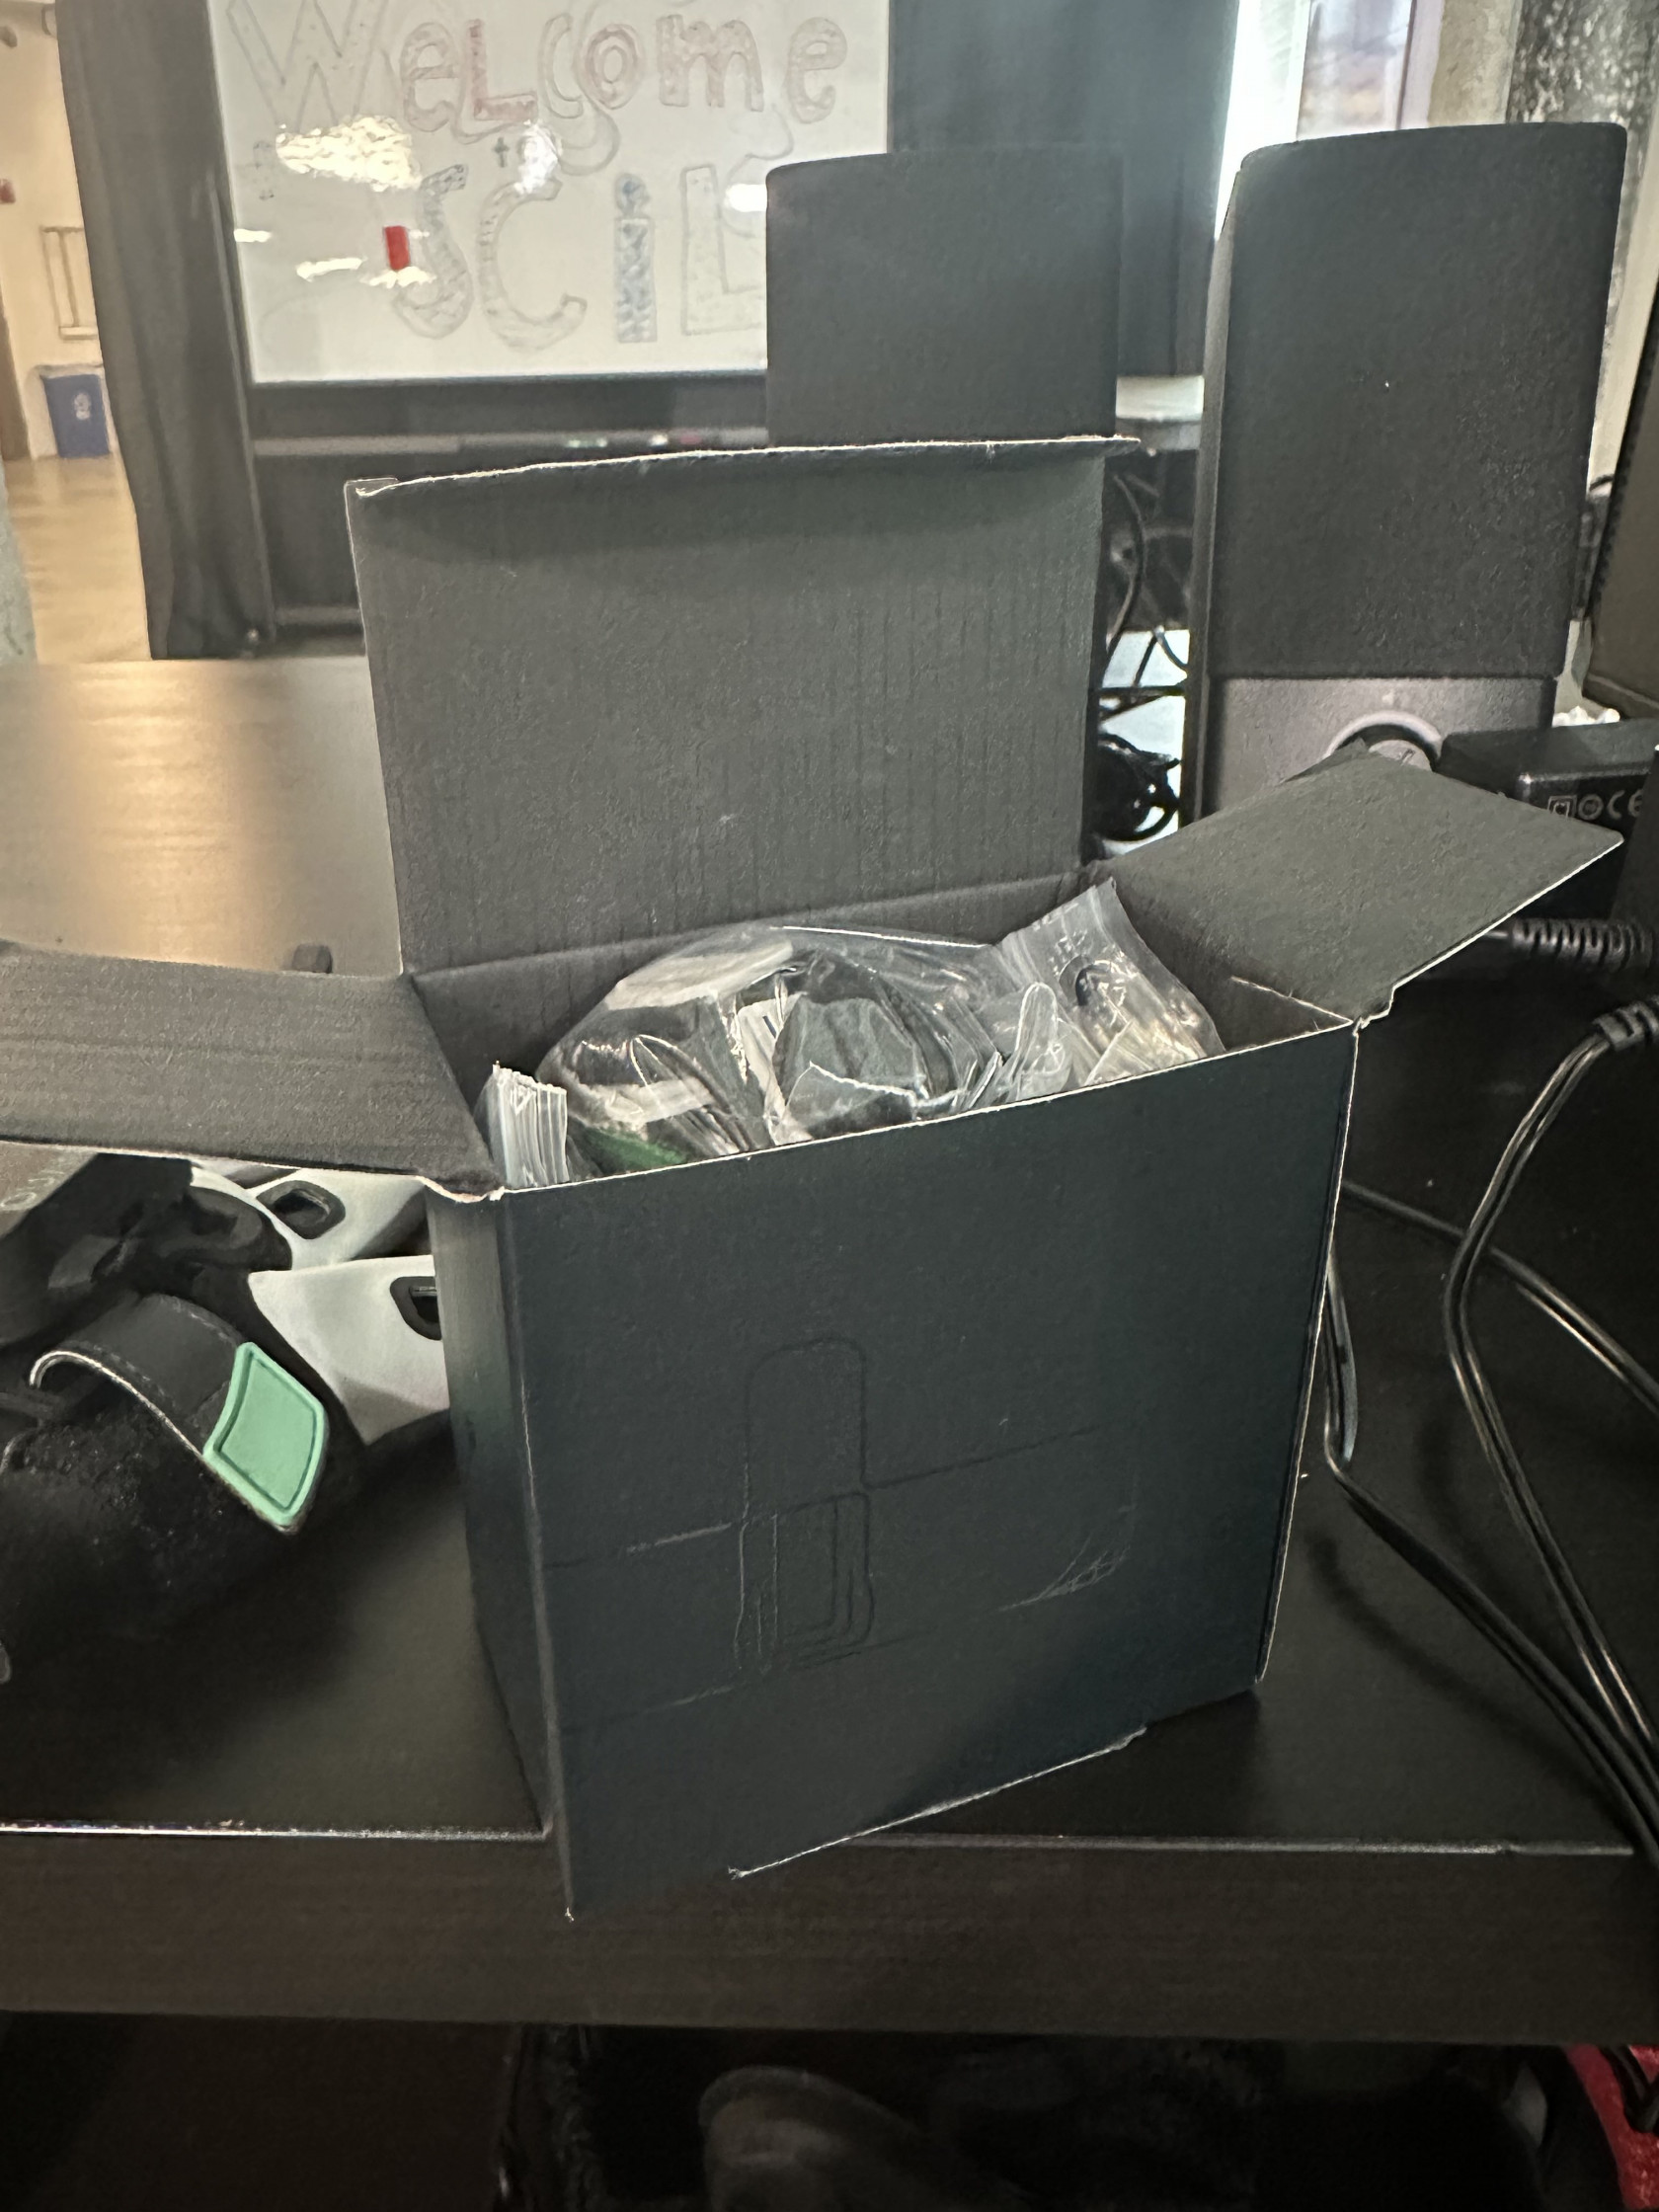
2. Identify the box containing fingertip covers located on the top of the charging station. These covers are stored in small ziplock bags, which are housed inside a black box.
3. Within the box, you will find three main bags, labeled on the covers are the sizes 1, 2, and 3. Select the size that best fits the actor. Based on previous experiences, typically two size three covers for the thumbs, two size one covers for the pinkies, and six size two covers for the remaining fingers provide the best fit.
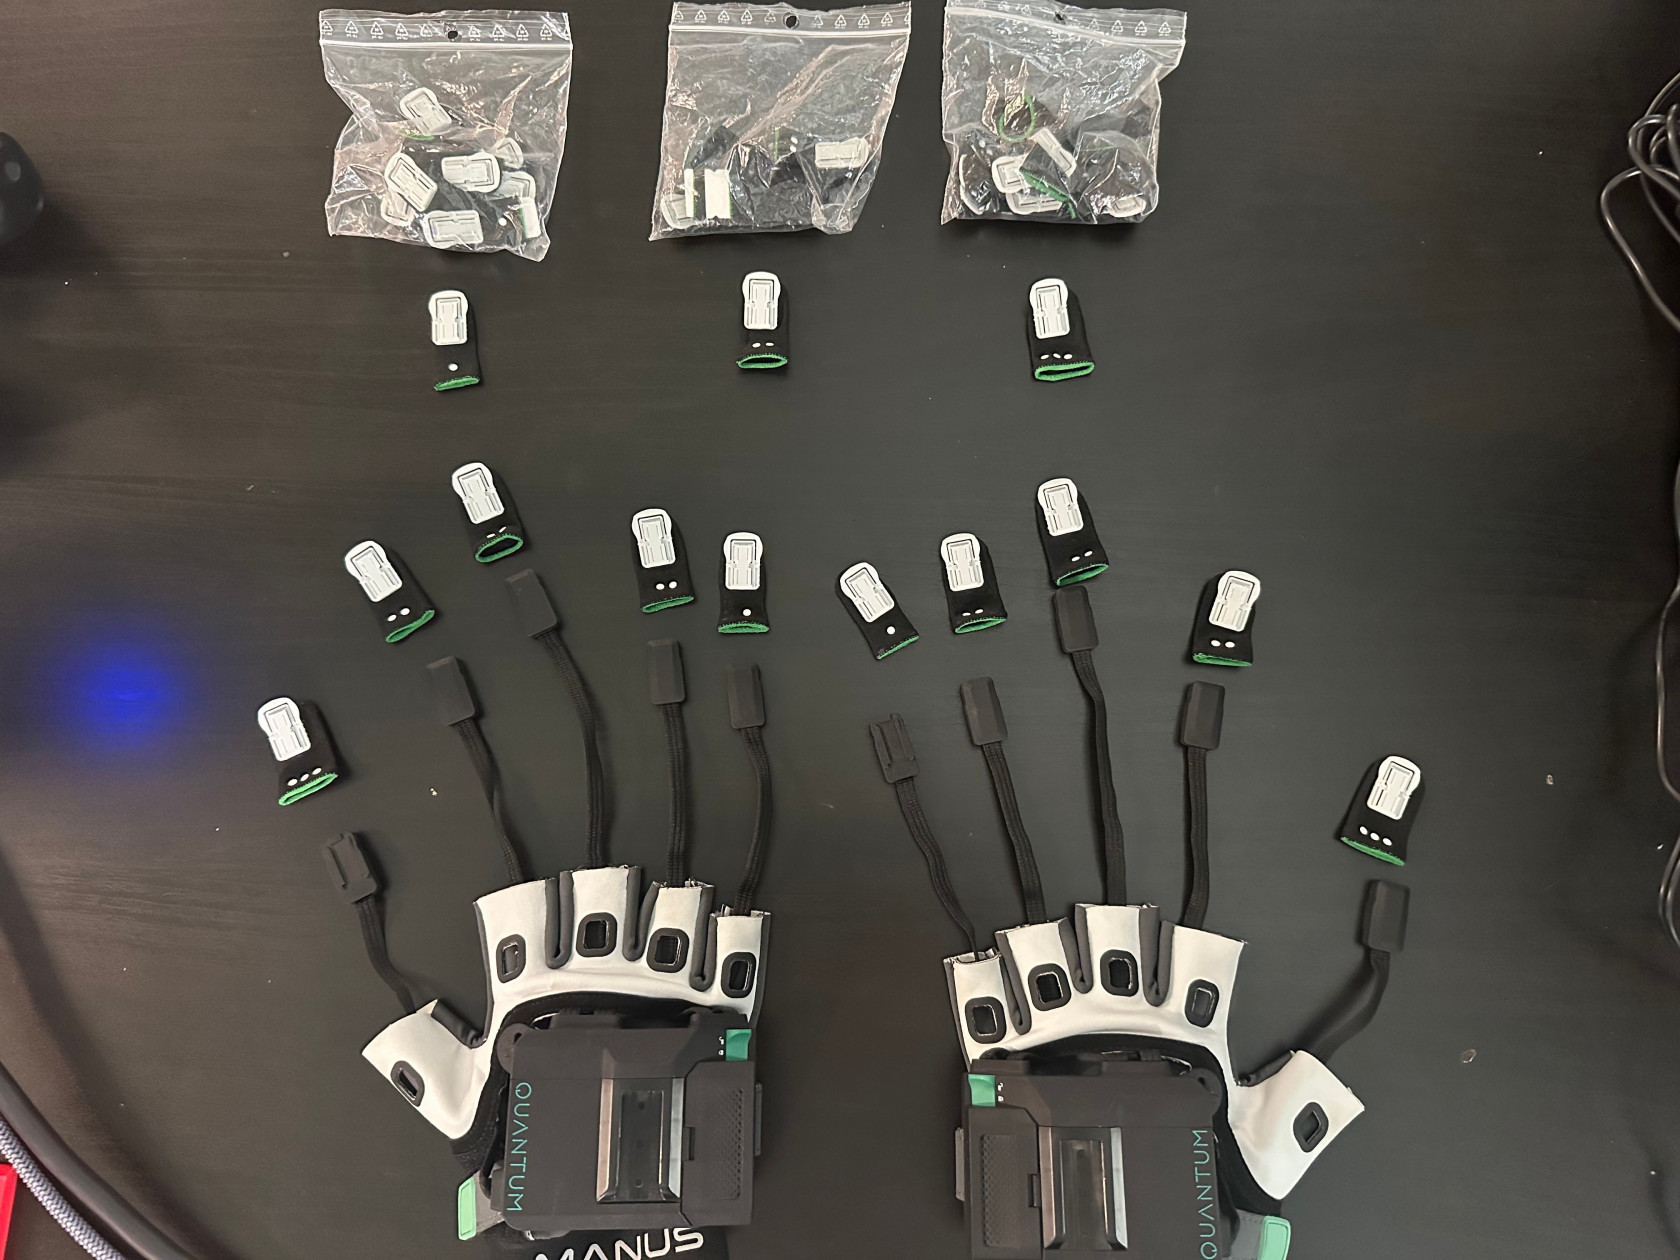
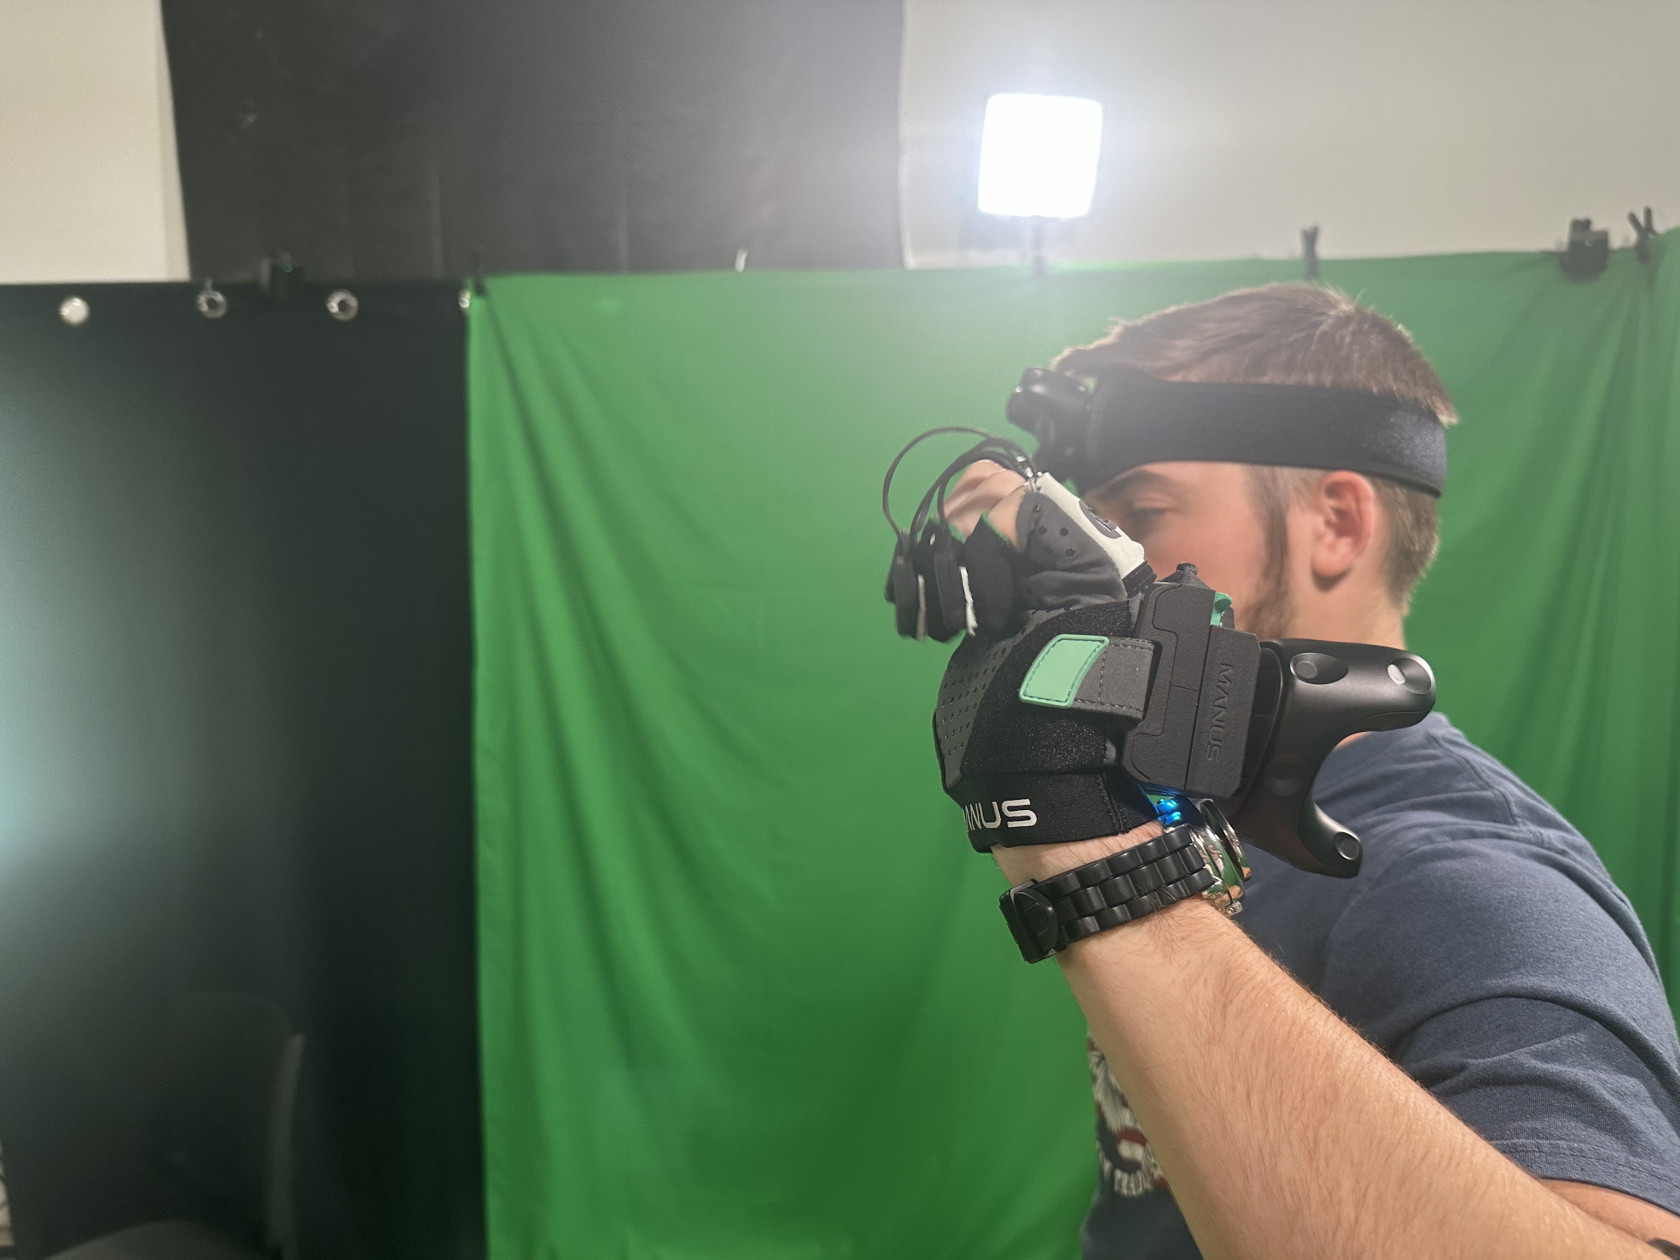
4. Once the appropriate fingertip covers are selected, gently assist the actor in putting on the gloves, one at a time. This process should involve two people for optimal efficiency and care.

5. After both gloves are worn by the actor, proceed to affix the selected fingertip covers onto each finger until all digits are covered.
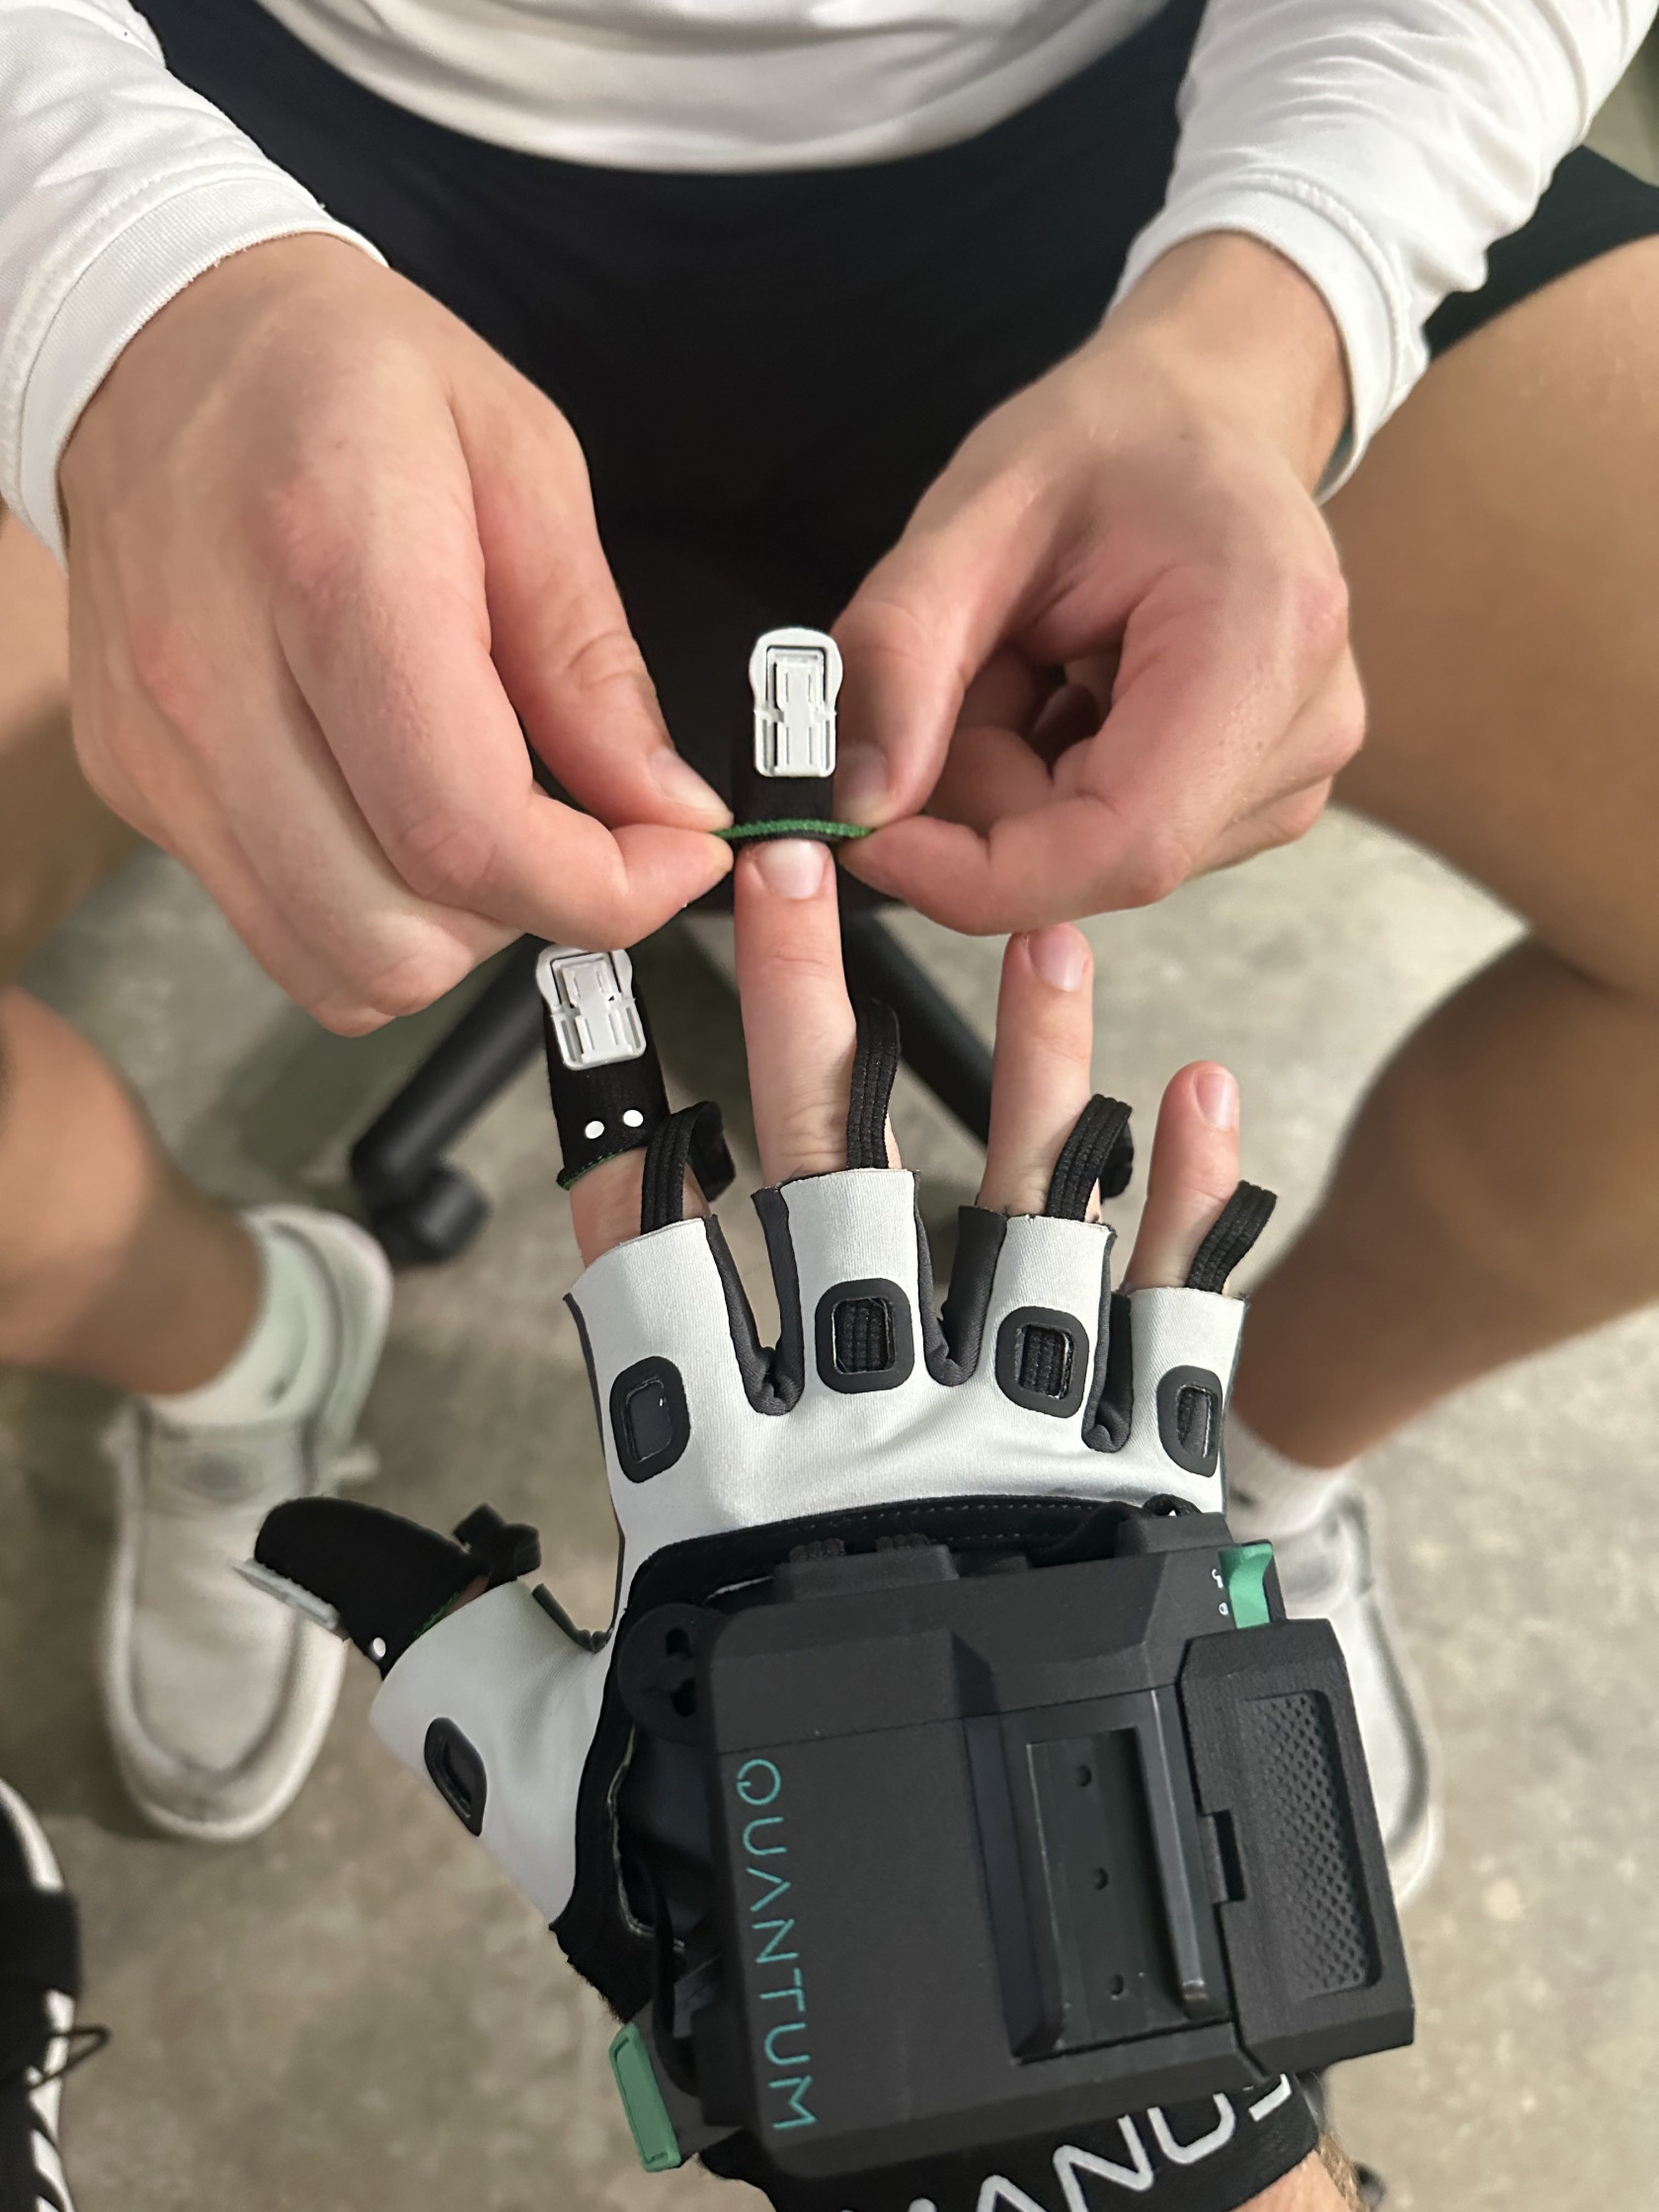
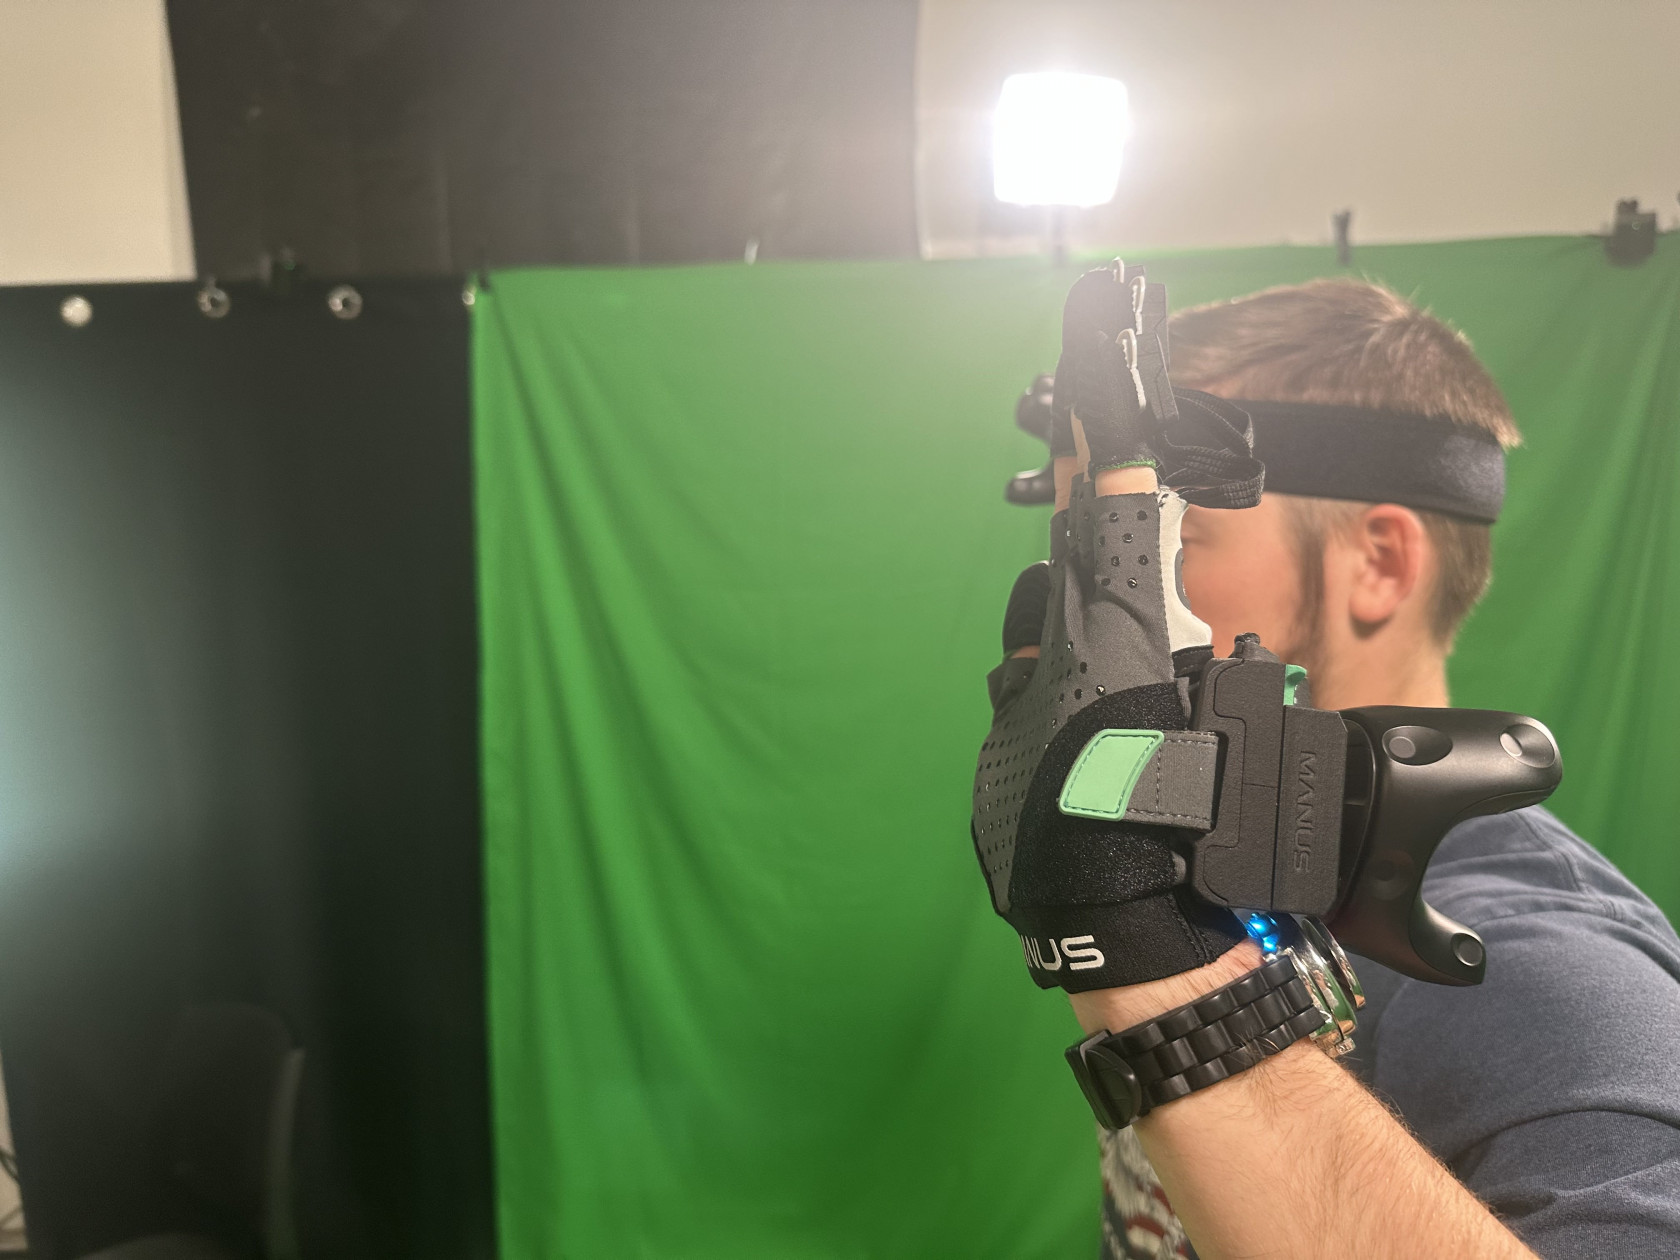
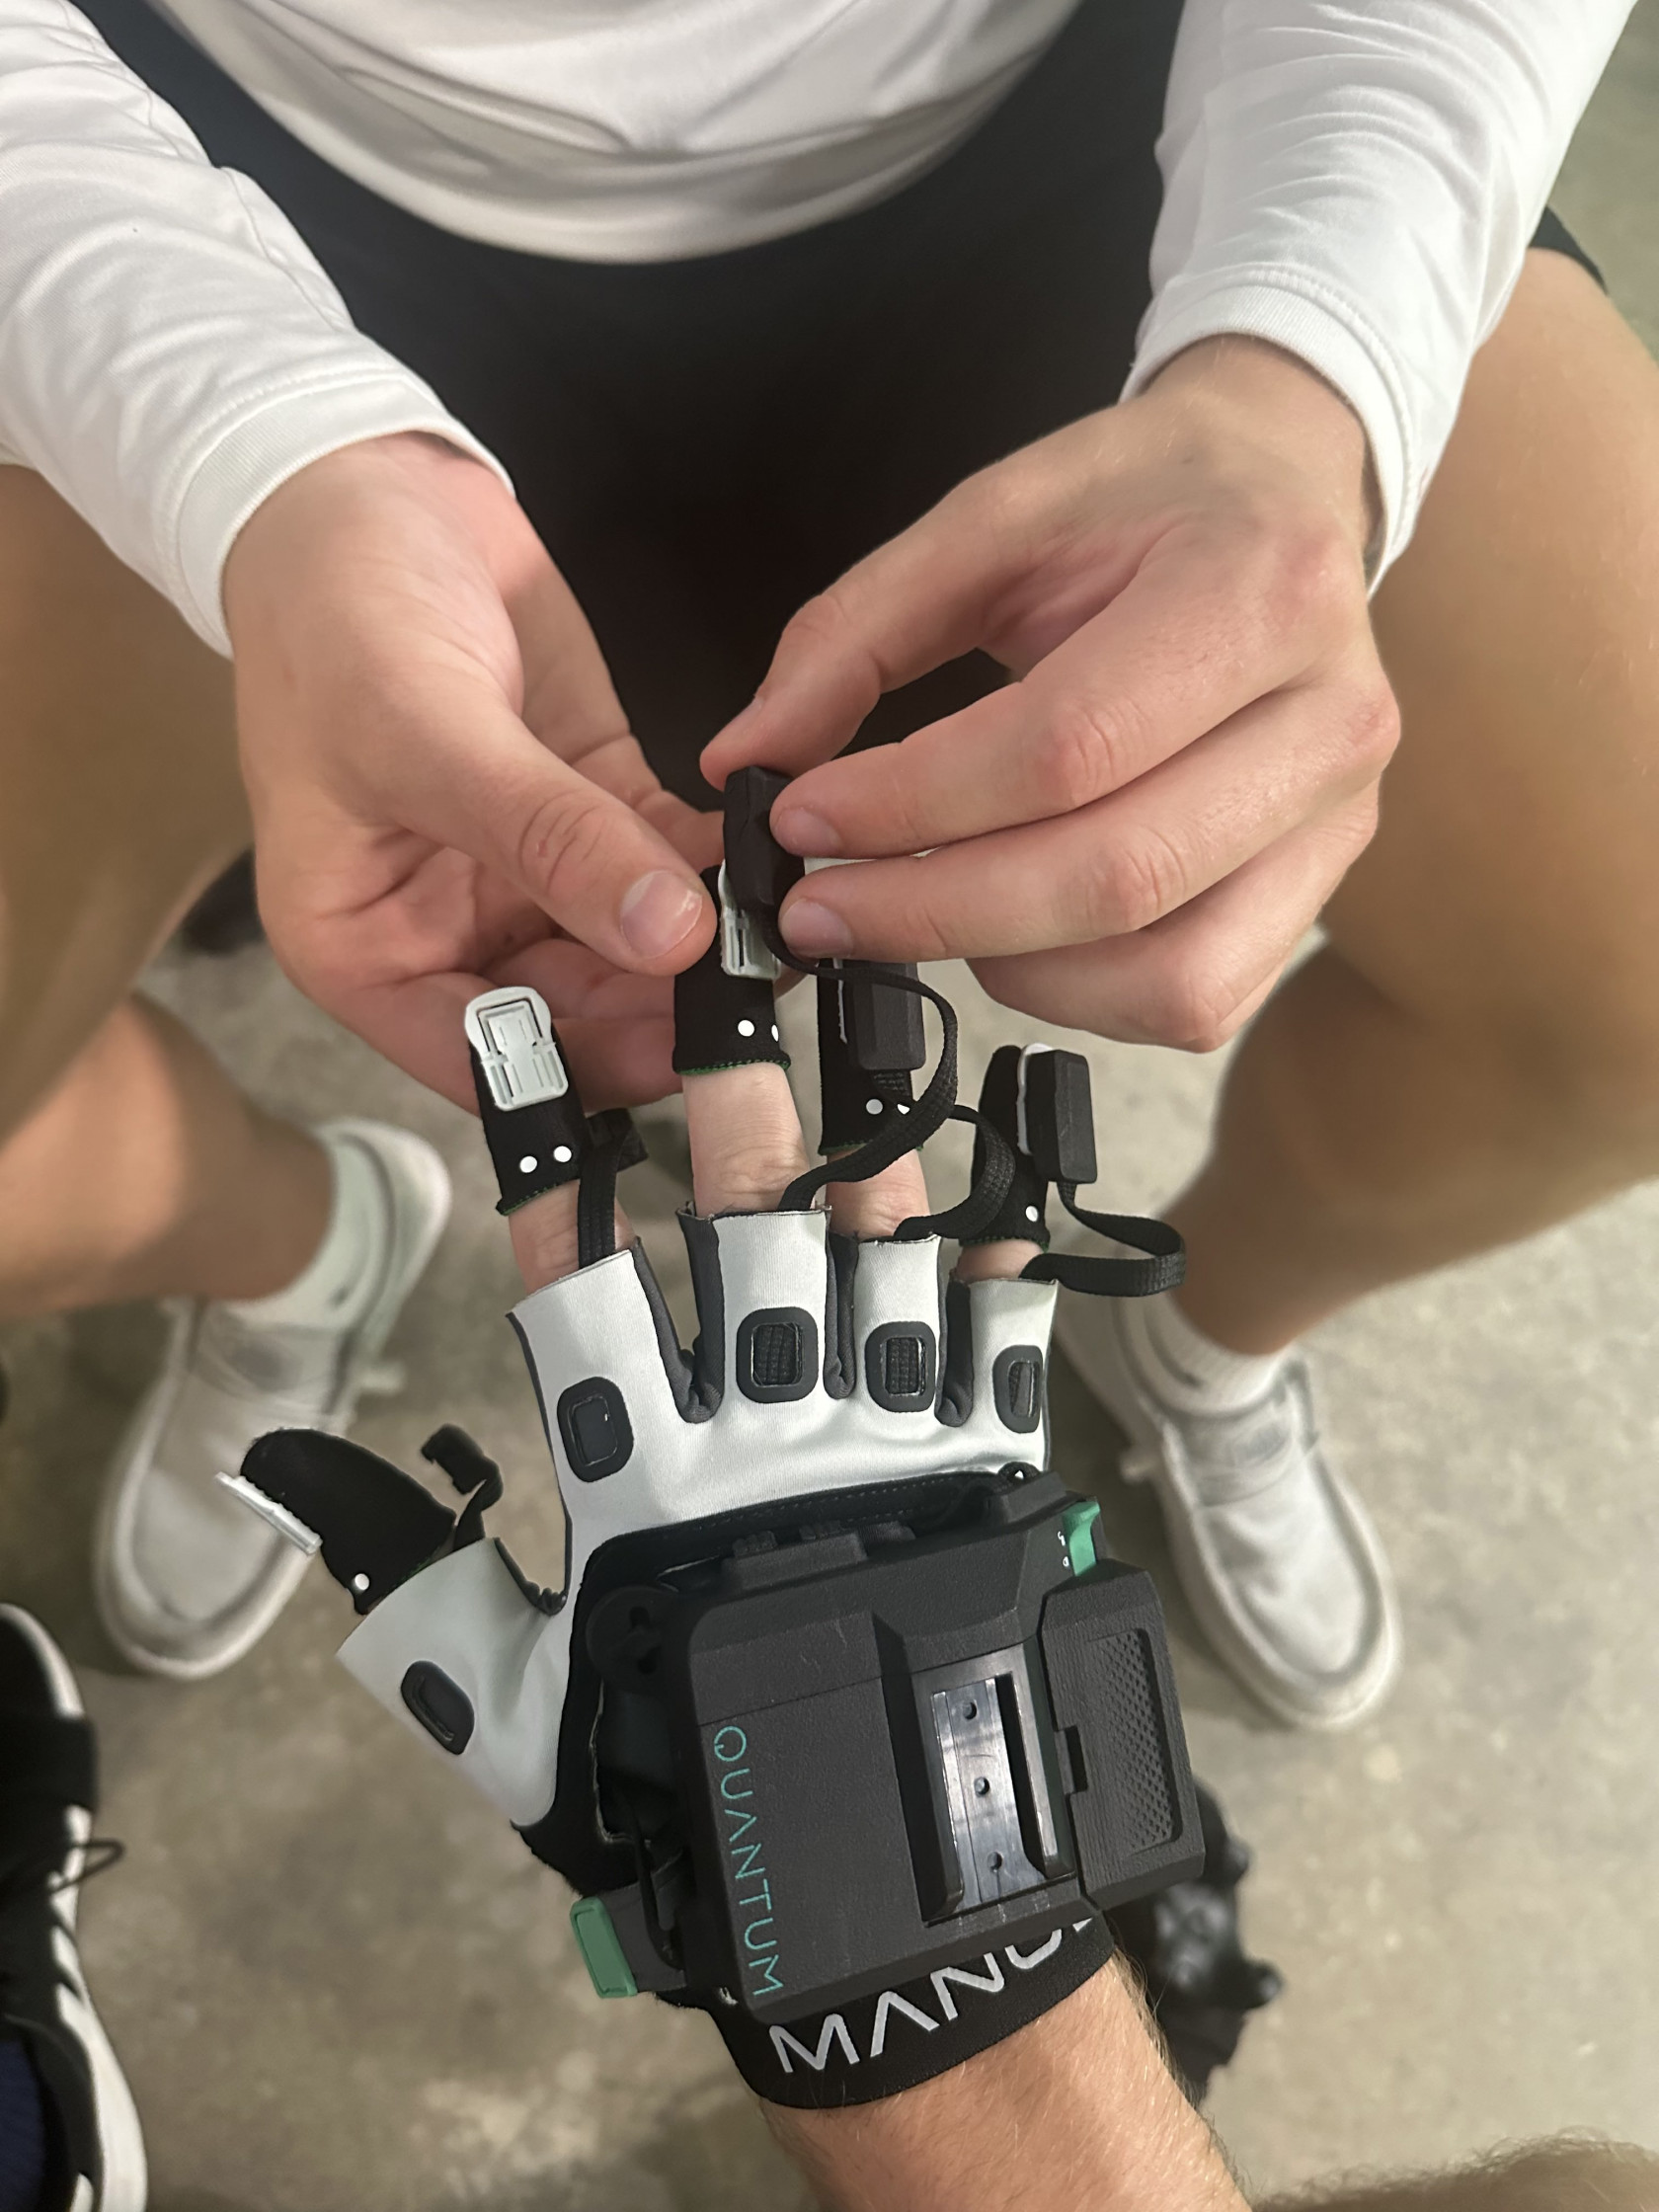
6. Attach the black sensor to each finger by sliding it onto the grey plastic slide rails attached to the fingertip covers. Do not allow the actor to perform this task; it requires two people to ensure proper and safe fitting. Slide the sensor until it locks into place or cannot slide any further.
Note: It is recommended to keep the black cords straight and untwisted once connected to the fingertip covers for optimal functionality.
7. Locate the remaining two VIVE hand trackers and slide them onto the top of the gloves where the guard rail is located, one at a time. Slide each tracker until it locks into place or can't slide any further.
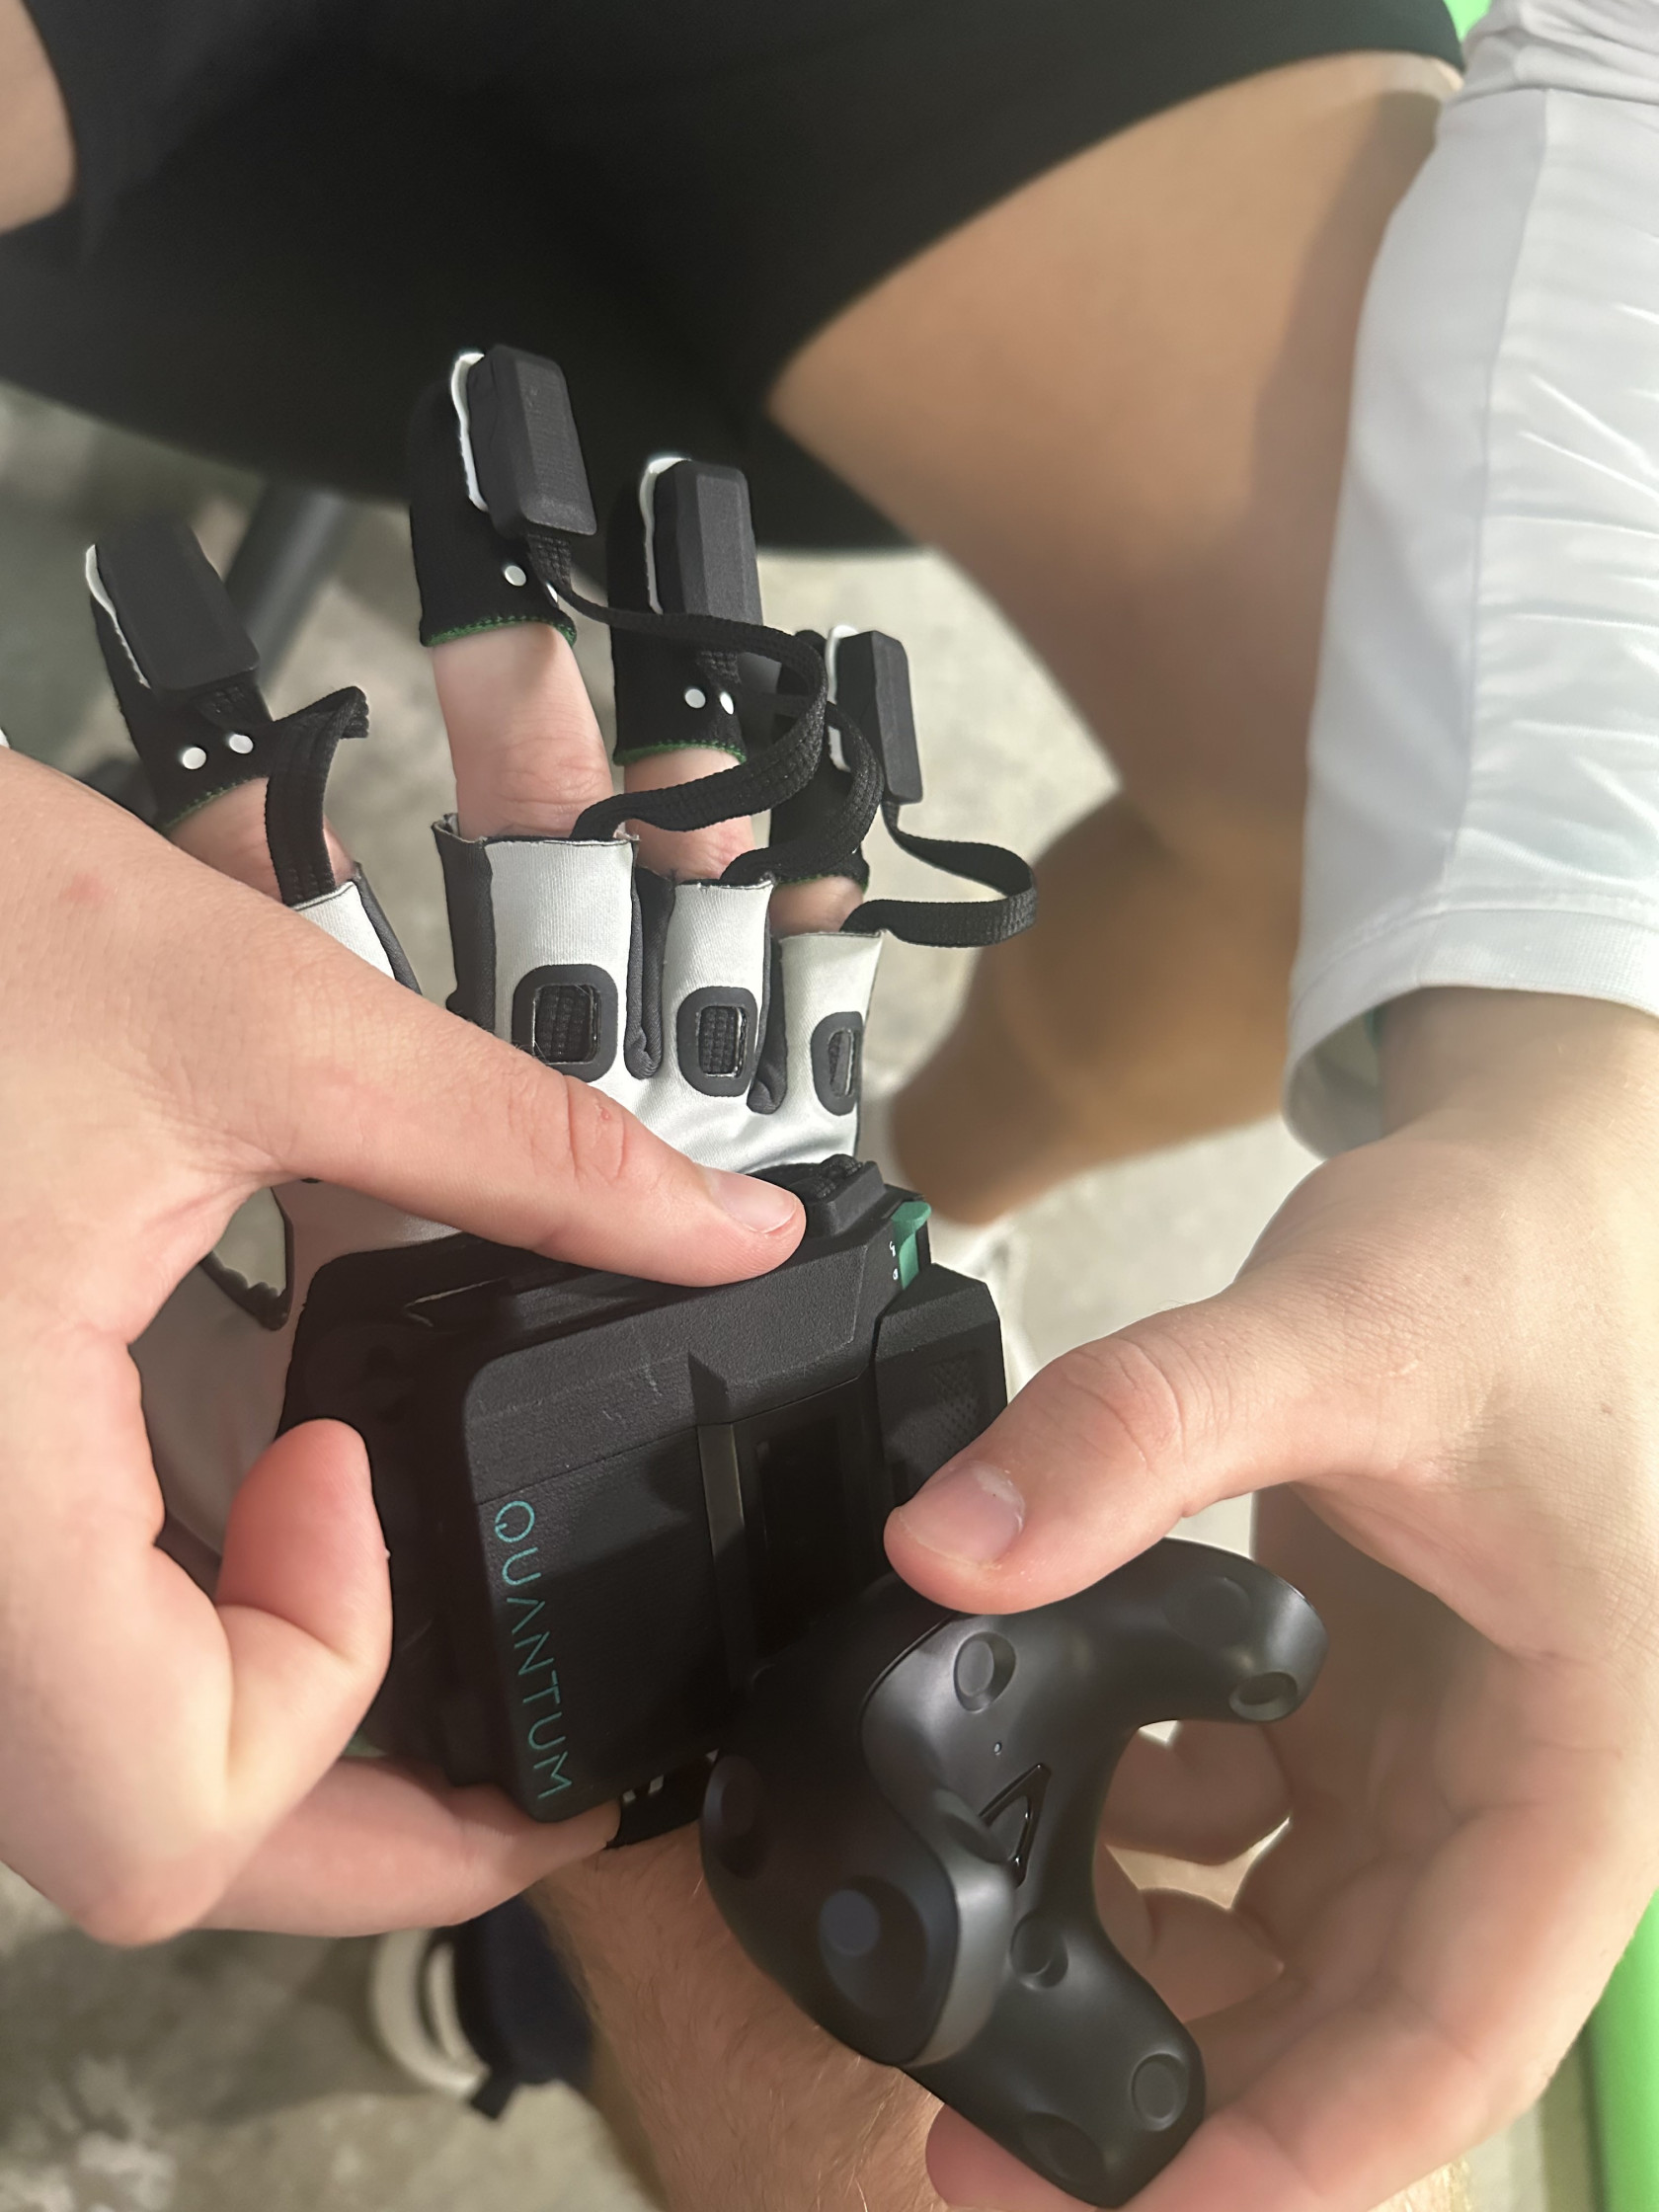
8. Thoroughly inspect both gloves and confirm with the actor that everything feels comfortable and secure. This may include adjusting the green side straps on the gloves for a tighter fit if necessary.
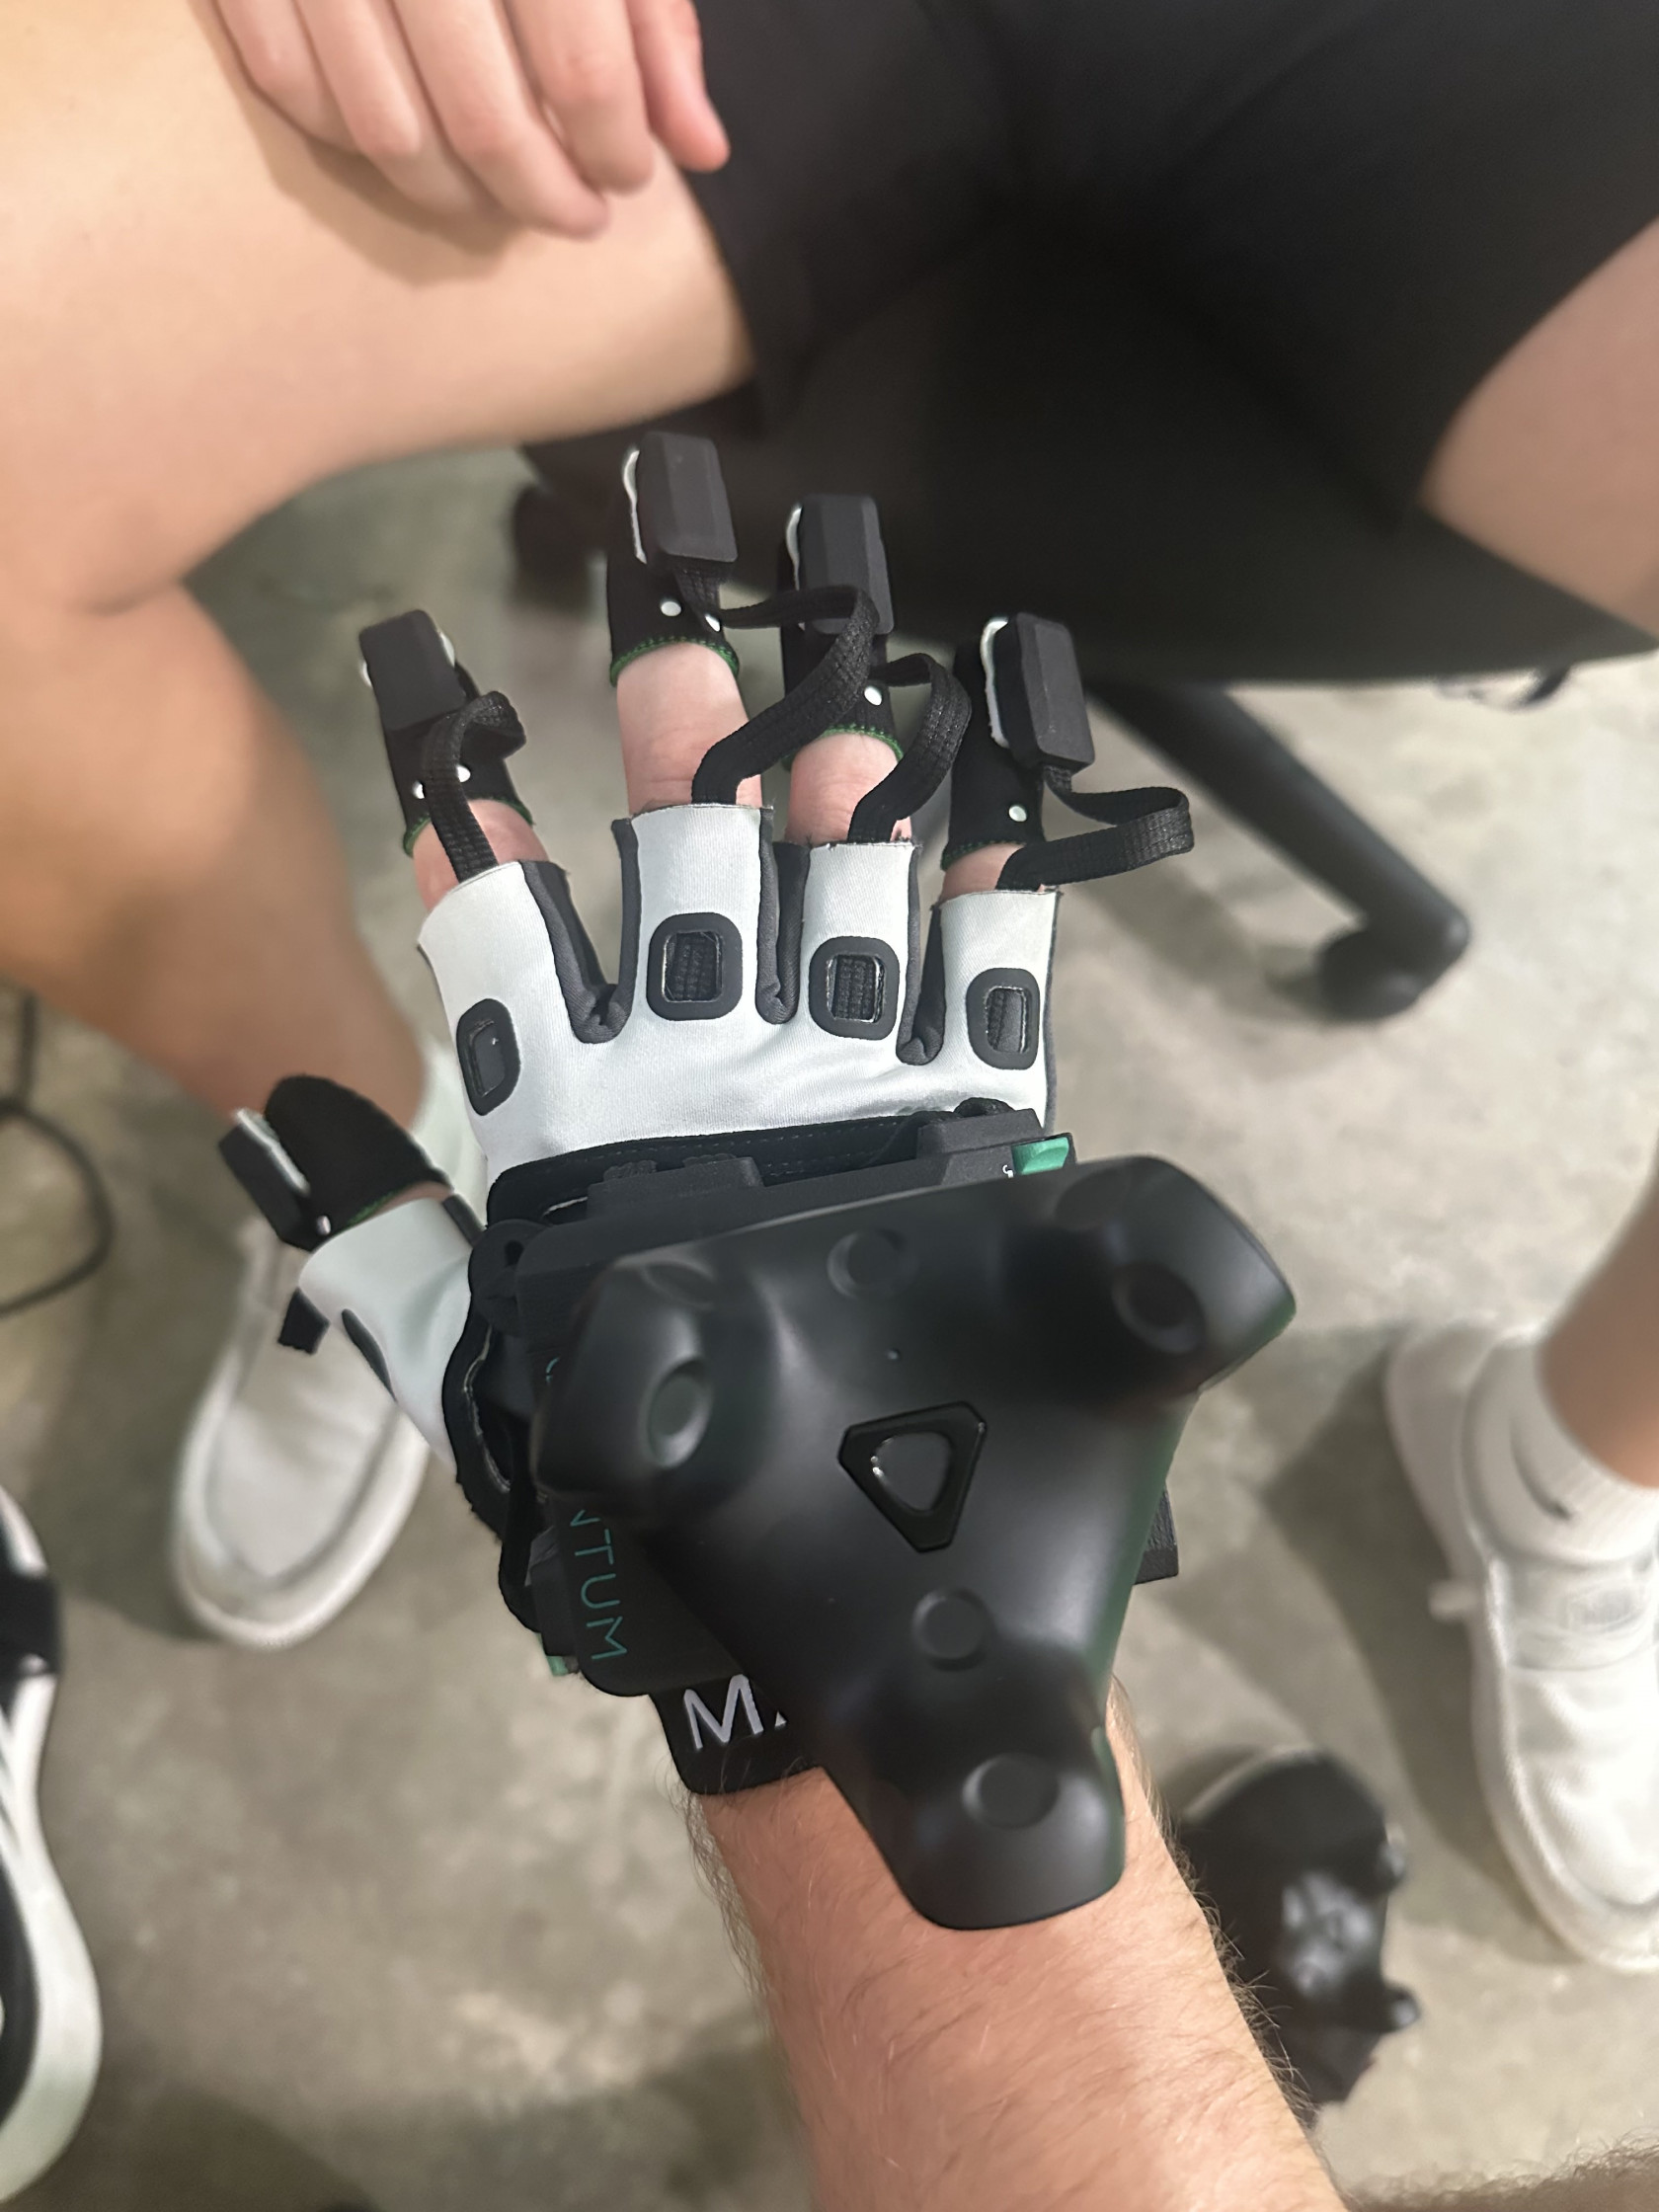
9. Once the actor is comfortably equipped with both gloves and the eight trackers are appropriately positioned, please proceed to the MANUS Core Setup page.
Equipment Maintenance
Upon completion of your performance capture session, it is crucial to follow best practices for equipment maintenance and organization. Properly turning off all devices and ensuring they are charging will prolong their life span and prepare them for future use.
- Glove Removal: Begin by assisting the actor in removing the gloves. It is recommended that the actor does not attempt this task independently. Once the gloves are removed, return the fingertip covers to their respective bags and place the gloves in the charging station, ensuring they are plugged in for recharging.
- Vive Tracker Removal: Next, aid the actor in removing the eight Vive trackers. Ensure that all eight trackers are returned to the charging station and correctly plugged in for recharging.
- Power Down Equipment: Proceed by turning off the surge protector power strip that was initially activated. This action will switch off the LED lights and lighthouses.
Once these steps are completed, all hardware has been taken care of and prepared for the next session.
For the software component:
- Close Software: Exit out of the MANUS Core program, making certain that you have saved all data and finalized all tasks prior to shutting down the PC completely.
- Lastly, ensure that the computer and Motion Capture (MOCAP) workspace is clean and free from trash or miscellaneous items that might cause clutter or obstruction. Maintaining an organized work environment is critical for efficient operation.
Mocap Post Production
READ ME FIRST
Important!
It is important to understand the process of post production or the area between recording an animation and then using it within a game engine such as Unity or Unreal.
After a successful recording with the Manus software, generally we export the animation as an FBX format file and with the skeleton type Mixamo. The Mixamo skeleton type is the standardized bone and joint structure and reflects a T-Pose at its base:
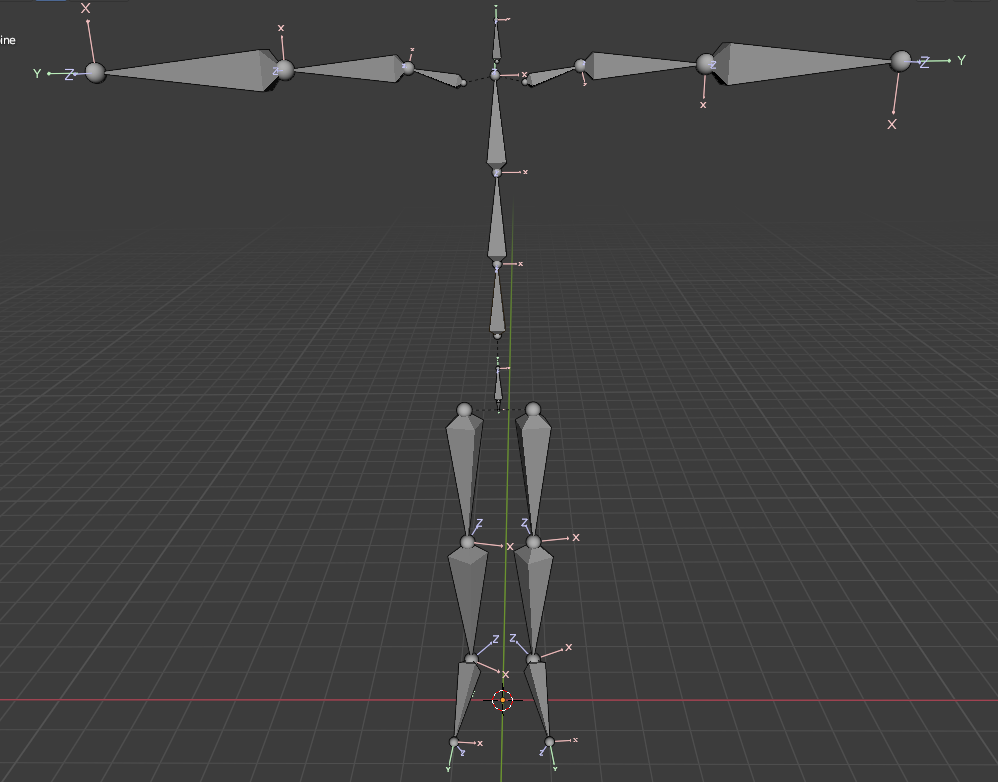
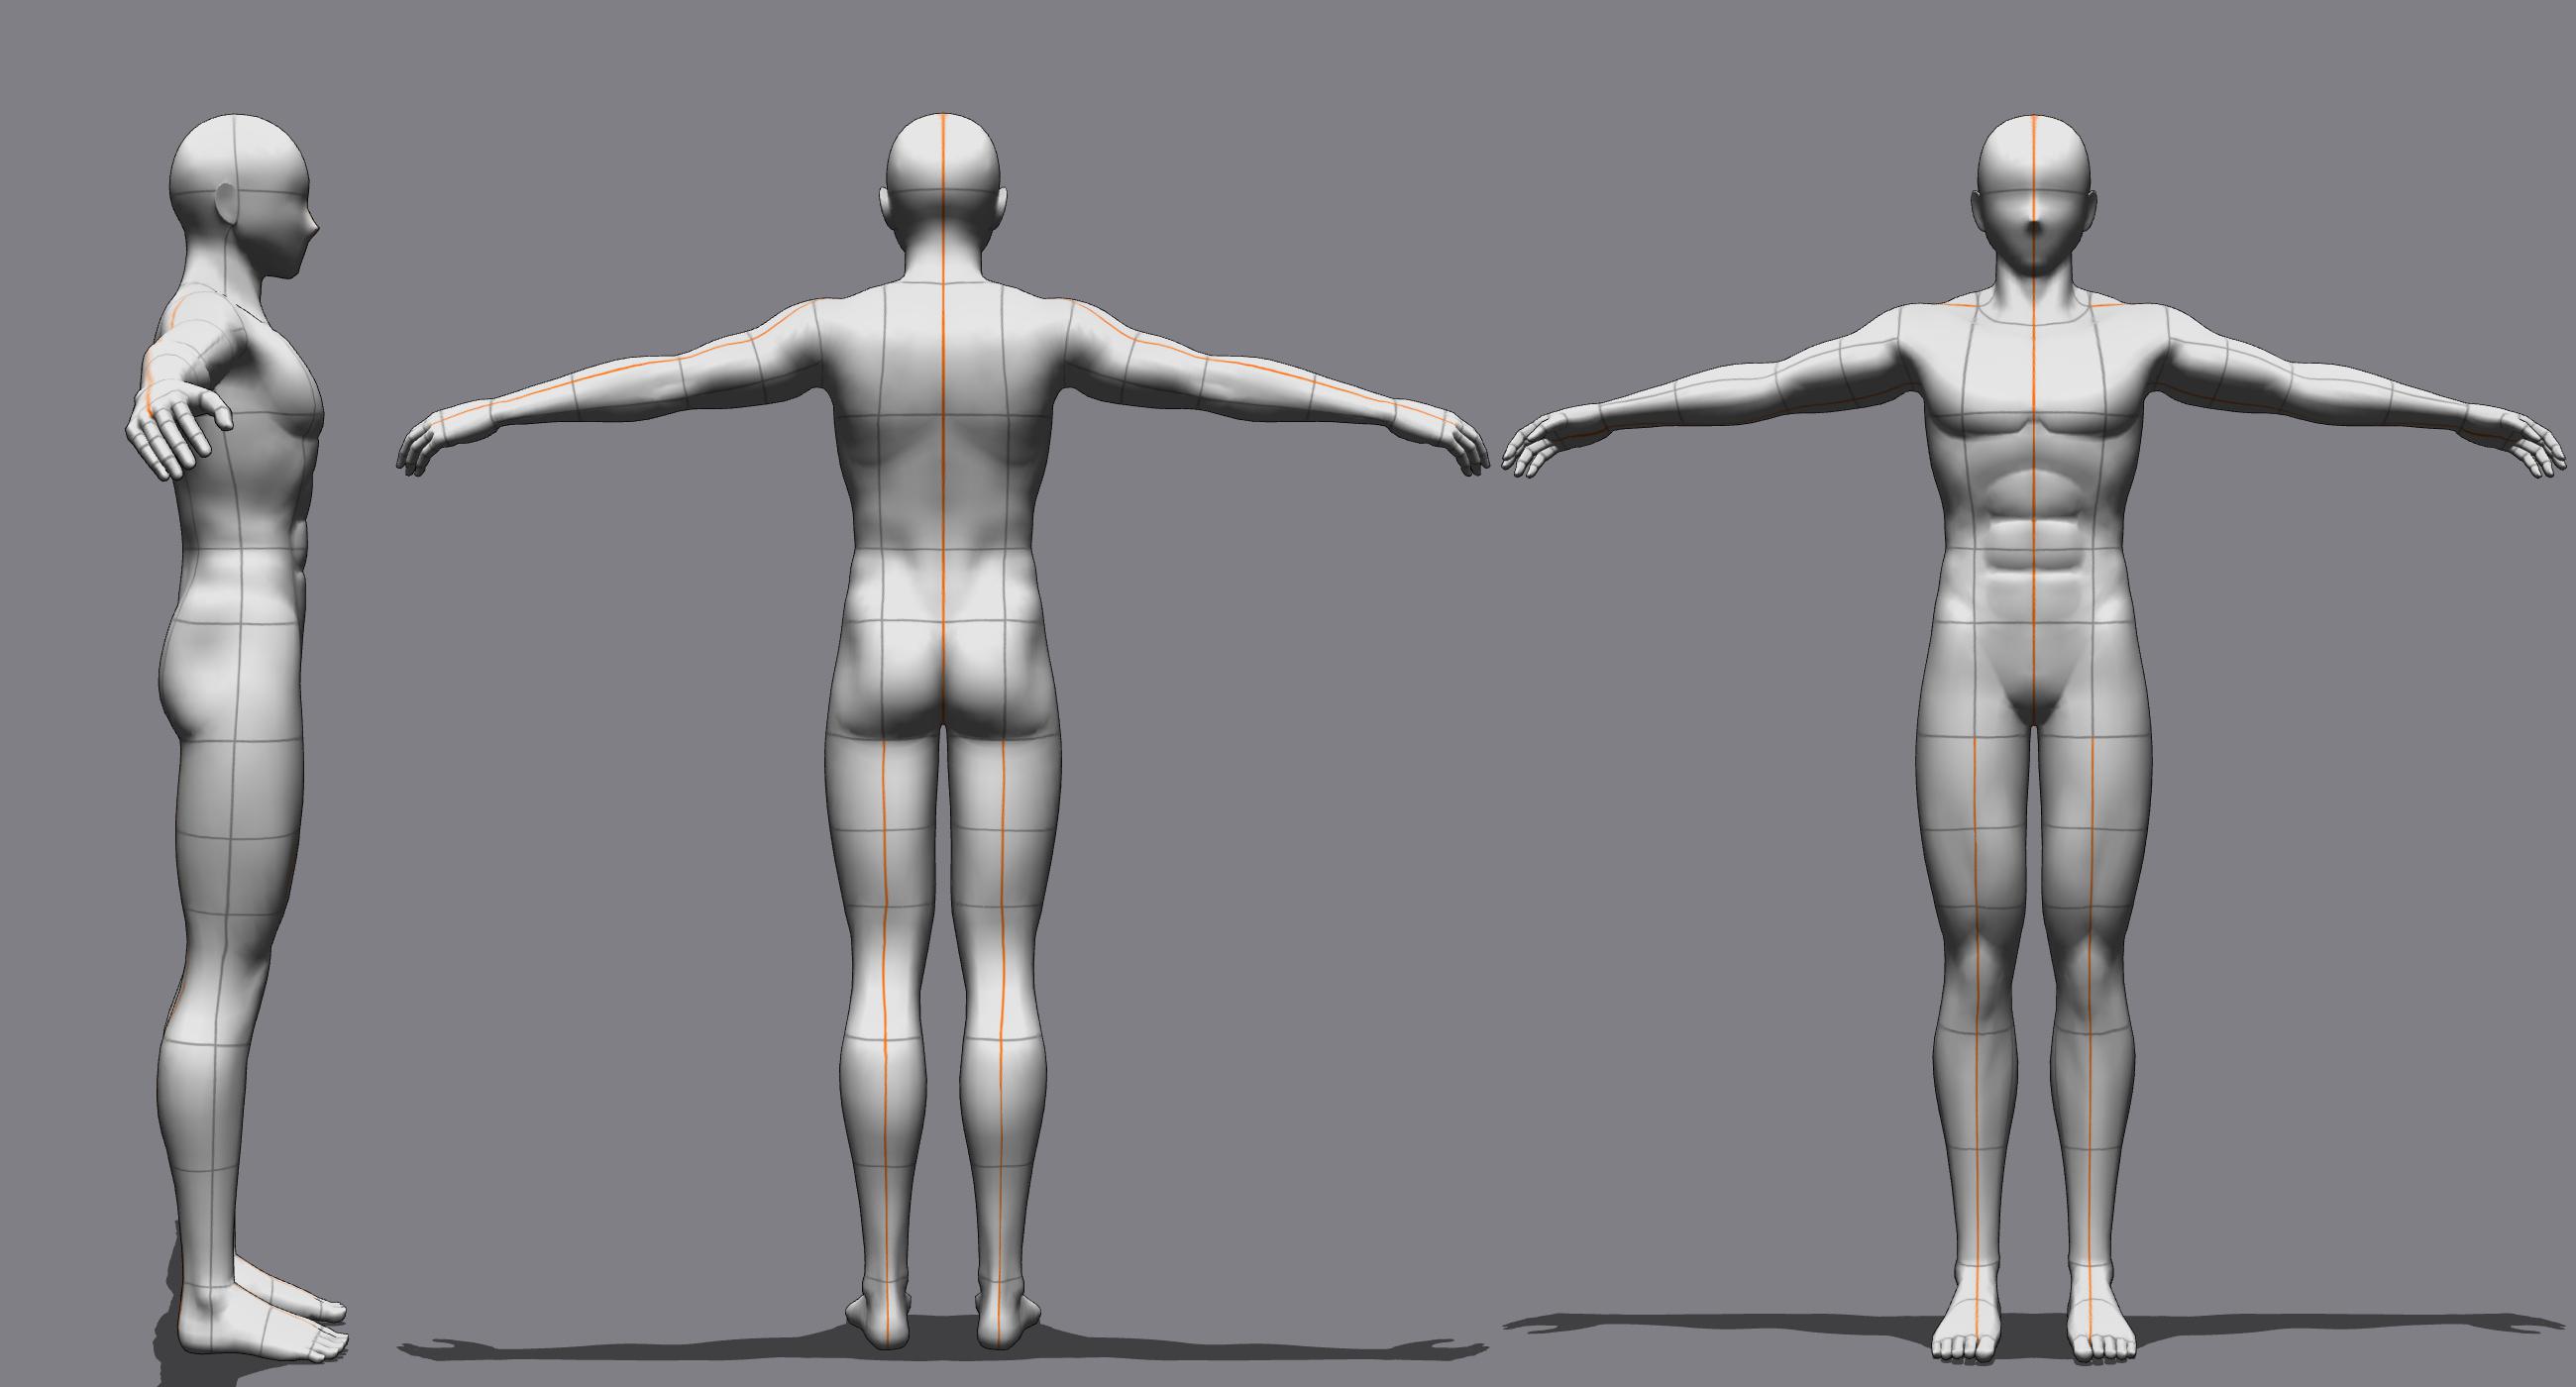
These joints should look familiar from your Manus recording.
PLEASE NOTE: Your recording from manus is RAW DATA. The data can be used for any t-pose, mixamo-bone-based, character but until it is re-targeted (explained below), the character using the animation most likely will have some weird scaling and stretching!
What is Animation Retargeting?
Animation Retargeting
Animation Retargeting is the process of repurposing existing animations for use between multiple characters, eliminating the need to create entirely new animations as you can instead share your animation assets between characters.
How do I do it?
There are MANY ways to handle it. For this tutorial, we will use Umotion Pro (a fantastic asset that is used in Unity). The benefit of this tool is that any edits can be exported for use with other game engines, such as Unreal.
In this wiki chapter, there are articles to get going with UMotion Pro, but the process I use is as followed:
- Bring in your character to Unity and set it's rig to humanoid. See here: Importing Animation
- Copy and paste the FBX. One file will be used to pull into UMotion Pro, the other asset will be the NEW or OUTPUT FBX that will be REWRITTEN after your animations. Remember, FILE ORGANIZATION :)
- Set up UMotion Pro, set up your character, set character for IK (inverse kinematics), import your animation (with IK). Again, see the other pages in the wiki for UMotion Pro.
- Make your adjustment edits as an ADDITIVE LAYER within UMotion Pro. Now, the animation is adjusted AND retargeted! :)
- Export the animation as an FBX (to the copy you made earlier, this will rewrite!)
- Profit.
UMotion Pro package can be found here:
https://drive.google.com/drive/folders/11TLL6_xIiJTCOBv7oGCIzmAohw_Rn1OT?usp=drive_link
Animation Editing/Retargeting UMotionPro
About
We will be using UMotionPro, a third-party plugin for Unity, to re-target and edit our animations. UMotion is a complete tool with advanced features and runs as an independent plugin within the Unity editor. We won't be using any Unity features except the basics to get up and running.
I am assuming for this guide that you have not used Unity before. Game engines and software are updated constantly and parts of software gets deprecated so always keep in mind that sometimes there is an investigation portion if something appears missing.
If this is your FIRST TIME in Unity, check out this link before getting started: https://learn.unity.com/tutorial/explore-the-unity-editor-1#
Setup
Launch Unity Hub. Under the Projects tab, select New project. Choose 3D (Built-in Render Pipeline). On the right, create a project name. Be sure to uncheck Connect to Unity Cloud! Select a location, such as your Desktop, and when you are ready, select Create project.
You may need to sign-in to Unity Hub with a Personal License. You can use to sign in with Google and sign in with your SU credentials.
Your next step is to download UMotionPro here: https://drive.google.com/file/d/1mEKMc3H7dxucxabkgFGkOLFHYZnhCVTK/view?usp=drive_link
After downloading, either double-click or drag the file into your Unity project. When prompted, select the button to Import All. For some, a Consent Request window may appear to update some files. Select Yes.
Before moving to the next step, if you have not used Unity, it may be a good idea to take a moment and familiarize yourself with the editor, such as the Hierarchy, Inspector, Project window, Scene window, etc.
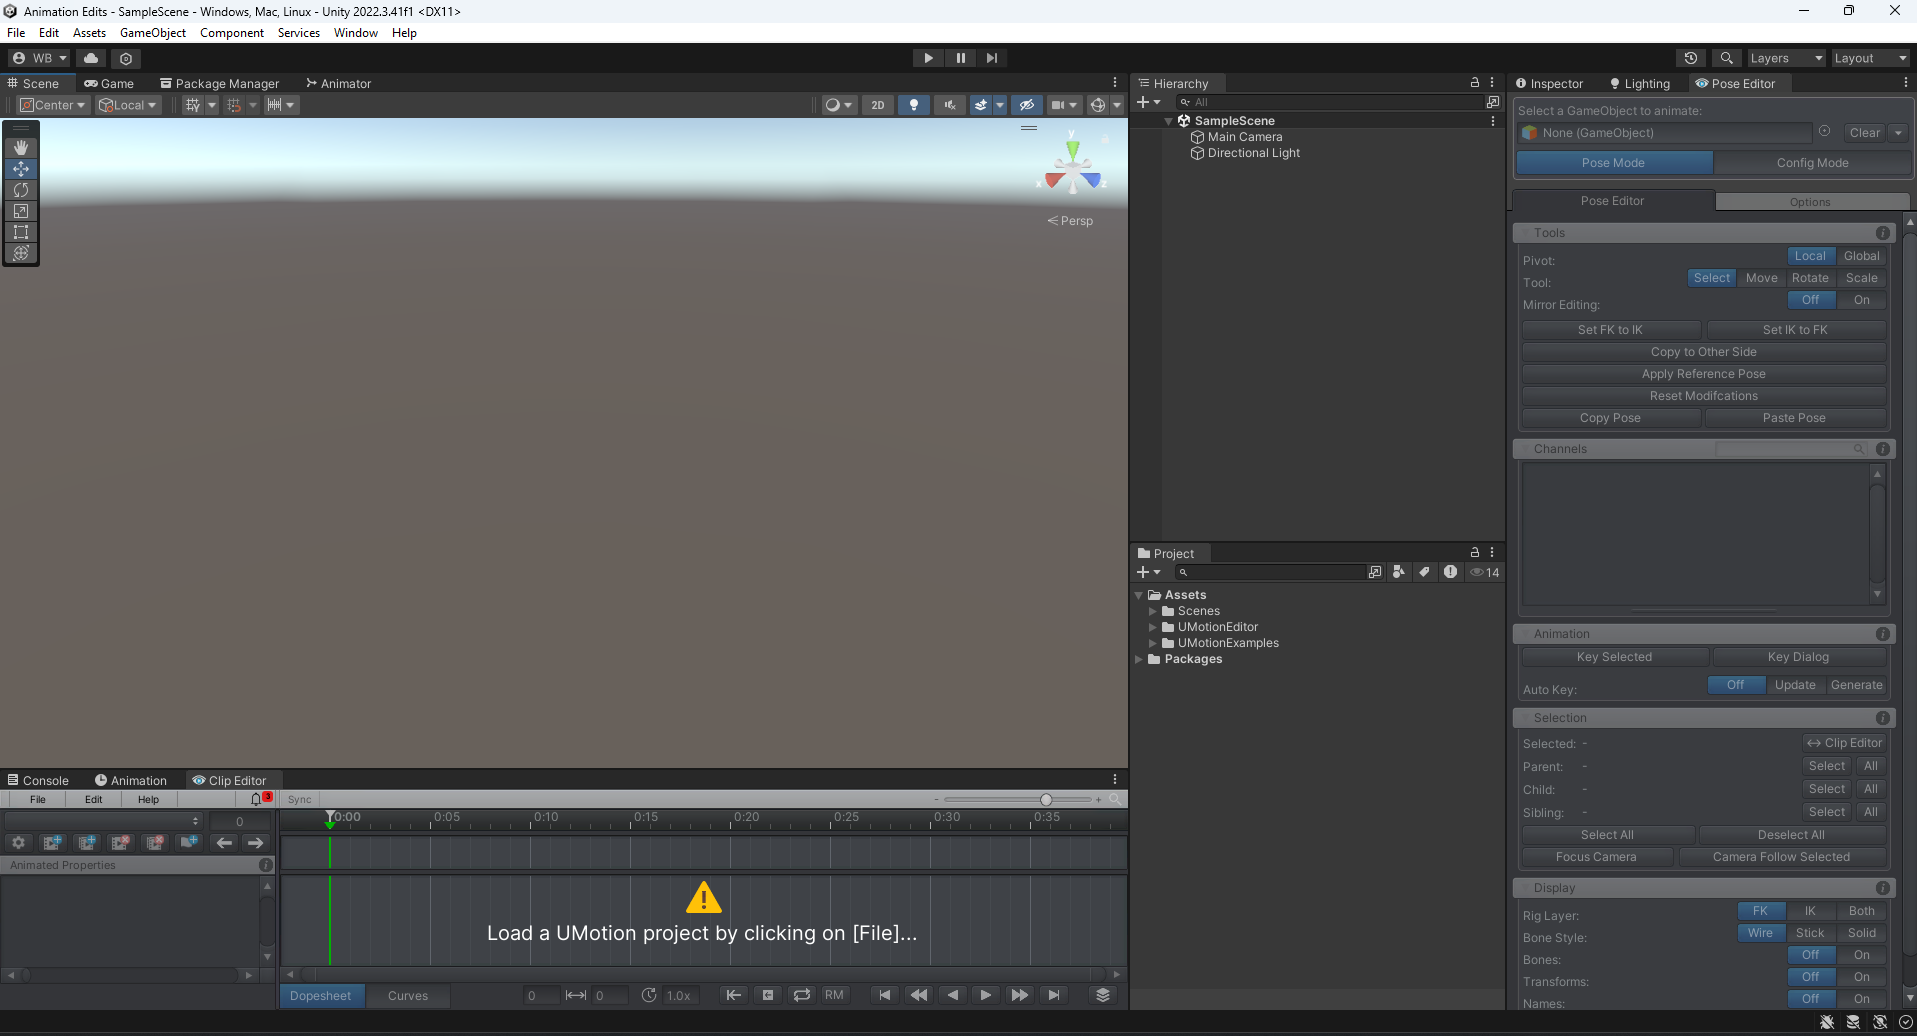
The last thing we need to do is open some windows for UMotionPro. There are two windows, the clip editor and the pose editor. The clip editor is where animations are made/edited. The pose editor is where the configuration for the humanoid character takes place. To open these windows, go to the top under Window/UMotion Editor/Pose Editor (and Clip Editor). Position them where convenient. I like to leave open my Hierarchy, Project window, and Scene window.
Now, let's import a character and animation. Create a folder in your project window and give it a name such as your character's name. Inside, you can drag and drop your animation files as well your character files. Textures and materials are not a big concern here so I am skipping that set up.
For each character AND animation file you import (typically as an FBX), you must set its animation type to Humanoid. Select one of your files and information will appear in the Inspector window. Select the Rig tab and under the Animation Type drop down, switch from Generic to Humanoid. Finally, click Apply.
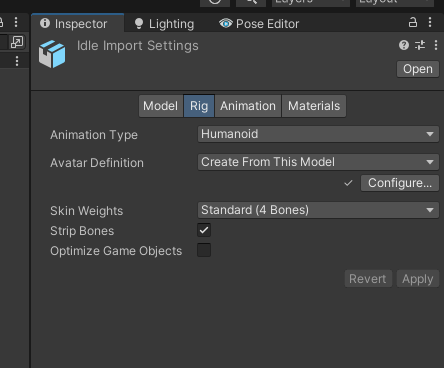
For humanoids, it is critical within Unity you change any character model or animation to humanoid. The number one issue people run into moving forward is missing this step!
UMotionPro
I recommend checking out the following playlist before getting started. The first 4 videos you should watch to get a sense of what I am about to cover below. https://www.youtube.com/playlist?list=PLI-5k9R34MAzGs-FomlWDZQXF93w6qyfD
Assuming you checked out the videos above, under the Clip Editor window, create a new project by going to File/New Project/Humanoid. Save the project in your character's folder you created earlier.
Drag your character from the Project window into the Hierarchy window or in the Scene window. In the Inspector tab, reset their Position and Rotation to 0, 0, 0. Afterward, switch to the Pose Editor tab.
Drag your character from the Hierarchy into the empty field Select a GameObject to animate inside the Pose Editor. Click Create Configuration and if UMotion detects Blend Shapes, select Add to Head.
Now back under in the Clip Editor, add your animations. Go to File/Import Clips and click on Add Clips. Select all your animations and click Import.
Verify your animation runs by selecting it under the drop down in the Clip Editor.
Export Animation
I have found the best way to export animations with the least amount of problems, good compression, and cross-engine compatibility is to export and bake the animation into an FBX file.
Close your UMotion project by going to the Clip Editor, choosing File/Close Project.
Find your character in the Project folder within Unity. Right-click on that character file and choose Copy.
Now, right click and Paste the character to a different folder location, such as creating a directory called Exports. This new character will receive the exported animations and will not interfere with the old character.
Reopen your UMotion project by going to File/Open Project in the Clip Editor. Reassign your character in the Pose Editor.
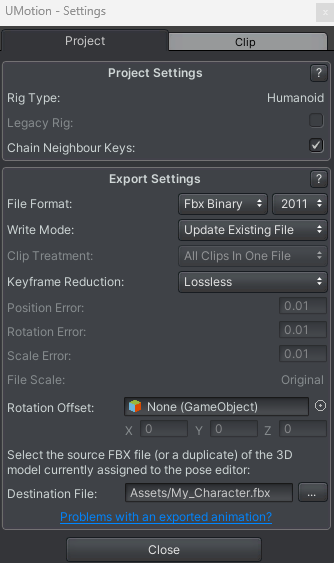
Now, go to File/Export/Export Settings. Change the File Format to Fbx Binary. Under Destination File, choose the button with the 3 dots and select your COPIED character. Do not choose your current character as the overwrite could make strange behavior within UMotion.
Close the window.
You can now Export your animations by going to File/Export/All Clips OR Current Clip within the Clip Editor.
Close out of your UMotion project when you are finished.
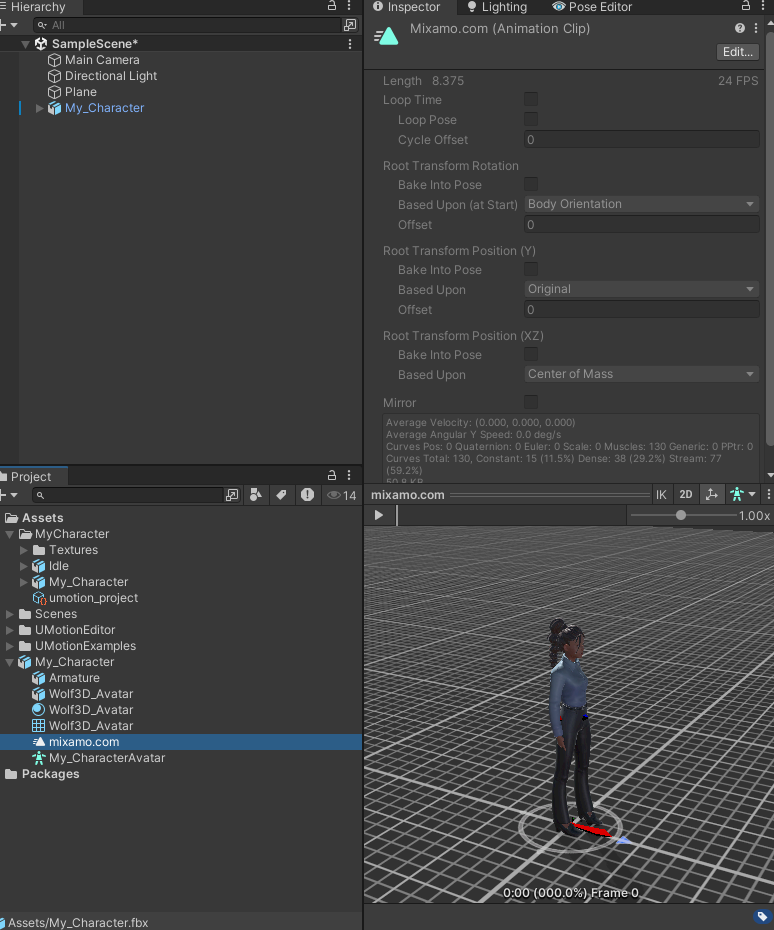
Find your exported character in the Project window. You can verify the animation(s) were exported correctly by collapsing the file and selecting your animation. The Inspector window will show the character and allow your to Play to preview.
You can now save this character FBX character with its new animations by navigating to its directory and making a copy somewhere. Hint: within Unity, right click on the file and select Show in Explorer to get there quicker.
Editing your animation (Optional)
There are many ways to edit your animation within UMotion. My approach is to generally start with a reasonably well recorded animation to start with that does not have major errors (such as frame skips) and to use Inverse Kinematics (IK).
This can be an involved process depending on your animation! If a lot of editing is needed, consider re-recording. Like 3D modelling, animation editing is a very creative/artistic process which is a skill that can improve over time!
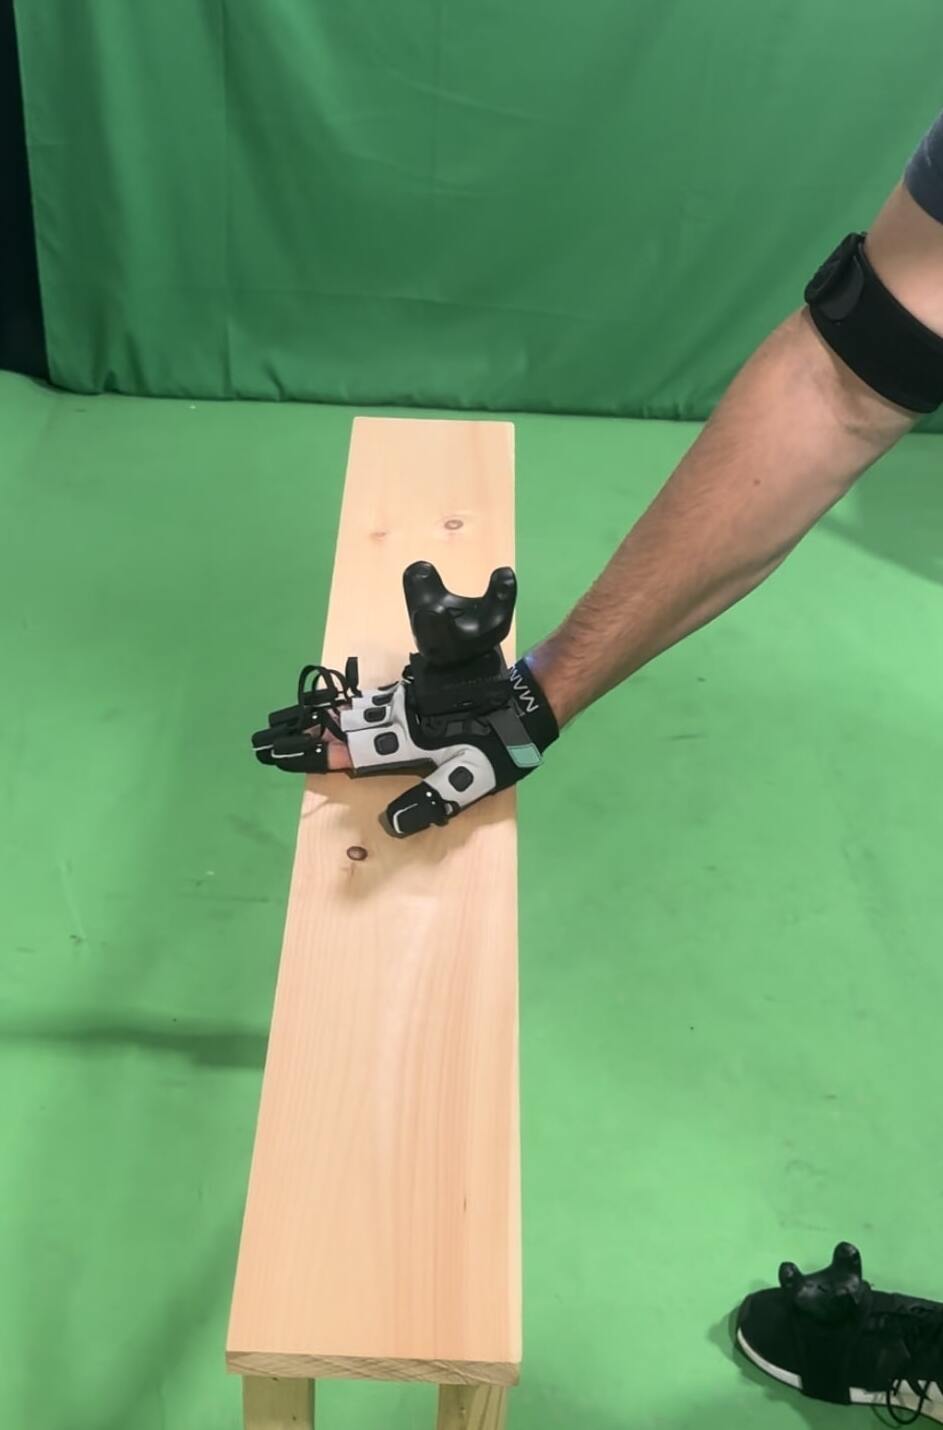
For this, let's pretend our actor had their hand placed on a desk and we needed to align it with the 3D model desk we would be using. In this scenario, you would import your desk model as a guide object, place it within the scene near your character, preferably in proximity to the animation.
Open your animation in the Clip Editor and set the character in the Pose Editor as you normally would. Within the Pose Editor, switch to Config Mode at the top. You will find a button about halfway down called IK Setup Wizard. Click it, leave the defaults the way they are, and select Create. Your character will now have dark blue limbs. Switch back to Pose mode.
Notice how your skeleton limbs (white) match the animation and the blue limbs (IK) are not moving? We need to convert our animation to IK as well! But first, let's go to the Pose Editor and find the Display section. Under Rig Layer, switch the button Both to just IK. It makes the preview of the bones easier to follow. Now to convert your animation to IK:
Exercise: Take a moment and see if you can figure out how to convert the animation to IK
Solution: In the Clip Editor, with your current animation applied, go to Edit/FK to IK conversion. Then click Convert.
It may take a moment or several to convert to IK depending on the size/length of the animation.
Let's add a LAYER to our animation, something that will additively take the hand with the same animation, but adjust it to the point where it needs to "place on the desk."
In the Clip Editor, in the absolute bottom right, is a button that opens up Layers. Click it and you will notice we have a default layer called Base Layer. Click on the icon with the [+] to add another layer. Give it a meaningful name.
Within the Pose Editor, under the Animation section, switch Auto Key to Generate. This allows us to move items within the timeline of our Clip Editor and key frames will be added automatically.
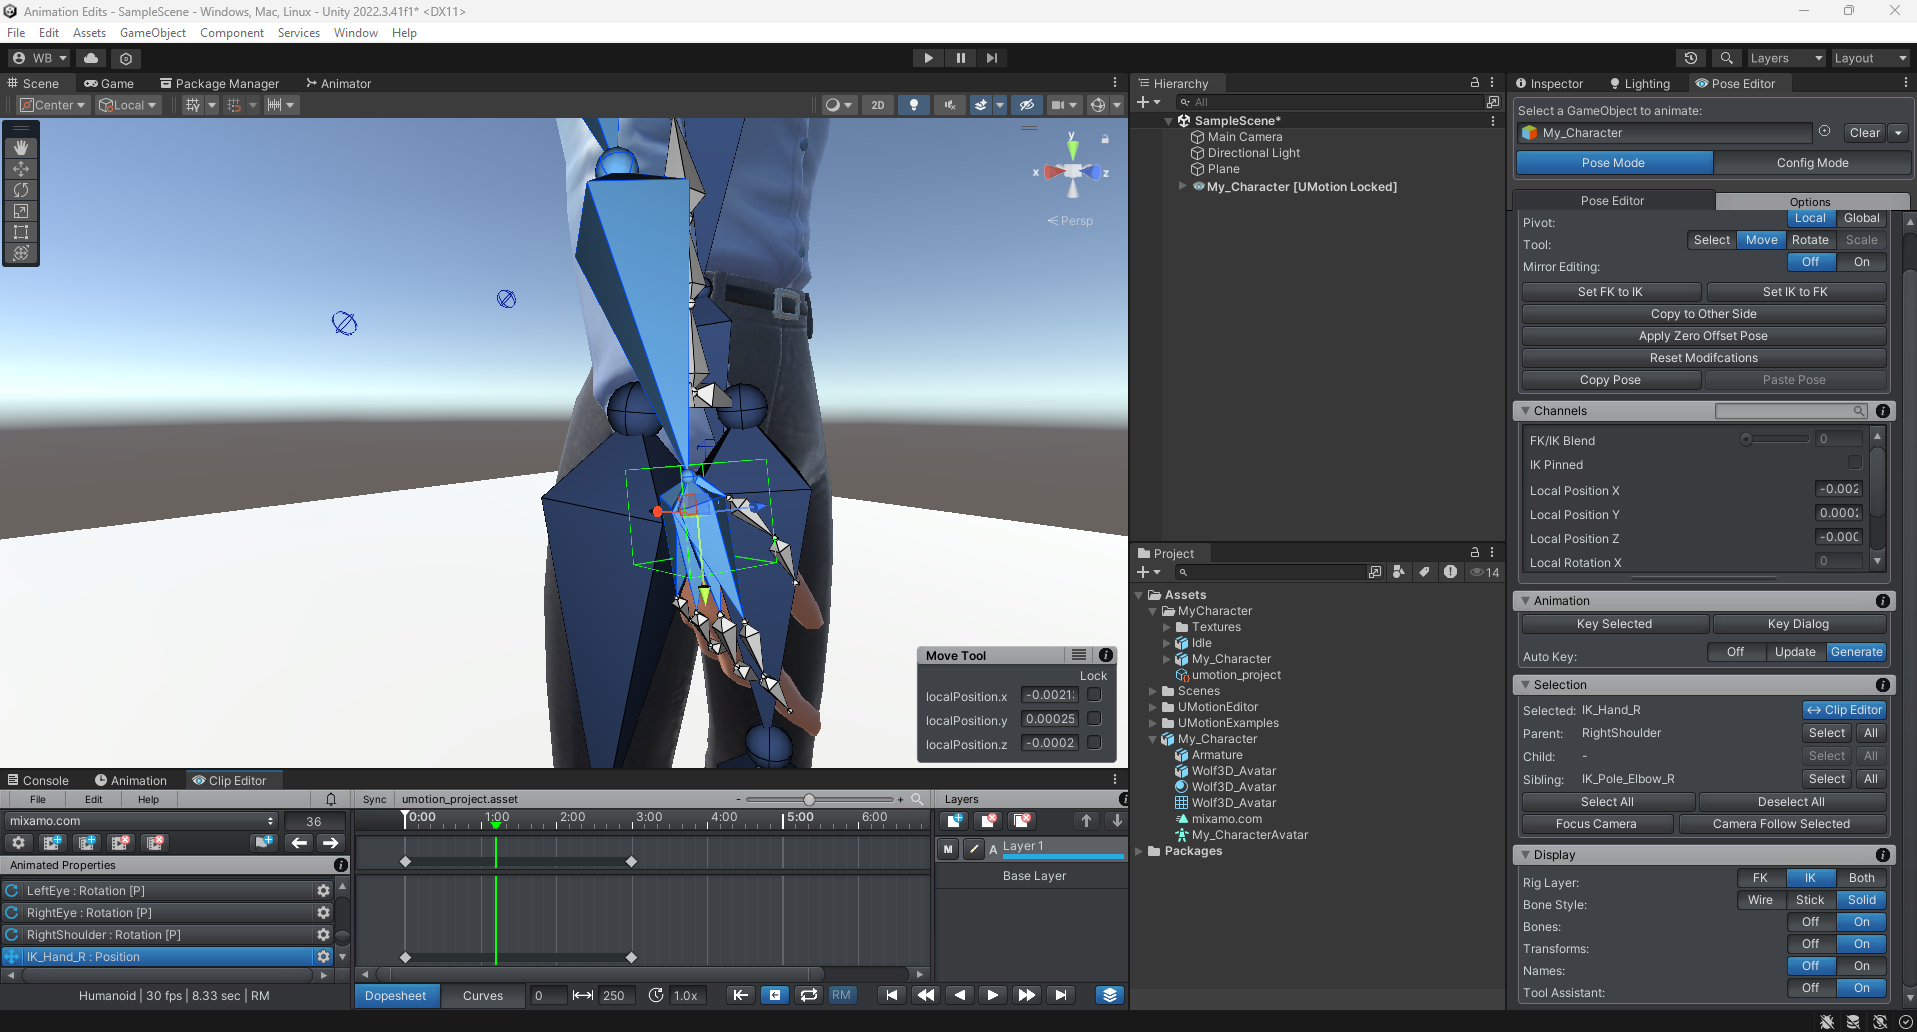
Scrub through your timeline to the point where an animation needs adjusted. If you click on the characters "hand" you will see a blue box with some translation controls. Feel free to adjust your character
Depending on how far you are in your animation time, you may need to move backward a few frames and adjust your hand "back" with a new key frame so that there isn't a dramatic compensation within the layer!
You can export your animation in the same process you followed above.
Video Version
Where to go from here?
There are more advanced tutorials and concepts for UMotion, such as advanced editing and even creating animations from scratch. I provided their Playlists from YouTube below:
https://www.youtube.com/@SoxwareInteractive/playlists
For Unreal developers or those looking for advanced/complete animation capabilities, the animation sequencer suite within Unreal has become a game engine industry standard.
UE Facial Capture (Setup)
About
For this guide, we will be using Unreal Engine and capturing our facial data using the app Live Link. This app uses FaceID, which is available on most iPhones as well as our lab iPads.
Characters should follow standardized rigged bone-structure and this also applies to the face. We won't be covering how to rig a character but instead will use a character creation tool that is free and characters are ready to go.
Create Character
Create a character (ReadyPlayer.Me)
Let's visit ReadyPlayer.Me and customize your character. At the end of the process, a window will appear with a link and a button to your character. Click the Copy button and paste into a new browser window/tab. This should download your character (.glb)
glb and gltf files are a great file extension, but in the case for ReadyPlayer.Me, I found that Morphs/Blendshapes are imported incorrectly in Unreal at the time of this writing. For this step I am going to use Blender.
Open Blender and delete the Cube, Camera, and Light from the scene. Now go to File/Import gLTF 2.0 and import your downloaded model.
OPTIONAL: I recommend exporting the textures out in case they have problem packing with the new export
Now go to File/Export/FBX. Leave the default settings and give your character a name. Finally, click the button Export FBX.
Unreal Engine Setup
This project will ONLY be used for your animations!
- Launch Unreal Engine. Create a new project under Games and select Blank. Set the Target Platform for Mobile and Quality Preset to Scalable. Leave Starter Content and Raytracing unchecked. Give the project a name and select create.
- Go to File/New Level. Select Basic and click Create. Now go to File/Save Current Level As... and choose a name for the map. I recommend creating a folder called Maps and saving this map inside there.
- Go to Edit/Project Settings/Maps and Modes and change your Editor Startup Map to the map you just created.
- Go to Edit/Plugins and enable the following: Live Link. If you are recording a live performance, enable Apple ARKit and Apple ARKit Face Support. If you are not, enable LiveLinkFaceImporter Restart the editor.
After the editor restarts, you should be back in your basic starting map! (If you see the terrain map, you did something wrong)
Character Setup
Now let's import your character.
- Create a folder called Characters inside Content. Inside, create a folder for the CURRENT character you will be working with. Open this folder directory inside the Content Drawer.
- Drag and drop your character FBX into this location. A menu will appear and you MUST select under Mesh/Advanced Import Morph Targets and Use T0 as Ref Pose. Then select Import All
- Assign any textures to the materials if you need.
- Click Save All and verify everything is correct before proceeding.
Now, drag your character (Skeletal Mesh, pink) on to the level.
Inside the folder for your character, right-click and selection Animation/Animation Blueprint. Select your character's skeleton in the popup window and select Create. Give this file a decent name.
Select your character inside the level. In the Details Panel, under Animation/Anim Class, assign this animation blueprint into the class.
Character Setup for Live Link
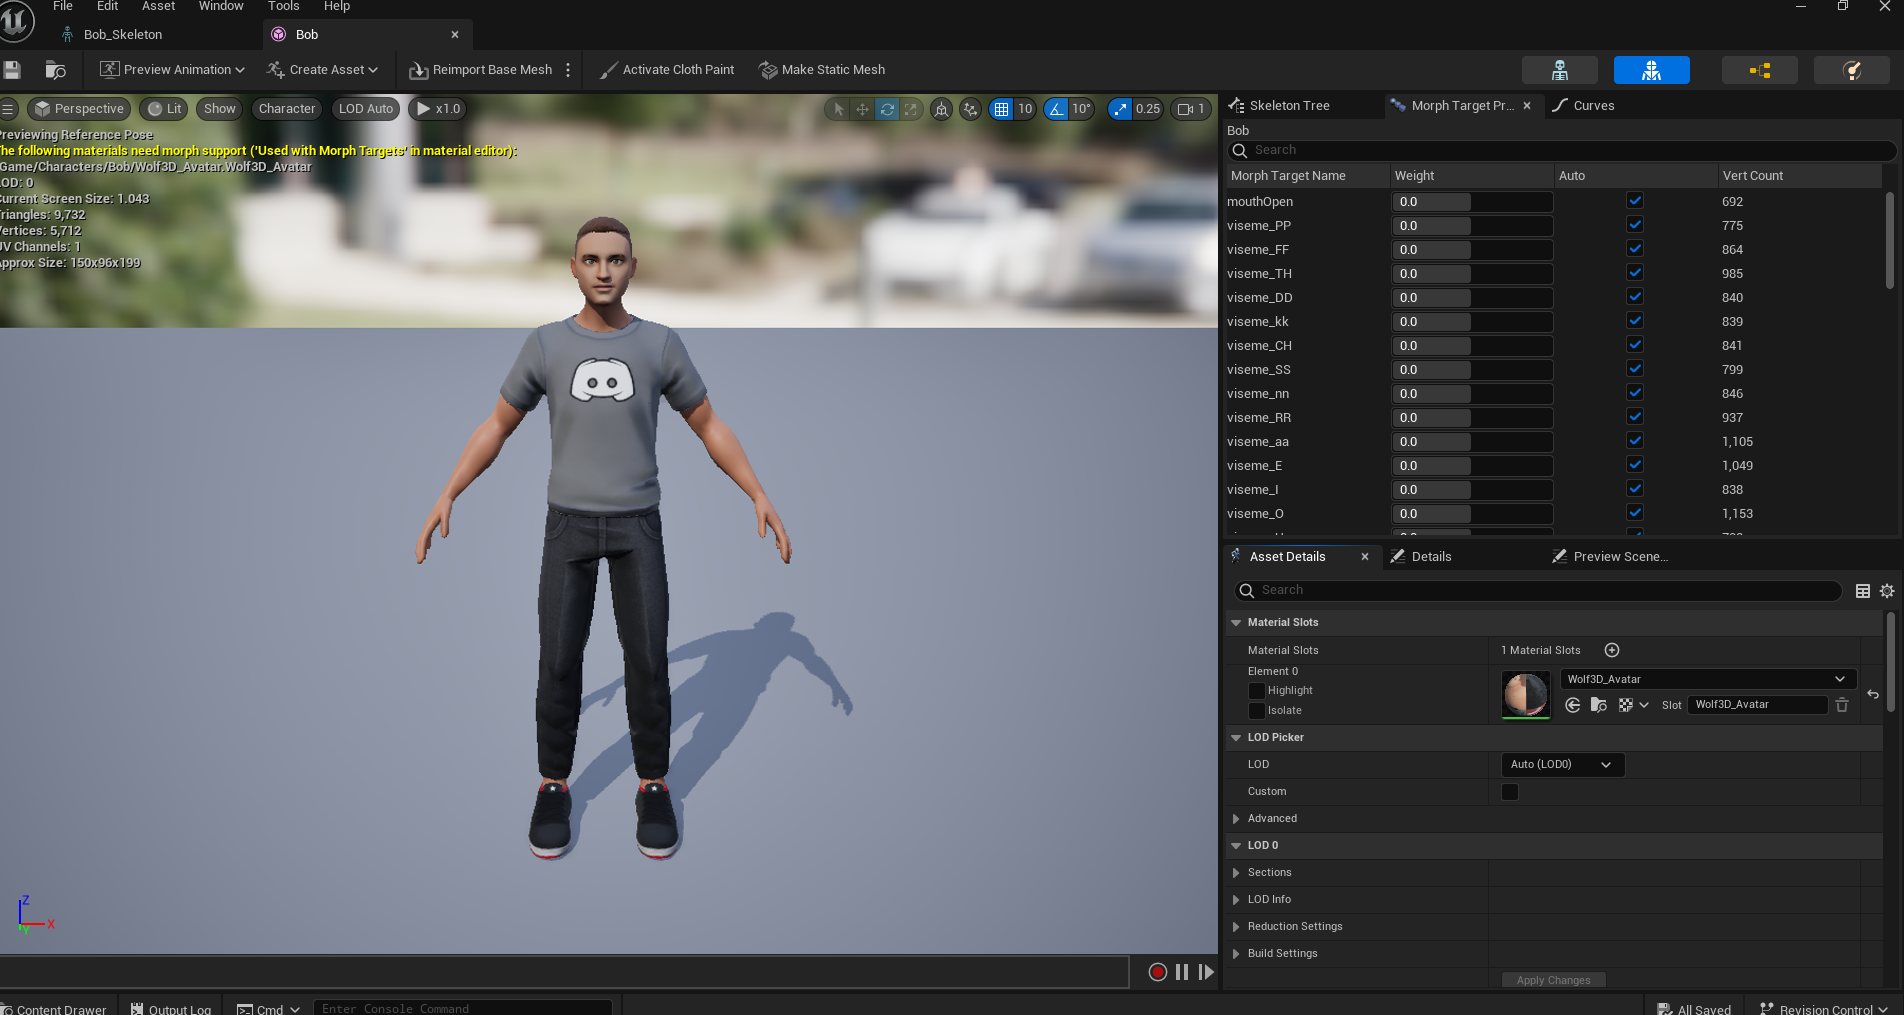
Our character will need to receive the data from the iPad and translate this data into your character's face. Here is an example of the Morph Targets that my character's skeleton has:
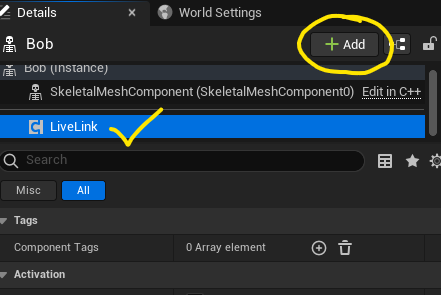
First click on your character in the level. In the Details Panel, click the [+ Add] button and add a Live Link Skeletal Animation component.
Now, open the Animation Blueprint you created earlier.
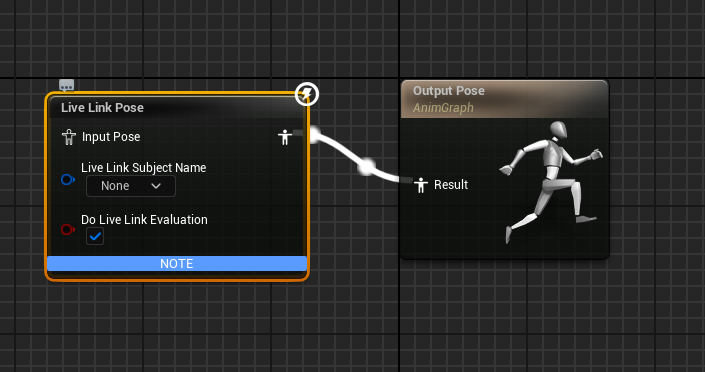
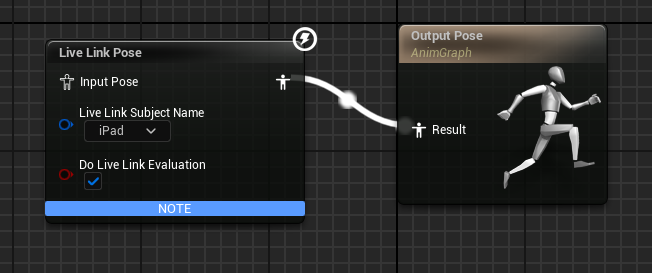
In the Anim Graph tab, you will see a node called Output Pose. Right click and choose Live Link Pose. Connect the two nodes together with the person-looking execution pins.
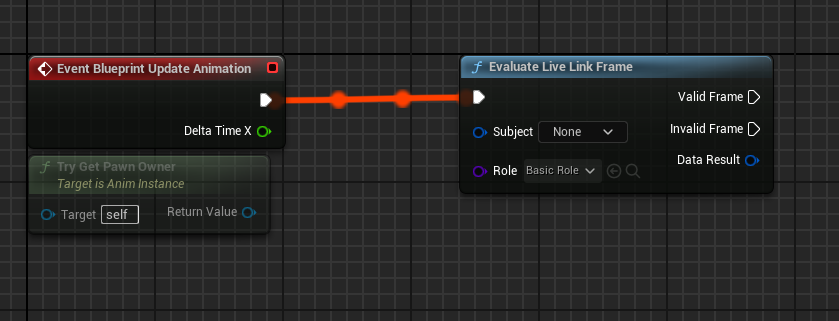
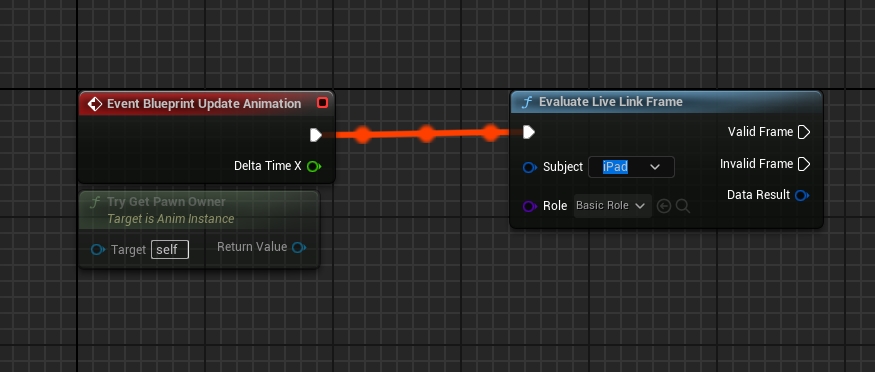
Now switch to the Event Graph tab. Create a node called Evaluate Live Link Frame. In this node there is a purple class dropdown. Choose LiveLinkBasicRole.
Note the Subject drop down in both nodes you created. YOU WILL HAVE TO RETURN TO THESE LATER AND VERIFY THE iPAD APPEARS HERE.
Click Compile and Save.
Create the Remapping Asset (For Live Recordings)
This is probably the most involved item on the list. In your character folder, right-click and create a new Blueprint Class. Under All Classes, search LiveLinkRemapAsset. Choose this and create the asset. Name it something like YourCharacterNameRemap. Now open the file.
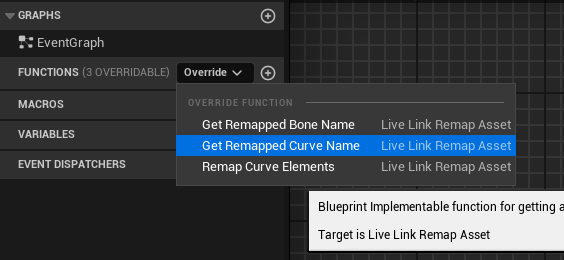
Inside the file, on the left under Functions, if you hover over the word/header, a dropdown that says Override appears. Click the drop down and choose Get Remapped Curve Name.
What do we need to do here? In the above image I show those Morph Targets that need to be used in my character's skeleton. This function receives as a parameter the name of the curve from your face in the iPad and we need to match it to our character's Morph Target curve.
Create a new variable called SkeletalMesh. Under its type, search for Skeletal Mesh and choose Object Reference. Press Compile in the top left and under Default Value you should be able to select your mesh.
From here create the nodes like following:
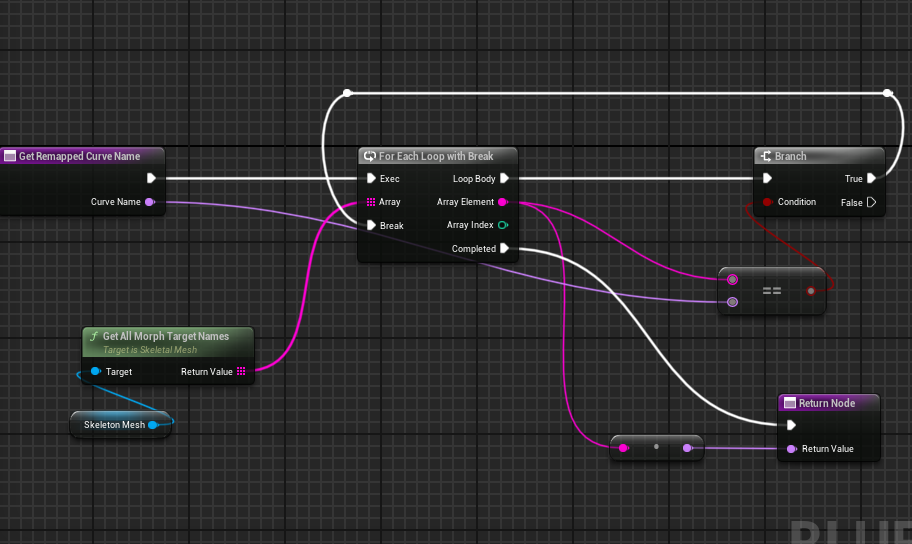
The pins that move from the Branch True back to Break are called Reroute Nodes. The can be created by double clicking on the node path and can be readjusted
It looks scary but it's simple. Here is the algorithm:
- Take our skeleton mesh and get all of the Morph Target Names
- Let's cycle through each name and see if it matches the Curve Name that is coming in from the iPad.
- If it matches, stop searching and exit with the name that was found.
Now, all we have to do is assign this file. Open up your Animation Blueprint, select the Live Link Pose node. On the right, under Retarget Asset, select this file.
YOU HAVE FINISHED THE SETUP
From here, you can proceed to the Recording Section of this guide.
UE Facial Capture (Recording)
About
This guide covers using the mobile app Unreal Live Link to record ReadyPlayer.Me facial animations with ARKit using an iPhone/iPad Pro. I know many iPads issued by SU will work, but if they don't SCiL has iPads available. By the end, you should have a working facial animation that can be paired with body animations and audio.
I chose ReadyPlayer.Me for several reasons: there is character customization, standardized face morphs/blend shapes, standardized character bone rig, and others.
The previous tutorial covers setting up your character. You must do so before proceeding!
Any Apple device that uses FaceID can be used. In this guide, SCiL iPads are being used.
Getting Started
Verify connection
It is IMPORTANT that both the workstation and the iPad are on the SAME NETWORK.
For the workstation, open a command-line prompt and type in:
ipconfigLook for IPv4 Address that matches you connection type (Wi-Fi vs Ethernet). This is the address that you will enter into the iPad.
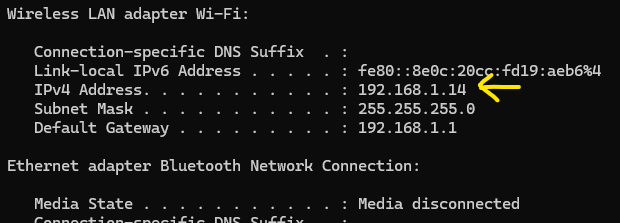
When you are ready, launch Live Link on the iPad. Select Live Link (ARKit) and press Continue. Press the [gear] icon in the top left. Tap the button Live Link under Streaming. You can leave the Subject Name alone but press Add Target. Add the IP address you obtained from the command-line in the previous step and enter 11111 in the Port. Exit the menus and return to the full scene where your face is being recorded.
Open the Unreal Project if it is not already opened. Open the window Live Link located in the menus at top under Window/Virtual Production/Live Link. If everything is running properly, you should see the iPad under the Subject Name area. Notice the yellow dot when it is NOT tracking your face, and green when it is. You can close the Live Link window.
Remember when I said to keep an eye out for the Subject drop downs in both nodes of the Animation Blueprint?
Visit your animation blueprint and in both the Event Graph tab and Anim Graph tab, the two Live Link nodes you added, assign the iPad in the drop down. Then hit Compile and Save.
Verify everything is working
This is a moment to take to verify everything is working. While using the iPad, you should notice your ReadyPlayer.Me character is now following your face, including your eyes! if it is not working immediately, close the editor and reopen.
From here, I like to run through various facial expressions or even lines and watch how my character emulates the movement. Whether it is you doing the recording, or an actor. I think it's important here to try the character so you can adjust your own facial expressions to match the expected facial expression you desire when recording.
Recording
In the Take Recorder window, you will notice a [+ Source] button. Press this button followed by From Live Link and then select the iPad source. The iPad should appear in the source window. Click on the iPad (not the yellow toggle) to review details in the panel underneath. Uncheck Use Source Timecode. You can also change the Subject Name to your character's name.
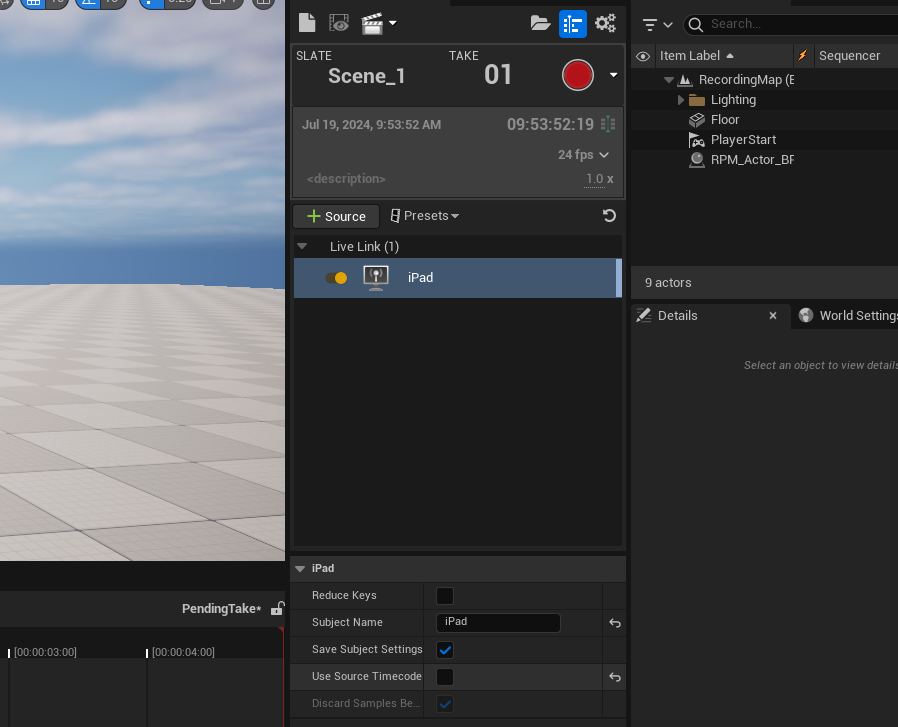
Unchecking this button uses time based off the engine. I recommend this because it will always be a consistent time versus the time based off the recording.
You will notice some information before recording, such as Slate information, Take, and Description (see image above). Feel free to edit these values with each new recording so that information matches with your take sheets.
Notice above the description that the default fps is set to 24 fps? This is one of the cinema standards. You may feel compelled to use a high frame rate so that your experience "looks good." Unlike a game engine's standard FPS, this is the interval that key frames are taken. This is independent from the actual Tick/Update loop of the engine and will look the same regardless of CPU speed. I recommend for good performance/balance to leave this alone and keep animations in general at no more than 29.97.
To record, fill out the appropriate information. Press PLAY to enter play mode first. Press F8 to center your camera up. This is only cosmetic so you are able to view the character as you record. When you are ready, press the red record button in the Unreal editor (not the iPad). Press the same button again to end the recording.
Afterward, a recording will be saved in your Content Drawer as Cinematics/Takes/etc.
Baking/Exporting
If you open up your recordings, you will notice there are two recordings for each take. One recording is what you will use and the other you will find empty.
You can test the recording. Exit play mode if you are still in play mode, and navigate to the take in the Content Drawer. Mine was saved under 2024-07-22/Scene_1_01_Subscenes. Double click on the file, close the content drawer, and you should be able to see your animation in the sequencer. Scrubbing or pushing Play will show your live link character previewing the animation.
Now drag your character actor from the Outliner into the sequencer. Unreal will complain that the animation is read-only. Click the lock icon in the top right corner of the Sequencer window to unlock. Try dragging your your character back into the sequencer.
Holding shift, select both the character AND the animation in the Sequencer. Right click on them and select Bake Animation Sequence. Save this somewhere useful and named with a good convention. The saved animation will be a green-bar Animation Sequence asset in your content browser. You can open it up and preview.
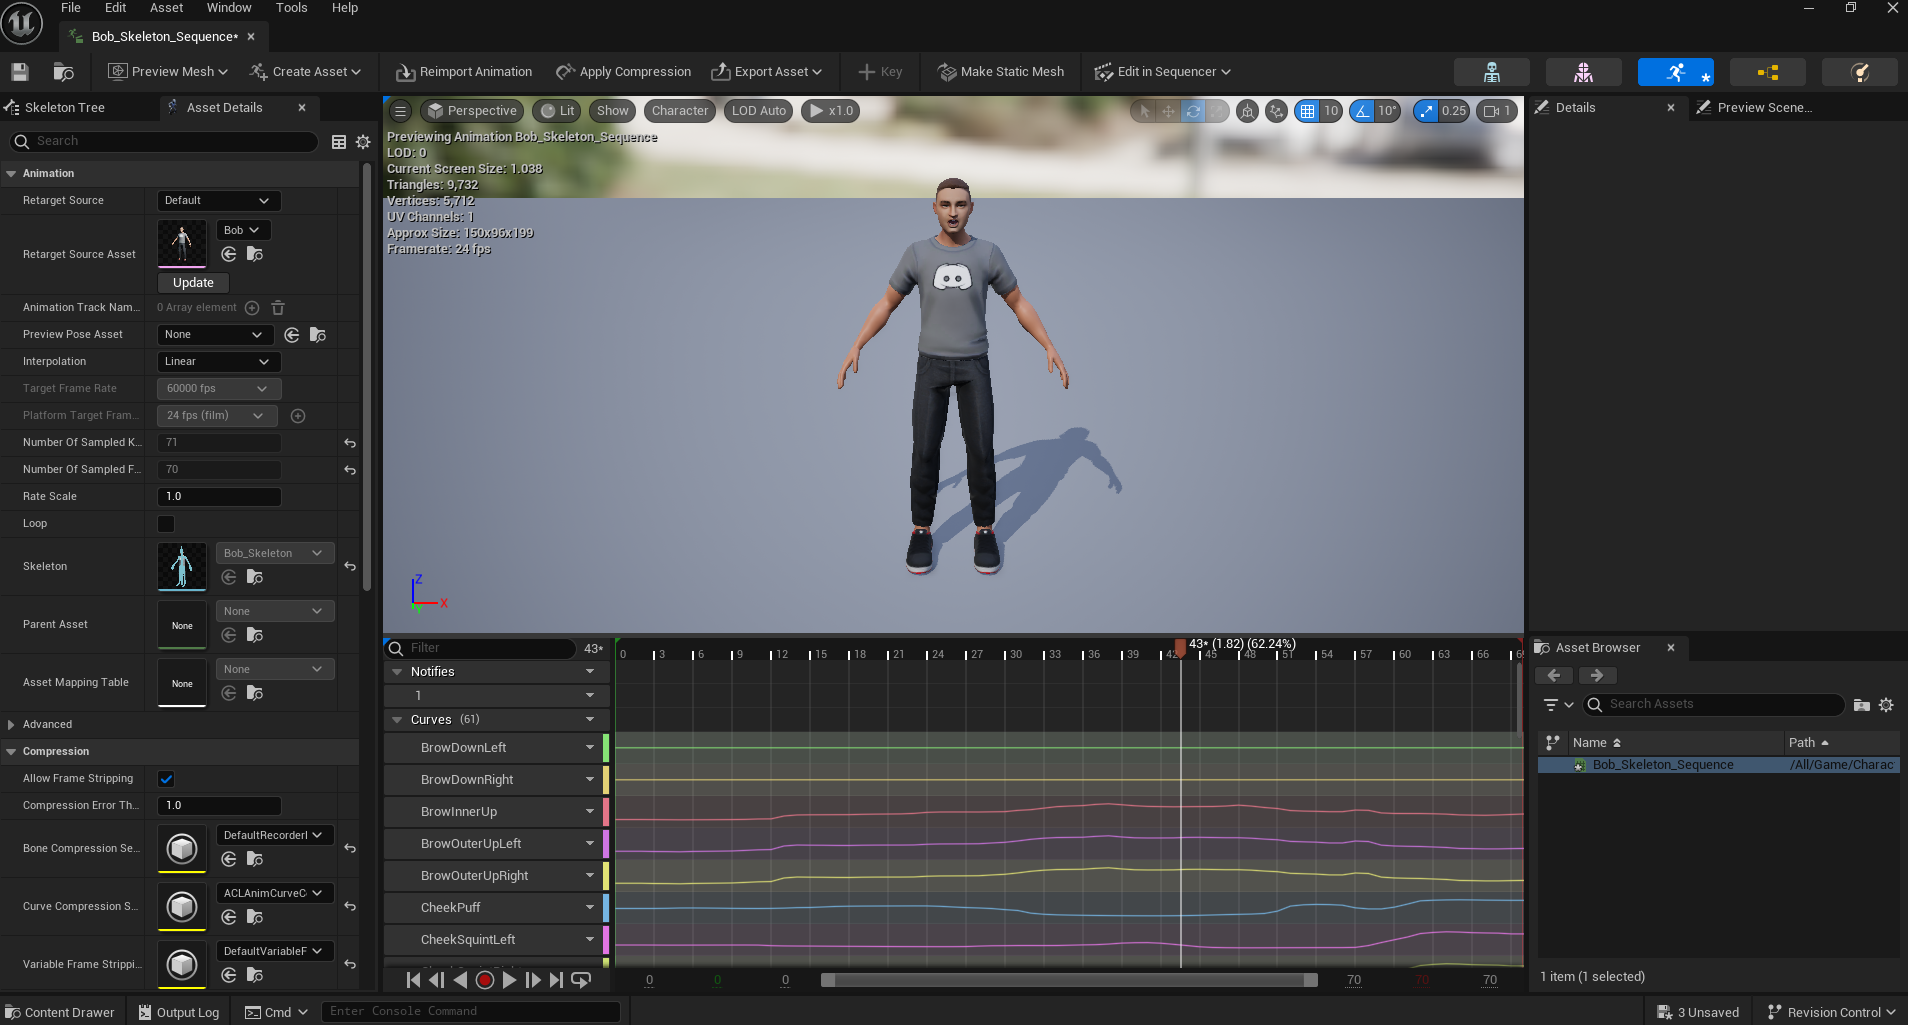
Notice the key frames are added?
Using Recorded LiveLink
Where to go from here?
You can migrate your character and animations to your WORKING project. Do not delete this project until you have finalized all your facial animations.
LIV VR Mixed Reality
LIV Mixed Reality Software
Technical Walkthrough
IMPORTANT: Do not unplug cables arbitrarily, you may break something
You will need:
-
SteamVR compatible headset (LIV is highly dependent on SteamVR)
-
If you are planning to use the Valve Index, check with Wes to make sure you’re okay to unplug it from the motion capture PC, and don’t forget to plug it back in when you’re done.
-
-
Sufficient lighting (the lights in the studio are plenty)
-
Decent camera/webcam, preferably 60 frames per second
-
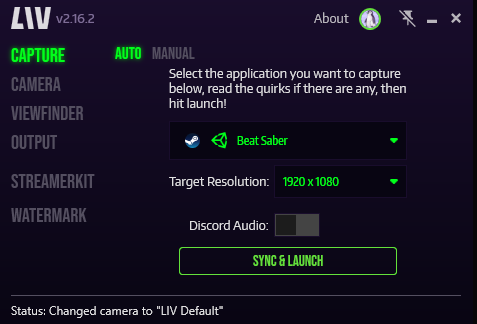
The game you are using; SCiL does not own Beat Saber, so I am using my own Steam account for the purposes of this walkthrough
-
The following apps:
-
Meta Quest Link (Only needed if using a Meta headset)
-
Steam & SteamVR
-
LIV application
-
Game (Beat Saber)
-
OBS (if recording)
-
Step 1: VR Setup (Meta)
If you are using a non-meta headset, skip to the SteamVR startup.
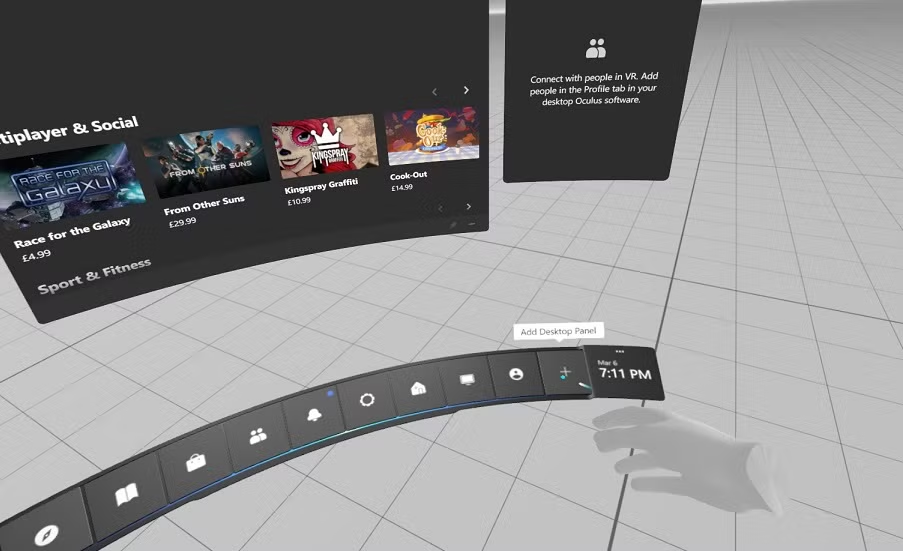
Firstly, you will need to open the Meta Quest Link app, and start VR within the headset
-
In the view of the headset, it should look like this:
Step 1a: VR Setup (SteamVR)
-
You can then open SteamVR from the desktop, or the Steam library

-
Once open, you should see this status window
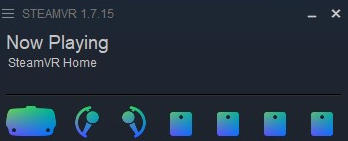
-
These icons will look different depending on what headset you are using, for example, these are for the Valve Index.
Step 2: Opening LIV
-
Open LIV from the desktop, or from the Steam library

-
It will likely prompt you for administrator privileges, just click “No” and it should open without an issue.
-
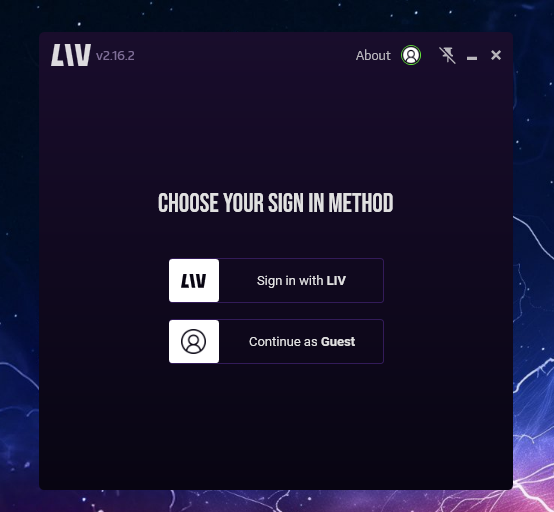
You should see this window:
-
You can choose to make an account or not, but be aware that if you continue as a guest, there will be a LIV watermark on the output screen, which is what you will record.
-
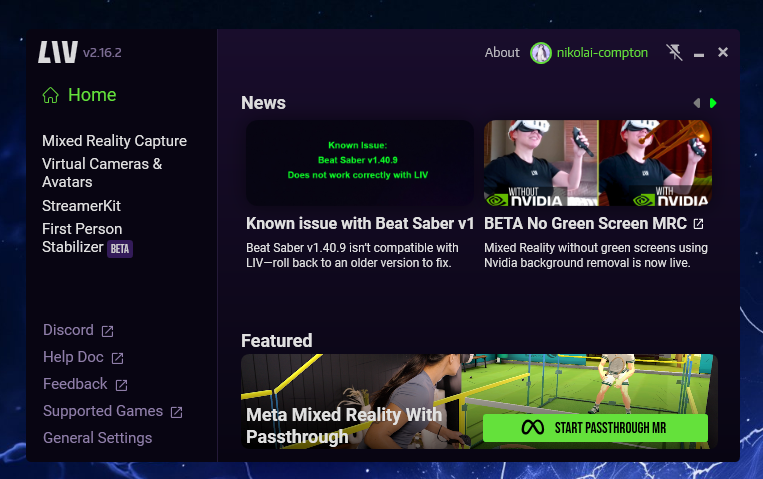
After this step, you should see this:
-
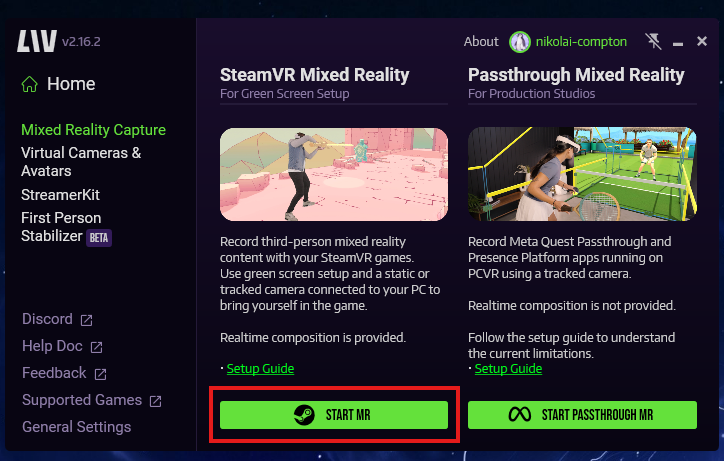
Click on “Mixed Reality Capture”
-
On the bottom, you can then click “Start MR”
-
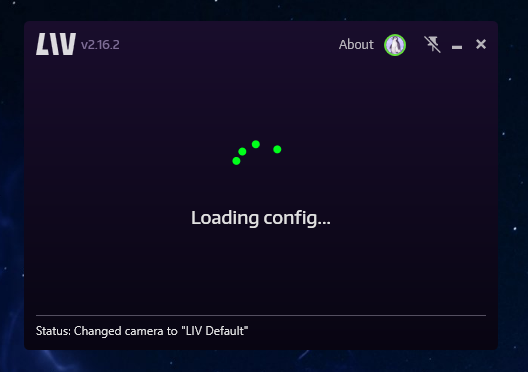
It will do some loading for a while on this screen:
-
When it finishes it should look like this:
Step 3: Calibration
-
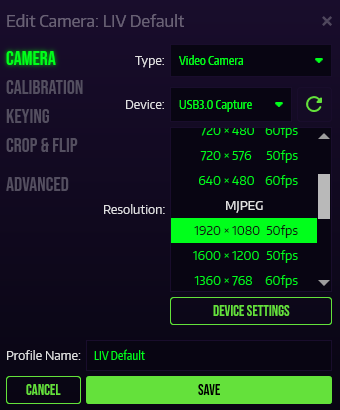
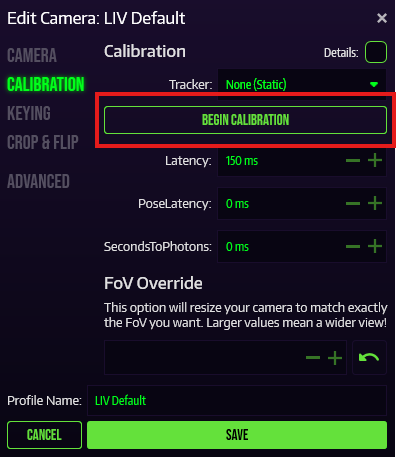
Once there, click on the “Edit” button, it looks like this
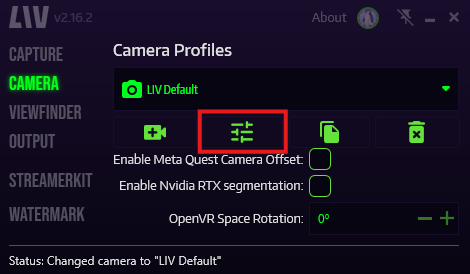
-
The camera settings should look something like this
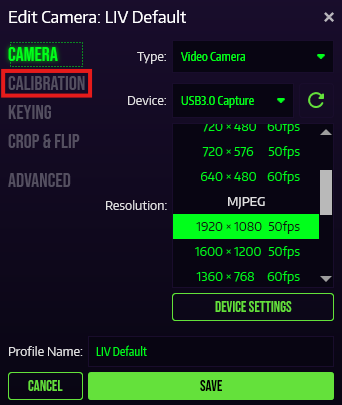
-
At this point, you can click “Begin Calibration”
-
You can choose to calibrate within the headset, or with your computer monitor, for this example, I will be using the headset.
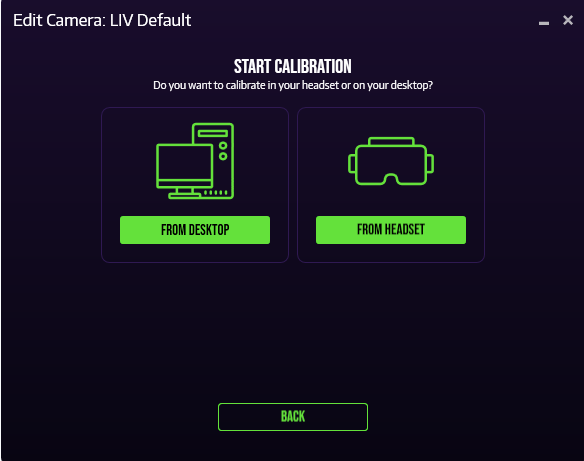
-
It should still display instructions on the computer screen, as well as the VR display.
-
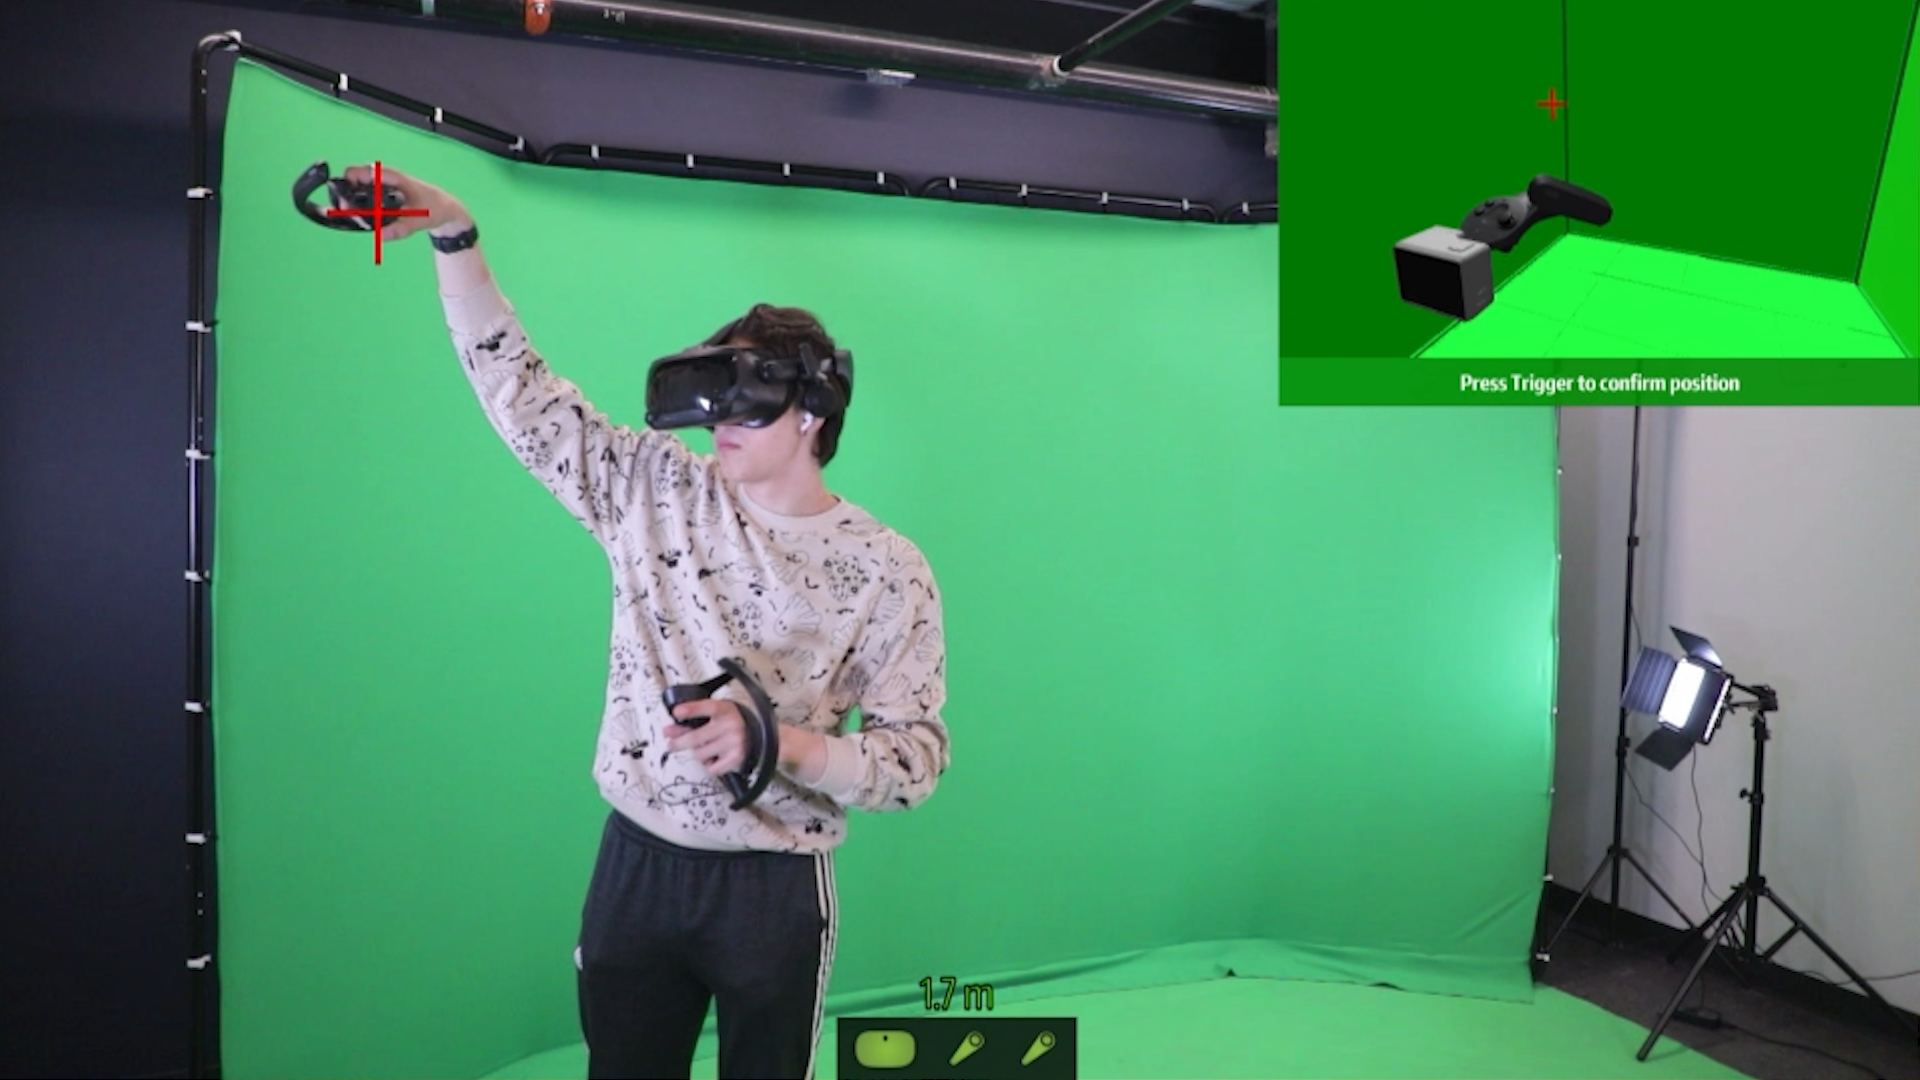
If you followed the instructions correctly, you should see a big red ‘plus’ on the output window.
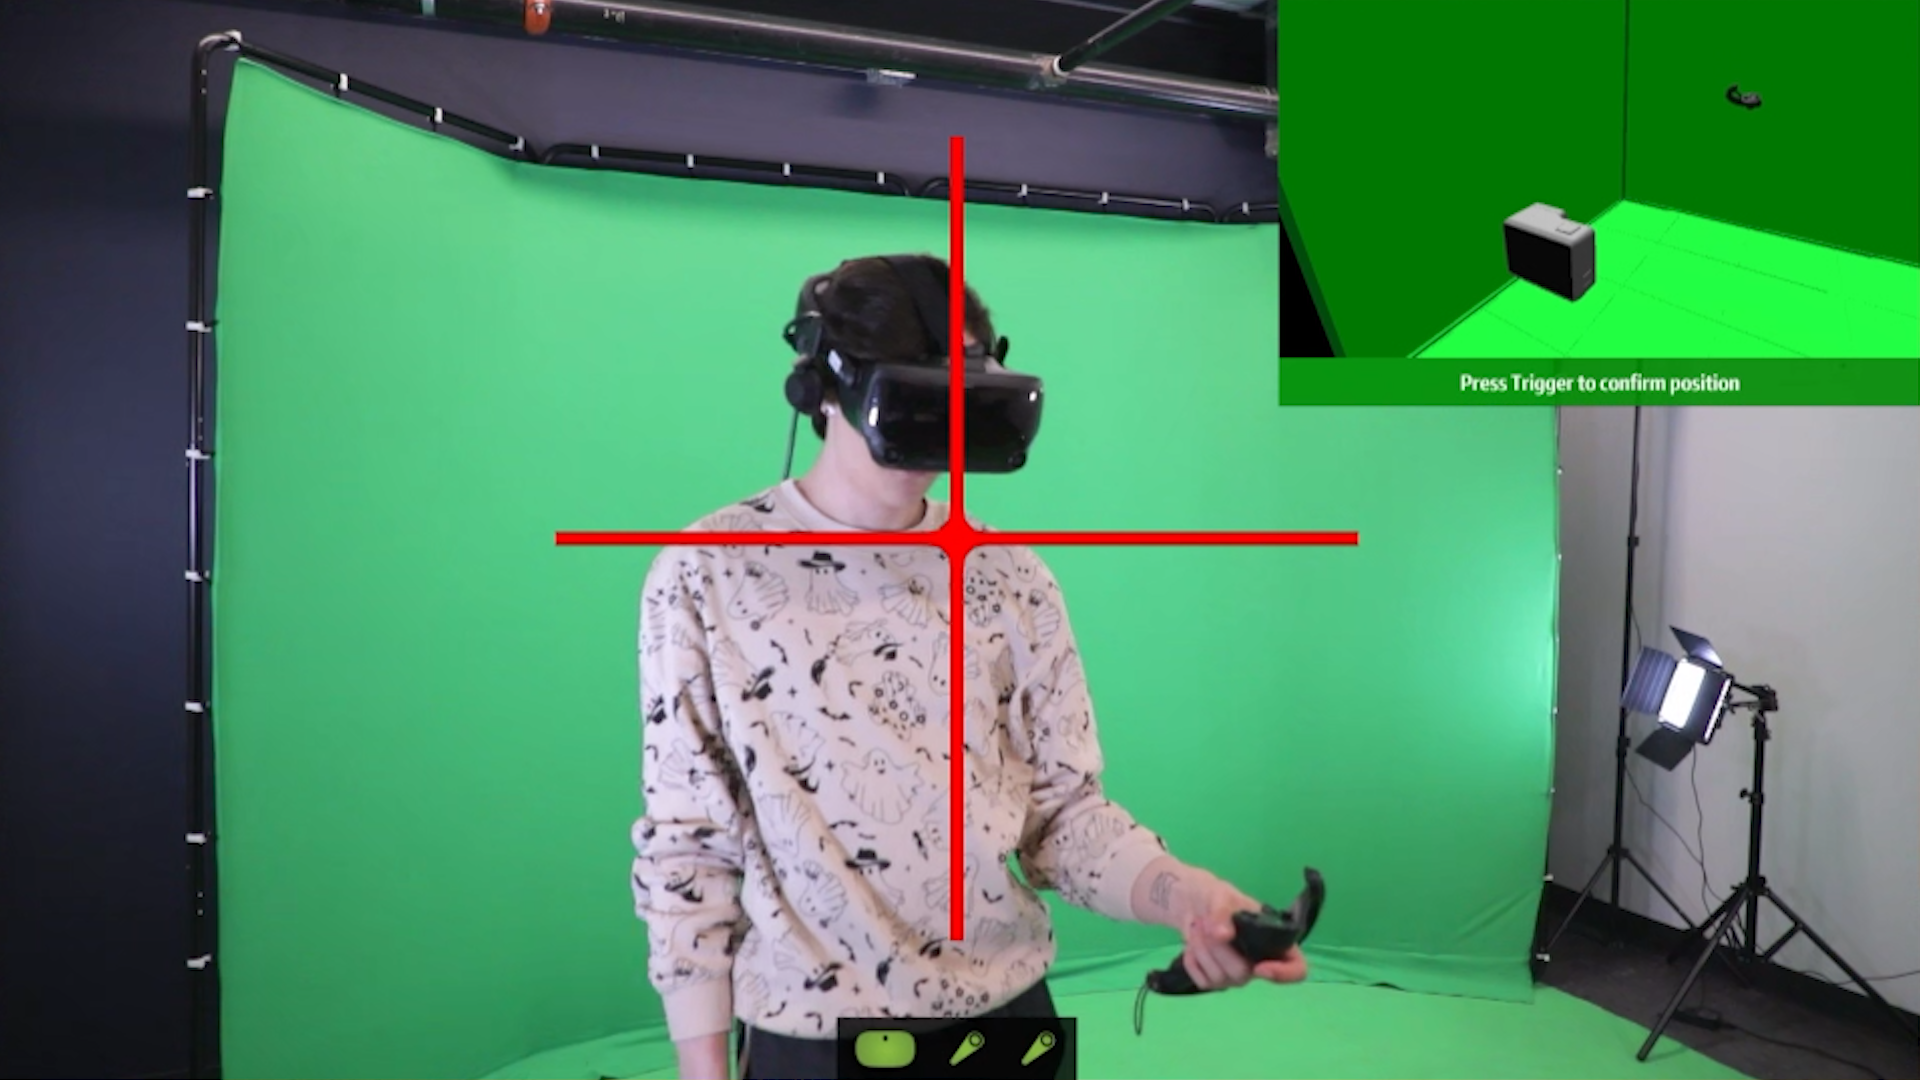
-
This indicates how you should place your controller for the calibration sequence. Note the top right video example.
- So you should do this:
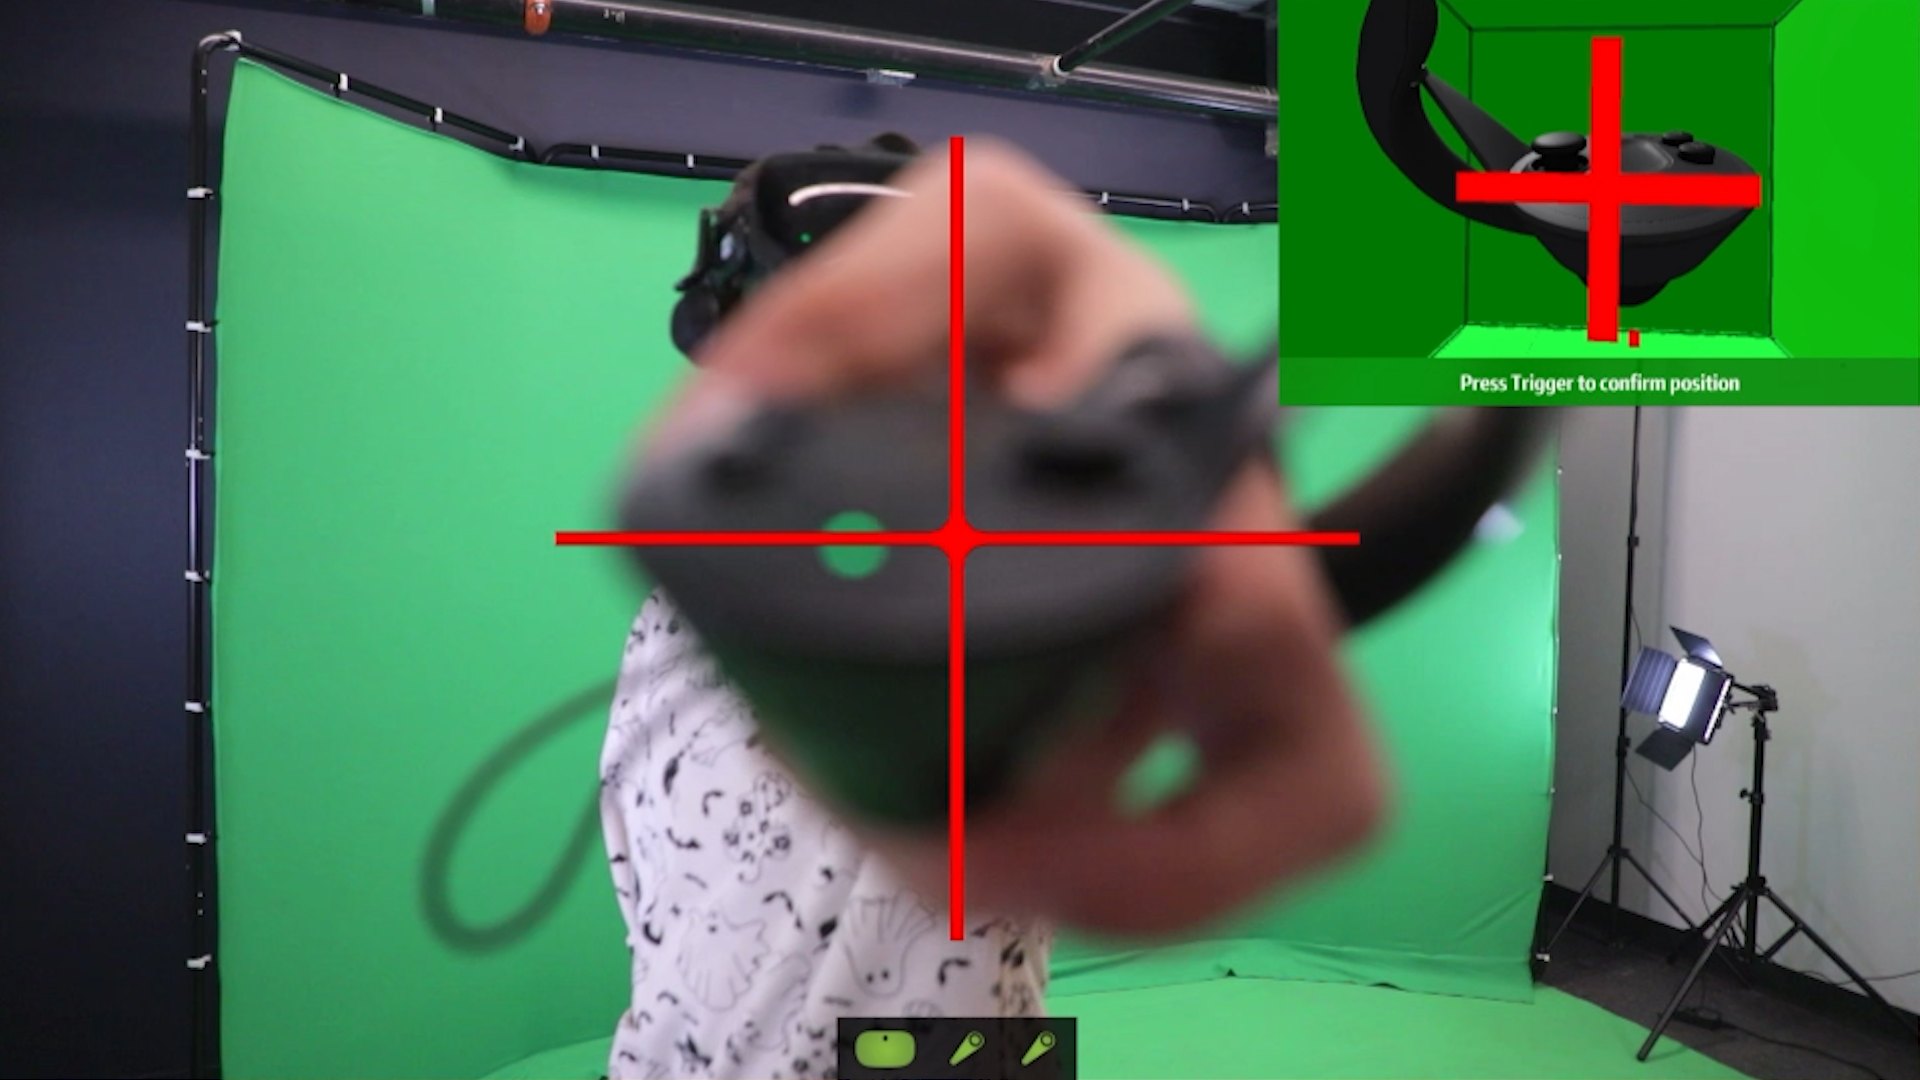
-
Like it says, you can press the trigger button to confirm and move onto the next step.
-
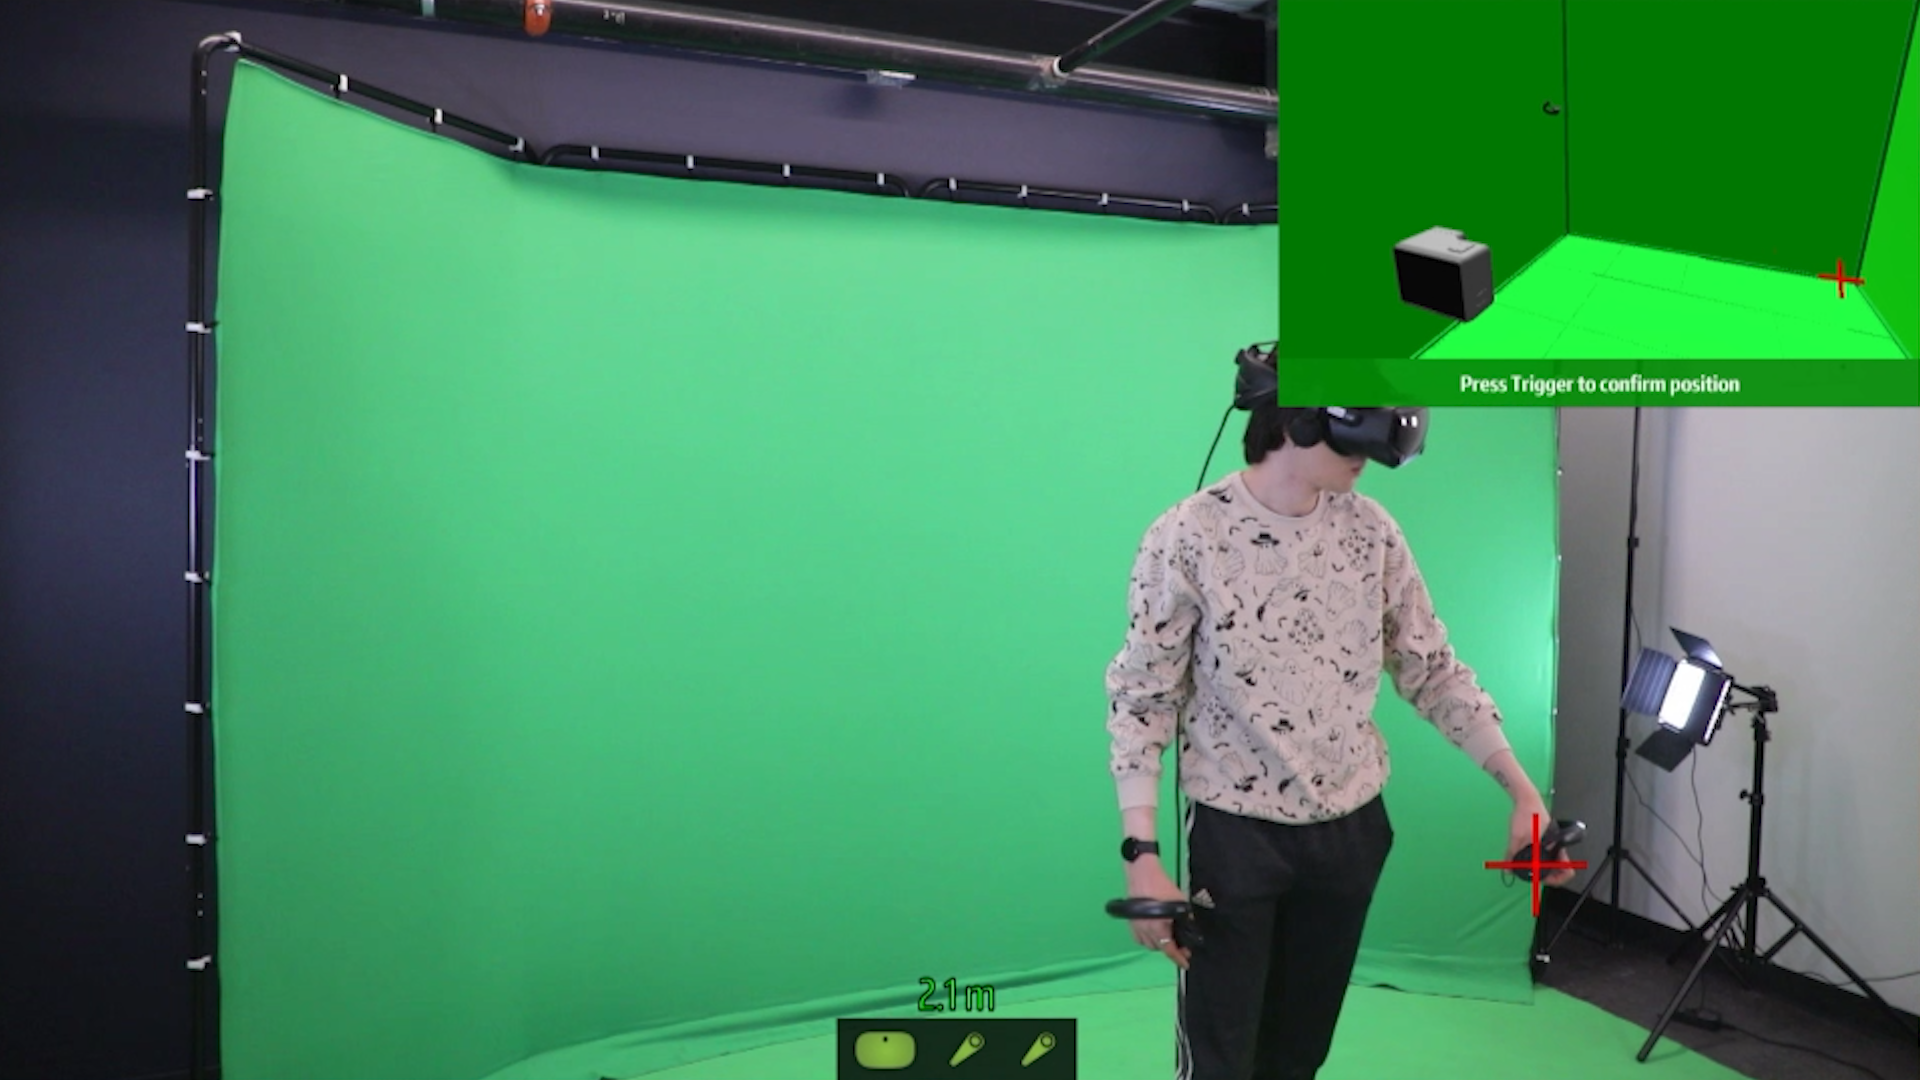
For the next 2 steps, it will instruct you to back up from the camera. Once the text turns green, you’re fine. In my experience, 2 meters is plenty, but if you are working with a smaller space, 1.5 meters is the closest you should be.
-
You may need to press the trigger twice, if you are using the other controller. For example, if I did the first plus with the right controller, and I want to do the second plus with the left controller, I would need to press the trigger once to tell the software I’m using the other controller, and again to confirm the position.
-
You’ll want to make it as close as you can to the example video, but as we’re humans, and the video is a 3D render, our attempt will probably never be perfect.
-
One more ‘plus’, this time in the opposite corner,
-
After this step, you should have overlaid virtual controllers on top of(if you’re really good at it) or next to your real controllers.
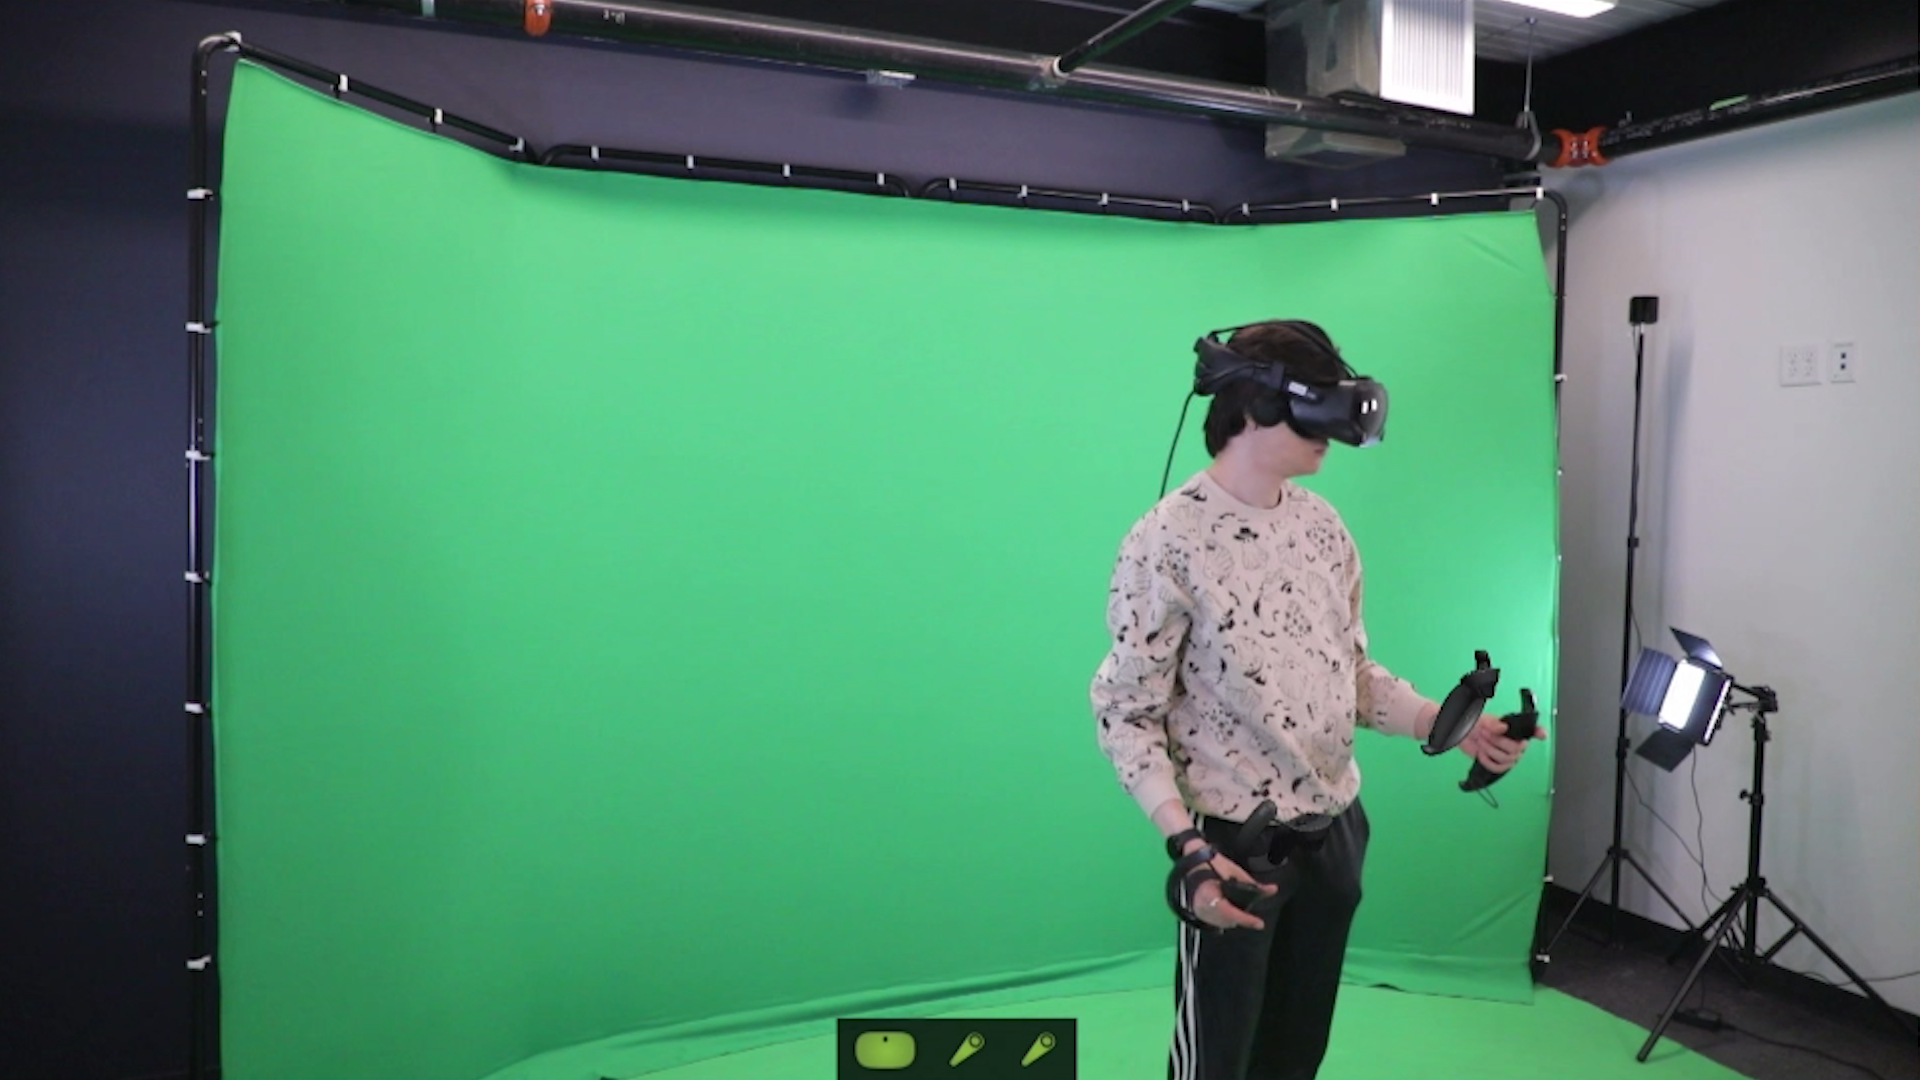
-
Now since this calibration isn’t perfect, we can fine-tune it. In your VR view, you will see a few tabs with controls. You can also see them on your computer monitor.
-
Personally, I always start with latency. The capture card for this camera isn’t perfect, so the latency can vary, but it usually stays at about 160ms. So that’s what we’ll set the number to.
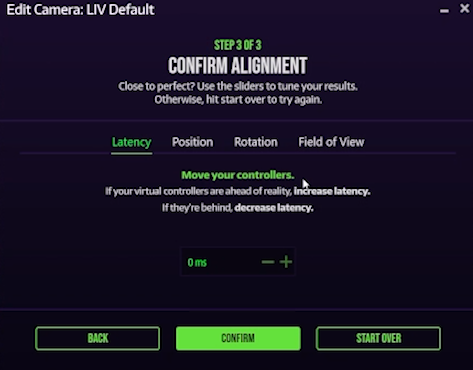
-
Use the other tabs to fine-tune further.
-
After a while, it should look something like this, maybe even better if you really want it to be perfect.

Step 4: OBS Capture (Optional)
-
If you want to capture your gameplay with OBS, follow these steps.
-
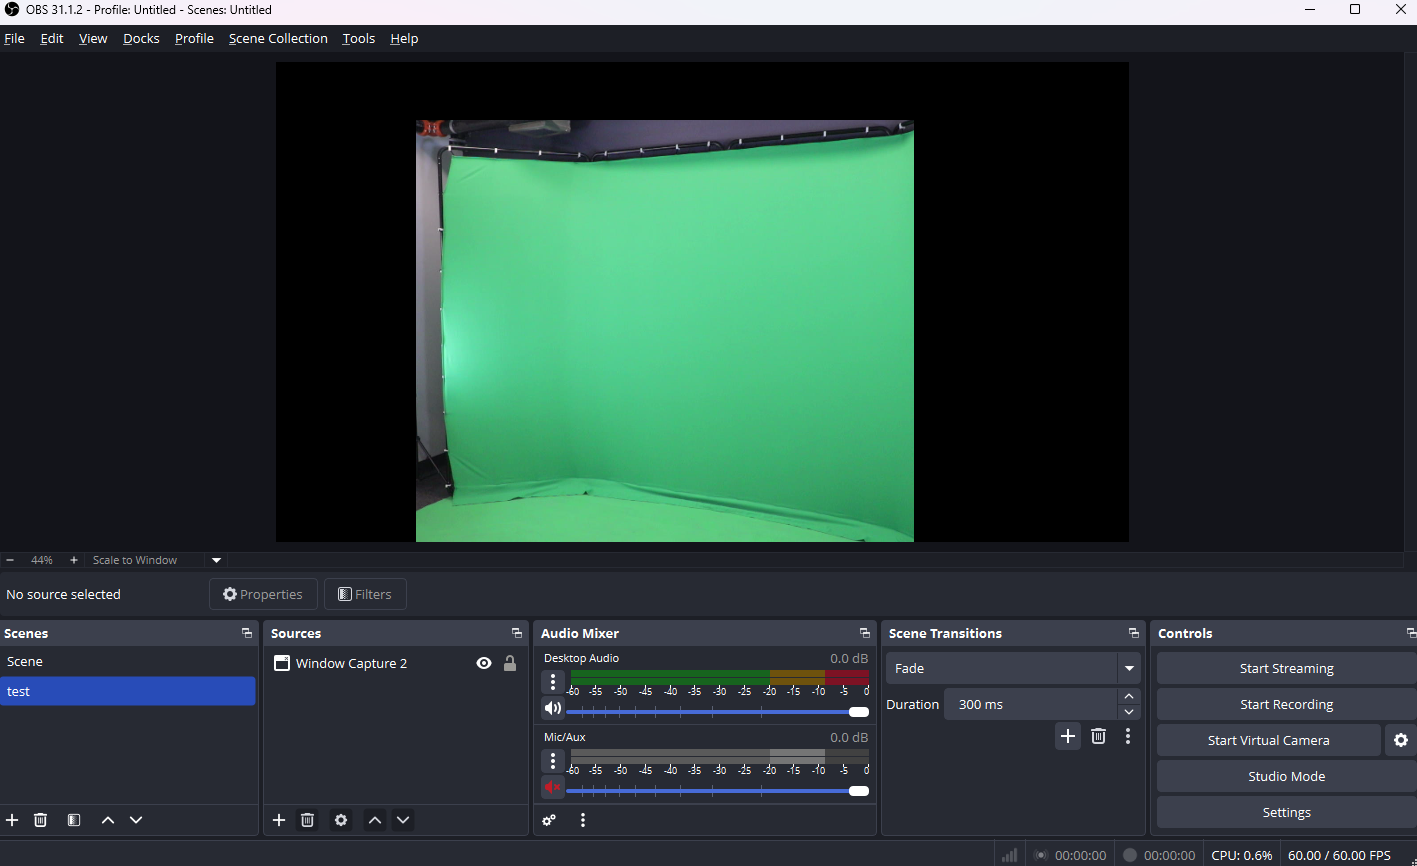
Make a new scene in OBS
-
Click the plus button under “Sources”
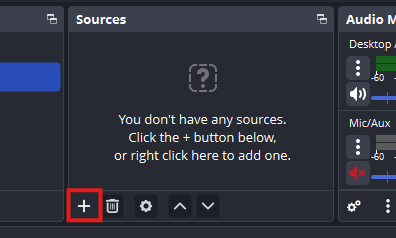
-
Click “Window Capture”. “Game Capture” will not work with the LIV output window, as it isn’t recognized as a game.
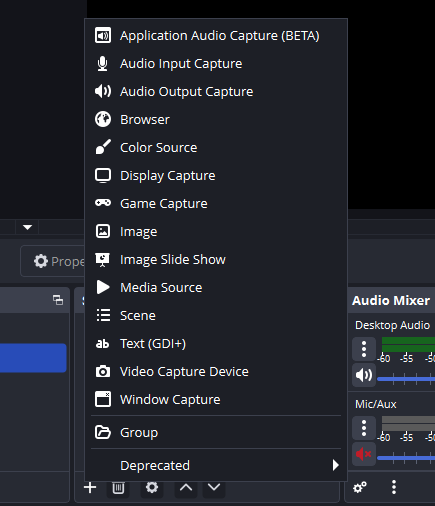
-
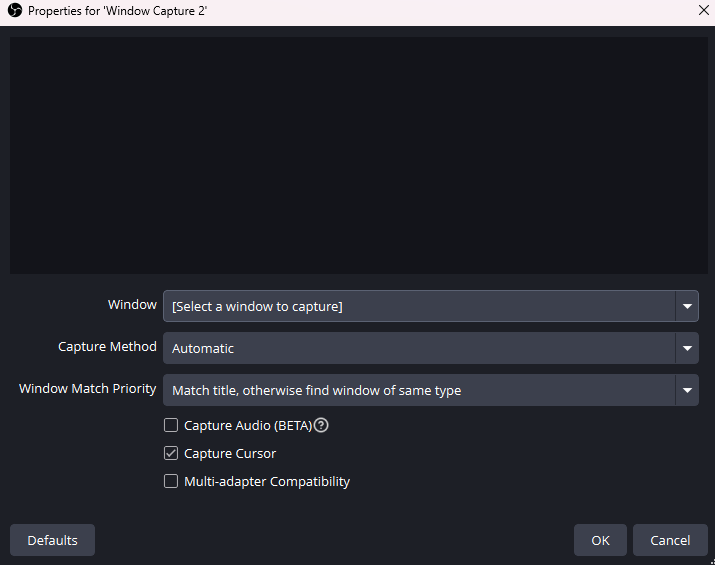
You can name it whatever you want, it’s purely for keeping track of your sources.
-
A new window should open that looks like this:
-
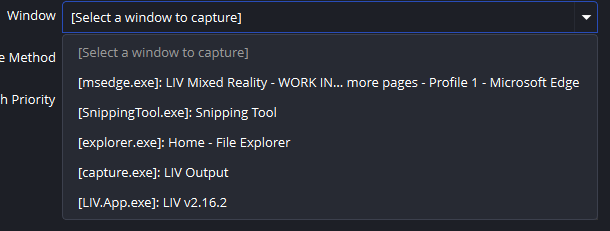
Select the “Window” dropdown, and find “LIV Output”. NOT the LIV app.
-
Your OBS window should now look like this:
-
You can now click “Start Recording”.
Faceware (Unavailable)
Actor Setup
Adapted from Manual by John Ulbrich
Actors should remain front and side lit in an area with ample and consistent lighting. Actors are advised to be clean-shaven and not wear facial accessories such as glasses.
The camera should be at the actor's nose level so that their line of sight is just above the top of the camera. The camera should be parallel to the face and centered horizontally.
Actors should refrain from making quick head movements and watching the camera. The camera should not shift on its own- it should always move with the headset relative to the face.
Faceware Analyzer
Written by: Orion Tighe
Helpful Resources
http://support.facewaretech.com/home
http://support.facewaretech.com/analyzer
http://support.facewaretech.com/retargeter
- Get video from Facial Videos folder in drive
- Check video, make sure it’s full length (contains the whole section of dialogue), or that dialogue is present across collective clips
- When recording the face videos, the GoPro would split the recording at ~8 minutes, making a few different clips for one piece of dialogue
- Try to choose video with most accurate mouth movements - eyes are taken care of by Salsa in Unity, and brows are straightforward
- Download video and move to documents Facial Videos folder
- Check video, make sure it’s full length (contains the whole section of dialogue), or that dialogue is present across collective clips
- Open selected video in Faceware Analyzer
- Analyzer does better with smaller segments
- When opening video, select the timeframe in seconds to work with - cut out excess movements from the beginning before speaking occurs, and work in roughly 2-3 minute segments
- Make sure to mark down where you split! Animation checklist doc, desktop sticky note, txt file - just write it down somewhere
- Each time you make a new faceware tracking file, overlap with the previous clip by a second or two
- When making the analyzer clip, you will:
- Select the video clip (from the facial videos folder)
- Name the job
- I named the monologues as MonoX, where X is the clip number; and the dialogues as DialogueX, where X is the number of times they’ve spoken (first time they speak is Dialogue1, second time is Dialogue2, etc. Feel free to name them however you’d like, as long as you’re keeping them organized
- Assign a job location
- By default, Faceware will try to place the job in the video folder. Move it to a better place: Documents/Great Experiment/Faceware/ActorName/JobName, i.e. Wilson/Dialogue1. You’ll have to manually create a new folder for the job, then select that folder as the job location where FW will generate it’s files
- Trim the job to the desired length in seconds
- Analyzer does better with smaller segments
- Train/track the video clip in Analyzer:
- Make sure you’ve reviewed the tutorials and guides online, and reference them regularly http://support.facewaretech.com/home
- Do not work on the Face Group! That is for ‘review’, but realistically you’ll never even use it
- Complete each layer one at a time
- For the first time you track and actor, make three keyframes across the timeline in the layer: generally you’ll have one near the beginning, and then two more in extreme poses
- Once you have three keyframes, click Train; after it’s finished, click Track; then, scrub through the timeline to look for places where the analyzer loses tracking or is inaccurate and make new keyframes in the worst spots
- Important: any time you make a keyframe, align ALL nodes with the correct spot! Do not adjust only a few nodes, makes sure they are all moved to the correct position
- When moving nodes, you can enable Intelligent Drag in the toolbar, or hold down Shift when it’s disabled to use it. This will move all unaligned nodes to logical spots
- When moving nodes, make sure you are putting the correct node in the correct spot! It can be very easy to accidentally flip the left and right sides of a pupil, or switch the inner and outer mouth nodes. Doing so will generally cause major glitches and bugs in the tracking; if you find that a training model is not working as it should, check if everything is in the correct spots
- Personally, I’ve found more success manually scrubbing frame by frame (holding the left or right arrow key) than using the play button, since it plays slightly slower and smoother
- When tracking the brows, place the inner landmark on the upper corner of the brow and the outer landmark on the edge
- Most of these details are covered in the Faceware guide and video tutorials, as are the hotkeys and shortcuts. Watch them!!
- If this is not the first time training an actor, you will likely already have a usable training model. Before you make keyframes, import the training model for the actor under File. Then, you will only need to make one keyframe before training and tracking the first time.
- Finish tracking the clip:
- The first time you train an actor, you will not have a training model yet. Go to the actor’s folder under the Faceware folder, and make a new folder named [Actor] Model. In Faceware, go to File>Export Tracking Model and export it to the folder you just created. From then on, any time you do a job with the actor, you can import that model to make your life a lot easier.
You also need a Neutral Frame, as it can make things a bit easier. Find a spot in the timeline where the actor’s face is as neutral as it can get, then go to File>Export neutral frame. The frame you have selected will need all nodes aligned; this can be done easily by selecting landmarks you want to mark and hitting Ctrl+T. Simply save the neutral frame in the actor’s faceware folder. - Any other time you finish working on an actor, you’ll export the training model again. Select Export Training Model, and choose the original folder for the model; it will overwrite the old model with the newer, better model generated with the current job.
- Finally, once the job is accurate enough and you’ve exported the new training model, you’ll click Parameterize in the top right corner. This will take some time, and generate a performance file that will be used in the Retargeter in Maya.
- The first time you train an actor, you will not have a training model yet. Go to the actor’s folder under the Faceware folder, and make a new folder named [Actor] Model. In Faceware, go to File>Export Tracking Model and export it to the folder you just created. From then on, any time you do a job with the actor, you can import that model to make your life a lot easier.