***The Exposure Triangle***
- A photographer must understand the relationship between **ISO** (how sensitive the light sensor will be to light), **f-stop/aperture** (how much light is allowed to pass through the lens), and **shutter speed** (how rapidly the shutter closes, cutting off the incoming light). - Any adjustment to one of these settings will impact the others. It is up to the photographer to set all three in balance, to achieve the desired depth of field, motion blur, and exposure.***The 5 Elements of Exposure***
- ***ISO*** - The International Organization for Standardization (ISO) established a numerical scale to rate how sensitive different kinds of film were to light. This scale was retained for digital cameras. When you change the ISO value on a DSLR, you can think of it as changing film to something more or less light sensitive to what is currently in the camera. A big advantage of a digital camera is that you can change the ISO from shot to shot, instead of only per roll of film. - Higher ISO numbers are more light sensitive, meaning the camera will be able to take pictures in darker environments. However, higher ISO numbers also tend to produce grainier images. - Examples: - ISO 100: suitable for a bright, sunny day - ISO 800: indoor spaces when not using a flash - ISO 1600: dim or even dark environments - ***Aperture*** - Determines how much light is allowed to enter the camera to reach the imaging sensor and measured in F-Stop. This is controlled mechanically, by opening or closing the camera *aperture*. Different lenses have different apertures, handling different f-stop ranges. Aperture also determines the Depth of Field. - Lower f-stop numbers indicate that the aperture is more open, allowing in more light. Lower f-stop numbers also narrow the depth of field, causing the area of focus to be relatively shallow, with foreground and background parts of the image being out of focus. - Examples: - f/1.2 - f/2.8 - lets in a lot of light; shallow depth of field - f/4 - f/8 - useful in many scenarios; somewhat wider depth of field - f/11 - f/32 - best for bright settings; wide depth of field - The “depth of field” is the distance between the nearest and furthest in-focus objects in an image. A narrow depth of field will have a very narrow area in which objects will be in focus. A wide depth of field will put most elements of the image in focus. Turning the focus ring will adjust the position of the in-focus area, or *focal point*.| Shallow Depth of Field | Aperture | Wide Depth of Field |
| Aperture = f/1.4 DOF = 0.8cm | f/4.0 DOF = 2.2cm | Aperture = f/22 DOF 12.4 |
**Other Important Things to Note**
- ***White Balance*** - What is determined by white light from the camera, what is measured as white. Higher temperatures are cooler (blue tint), lower temperatures are warmer (orange tint). Baseline is whatever you set it to, everything below the baseline is orange or warmer, everything above the baseline is bluer or cooler. - Measured in Kelvin (temperature) - Daylight = 5500-5600 - Fluorescents/Camera Flash = 5000 - Light bulbs = 3200 - Candle Light = 2000 - ***Over- and Under-Exposed*** - Overexposed images may look “too bright” because they were captured with settings to allow an overabundance of light into the sensor. An unwanted overexposure might happen because ISO was set too high, f-stop was set too low, or shutter speed was set too high. - Underexposed images may look “too dark” because they were captured with settings to allow less than expected light into the sensor. An unwanted underexposure might happen because ISO was set too low, f-stop was set too high, or shutter speed was set too low. # Chapter 2: Elements of Exposure, ISO **ISO** stands for the ***International Organization for Standardization*** (it is [technically not an acronym](https://en.wikipedia.org/wiki/International_Organization_for_Standardization)). This organization established a numerical scale to rate how sensitive different kinds of film were to light (called a film's **speed**). The current standard dates to 1974. The ISO film speed standard was retained for digital cameras, even though light sensitivity is now determined by the camera's computer software and light sensor hardware, rather than the chemical composition of film. When you change the ISO value on a DSLR, you may think of it as swapping out a physical roll of film and replacing it with a new roll that is more sensitive or less sensitive to light. One big advantage of a digital camera is that you can change the ISO with the press of a button and from shot to shot, instead of only when you change the roll of film. **Here are some important things to know about camera ISO:****Higher ISO numbers** are more suitable for **dark environments** but make the image **grainier**.
**Lower ISO numbers** are more suitable for **bright environments** and the image will usually be **less grainy**.
**ISO 100**: Suitable for a bright, sunny day
**ISO 800**: Suitable for indoor spaces when not using a flash
**ISO 1600+**: Suitable for dim or dark environments (but the picture will be increasingly **grainy looking**)
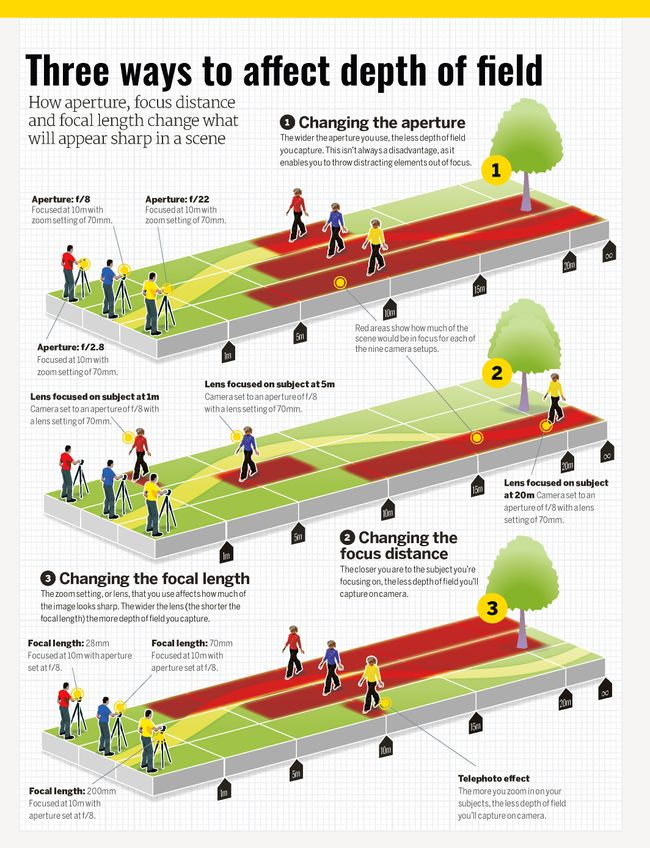
In the diagram below, note how the higher ISO number produces a much lighter, but also much grainier image. 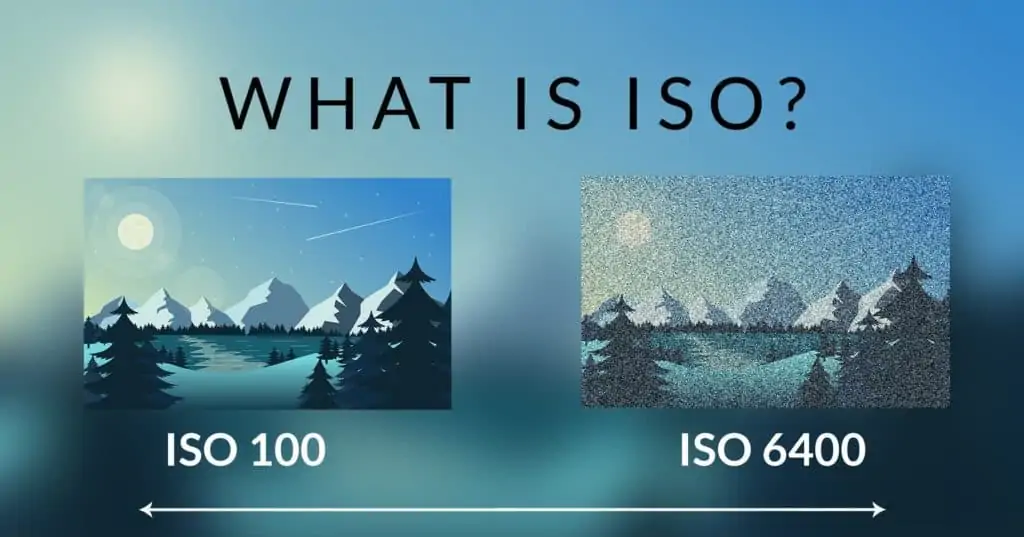 # Chapter 3: Elements of Exposure, Aperture The **F-Stop** setting determines how much light is allowed to enter a camera through the lens to reach the imaging sensor. F-stop is normally a setting of the lens that is attached to the camera, and is controlled mechanically, by opening or closing the lens ***aperture***. Different lenses have different apertures and so can handle different f-stop ranges. The **Canon EF 24-105mm f/4L IS II USM lens** that is normally kept on the SCiL DSLR cameras has an **adjustable f-stop range**from **f/4** (wide open) to **f/22** (nearly closed). It will retain the f-stop you set through its entire zoom range from 24mm to 105mm. When the camera is set to **video mode**, you can **set the f-stop** on the Canon EOS 5D Mk IV using the **large dial** around the "set" button located at the lower right of the camera body. 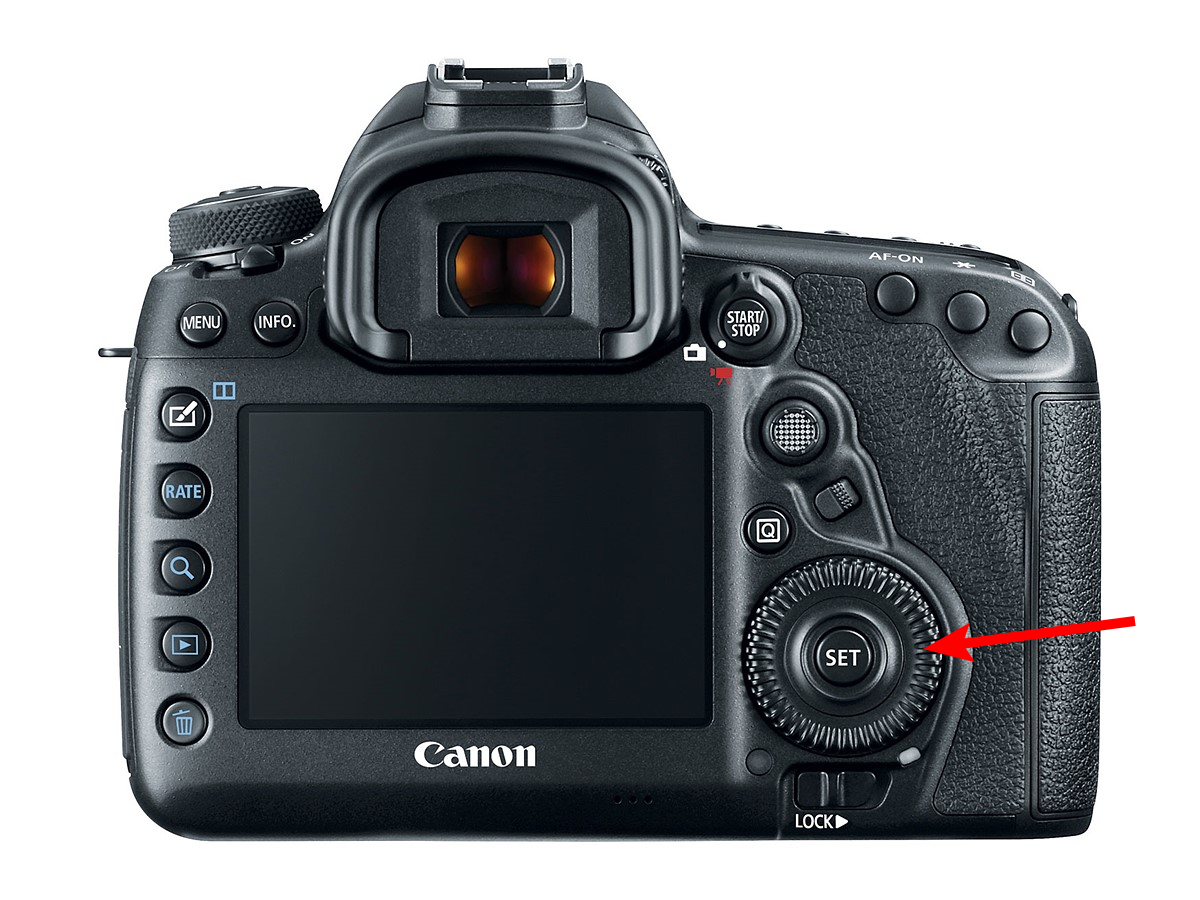**Lower f-stop numbers** (like f/4) indicate that the **aperture is more open**, **allowing in more light**.
**Higher f-stop numbers** (like f/22) indicate that the **aperture is more closed**, a**llowing in less light**.
**F-stop settings influence the [depth of field](https://scil-wiki.su.edu/books/photography/page/chapter-8-depth-of-field "Depth of Field").****f/1.2 - f/2.8** - lets in a **lot of light**, with a correspondingly **shallow depth of field**.
**f/4 - f/8** - useful in many scenarios, with a somewhat **wider depth of field**.
**f/11 - f/32** - best for **bright settings**, with a **wide depth of field**.
In the chart below, see how different **f-stop settings change the amount of light reaching the sensor and the depth of field**: [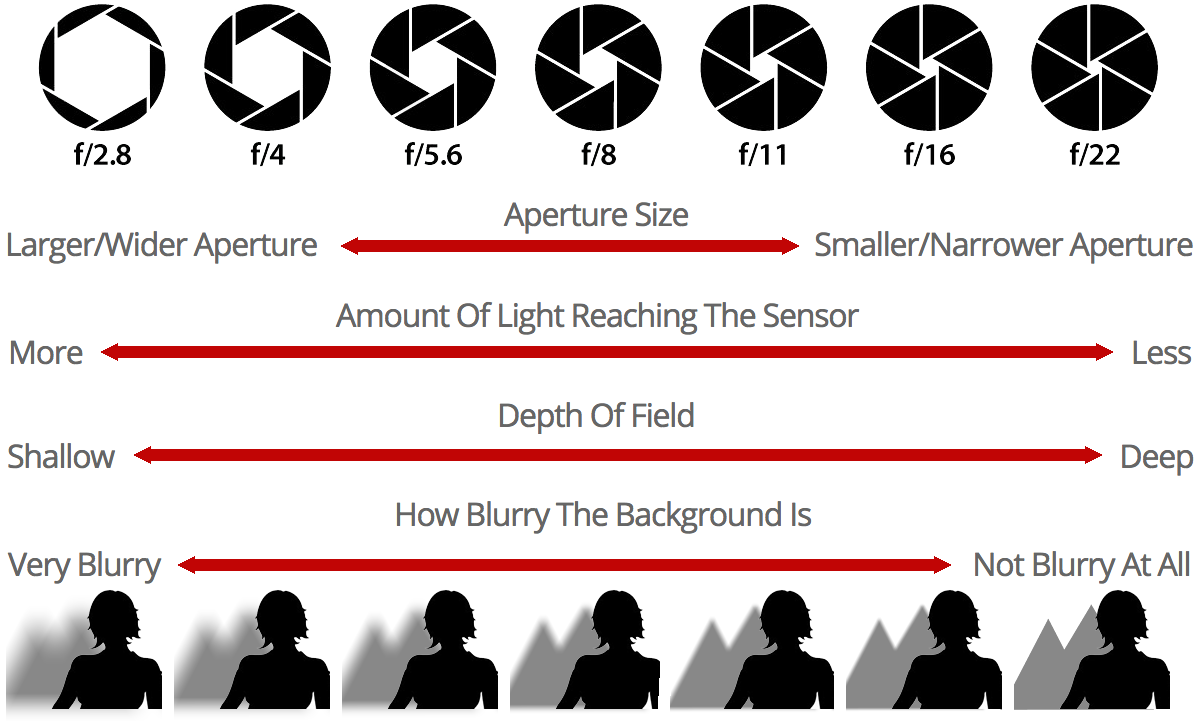](https://scil-wiki.su.edu/uploads/images/gallery/2025-01/i6Mimage.png) # Chapter 4: Elements of Exposure, Shutter Speed The **shutter speed**, aka **exposure time**, is the time that the image sensor is exposed to light when capturing an image. The shutter is a mechanical window inside the camera that opens and closes to allow light into the sensor for a selected amount of time. This video [explains more about different types of camera shutter](https://www.youtube.com/watch?v=FNScFNl4Jro). **Shutter speed is not necessarily the same as frame rate**, which determines how many exposures will be taken per second. For example, it is possible to have a frame rate of 24 frames per second (fps) but have a shutter speed (exposure time) of 1/1000 of a second instead of 1/24 of a second. A **fast shutter speed**, such as 1/1000 of a second, will allow light into the sensor extremely briefly. This will work in bright lighting conditions but may not allow enough light to impact the sensor in dimmer light. A **slower shutter speed**, such as 1/250 of a second, will allow more light into the sensor, and may work better in lower light conditions. However, a lot can happen over longer periods of time, so faster moving subjects or camera movement may result in a **blurry look**. This could be an intentional, artistic effect, or could simply ruin your shot or take. **Extremely slow shutter speeds** (for example ½ second, 1 second, or more) will allow a **LOT** of light into the sensor and will almost certainly result in blur effects. However, these shutter speed settings could also be used to capture long exposure photos with their own unique aesthetic appeal. 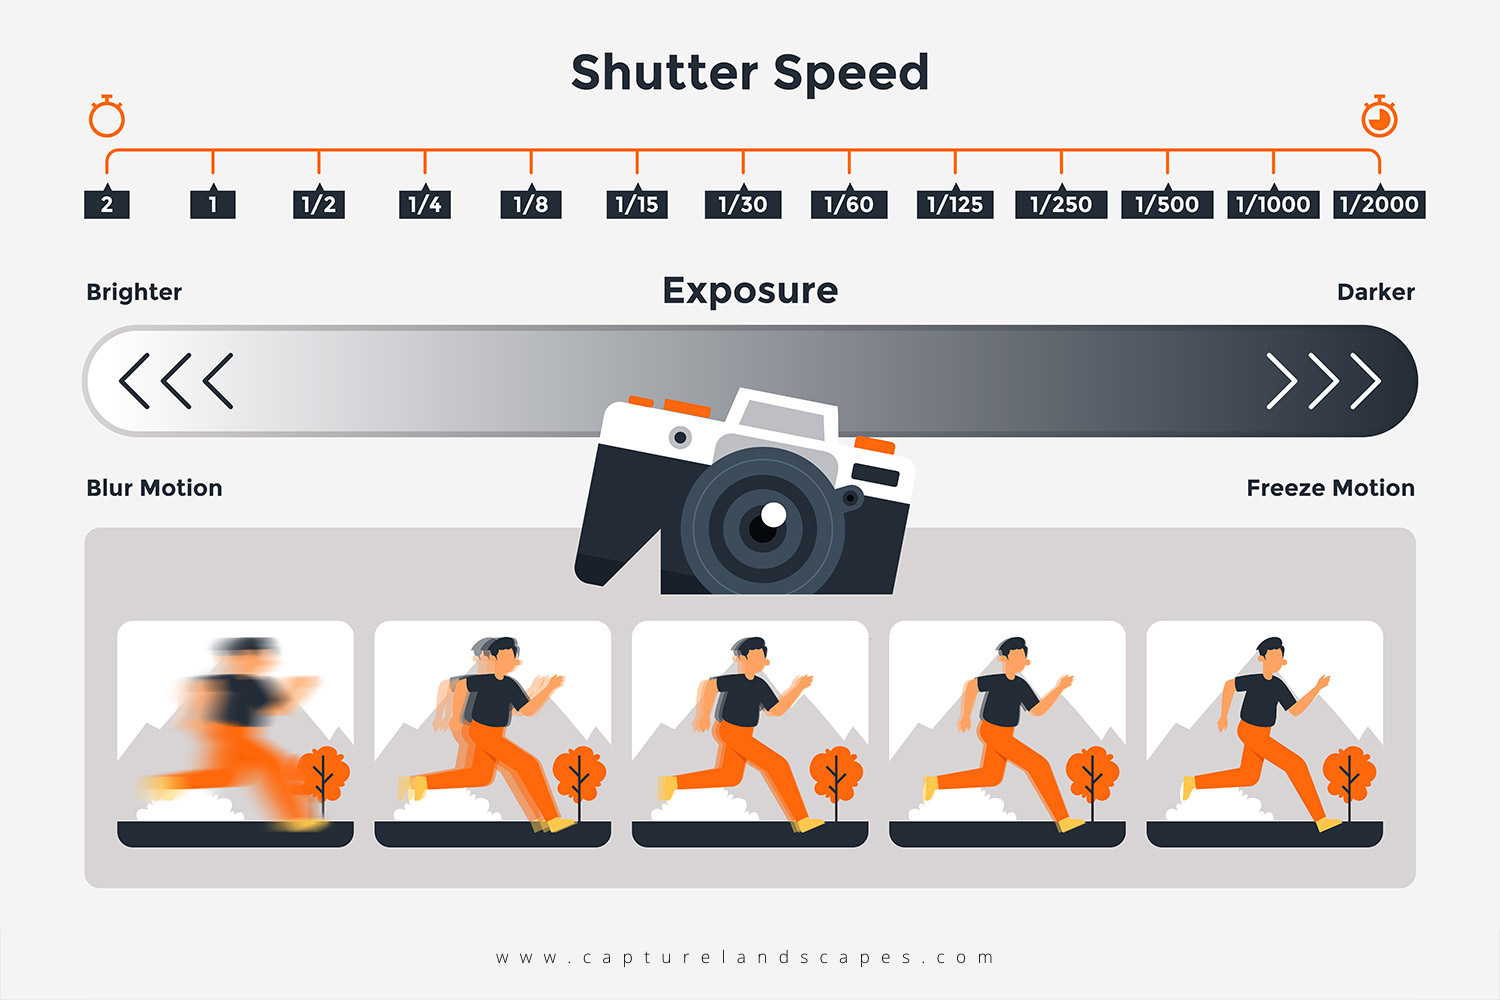 In the image below, note how a 1/30 second shutter speed produces an image with less blur, while a 15 second exposure time adds considerable blur to the waterfall, resulting in an appealing, soft look. 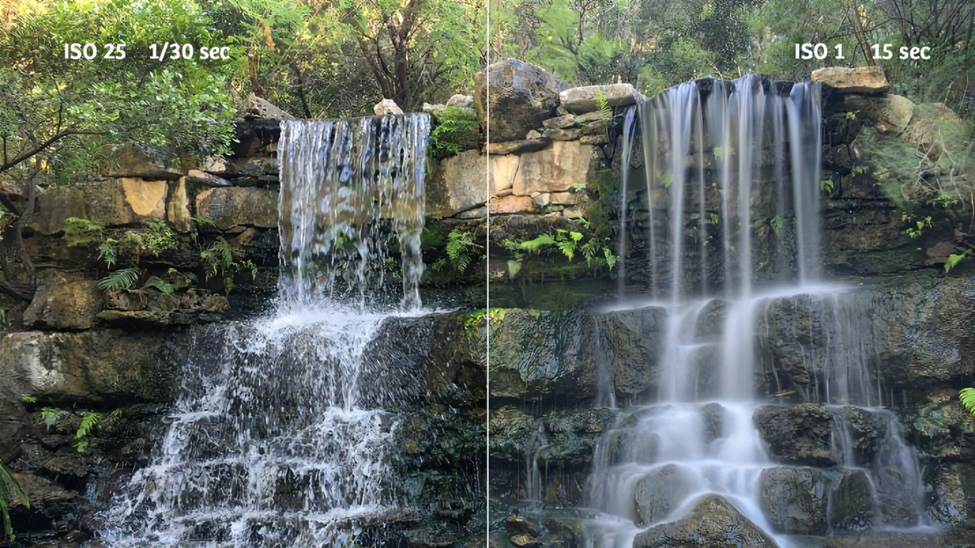 # Chapter 5: Elements of Exposure, Filtration Filtration in photography involves placing glass, resin, or plastic filters over the lens to control light, color, and image quality. There are three important filters you should know: - ND Filters - Neutral Density (ND) Filters act as sunglasses for the lens, reducing light to allow a wider aperture or slower shutter speeds for smoother motion blur in videos without overexposing. - Variable ND (VND) Filters are single filters that covers a range of light reduction, offering versatility for changing lighting conditions. - Polarizer Filters - Circular Polarizers (CPL) cut reflections on glass or water, darken skies, and increase contrast. These filters are good for landscape and urban scene photos/videos. - Diffusion Filters - Diffusion or Mist Filters soften digital images, reduce contrast, and can create a dreamlike haze around lights sources, often used to make digital footage look more filmic. - UV/Haze Filters - Primarily used to protect the lens from scratches, dust, and moisture. It can also slightly reduce haze. # Chapter 6: Elements of Exposure, External Lights External lights (either natural or artificial) are the primary source when determining exposure, which then dictates how you setup your camera settings. Here are some key elements when going to shoot photos: - Ambient Light (Natural/Available Light) - The primary light in the scene, this could be sunlight, daylight, golden hour/blue hour. Camera settings should be set to match the intensity of the light. - Flash/Strobe (Artificial) - Used to fill shadows or to overpower the sun. Strobes are essential when the subkect is backlit to match or exceed the brightness of the ambient background. - Quality of Light (Hard vs. Soft) - Hard Light - Can be direct sun or clear skies that create high contrast, intense highlights, and deep shadows. This can cause overexposure. - Soft Light - Can be overcast skies or diffused light, as well as golden hour. This provides gentle contrast, lower intensity, and better retention. - Positioning and Direction of Light: - Key Light - This is the main source of light in the scene. - Fill Light - Helps fill in some shadows. - Back Light - Not always necessary, but it helps separate people from the background. # Chapter 7: White Balance Digital cameras require a certain amount of **calibration** to **capture color information (RGB) properly**. This calibration is called **white balance**, because the camera is being given the information it needs to identify white areas of the image and reproduce them correctly. The image below shows the same scene white balanced to different color temperatures:  You can (and should) confirm or set the white balance on the Canon EOS 5D MkIV camera before capturing images or video. You can do this by pressing the **WB** button on the top right of the camera chassis. A menu will appear (it looks slightly different depending on whether you are shooting in image or video mode), and you can use the large dial on the right side of the camera chassis to select the white balance mode. The available **white balance options are**: - **AWB** (auto white balance): the camera will seek an appropriate white balance for the **current lighting conditions** - **Daylight**: the camera will set an appropriate white balance for **sunny daylight conditions** - **Shade**: the camera will set an appropriate white balance for **shady daylight conditions** - **Cloudy**: the camera will set an appropriate white balance for **cloudy/overcast conditions** - **Tungsten Light**: the camera will set an appropriate white balance for **tungsten light** (~3200K, a warm, orange light) - **Fluorescent Light**: the camera will set an appropriate white balance for **fluorescent light**, such as in an office building - **Flash**: the camera will set an appropriate white balance for the **color temperature of the camera's built-in flash** - **Custom**: you can **take a photo** of a white surface **under desired light conditions** and then **use it to set the white balance** - **Color Temperature**: you can manually set the white balance to be appropriate for **different color temperatures** Which setting should you use? It will depend on what you are trying to accomplish, but the most usual settings would be: - **AWB** if you do not want to control the white balance for yourself - **Daylight**, **shade**, or **cloudy** if you are shooting outdoors under **natural light** - **Color temperature** if you are shooting in the studio and know the color temperature of your lighting conditions You should check and confirm your white balance setting **before** you begin a photo or video shoot. Typically, you will want to leave the white balance setting alone once you set it to your preferred selection. # Chapter 8: Depth of Field The **depth of field** is the distance between the nearest and furthest in-focus objects in an image. A narrow depth of field will have a very narrow area in which objects will be in focus. A wide (or large) depth of field will put most elements of the image in focus. [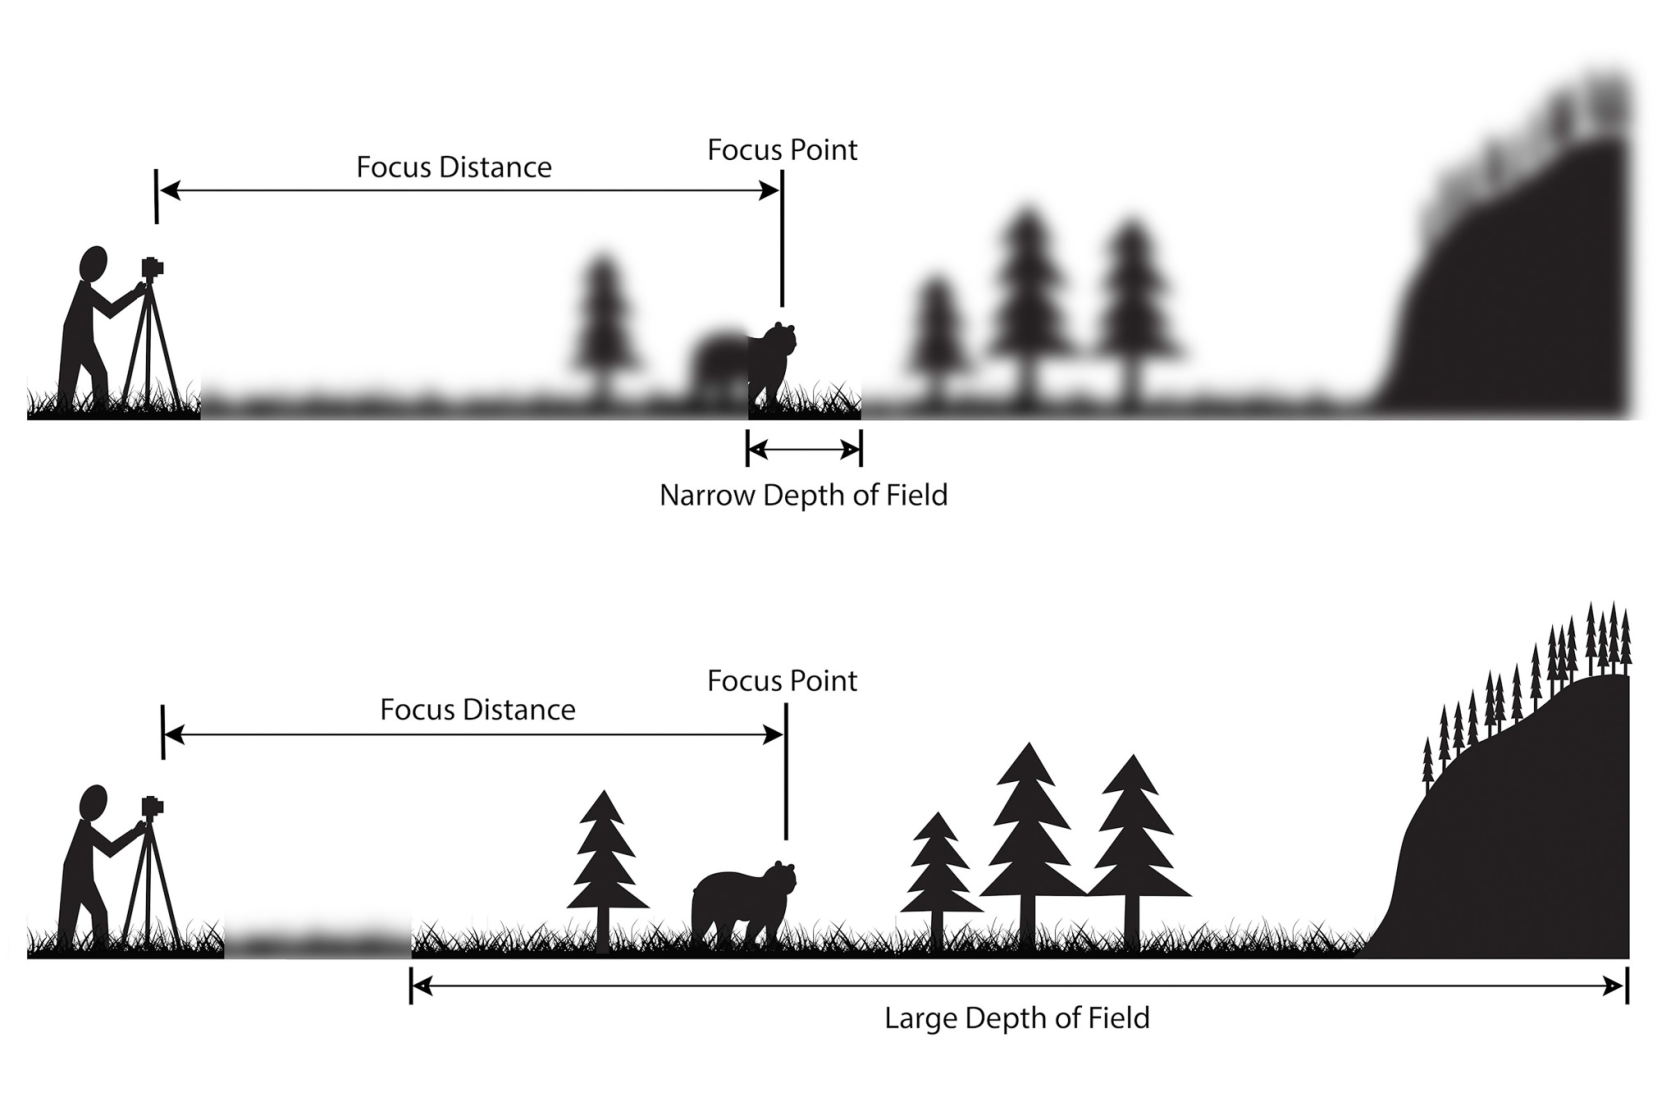](https://scil-wiki.su.edu/uploads/images/gallery/2025-01/ZvSimage.png)Depth of field is influenced by several **camera settings** including **aperture** (f-stop) and the **lens focal length**.
**Lower f-stop settings** (f/1.2 - f/2.8) have **shallow depths of field**.
**Higher f-stop settings** (f/11 - f/32) have **wider depths of field**.
**Longer focal lengths** (like the **105mm** setting on the Canon EF 24-105mm lens) will have a **shallow depth of field**.
**Shorter focal lengths** (like the **24mm** setting on the Canon EF 24-105mm lens) will have a **wider depth of field**.
Turning the **focus ring** on the lens will adjust the position of the in-focus area, or ***focal point***.| 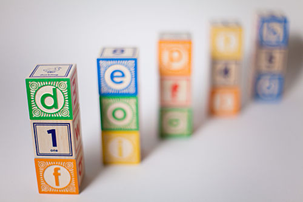 | 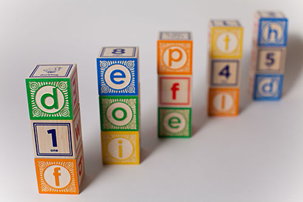 | 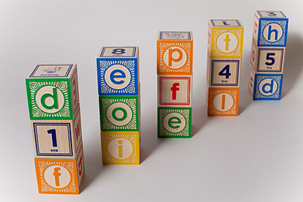 |
| **Shallow Depth of Field** Aperture = f/1.4. DOF = 0.8 cm | **Medium Depth of Field** Aperture = f/4.0. DOF = 2.2 cm | **Wide Depth of Field** Aperture = f/22. DOF = 12.4 cm |
The **depth of field** will be **wider** when the camera is focused on **more distant subjects**.
The **depth of field** will be **shallower** when the camera is focused on **closer subjects**.
[](https://scil-wiki.su.edu/uploads/images/gallery/2025-01/rG6image.png) # Chapter 9: Lenses Focal Length is the measurement of the lens in mm. There are two types of lenses; Prime and Zoom, and three categories; Telephoto, 50 (Normal), and Wide. - Prime lenses - Have only one focal length - Zoom lenses - Have multiple focal lengths (multifocal) Three Catepgories - Telephoto - 50 (normal) - Wide Going up in focal length narrows the field of view (FOV), while going down in focal length widens the FOV. - Examples: - 200mm telephoto -> 85mm -> 50 (normal) -> 40mm -> 35mm -> 28mm -> 18mm wide -> 12mm fisheye -> 8mm. - Trade offs: for wide angles, it can cause distortion, so the subjects in the frame look farther apart. For telephoto, it can narrow the FOV, making it harder to frame shots & require a higher shutter speed to avoid camera shake. # Photography Basics***The Exposure Triangle***
- A photographer must understand the relationship between **ISO** (how sensitive the light sensor will be to light), **f-stop/aperture** (how much light is allowed to pass through the lens), and **shutter speed** (how rapidly the shutter closes, cutting off the incoming light). - Any adjustment to one of these settings will impact the others. It is up to the photographer to set all three in balance, to achieve the desired depth of field, motion blur, and exposure.***The 5 Elements of Exposure***
- ***ISO*** - The International Organization for Standardization (ISO) established a numerical scale to rate how sensitive different kinds of film were to light. This scale was retained for digital cameras. When you change the ISO value on a DSLR, you can think of it as changing film to something more or less light sensitive to what is currently in the camera. A big advantage of a digital camera is that you can change the ISO from shot to shot, instead of only per roll of film. - Higher ISO numbers are more light sensitive, meaning the camera will be able to take pictures in darker environments. However, higher ISO numbers also tend to produce grainier images. - Examples: - ISO 100: suitable for a bright, sunny day - ISO 800: indoor spaces when not using a flash - ISO 1600: dim or even dark environments - ***Aperture*** - Determines how much light is allowed to enter the camera to reach the imaging sensor and measured in F-Stop. This is controlled mechanically, by opening or closing the camera *aperture*. Different lenses have different apertures, handling different f-stop ranges. Aperture also determines the Depth of Field. - Lower f-stop numbers indicate that the aperture is more open, allowing in more light. Lower f-stop numbers also narrow the depth of field, causing the area of focus to be relatively shallow, with foreground and background parts of the image being out of focus. - Examples: - f/1.2 - f/2.8 - lets in a lot of light; shallow depth of field - f/4 - f/8 - useful in many scenarios; somewhat wider depth of field - f/11 - f/32 - best for bright settings; wide depth of field - The “depth of field” is the distance between the nearest and furthest in-focus objects in an image. A narrow depth of field will have a very narrow area in which objects will be in focus. A wide depth of field will put most elements of the image in focus. Turning the focus ring will adjust the position of the in-focus area, or *focal point*.| Shallow Depth of Field | Aperture | Wide Depth of Field |
| Aperture = f/1.4 DOF = 0.8cm | f/4.0 DOF = 2.2cm | Aperture = f/22 DOF 12.4 |
**Other Important Things to Note**
- ***White Balance*** - What is determined by white light from the camera, what is measured as white. Higher temperatures are cooler (blue tint), lower temperatures are warmer (orange tint). Baseline is whatever you set it to, everything below the baseline is orange or warmer, everything above the baseline is bluer or cooler. - Measured in Kelvin (temperature) - Daylight = 5500-5600 - Fluorescents/Camera Flash = 5000 - Light bulbs = 3200 - Candle Light = 2000 - ***Over- and Under-Exposed*** - Overexposed images may look “too bright” because they were captured with settings to allow an overabundance of light into the sensor. An unwanted overexposure might happen because ISO was set too high, f-stop was set too low, or shutter speed was set too high. - Underexposed images may look “too dark” because they were captured with settings to allow less than expected light into the sensor. An unwanted underexposure might happen because ISO was set too low, f-stop was set too high, or shutter speed was set too low. - ***Lenses*** - Focal Length is the measurement of the lens in mm. - Prime lenses have only one focal length. - Zoom lenses have multiple focal lengths (multifocal). - There are three categories; telephoto, 50 (normal), and wide. Going up in focal length narrows the field of view (FOV), while going down in focal length widens the FOV. - Examples: - 200mm telephoto -> 85mm -> 50 (normal) -> 40mm -> 35mm -> 28mm -> 18mm wide -> 12mm fisheye -> 8mm. - Trade offs: for wide angles, it can cause distortion, so the subjects in the frame look farther apart. For telephoto, it can narrow the FOV, making it harder to frame shots & require a higher shutter speed to avoid camera shake.