SCiL
Available Servers
Git Address: http://10.72.1.100
Web Server Address: http://10.72.1.103
Nextcloud (Gesture Interface): http://10.72.1.156
Git Project Quickstart
What is Git?
Git is a distributed version control system that tracks versions of files. It is often used to control source code by programmers collaboratively developing software.
How is it used differently for game engines such as Unity, Unreal, or Godot?
First, git tracks EVERYTHING from the start and it's important to establish a good workflow/pipeline, otherwise your project becomes cumbersome and difficult to maintain. Git was not designed to handle asset content, such as media (audio and videos), 3D models (FBX, OBJ, etc), textures (PNG, JPG, EXR, etc.). These files are often large in file size, greater than 100 megabytes where Git was designed to track source code files which are in kilobytes.
I recommend adding asset content, such as audio, video, 3D models, textures, etc. after the content as been FINALIZED, e.g. content has been checked in a dummy project and confirmed it has reached the final iteration and no changes will be made.
What is our Git server?
Our git server, http://10.72.1.100, is a privately hosted server located at SCiL. The software runs a custom version of GitLab, which is similar to gitlab.com. It is important to remember two things with our server:
- Your username and password is not associated with SU's credentials. Also, I recommend using the same username as your SU, which makes project collaboration easier, e.g. my username is wbrown1 out of wbrown1@su.edu
- Our server, which presents GitLab in the browser is NOT associated with GitLab.com. This means your projects hosted on our server are not on the servers with Gitlab.com
Getting Started with SCiL Git
Create an account if you have not already done so at http://10.72.1.100/users/sign_in. Sign in afterward.
Download GitHub Desktop here. Most software engineers use a variety of interfaces or even the command line for Git, but for us, GitHub Desktop is a relatively simple entry point.
If you are using a SCiL workstation, be careful about about using a browser's built-in password manager. These workstations are shared and security is handled differently by the browser vendor.
If are only copying a project using Git and not setting up a project, ensure you have GitHub Desktop installed, and proceed below to Pulling the Project
Step 1: SCiL Git Server
Get familar with the layout of the website. When you are ready, head to the dashboard and select the blue button at the top right New Project.
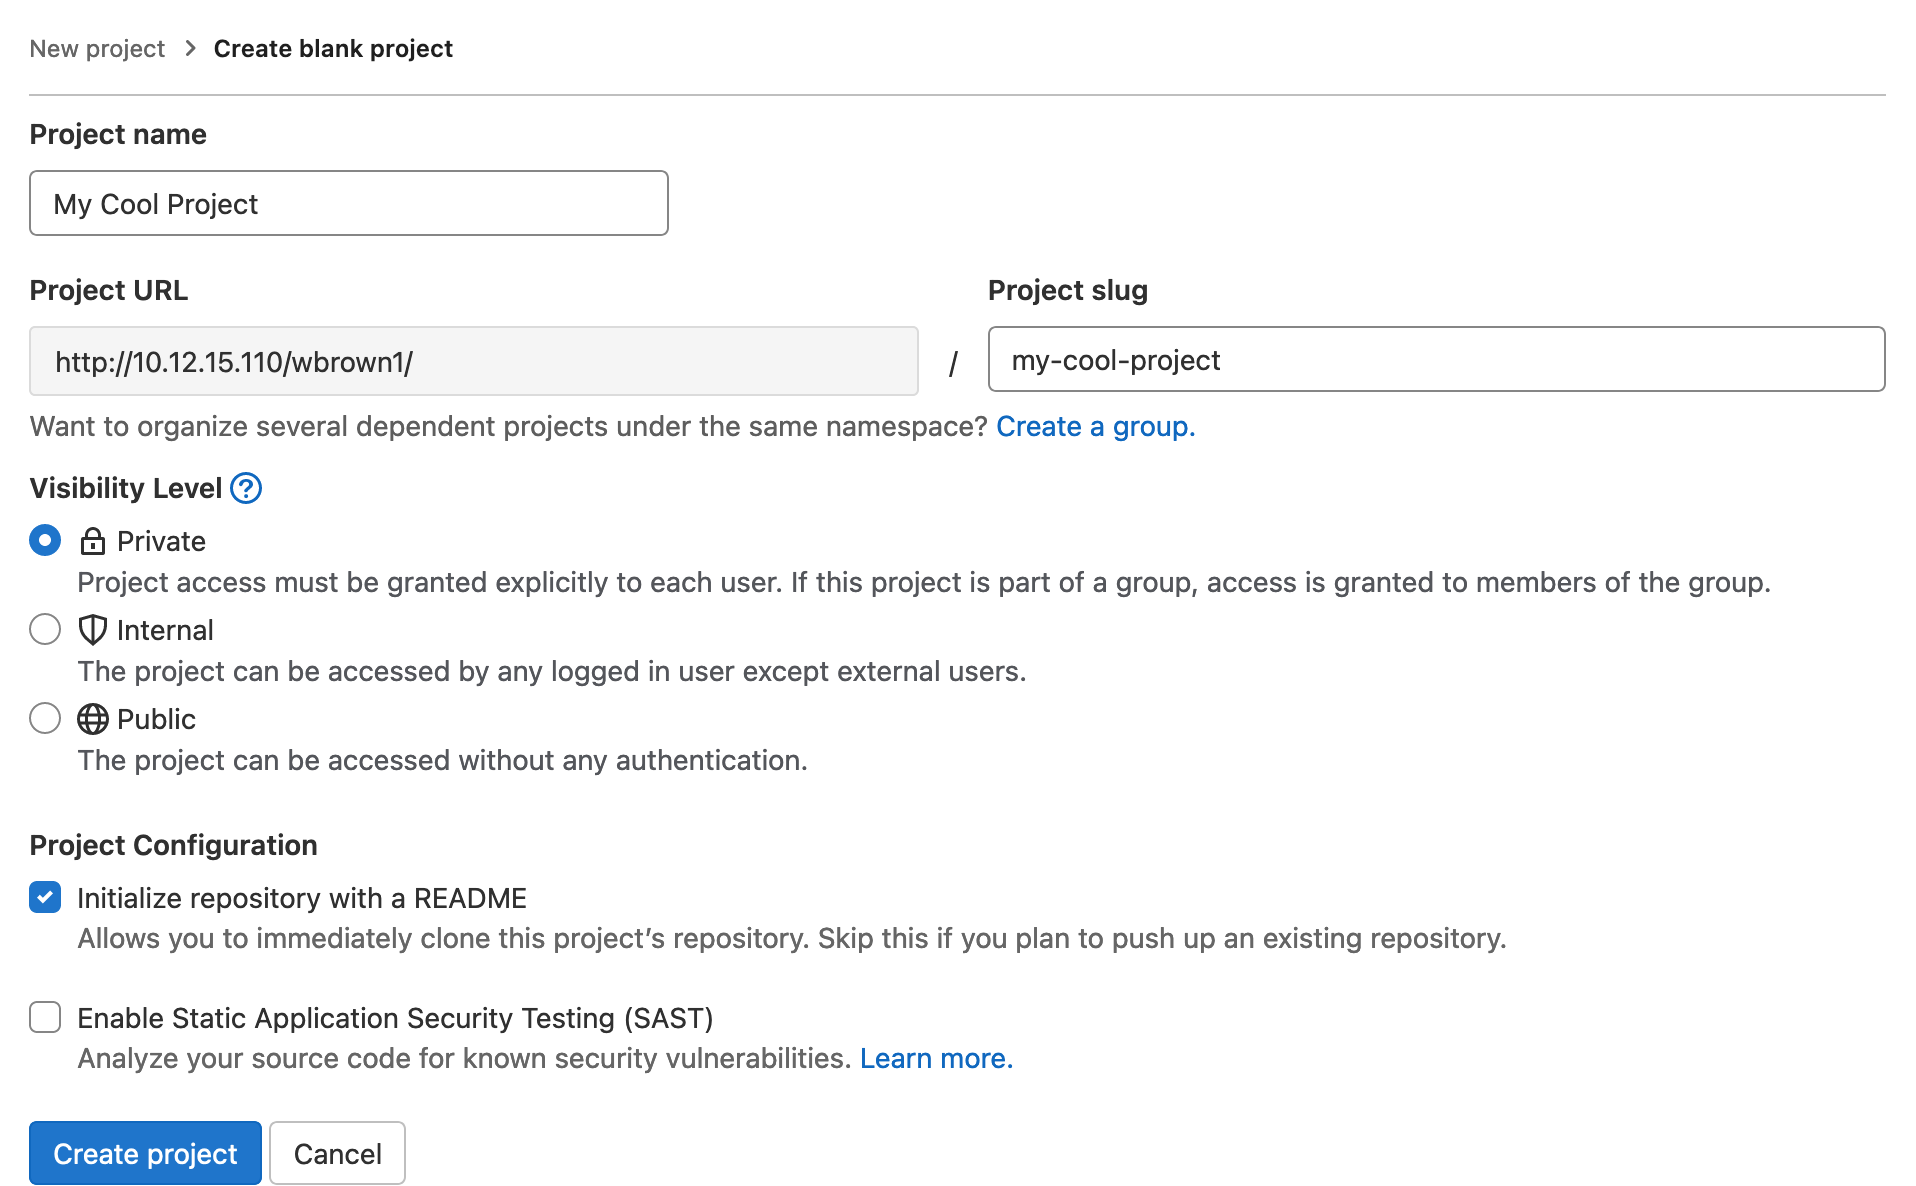
Select Create blank project
Give your project a name. Note the project slug gets updated.
Select your visibility level. Your visibility level and README can be changed later, if desired.
Click Create project
Step 2: Organize Project
Head to https://desktop.github.com/download/ and download and install the GitHub Desktop app.
This app is distributed by GitHub.com and although we are not using their service, it's a great and simple tool to manage our project.
This app should already be installed on the SCiL workstations. If not, we are happy to help get it installed.
After installation and providing a name and email, we need to clone our repository from the git server.
- Go to your project page. At the top right is a blue button that says Clone. Click the dropdown arrow and copy and paste the address under Clone with HTTP. You may also use the button next to the URL to copy it.
- In the GitHub Desktop app, go to File/Clone Repository. Select URL and paste in the URL you had just copied a minute ago. Before selecting Clone, acknowledge the location where this project will be saved.
-
Do not change the patch URL to your current Unity/Unreal project if you already have a project! That is for an advanced topic I am happy to cover.
- Click Clone.
- Your project folder is now initialized and we need a gitignore. Go to Repository/Repository Settings/Ignored Files. Inside this box you need to copy and paste contents from an established gitignore template, so that we don't track any garbage or cache files that get generated. Here are some samples:
- Test: You should have a new file added for your first commit! That file is your gitignore. Type in a useful message that describe your changes in the title and description fields (bottom left) and click Commit to main. This commits your changes locally only. On the header toward the top of the window, you now have an available ability to Push your changes to the server, which uploads the changes to the server as well.
You have made your first commit!
Please note: unlike services such as Google Drive, OneNote, Dropbox, files don't automatically sync in git. You have to save/commit these files as you make changes. This is necessary to avoid headaches when working with teams.
The gitignore is the most important file in your project and must be set up properly from the beginning, before uploading your project files. If you added a gitignore after committing your project files, see Wes at SCiL because the process to fix this will take some time.
Step 3: Adding the project
If you are creating a NEW project. Simply create an empty project with your game engine, anywhere BUT your git directory. Then, follow the step below.
If you may already have a project: If you do, close whichever game engine your are running and copy the folder contents (NOT the root directory itself) to your git project directory. After copy completes, open that directory in your game engine to confirm everything works.
Now open GitHub Desktop and you should see all your added files. Notice how some files are missing, intentionally, such as Library or Logs or Build if you are using Unity. These are cache files that the gitignore file is ignoring. Saving these files is useless endeavor as they are regenerated constantly, even on different machines.
When you are ready, give your changes an informative message on what changes you have made. Click Commit to main. This may take some time. Afterward, you can Push to the server, which also may take time depending on the size of your project.
Step 4: Final
Open your game engine once again and confirm everything is working properly. If it is, you may now delete your old project files or copy them to a portable hard drive as a backup (don't forget to zip first!!). If you created a dummy project to setup git, you can delete that too.
If you have any questions, feel free to visit staff at SCiL.
Pulling a Project
- Go to your project page in the server. At the top right is a blue button that says Clone. Click the dropdown arrow and copy and paste the address under Clone with HTTP. You may also use the button next to the URL to copy it.
- In the GitHub Desktop app, go to File/Clone Repository. Select URL and paste in the URL you had just copied a minute ago. Before selecting Clone, acknowledge the location where this project will be saved.
-
Do not change the patch URL to your current Unity/Unreal project if you already have a project! That is for an advanced topic I am happy to cover.
- Click Clone.
Web Hosting
Web Hosting
To access your web site, visit http://10.72.1.125/~SU_LOGIN
For example, to test my hosting location it would be http://10.72.1.125/~wbrown1
DISCLAIMER: This site hosting is for SCiL/Class purposes only and users who fall under this criteria are given access. Hosting is not accessible outside of campus. Finally, always backup your work, keep local copies, and understand SCiL resources are routinely wiped. For questions or special needs, please reach out to Wes wbrown1@su.edu.
Change your password
If you know you are going to be using web hosting for a class, a password would have been given to you. These passwords are NOT affiliated with SU systems! To change the password open up the Terminal app for macOS OR the Console app for Windows and enter the following:
- ssh [su_login]@10.72.1.125
- Enter current password
If you are a Windows user and are having trouble with the Console app, I HIGHLY recommend downloading Git-For-Windows which comes with a Unix-like program app called bash. Download the 64-bit Installer here.
If this is your first time using SSH, you may be greeted with an SSH request to enter yes/no. Enter yes.
You should now be logged into the server. To change your password, type in the following below and follow the instructions:
- passwd
You may now type exit and close the terminal
Remote edit your site with Visual Studio Code (VS Code)
You should always keep a backup of your files (and possibly versions with Git if you are familiar). My web development workflow is to work offline/in a safe directory, use version control, and push the changes to the live server after I test and verify my work.
Download Visual Studio Code: https://code.visualstudio.com/download
If you have not used VS Code before, from here you would open a folder directory as a "workspace" and begin working. Here is a tutorial for an overview: https://www.youtube.com/watch?v=B-s71n0dHUk
Setup
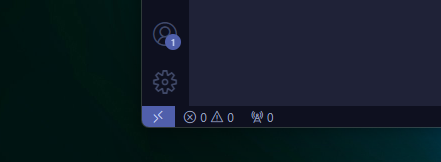
First, click the blue lightning-bolt icon in the very bottom left corner of the editor to Open a Remote Window.
A drop down will appear. Yours may vary, but within the drop down that appears, choose Connect to Host... Remote SSH.

Next, click + Add New SSH Host...
Then type in the ssh command, like the one you used to change your password (above). Mine is as follows:

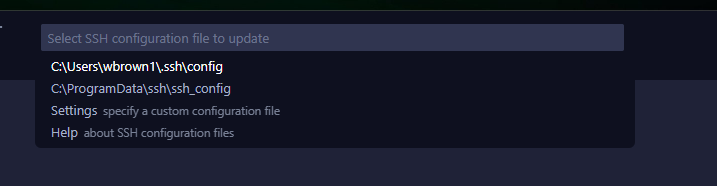
FOR WINDOWS USERS: Choose a configuration file. I chose the one with my name in (the first one). With macOS there may be something similar.
 The host information should now be added!
Open Remote Folder
If the Host Added! window is still open you can press the Connect button. Otherwise, move to the next step.
Click the blue lightning-bolt icon again in the bottom left corner to open the Remote Connection.
Choose Connect to Host... Remote SSH (same as before)
Choose the server address: 10.72.1.125
For the platform of the remote host, choose Linux
Enter your password.
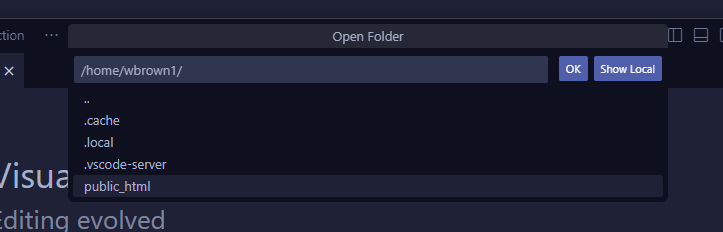
VS Code creates the remote connection and connects you to your Home directory within the linux web server. Your website directory is located here in a folder called public_html. To open this folder as your working directory, Go to File/Open Folder... and choose public_html and then click OK. You may have to enter your password one more time to set up the workspace as well as Trust the workspace.
From here you are finished. When you close VS Code when you are done working using a Remote Connection, go to either File/Close Remote Connection...
Access your site with an FTP client (FileZilla)
Download the client:
- For macOS with Apple Silicon (default for most SU users): https://filezilla-project.org/download.php?platform=macos-arm64
- For macOS with Intel: https://filezilla-project.org/download.php?platform=osx
- For Windows users: https://filezilla-project.org/download.php?platform=win64
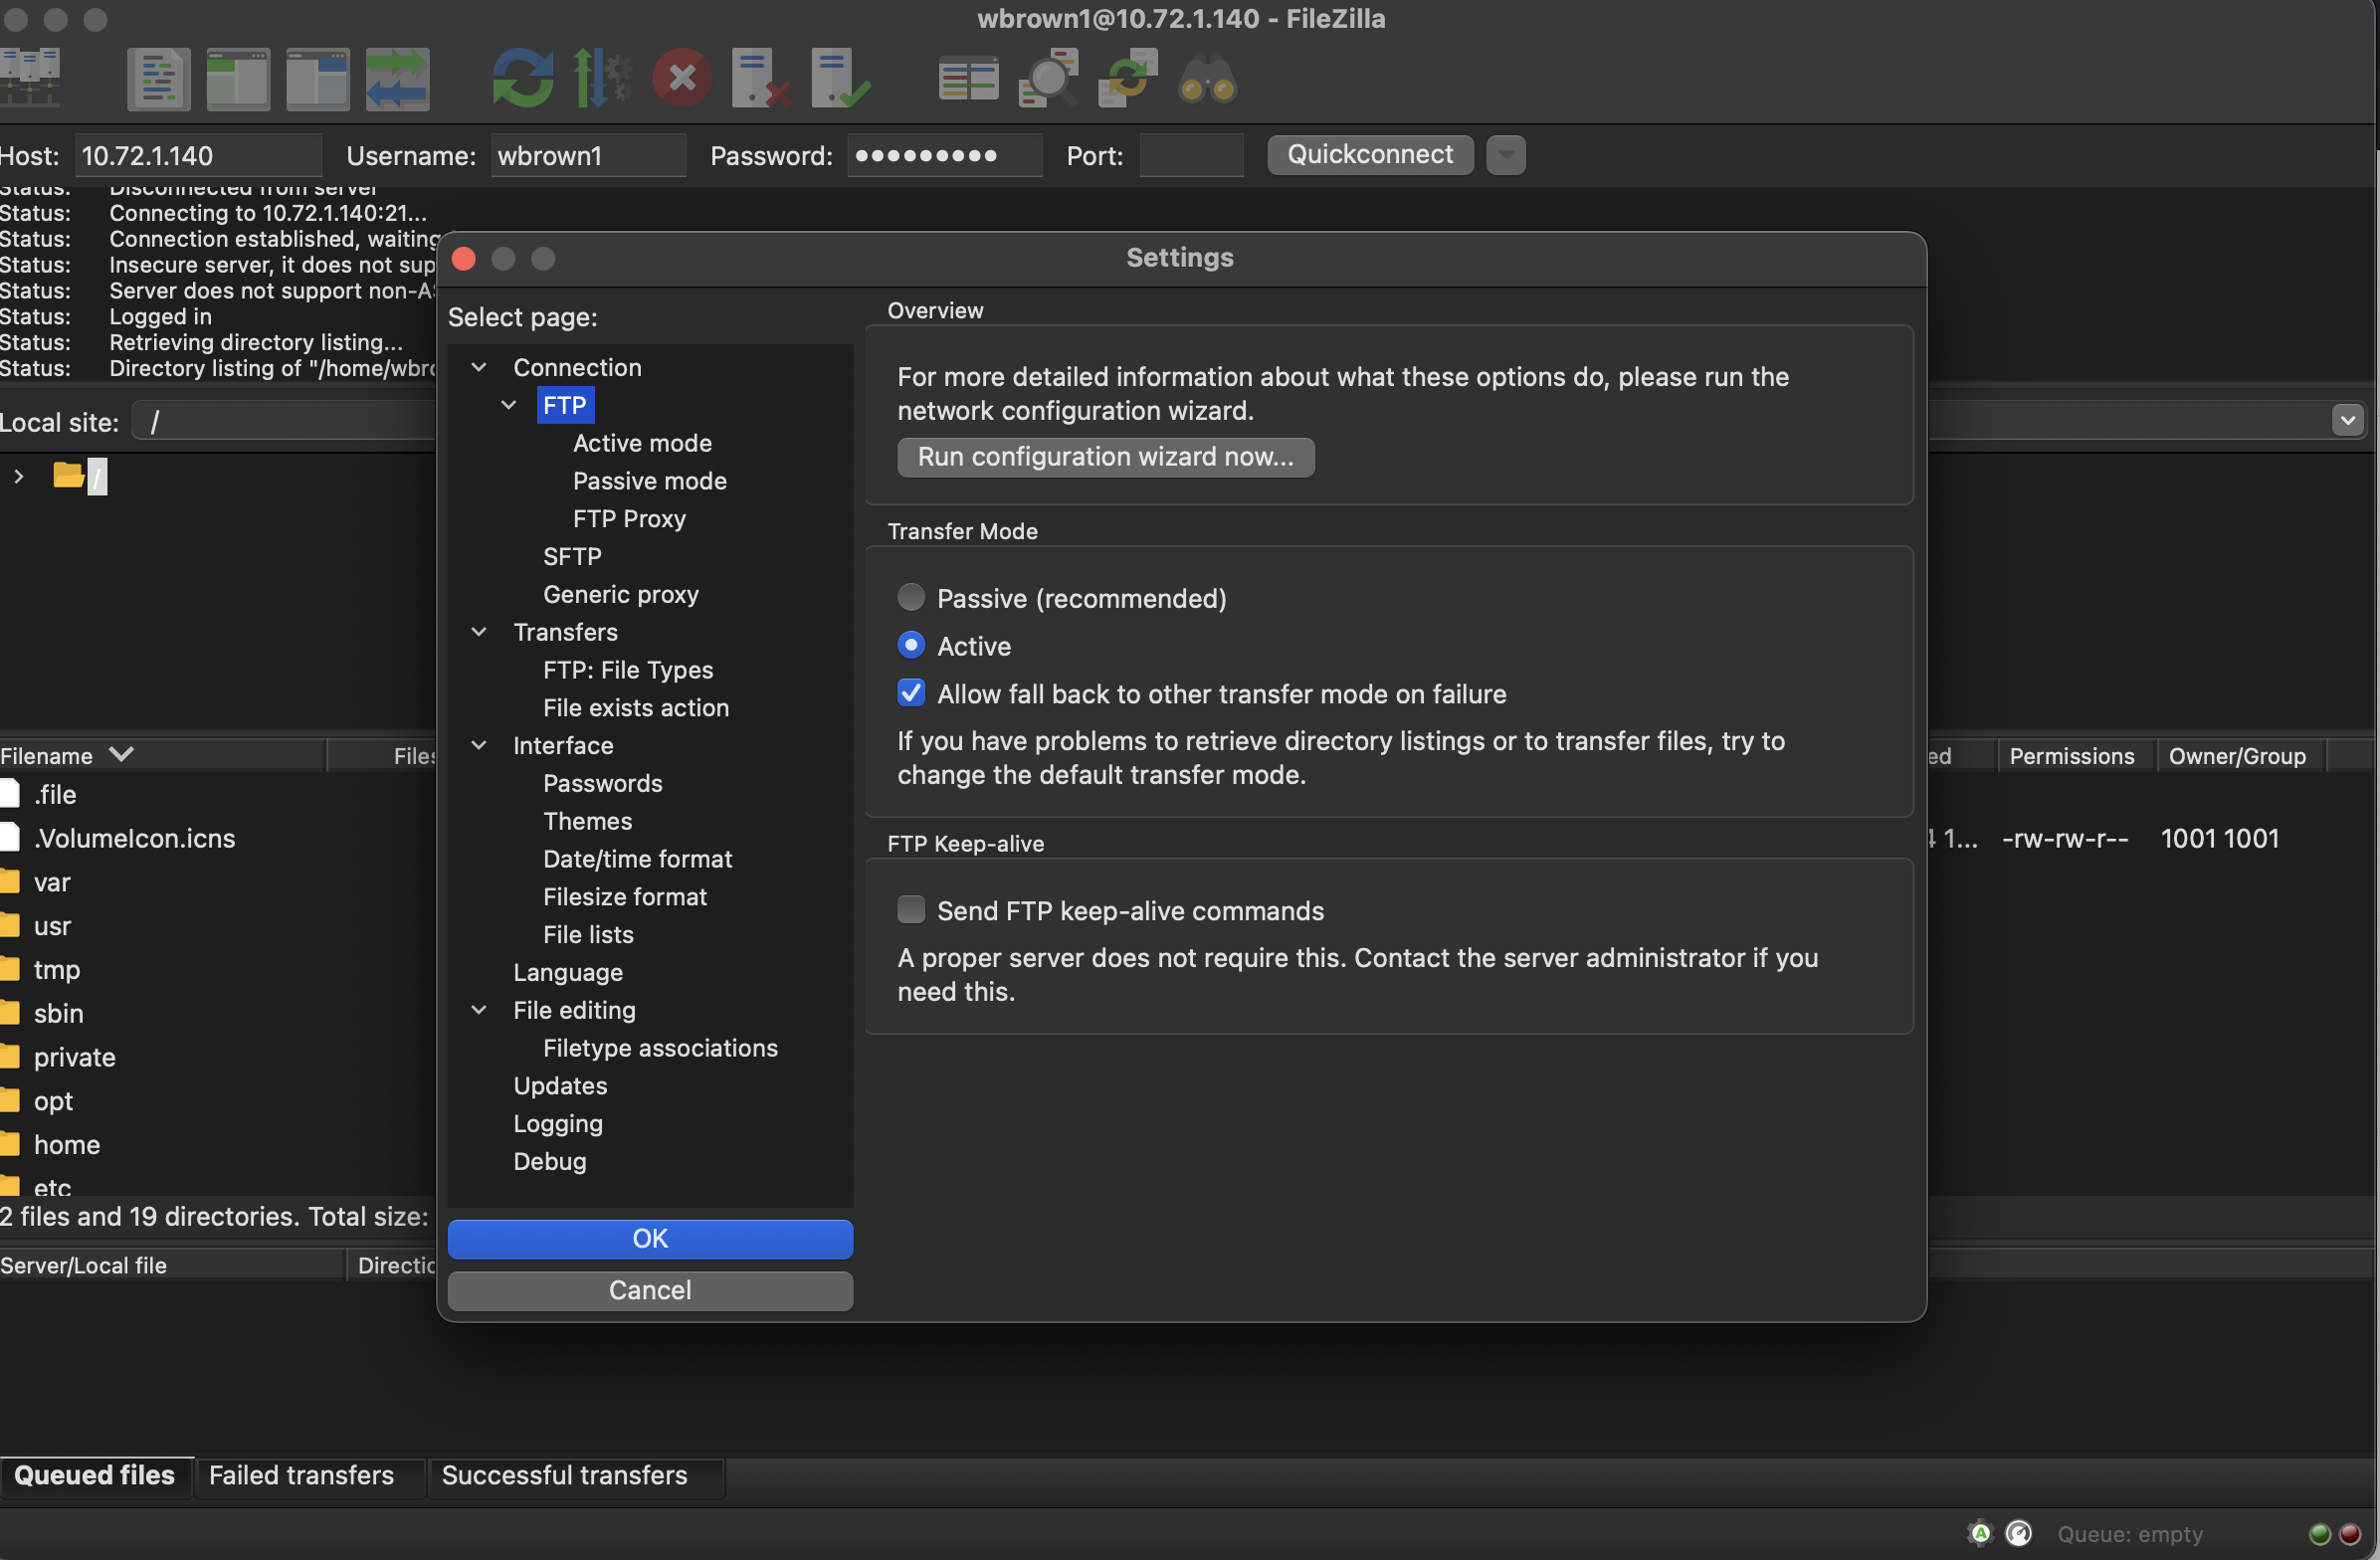
Open the FileZilla app. We need to change a configuration first, since this is a basic hosting server. Open FileZilla/Settings in the task bar at the top. Select FTP for the page on the left. On the right, switch from Passive mode to Active mode. Then click OK.
To login, enter the following at the top bar of the app:
- Hostname: 10.72.1.125
- Username: Your SU login
- Password: Your password (listed above)
- Port: 21
After a successful connection, you should see your directory in the remote site section (right side of app). Your website directory is under public_html.
Questions
If you have any questions, email Wes at wbrown1@su.edu. Please note: It may take upward of one business day to respond.
Modifying Content in the Gesture Interface
Modifying Content in the Gesture Interface
Step 1: Navigate to the Gesture-Interface Folder
- Open your ownCloud server: Access your ownCloud server through your web browser or ownCloud client.
- Locate and open the
Gesture-Interfacefolder: This folder is the main directory where your content is organized.
Step 2: Understand the Example Folder Structure
- Inside the
Gesture-Interfacefolder, find theExamplefolder. This folder serves as a template for structuring your content. - Contents of the
Examplefolder:- JSON file: The JSON file contains metadata for the images. Here's the format:
{ "left": { "title": "Example Image 1", "caption": "Lorem ipsum odor amet, consectetuer adipiscing elit. Eget finibus eget vel ullamcorper vel massa potenti amet. Fringilla morbi efficitur neque malesuada lectus lobortis. Adipiscing tempus orci amet dis; tortor diam maximus lacus ultrices." }, "right": { "title": "Example Image 2", "caption": "Lorem ipsum odor amet, consectetuer adipiscing elit. Pretium sed pharetra egestas vivamus lectus nulla fusce arcu. Mattis aenean viverra, curabitur vivamus eu netus. Sollicitudin ligula posuere quisque varius habitasse mi habitant. Suspendisse neque ipsum ullamcorper ipsum dignissim taciti sodales." } } - Photos: Two images named
LeftandRightin JPG or PNG format.
- JSON file: The JSON file contains metadata for the images. Here's the format:
Step 3: Navigate to the Runtime Folder
- Inside the
Gesture-Interfacefolder, find theRuntimefolder: This folder contains subfolders with different names but similar structure to theExamplefolder.
Step 4: Create a New Folder in Runtime
- Inside the
Runtimefolder, create a new folder: Name this folder according to your project or content.
Step 5: Add JSON File to the New Folder
- Create a JSON file: In the newly created folder, create a JSON file with the same format as the one in the
Examplefolder. - Example JSON file format:
{ "left": { "title": "Your Image Title 1", "caption": "Your caption for the left image." }, "right": { "title": "Your Image Title 2", "caption": "Your caption for the right image." } } - Details:
- Title: Provide a descriptive title for each image.
- Caption: Write a detailed caption that explains or describes the image.
Step 6: Add Photos to the New Folder
- Add two photos: Name the photos
LeftandRightin JPG or PNG format. - Ensure proper naming: The names should match exactly (
LeftandRight) to ensure the JSON file references them correctly.
Step 7: Verify the Structure
- Check the new folder: Ensure the new folder in
Runtimehas the following structure:- JSON file: Verify the JSON file is correctly formatted and contains the necessary metadata.
- Photos: Ensure the photos named
LeftandRightare present and correctly named.
Step 8: Repeat for Other Folders
- Repeat steps 4 to 7: For any other folders you need to create in the
Runtimefolder, follow the same steps to ensure consistency.