Visual scripting in Unity seems to work well and you can build most things you will need. However, Unity's visual scripting is no where near the quality and power of Unreal's Blueprints!
##### An introduction to Unity's Visual Scripting Build a complete game. I have done this playlist and it works well. **You can use the latest version of Unity**. [https://www.youtube.com/playlist?list=PLrw9uFU6NhfPCiMfDLsL-ccDMCMJ0bMJk](https://www.youtube.com/playlist?list=PLrw9uFU6NhfPCiMfDLsL-ccDMCMJ0bMJk) ##### How to Translate C# script to Visual Scripting Graph in Unity This is a common question I'll get asked. This guide is VERY USEFUL if you come across Unity C# code and need to translate into Unreal Blueprint code as well. [https://www.youtube.com/watch?v=waBRBKZaY9Q](https://www.youtube.com/watch?v=waBRBKZaY9Q) # Lighting & Exposure Cheat Sheet [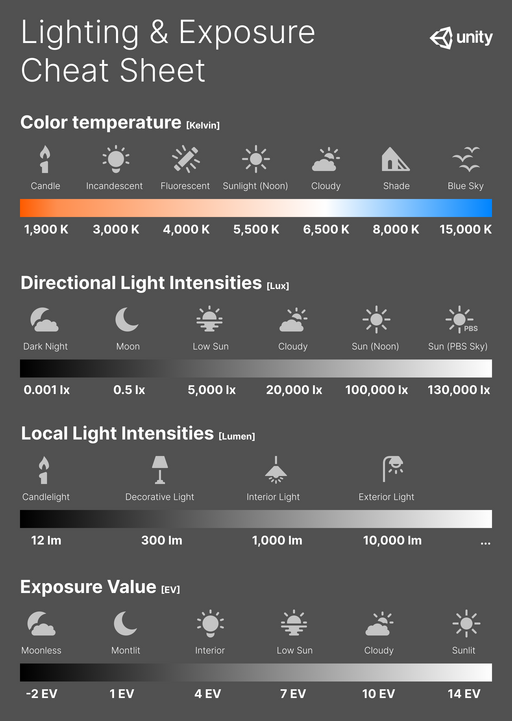](https://scil-wiki.su.edu/uploads/images/gallery/2023-11/upload-2021-1-25-11-4-39.png) # Unity Audio Mixer Here are two great resources for using Unity's Audio Mixer, which is great for adding post effects for environments. The first is Unity's documentation, which gets frequently updated, and the other a great tutorial from the internet with detail on it's full use. [Unity - Manual: Audio Mixer](https://docs.unity3d.com/Manual/AudioMixer.html) [Audio Tutorial for Unity: The Audio Mixer](https://www.kodeco.com/532-audio-tutorial-for-unity-the-audio-mixer) # Terrain Tool Right click in the Hierarchy and navigate to 3D Object > Terrain. There are several options under the Terrain component. #### Create Neighbor Terrains **Create Neighbor Terrains** lets you create more terrain planes. If Fill Heightmap Using Neighbor is selected it will base the new plane on the ones adjacent to it. If Fill Heightmap Address Mode is set to clamp, it will try to interpolate heights while mirror will simply mirror the terrain across the axis. Just click in a highlighted square to create a new plane. #### Paint Terrain The **Paint Terrain** tool allows you to alter the plane's mesh. [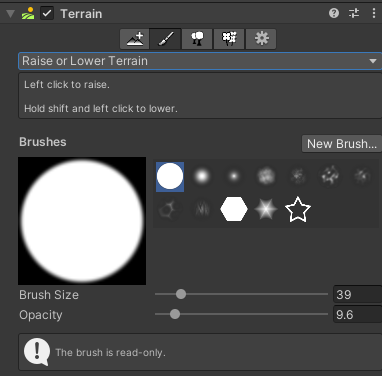](https://scil-wiki.su.edu/uploads/images/gallery/2023-11/yb0image.png) Raise or Lower Terrain** lets you adjust the height of the mesh, giving the appearance of hills and mountains. Different brushes achieve different effects. The brush size controls the amount of ground you change at once while the opacity controls how fast you change it. If you're noticing you're having trouble controlling your brush, try turning down the opacity. **Paint Holes** allows you to paint holes in your mesh. **Paint Texture** allows you to edit the material of the plane. **Set Height** will use the height set in Height and adjust all levels painted to that height. This is good for creating planes at uniform elevations. **Smooth Height** allows you to smooth rugged edges. This is good for creating slopes and hills. **Stamp Terrain** lets you place terrain elements one by one based on the chosen brush. Selecting subtract will instead remove terrain in the shape of the brush. #### Paint Trees In order to paint trees, you need to select a prefab to use for the tree(s). You will see a box labeled "Trees". Under this, there is a button called *"Edit Trees...".* Click that and click *Add Tree.* In *Tree Prefab* assign a prefab to use. When you go to paint, this is what will be painted. This tutorial will use the Free Trees package from the Unity Asset Store, located [here](https://assetstore.unity.com/packages/3d/vegetation/trees/free-trees-103208#description). [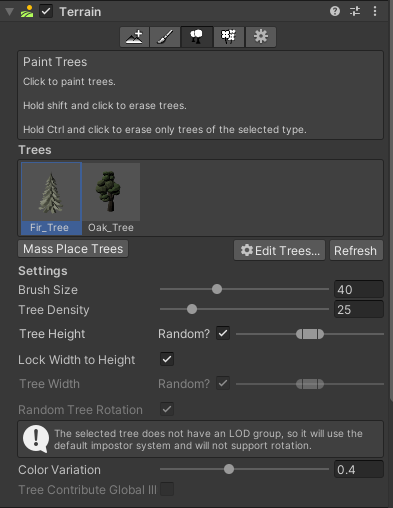](https://scil-wiki.su.edu/uploads/images/gallery/2023-11/xtdimage.png) You can add multiple trees to the registry for easy switching. *\*Note: The prefab can be of anything- if you need a massive amount of the same prefab in an environment, consider placing them as 'trees'.* Select a tree to begin painting trees onto your mesh. Brush size changes the size of the area you will place trees in at one time and density effects how many trees appear within that area. There are some options to add some simple variety to your trees, such as height and width. Clicking **Mass Place Trees** will automatically add trees over the entirety of your terrain using a mix of the tree models you have loaded. You can change the amount of trees you'd like to spawn based on how populated you want your environment to be. #### Paint Details **Paint Details** operates similarly to **Paint Trees**, however there is no option to mass place details. You can also add a grass textures here so that you can paint unique grass onto your mesh. It includes a level of color variation to help diversify your grass automatically. # Importing Animation In your **Project** tab, right click and select create > timeline.If using a read-only animation:
*Import your animation to the **Project** tab. Select it (or the animation itself if included in an fbx package, denoted by a triangle icon) and select **edit**.* [](https://scil-wiki.su.edu/uploads/images/gallery/2023-11/exhimage.png) *If the model you are using is humanoid, select **Rig** and change **Animation Type** to **Humanoid**. Click Apply.* [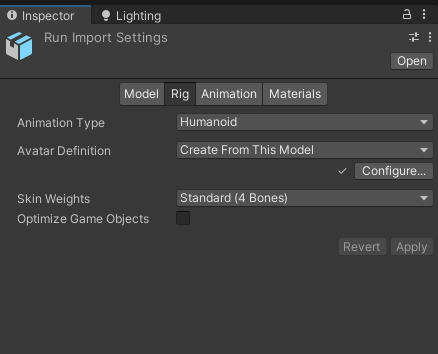](https://scil-wiki.su.edu/uploads/images/gallery/2023-11/783image.png) Import your model to the **Project** tab. Select it and select **edit**. On the model, if the model you are using is humanoid, select **Rig** and change **Animation Type** to **Humanoid**. Click Apply. In the **materials** tab, click **extract textures** and select the same folder where the character is stored in the Unity project. Click **extract materials** and do the same. The blank "remapped materials" list should now populate with the correct materials. [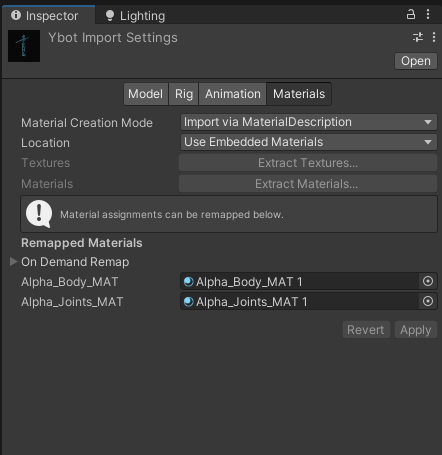](https://scil-wiki.su.edu/uploads/images/gallery/2023-11/lx0image.png) Drag your model into your scene. Create an empty object in the scene and name it "Timeline". Add the component **playable director** to "Timeline". In the **Project** window, right click and go to create > timeline. Name it "Sequence". Click on "Timeline" in the hierarchy and change the Playable Director's **Playable** to "Sequence". [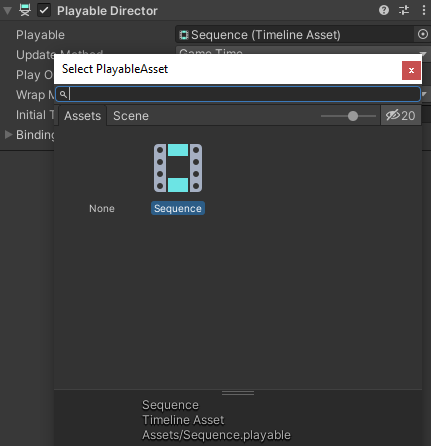](https://scil-wiki.su.edu/uploads/images/gallery/2023-11/gbzimage.png) Go to window > sequencing > timeline to show the timeline window. You may want to drag this somewhere into your setup. Right click in the empty left area of the timeline window and add an **animation track**. Select or drag the model you want to animate to the blank box currently labelled "None (Animator)". This will make it so any animation placed on the section of the timeline applies to that model. [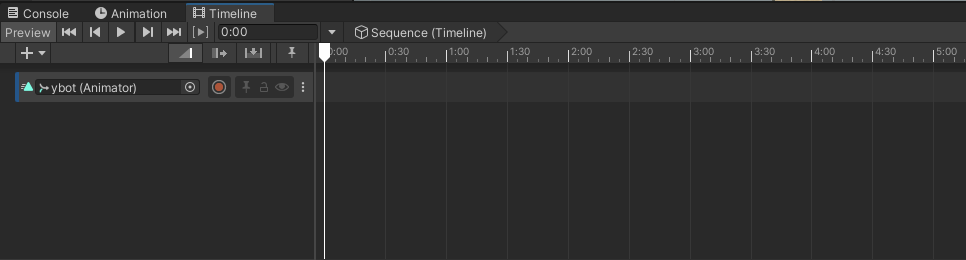](https://scil-wiki.su.edu/uploads/images/gallery/2023-11/zaiimage.png) Drag the animation from earlier into the timeline. Press the play button in the timeline to watch it play in the editor. *\*Note: if the animation moves your model, select the animation in the timeline and change the **Clip Transform Offsets** to match where you want your model to be.*