Unity
- Simple XR Rig Setup
- XR Interaction Toolkit Setup
- XRIT Interactions
- Building for PC in Unity
- VR Keyboard in Unity
- Unity URP Settings for Standalone VR
- Unity Features
- C# and Visual Scripting
- Await/Async in Unity
- AR Basics in Unity
Simple XR Rig Setup
Project Setup (Updated for Unity 6)
This guide covers how to set up a simple or basic XR rig, similar to other guides on this wiki. There are "prefabs" or a packaged object available for an entire player object that has everything we need, but sometimes it's nice to start with the basics and add features manually as we need them.
This guide assumes you have been briefed on the basics of the Unity editor, such as the project folder, inspector, hierarchy, scene, game tabs, etc.
Launch Unity Hub.
Click New project.
Under the templates, choose Universal 3D Core (URP).
Why URP?
Unlike the standard or built-in 3D pipeline for Unity, the universal rendering pipeline (URP) gives scalability for different systems out of the box as well as node-based shader creation.
See more: https://docs.unity3d.com/Packages/com.unity.render-pipelines.universal@17.0/manual/index.html
Give your project a name and choose a file destination under Project settings.
Project files can be large, so I recommend a fast connection external ssd.
Uncheck Connect to Unity Cloud and Use Unity Version Control. You can connect to these services later, if you wish.
Click Create project.
The project will be built. Take a few moments and get acquainted with the layout of the Unity Editor. Take a particular look at the Project Window, where your assets will live. Check out the URP Readme file. When you are ready, you may click the Remove Readme Assets button in the Inspector. You can also delete the InputSystem_Actions file as we will get our input from the XR Interaction Toolkit.
Enabling OpenXR
Go to Edit > Project Settings. Click on XR Plugin Management on the left and install the XR Plugin Management.
Check Open XR under Plug-in Providers.
If you get a message about enabling backends for the new input system, click yes. Unity will restart. This switches Unity to use the new Input System (which is better and more scalable).
Click the yellow warning sign next to OpenXR. Click fix all in the upper right corner of the window that appears. This may take a moment to process.
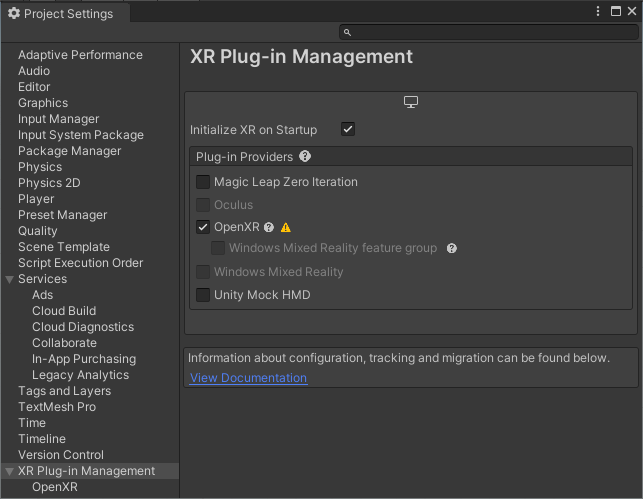
You'll notice not all of the warnings went away. What is left is adding controller support in something called the Interaction Profile. Before you leave, sometimes it is good to come back here to Project Validation to verify warnings are properly dealt with.
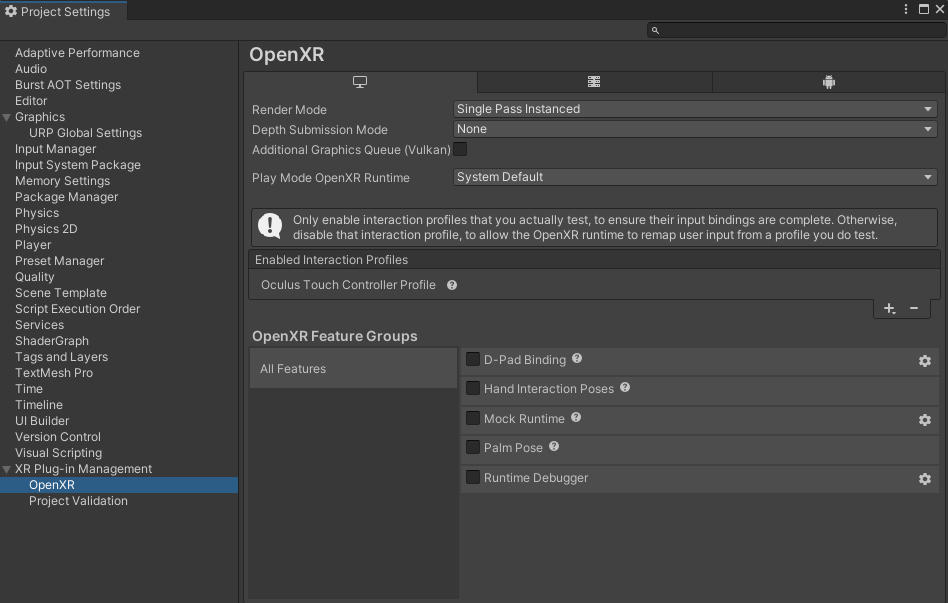
Under Interaction Profiles click the + button and add Oculus Touch Controller Profile. You may add more support for other devices if you wish.
Close Project Settings window.
Add the XR Interaction Toolkit (XRIT)
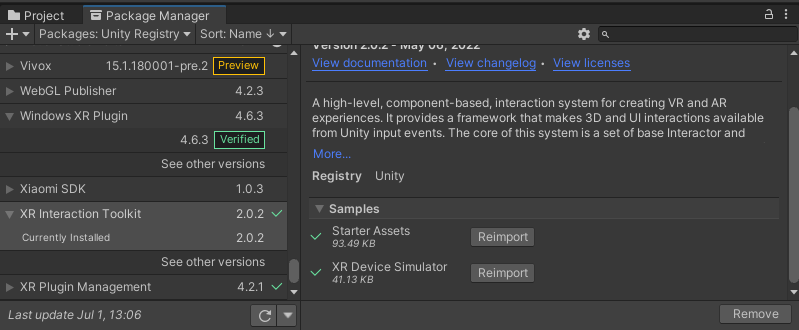
At the top, go to Window/Package Manager. Select Unity Registry on the left and scroll down until you find XR Interaction Toolkit. Select it and the window should change to give you descriptions and the ability to install. Click the Install button.
After a moment or two, a new tab within the window will appear called Samples. Click the tab and under Starter Assets, click the Import button. After a moment, you will have a Samples folder with Starter Assets inside your project.
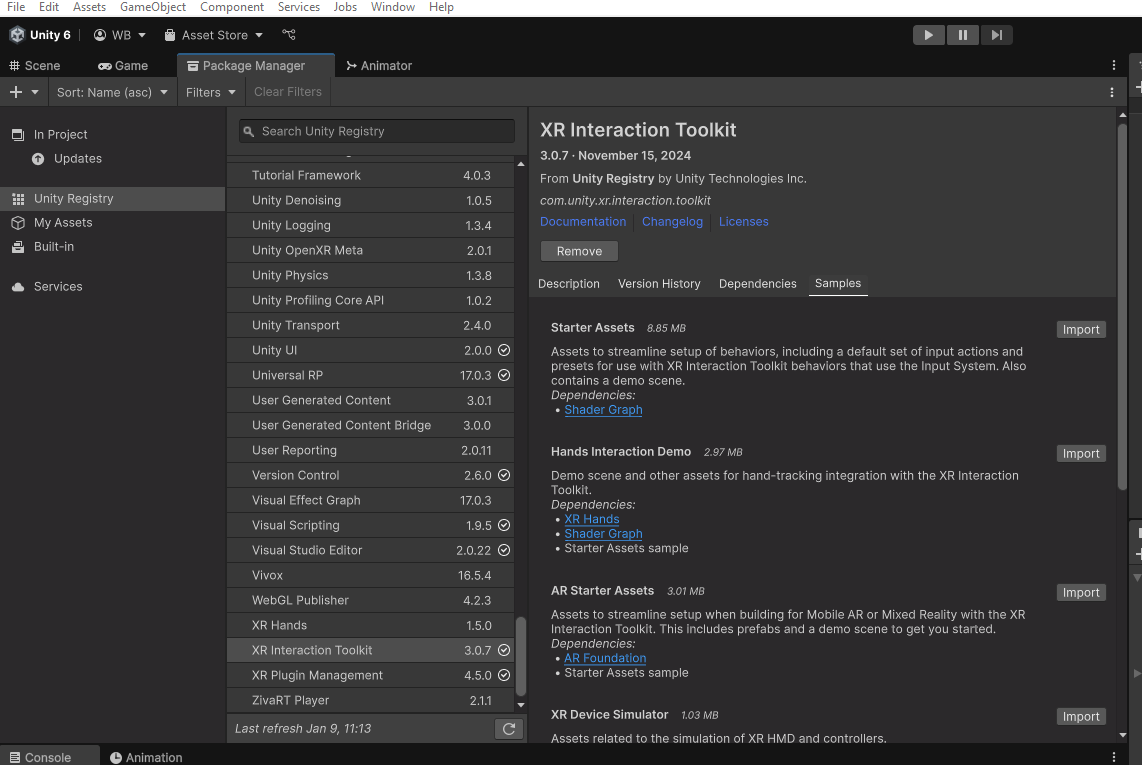
Feel free to browse these other samples but I caution you to not install them until you are comfortable with Unity, VR, and the basics!
Switch back to the Scene tab. If you get a window that pops up about Interaction Layer 31 should be set to 'Teleport' for... then select Fix or Fix all.
Create the XR Rig
Back in the scene tab, you should not have any cameras in your scene. Right click in the Hierarchy window and select XR/XR Origin (VR).
This creates two objects; an XR Interaction Manager which is responsible for the core parts of XR Interaction Toolkit, and an XR Orgin (VR) game object. If you select the XR Orgin (VR) game object, reset its position and rotation to 0, 0, 0.
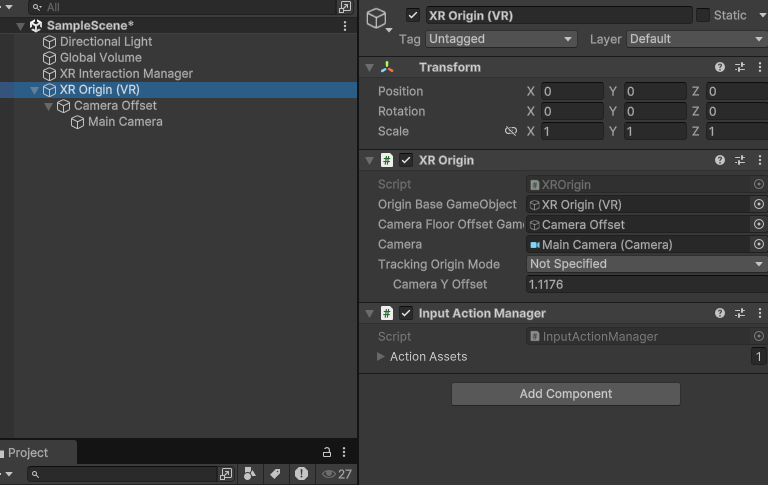
Notice that this game object has an XR Origin component and an Input Action Manager component. The Input Action Manager has input bindings configured from the starter assets we obtained. There is also a child object called Camera Offset that is controlled by the XR Origin, and a Main Camera as a child object of that. Feel free to browse these items but do not change their values until you have adequately tested your project.
This is a great moment to test your project in VR. Verify your headset is working through the PC. If you have to turn on PC-VR with Steam or Meta Link, it is a good idea to save and close your project, get VR up and running, and then reopen the project. This is the same for any game engine you use.
In Unity, press the Play button at the top-center and verify VR is working. If it is, proceed to the next step. If it is not, check connections, headset, restart the editor, Steam/Meta Link, or even the computer.
Adding Controllers
Because Unity has changed the way inputs are handled with XR Interaction Toolkit from the previous version (v2), we will handle things a little differently than the past. We will be using in this case, XR Direct Interactors to show our hands, but there are other options you can try in the future as well as different configurations. This guide, again, is for a simple XR Rig.
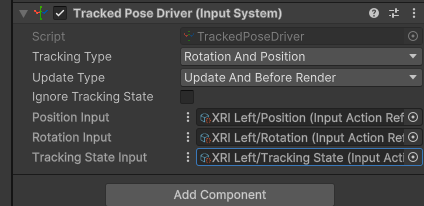
Right click on the Camera Offset game object and go to XR/Direct Interactor. Change its name to something like Left Direct Interactor since we will add another for bother controllers. Select new game object and in the Inspector, add a new component called Tracked Pose Driver (Input System).
DO NOT choose the one that is MISSING the (Input System) part otherwise you will have to delete the component and add the correct one again.

Inside this new component, change the Position Input, Rotation Input, and Tracking State Input values from Action to Reference buy selecting the vertical 3-dots icon and select Use Reference.

This is the tricky part for some: Click the bulls-eye icon on each value and assign the correct reference from the samples folder. Here is an example for Position: After you click the bulls-eye icon, a window appears. Start to type "XRI Left/Pos" and you will filter the results for left-controller position. Do this for rotation as well "XRI Left/Rot." For Tracking State Input, select the bulls-eye and begin to type "XRI Left/Track" and you will get the correct reference.
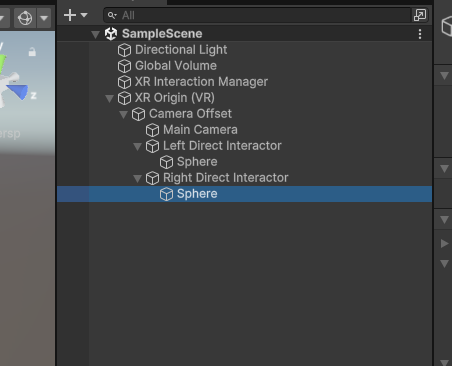
If you were to test this for the left hand right now, the hand will probably work but you won't "see" anything. For now, lets add a basic sphere for a visual for our hand. Right-click on the Direct Interactor game object and add a 3D object/Sphere and a child. Change its scale to 0.2, 0.2, 0.2. Remove the Sphere Collider component from the sphere object (NOT from the Direct Interactor).
Test in VR and you should have a left hand with a sphere. If everything works, repeat the process above and use values for Right instead of Left. When you are finished your rig should look like this:
This tutorial is now complete.
DON'T FORGET TO TEST IN VR!
Where to go from here?
The next steps would be to add possibly a form of locomotion or interact with objects such as picking them up.
You can also browse the complete XR Rig prefab from the samples folder in Samples/XR Interaction Toolkit/x.x.x/Starter Assets/Prefabs/XR Origin (XR Rig) although This is an advanced and very complete setup with features you may not need.
XR Interaction Toolkit Setup
Setup
This guide is for XR Interaction Toolkit version 2. If you are using a newer version, such as v3, OR you are using Unity 6 or higher, this guide is deprecated!
In Package Manager, click the packages drop down in the upper left (next to the + sign) and change it to Unity Registry.
Scroll down to XR Interaction Toolkit and click Install.
Once XR Interaction Toolkit is installed, click continue. (If it gives you another prompt, accept it and let Unity restart.)
Click Samples. Import the Starter Assets.
In the Project window, a Samples folder has been added. Click Samples > XR Interaction Toolkit > [Version] > Starter Assets. For each of the XRI presets, click Add to... at the top of the inspector.

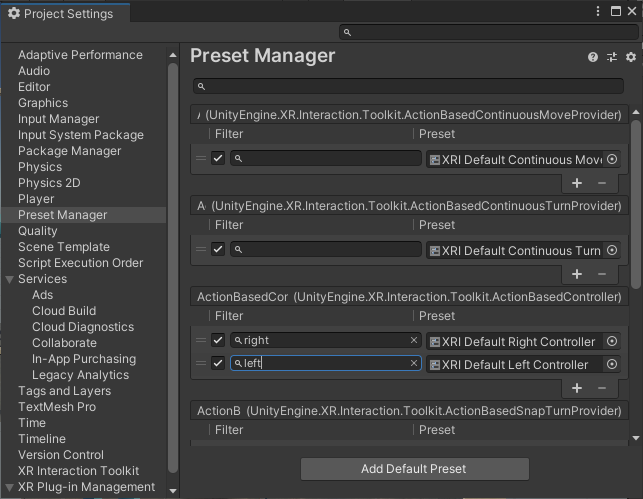
In Edit > Project Settings select Preset Manager from the left.
In the two boxes where it says XRI Default Right/Left Controller (it should be the third section down) type "right" and "left" for the corresponding box.
If you have a current XRRig, make a note of your XRRig position and rotation values and then delete your existing XR Rig.
Right click in the hierarchy and click XR > XR Origin (Action Based).
Select the XR Origin in the hierarchy and set its Tracking Origin Mode to "Floor" in the inspector window. *WARNING (see below)
As of January, 2024, there may be a bug with setting the Tracking Mode to floor with the XR Interaction Toolkit. Leave the dropdown as its default state (varies) will still project most modern headsets to the floor by default.
Open the XR Origin hierarchy and select the "left controller" object. Delete it. Then select the "right controller" object and delete that as well. (We are going to build our own versions of these)
Now we have a choice: 1) we can either set up a direct interactor that will let us pick up objects in the world, or 2) we can set up a ray interactor that will let us set up teleport locomotion.
In this tutorial, we will add both of these interactors. You can start with either one.
Decide which hand will be used for your direct interactor (for picking up world objects) and which hand will be used for your ray interactor (for teleport locomotion). For the purposes of this tutorial, you will want these functions assigned to different hands.
Setting Up a Ray Interactor (Teleport Locomotion)
Right click on the Camera offset (within the XR Origin) in the hierarchy and choose XR > Ray Interactor (Action-Based).
This will add a Ray Interactor to the rig. You can rename this in the inspector. Rename it to "R Ray interactor" to show that this will be assigned to the right hand (or "L Ray Interactor" as the case may be).
Make sure the R Ray Interactor object is selected.
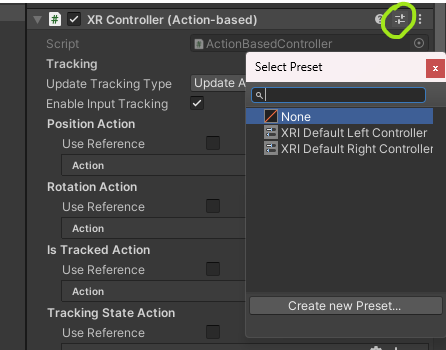
In the header of the XR Controller (Action-based) component, click the preset icon. This is the small icon on the right side of the component header between the question mark icon and the icon with three dots.
A window will appear. Choose either the left or right preset as appropriate.

Add a Teleport Area
Right click in the hierarchy and go to XR > Locomotion System (Action-Based).
If your XR Origin is not set, drag your XR Origin in.

Right click in the hierarchy and go to XR > Teleportation Area. This sets the area that can be teleported in- resize and position it to your liking. Multiple teleportation areas can be active at once. When positioned, turn off the mesh renderer to make it invisible.
Setting Up a Direct Interactor (Picking Up World Objects)
Right click on the Camera offset (within the XR Origin) in the hierarchy and choose XR > Direct Interactor (Action-Based).
This will add a Direct Interactor to the rig. You can rename this in the inspector. Rename it to "R Direct interactor" to show that this will be assigned to the right hand (or "L Direct Interactor" as the case may be).
Make sure the L Direct Interactor object is selected.
In the header of the XR Controller (Action-based) component, click the preset icon. This is the small icon on the right side of the component header between the question mark icon and the icon with three dots.
A window will appear. Choose either the left or right preset as appropriate.
Add visual objects for the hands (if desired). One way is to add a sphere as a child object of your interactor. Scale appropriately and REMOVE the collider component.
Add a Grabbable Object
For this tutorial we will make a grabbable cube.
Right-click in the hierarchy and create a 3D cube.
On the cube, add the XR Grab Interactable component.
Now, when you test your scene in VR, you should be able to pick up the cube with whichever hand is set up as a direct interactor.
XRIT Interactions
Valem
These guides is for XR Interaction Toolkit version 2 and/or versions prior to Unity 6. If you are using a newer version, such as v3, OR you are using Unity 6 or higher, this guide is deprecated!
Complete guide to XR Interaction Toolkit: https://www.youtube.com/playlist?list=PLpEoiloH-4eP-OKItF8XNJ8y8e1asOJud
Same as above, older, but has lots of common features such as two hand grab, drawers, levers, etc: https://www.youtube.com/playlist?list=PLrk7hDwk64-a_gf7mBBduQb3PEBYnG4fU
Full body in VR: https://www.youtube.com/playlist?list=PLrk7hDwk64-ZRB5lz-xJhgH7Lp6MIRcHJ
Often Valem's tutorials include heavy use of C#
Building for PC in Unity
Once you have a project that you want to build, you can follow this tutorial. This guide assumes you've configured your project for OpenXR. It is applicable to most PC VR systems that support OpenXR, including the following systems:
- Varjo Aero
- Valve Index
- Meta headsets
- HTC Headsets
- Windows Mixed Reality
You should use a different build process for other VR systems and/or projects that do not use OpenXR.
Building a PC VR Project in Unity
In Unity, go to File > Build Settings.
Verify that the platform is set to Windows, Mac, Linux.
In the lower part of the dialogue window, click on "Player Settings..."
In the window that opens, look in the left menu. Under "XR Plug-In Management" verify OpenXR is checked.
Underneath XR Plug-in Management there will be some items such as OpenXR, Project Validation, etc. Select OpenXR on the right. You will see a small window with Interaction Profiles. You may have already added the Oculus Touch Controller Profile.
Choose whichever controller is applicable to your targeted system. (You can add more than one profile to support multiple hardware systems)
- Index Controllers: choose "Valve Index Controller Profile"
- Rift S Controllers: choose "Oculus Touch Controller Profile"
- HTC Vive Controllers: choose "HTC Vive Controller Profile"
- HP Reverb G2 Controllers: choose Microsoft Motion Controller Profile"
Note: it is possible to use controllers from one manufacturer with a headset from another. For example, you might choose "Valve Index Controller Profile" if you are using the Valve Index controllers with any other compatible headset such as the Varjo Aero, HTC Vive, etc.
Go back to the Build Settings window, which should still be open (if not, open it again).
Verify that the scenes you want to build are shown in the "Scenes to Build" window. If no scenes appear, you can drag scene files from the Project window into this box.
In the "Build Settings" window, click the "Build" button in the lower right.
In the dialogue window that opens, navigate to a location where you want to build your scene. It is recommended to make a "Builds" folder within your Unity project, but this isn't necessary.
Click "Select Folder" and the project will build to that pointed directory.
To run your build, in your OS navigate to the folder where you built the project and double click the .exe file named for your project.
You can build a project on a computer other than the one you plan to run it on. Just make sure you run your build on the appropriate hardware per your build settings.
Considerations
Under Project Settings/Player/Resolution and Presentation, consider different modes such as Fullscreen or Windowed. Also note at the very top the is a location where you can add a Default Icon as well as Company Name and Product Name
Optimizing Your Build For VR
Though the process above will result in a working build, there are some extra settings you can use to optimize your project for VR applications. These setting are all available in the "Project Settings" window on the left side.
- Player > Other Settings > Color Space: Set this to "Linear" to better support the built-in color profiles of VR headsets
- Quality > Rendering > Anti-Aliasing: Set this to "4X" to optimize edge smoothing for VR performance
- Quality: At the top, choose "High" to set a collection of settings in a manner that optimizes performance for VR
VR Keyboard in Unity
Although different SDKs offer built-in keyboards, most don't offer cross-platform support. Below is an updated version of a VR friendly keyboard that has been modified from a now inactive blogger "Tales from the Rift." I have an included an updated version of their package including TextMeshPro elements.
The blog post instructions are still valid.
Download HERE - https://drive.google.com/file/d/1AoK9kyOT2Kru0hJb4C0DA4ho_fes2Skc/view?usp=drive_link
VR Canvas Keyboard
I’ve received a few emails about inputting text in VR, specifically around Unity’s Input Field.
Firstly, bugs, Input Fields rendered in world-space have several known bugs with displaying the caret in the wrong position. I’m not sure why Unity has not resolved these yet.
Secondly, conceptually text input in VR is obviously not going to be do-able with a physical keyboard, so you need a virtual input panel controllable by either a joystick input device and/or a virtual pointer. At this time though, Unity only supports input panels for mobile builds with a touch screen (iOS/Android) which are rendered in screen-space. Unfortunately Unity has no world-space keyboard listed on their roadmap.
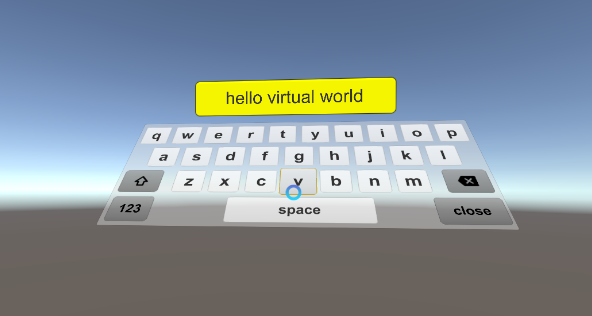
In this blog, I’ll show you how to create a canvas world-space keyboard for VR using look/gaze based control.
Watch the video below, when the keyboard is displayed the user can look at the keyboard button they want to trigger and select it with a physical button (Space on the PC physical keyboard, or X on the X-Box controller, or GearVR short-press button).
It works well enough when you only have a small amount of input, such as getting the users name before they join a game, but I’d hate to use it in a vr chat scenario!
Quick Start
For those in a rush, here is how you can add a keyboard to your VR application:
1. Download the .unitypackage and load it into your project.
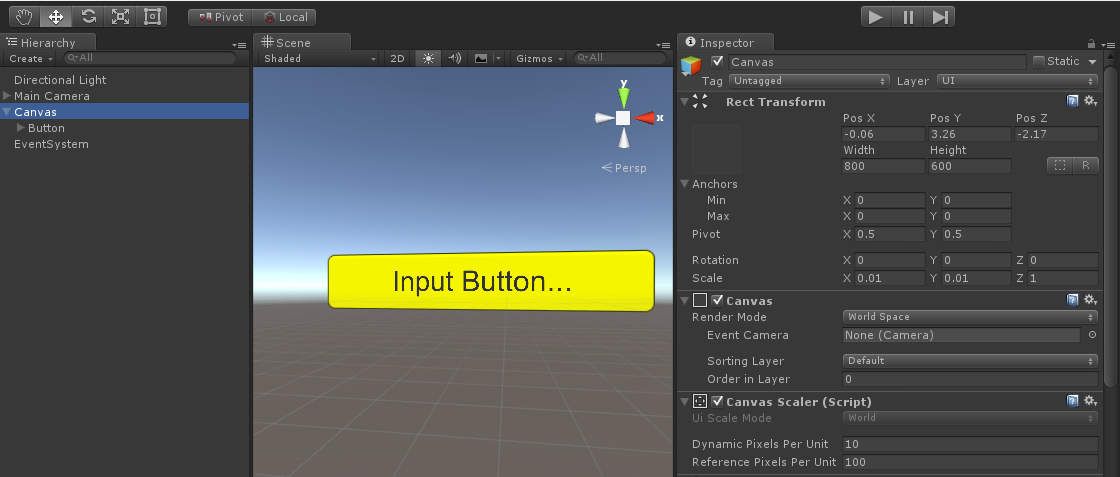
2. Create your text panel for input. To keep it simple, create a UI Button, and a canvas will automatically be created. Set that canvas to be world space, then scale and position it in the scene.
Note: We’ll use a standard text button because of the bugs with Input Fields.
3. Add an XR rig with an input mechanism, such as a ray interactor from the XR Interaction Toolkit.
Note: You can use an alternative input module, or even the standard touch input module. Whatever you like!

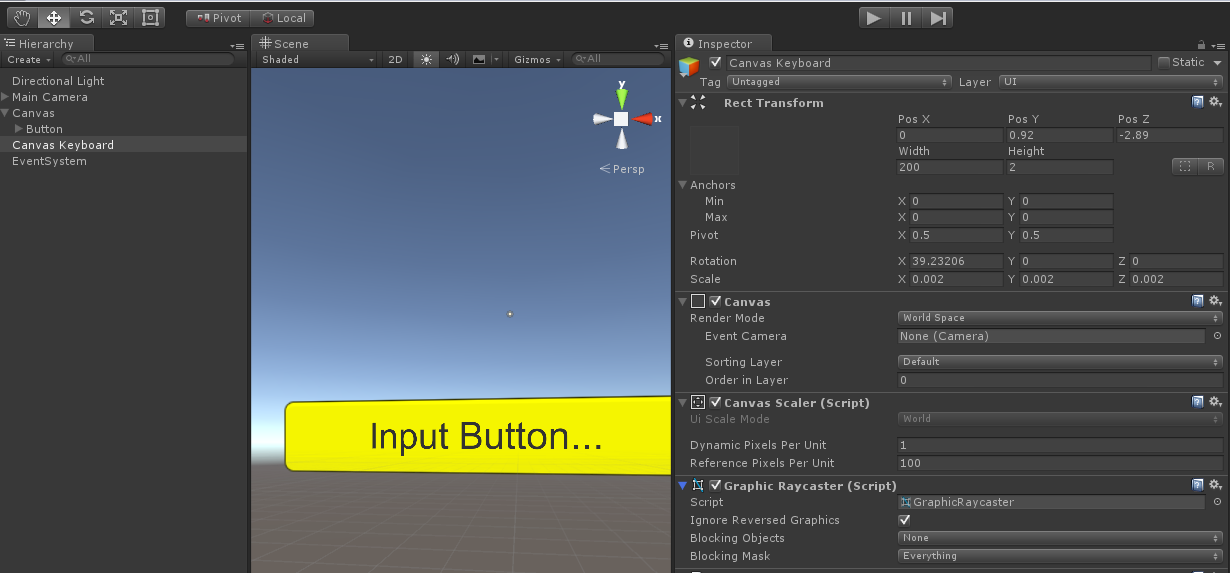
4. Create another canvas game object, also set in world-space which be the anchor for our actual keyboard. By default these are huge, so set it’s scale to something meaningful like (0.002,0.002,0.002):
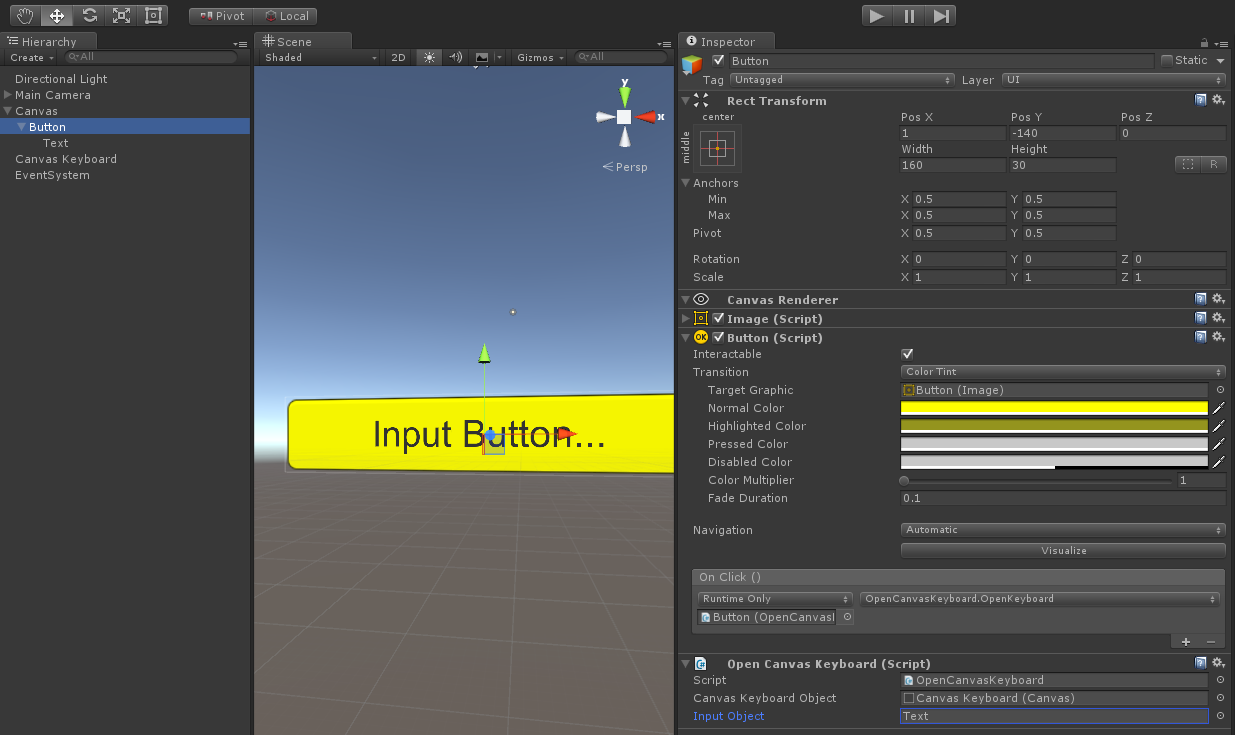
5. Lets wire up the click event on your button to open the keyboard on that canvas anchor.
Drag on the OpenCanvasKeyboard script to the button. And assign your Canvas from previous step 4 to the canvas property. Then assign the Text game object child to the Text attribute.
Finally, add an OnClick event handler to open the keyboard. Press + to add a handler, drag the button itself onto the Name (Object), and then in the drop down choose OpenCanvasKeyboard -> OpenKeyboard
That’s it. Now hit run. When you look towards the button and press SPACE the keyboard will display (you may need to rotate your canvas) and you should be able to type and see text change on the button.
When you change scenes the keyboard is automatically destroyed, or if you want to manually close the keyboard call: CanvasKeyboard.Close();
Unity Canvas
Since Unity 4.6 and 5, Unity has introduced it’s new UI system based on a 2d flat canvas that can be rendered to either screen or world-space. It includes all the dynamic sizing you would expect of a modern UI system. My keyboard is created out of UI buttons laid onto several panels, that are then attached to a canvas.
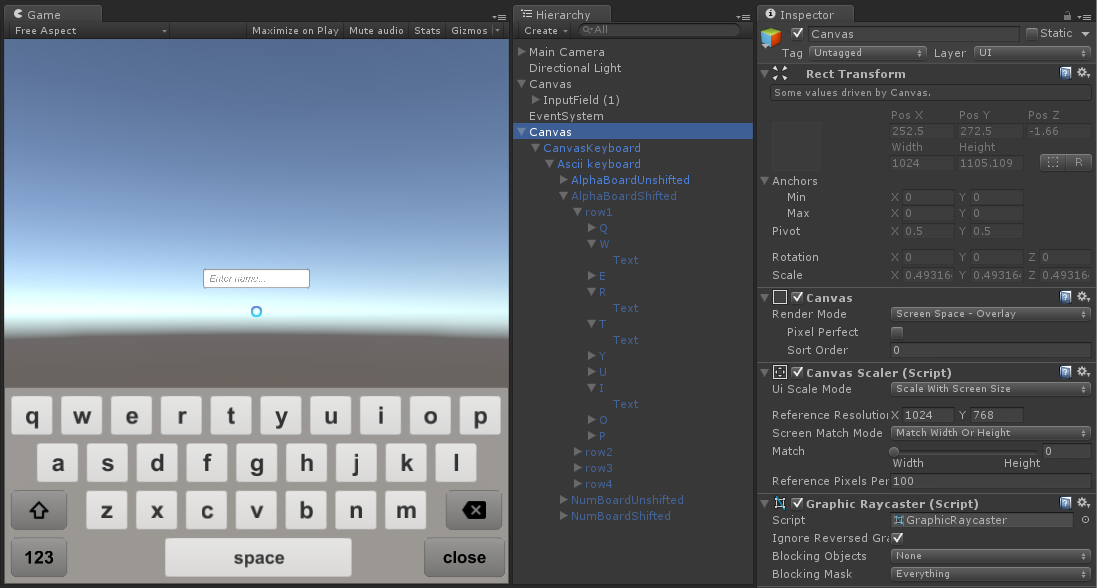
One of the best ways to create the keyboard is to initially lay it out using screen-space. Then you can more easily see how it scales.
If you see the screen shot below, I’ve used the Canvas Scaler to scale with screen size and used a reference pixel resolution of 1024×768, but I actually only care about the width (see how I’ve set Match slider to be width). Now now matter how wide the canvas scales it will always be 1024 reference pixels. The important part (which is not shown below) is that the panel “CanvasKeyboard” attached to the canvas is set to a width and height of 1024 x 400. So now we have a rectangular panel that scales maintaining it’s aspect ratio.
Important Note: If you are in VR Supported mode, and hit run, no screen space UI is displayed by design, as screen space UI doesn’t make sense in VR. So when you are designing and testing a keyboard (or menu, or whatever) turn off VR Supported mode, and use the standard event system for mouse input.
There are many styles of keyboard, from an mobile device style with multiple panels, or to a single panel, or to funky round layouts (which no doubt work better in VR as they have less movement):
I have chosen a standard mobile input style keyboard. I did this because our poor VR users are already dealing with a lot to learn about such a new environment, that I wanted them to see a keyboard they recognize and are comfortable with – even if it is not as efficient as it could be. (I like think about the lesson Apple learnt trying to introduce handwriting recognition with the Apple Newton – when the iPhone was launched they kept their keyboard very standard!).
Laying out rows of buttons is a perfect match for combing the Canvas VerticalLayoutGroup (rows) and then each row using a HorizontalLayoutGroup (columns). I didn’t use a grid layout because I wanted to stagger the buttons like a physical keyboard. I also wanted to have some different widths on keys such as SPACE and SHIFT. I can enforce the row heights by attaching a LayoutElement to each key and setting the Min Height property.
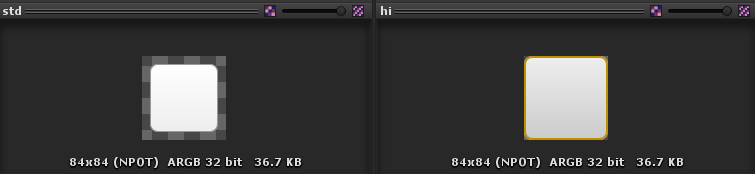
I did not use any padding between the keyboard buttons (even though it looks like it) because it made the keyboard a lot harder to use when there was a chance you were looking in between buttons. So I faked it. I included space around the button background image in standard (unpressed) mode, and removed the padding in the high (pressed) mode. That way as you look at a button, it grows giving the illusion it has activated. Here are the background image:
To use the keyboard, simply create a Canvas, drag the CanvasKeyboard prefab onto it as a child, and set the inputObject reference for the input object you want to edit. (add the Gaze/Look based VR input system , or use the mouse). Done!
A typical Canvas in world space looks like this:
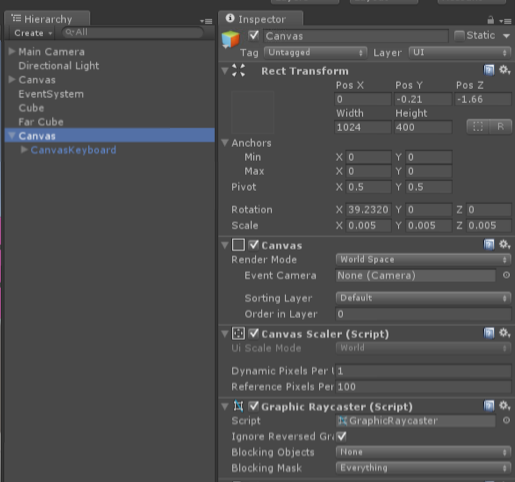
Create the default canvas is MASSIVE. So for VR the scale x,y,z will be something like 0.002,0.002,0.002.
Keyboard key events
I am anticipating several keyboard layouts would be available (eg: Alphabetical, Numeric, URL, etc), so I’ve created a generic CanvasKeyboard object, and then specific Keyboard layouts below that, such as CanvasKeyboardASCII.
So each key is a button, and when it’s OnClick occurs it calls CanvasKeyboardASCII.OnKeyDown(this). The CanvasKeyboardASCII then reads the key value from the name of the game object. Some keys it handles itself (such as close, or switching the panels), otherwise it sends the keypress up to the CanvasKeyboard.SendKeyString(). The role of the CanvasKeyboard class it to then set the text on the currently active game object or UI element. It does this by using reflection to see if the target object has a text property and if so updating it, otherwise it falls back to setting the target game objects name.
Pretty simple really!
CanvasKeyboard API
Dragging on prefabs is all well and nice if you have only one field to edit, but what if you have multiple? We need an API!
Unity has an excellent mobile keyboard accessible via the TouchScreenKeyboard API. I really like the simplicity of that for keyboard management, so I created a very similiar one for my CanvasKeyboard. That makes it a fairly straight forward transition if you already use the TouchScreenKeyboard.
They Canvas Keyboard can be opened and closed via static functions:
CanvasKeyboard Open(Canvas canvas, GameObject inputObject = null, CanvasKeyboardType keyboardType = CanvasKeyboardType.ASCIICapable)
Open the keyboard and parent it to a canvas. You should create your canvas as previously, and pass a reference to it here. Also add your input object that you want to keyboard to set text of. You can only have one canvas keyboard open, so if you already have one opened it will be closed.
void Close()
Close a keyboard if it is open.
bool IsOpen
Check if a keyboard is currently opened (the user may have closed it with the close button).
Here is the code for managing it:
CanvasKeyboard.cs
    public class CanvasKeyboard : MonoBehaviour
    {
        public enum CanvasKeyboardType
        {
            ASCIICapable
        }

        public static CanvasKeyboard Open(Canvas canvas, GameObject inputObject = null, CanvasKeyboardType keyboardType = CanvasKeyboardType.ASCIICapable)
        {
            Close();
            CanvasKeyboard keyboard = Instantiate<CanvasKeyboard>(Resources.Load<CanvasKeyboard>("CanvasKeyboard"));
            keyboard.transform.SetParent(canvas.transform, false);
            keyboard.inputObject = inputObject;
            return keyboard;
        }

        public static void Close()
        {
            CanvasKeyboard[] kbs = GameObject.FindObjectsOfType<CanvasKeyboard>();
            foreach (CanvasKeyboard kb in kbs)
            {
                kb.CloseKeyboard();
            }
        }

        public static bool IsOpen
        {
            get
            {
                return GameObject.FindObjectsOfType<CanvasKeyboard>().Length != 0;
            }
        }
    }
Unity URP Settings for Standalone VR
The following are settings came from a Unity forum but seem to work well. These are for standalone settings!
Switching your quality level can be done in Edit/Project Settings/Quality. I would recommend switching to the Performant setting and then using below as a guide for your URP asset.
Edit your Universal Render Pipeline Asset (usually in Assets/Settings) to below as a guide.
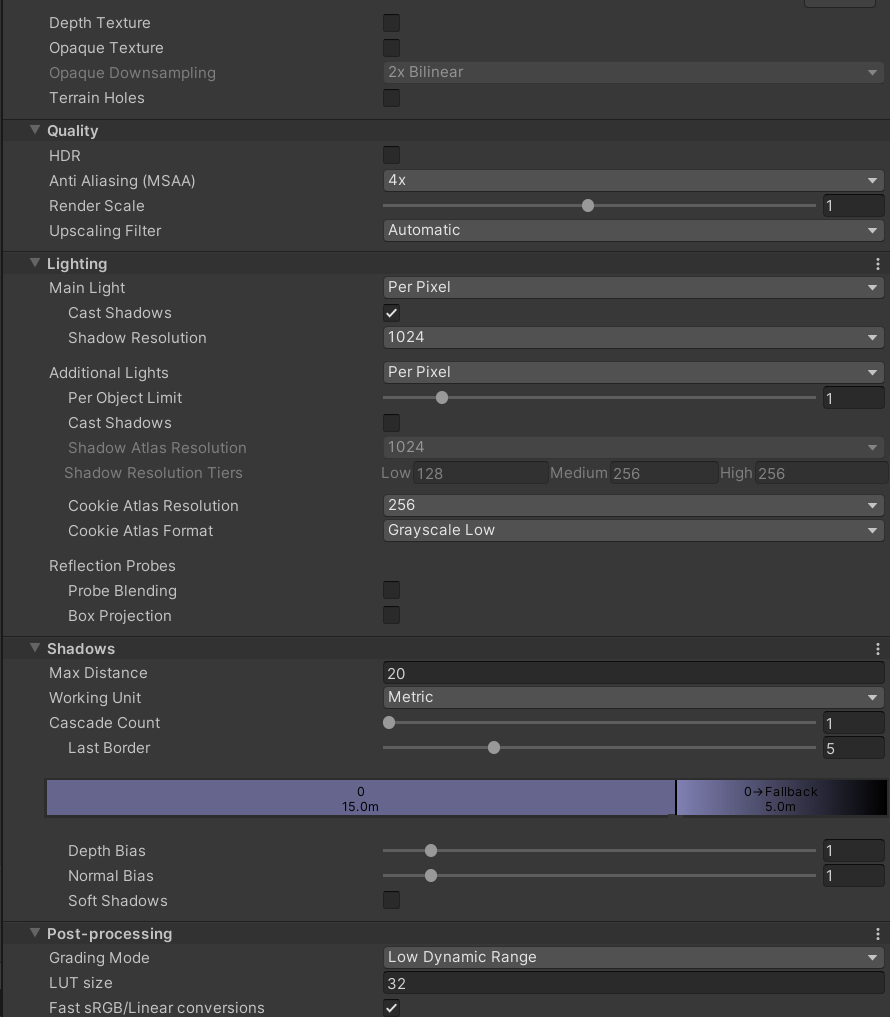
Remember to assign ALL NON-MOVING OBJECTS as STATIC and use Baked Lighting!
A reminder is you can find your Lighting Setting under Window/Rendering/Lighting. Create a new Lighting Settings Asset if you don't already have one and switch LightMapper from Progressive CPU to Progressive GPU.
Unity Features
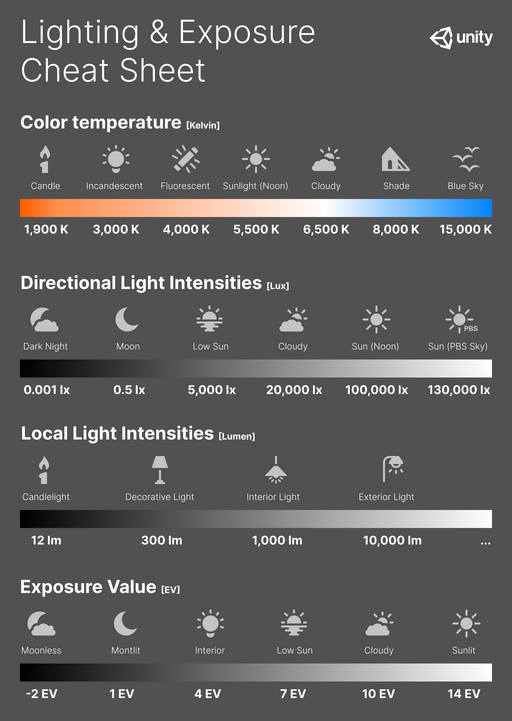
Lighting & Exposure Cheat Sheet
Unity Audio Mixer
Here are two great resources for using Unity's Audio Mixer, which is great for adding post effects for environments. The first is Unity's documentation, which gets frequently updated, and the other a great tutorial from the internet with detail on it's full use.
Audio Tutorial for Unity: The Audio Mixer
Terrain Tool
Right click in the Hierarchy and navigate to 3D Object > Terrain.
There are several options under the Terrain component.
Create Neighbor Terrains
Create Neighbor Terrains lets you create more terrain planes. If Fill Heightmap Using Neighbor is selected it will base the new plane on the ones adjacent to it. If Fill Heightmap Address Mode is set to clamp, it will try to interpolate heights while mirror will simply mirror the terrain across the axis. Just click in a highlighted square to create a new plane.
Paint Terrain
The Paint Terrain tool allows you to alter the plane's mesh.
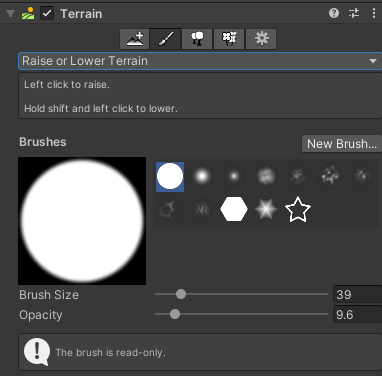
Raise or Lower Terrain lets you adjust the height of the mesh, giving the appearance of hills and mountains. Different brushes achieve different effects. The brush size controls the amount of ground you change at once while the opacity controls how fast you change it. If you're noticing you're having trouble controlling your brush, try turning down the opacity.
Paint Holes allows you to paint holes in your mesh.
Paint Texture allows you to edit the material of the plane.
Set Height will use the height set in Height and adjust all levels painted to that height. This is good for creating planes at uniform elevations.
Smooth Height allows you to smooth rugged edges. This is good for creating slopes and hills.
Stamp Terrain lets you place terrain elements one by one based on the chosen brush. Selecting subtract will instead remove terrain in the shape of the brush.
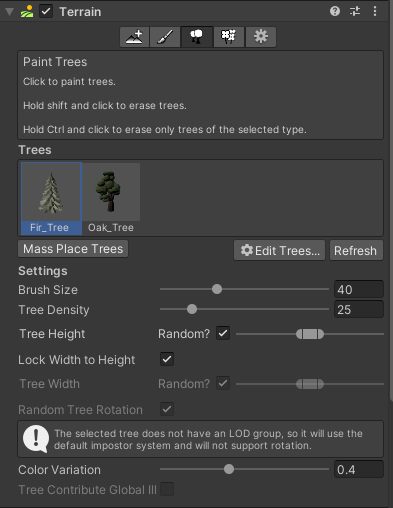
Paint Trees
In order to paint trees, you need to select a prefab to use for the tree(s). You will see a box labeled "Trees". Under this, there is a button called "Edit Trees...". Click that and click Add Tree. In Tree Prefab assign a prefab to use. When you go to paint, this is what will be painted. This tutorial will use the Free Trees package from the Unity Asset Store, located here.
You can add multiple trees to the registry for easy switching.
*Note: The prefab can be of anything- if you need a massive amount of the same prefab in an environment, consider placing them as 'trees'.
Select a tree to begin painting trees onto your mesh. Brush size changes the size of the area you will place trees in at one time and density effects how many trees appear within that area. There are some options to add some simple variety to your trees, such as height and width.
Clicking Mass Place Trees will automatically add trees over the entirety of your terrain using a mix of the tree models you have loaded. You can change the amount of trees you'd like to spawn based on how populated you want your environment to be.
Paint Details
Paint Details operates similarly to Paint Trees, however there is no option to mass place details.
You can also add a grass textures here so that you can paint unique grass onto your mesh. It includes a level of color variation to help diversify your grass automatically.
Importing Animation
In your Project tab, right click and select create > timeline.
If using a read-only animation:
Import your animation to the Project tab. Select it (or the animation itself if included in an fbx package, denoted by a triangle icon) and select edit.

If the model you are using is humanoid, select Rig and change Animation Type to Humanoid. Click Apply.
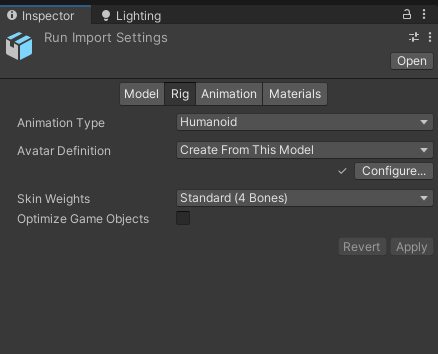
Import your model to the Project tab. Select it and select edit.
On the model, if the model you are using is humanoid, select Rig and change Animation Type to Humanoid. Click Apply.
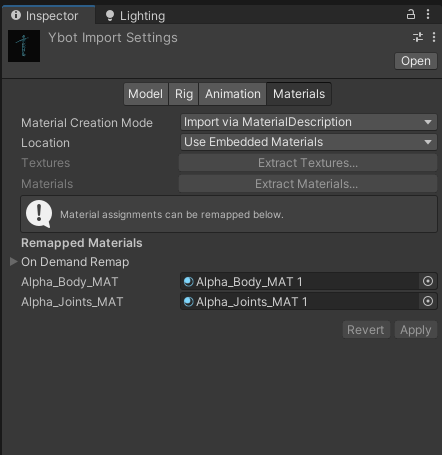
In the materials tab, click extract textures and select the same folder where the character is stored in the Unity project. Click extract materials and do the same. The blank "remapped materials" list should now populate with the correct materials.
Drag your model into your scene.
Create an empty object in the scene and name it "Timeline".
Add the component playable director to "Timeline".
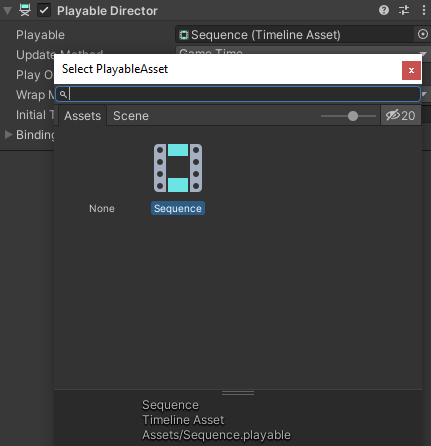
In the Project window, right click and go to create > timeline. Name it "Sequence".
Click on "Timeline" in the hierarchy and change the Playable Director's Playable to "Sequence".
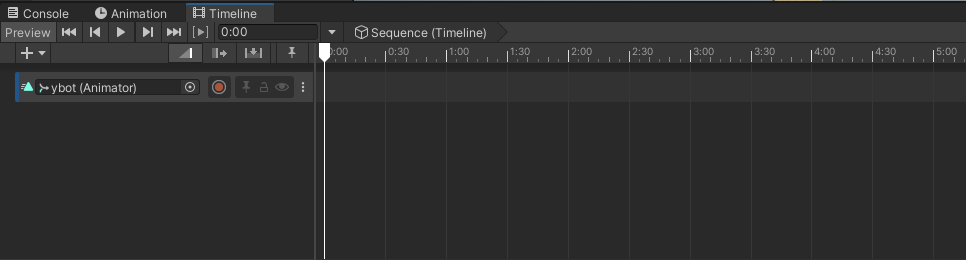
Go to window > sequencing > timeline to show the timeline window. You may want to drag this somewhere into your setup.
Right click in the empty left area of the timeline window and add an animation track.
Select or drag the model you want to animate to the blank box currently labelled "None (Animator)". This will make it so any animation placed on the section of the timeline applies to that model.
Drag the animation from earlier into the timeline.
Press the play button in the timeline to watch it play in the editor.
*Note: if the animation moves your model, select the animation in the timeline and change the Clip Transform Offsets to match where you want your model to be.
C# and Visual Scripting
About
The following is a list of SCiL preferred guides on getting started with C# and Visual Scripting that is focused on Unity (but still universal). These are specifically curated and are highly recommended! Some other language experience, such as Python, is recommended but not required.
C# Programming
Complete C# Programming with Kodeco
This is a complete introduction to C# and also a great refresher on various topics. If you want to get the most out of C# and starting out, this is a complete guide to the majority of topics you will need. It does not include delegates and events, something special and unique to the C# language but there is a recommendation on this page.
https://www.youtube.com/watch?v=k6kbUuMuhxw&list=PL23Revp-82LKjZisIn0uUFciNrkXBRjMp
Alternate: C# Programming with Brackeys
Similar to Kodeco, without as many topics. This playlist comes from the infamous Brackeys.
https://www.youtube.com/playlist?list=PLPV2KyIb3jR4CtEelGPsmPzlvP7ISPYzR
C# Delegates in Unity! - Intermediate Scripting Tutorial
C# Events in Unity - Intermediate Scripting Tutorial
This follows C# Delegates in Unity, so be sure to follow that one first.
https://www.youtube.com/watch?v=k4JlFxPcqlg&t
Visual Scripting Programming
Visual scripting in Unity seems to work well and you can build most things you will need. However, Unity's visual scripting is no where near the quality and power of Unreal's Blueprints!
An introduction to Unity's Visual Scripting
Build a complete game. I have done this playlist and it works well. You can use the latest version of Unity.
https://www.youtube.com/playlist?list=PLrw9uFU6NhfPCiMfDLsL-ccDMCMJ0bMJk
How to Translate C# script to Visual Scripting Graph in Unity
This is a common question I'll get asked. This guide is VERY USEFUL if you come across Unity C# code and need to translate into Unreal Blueprint code as well.
https://www.youtube.com/watch?v=waBRBKZaY9Q
Await/Async in Unity
Async/Await in C# Unity
Preface
The original content is from the author Santosh Parihar from Medium.com. It has been modified and updated for use in this wiki.
This is an advanced topic! You should have an understanding of Object Oriented Programming in C# as well as an understanding behind C# Delegates.
Getting Started
Lets understand Synchronous Operations first:
In software development, synchronous operations refer to tasks that are executed in a sequential, blocking manner. This means that one task is completed before the next one begins, and each operation waits for the previous one to finish. In synchronous execution, the program’s flow is linear, and tasks are processed one after the other. It’s like standing in a queue: each person must wait for the one in front to finish before proceeding.
Unity’s Main Thread :
Unity operates primarily on a single thread known as the “main thread” or “game loop”. This main thread is responsible for several critical tasks, including:
- Input Handling, Game Logic Update,Physics Simulation, Rendering and Repeat.
- The loop continues these steps continuously, maintaining the real-time nature of the game.
Unity often requires asynchronous operations due to the following key reasons:
1. Preventing Main Thread Blocking:
- In synchronous operations, if a task takes a long time to complete (like loading a large file or making a network request), it can cause the main thread to become unresponsive. This results in the game freezing or stuttering, leading to a poor user experience.
- Asynchronous operations allow you to perform these time-consuming tasks in the background, ensuring that the main thread remains free to handle other critical tasks like rendering, input processing, and game logic.
2. Handling Concurrent Tasks:
- Games often need to perform multiple tasks simultaneously, like loading assets, processing AI behavior, and handling network communication. Asynchronous operations enable you to manage these tasks concurrently without one task blocking the others.
3. Network Communication:
- When making network requests, especially over the internet, the response time can vary. Asynchronous operations allow the game to continue functioning while waiting for data from the network, preventing the game from feeling sluggish.
4. Error Handling:
- Asynchronous operations often offer better error handling. If something goes wrong during a synchronous operation, it can disrupt the entire process and may not be easy to recover from. With asynchronous operations, errors can be caught and handled more gracefully, allowing the game to continue running without catastrophic failures.
async Task HandleAsyncOperation()
{
    try
    {
        // Asynchronous operation
        await SomeAsyncTask();
    }
    catch (Exception e)
    {
        Debug.Log($"error : {e.Message}");
    }
}
Here’s a simplified explanation and different examples of async/await for beginners :
To use async/await, you first need to declare your method as async. This tells the compiler that the method can return an async Task object. You can then use the await keyword to wait for an asynchronous operation to complete.
using System.Threading.Tasks;
using UnityEngine;

public class AsyncExample : MonoBehaviour
{
    async void Start()
    {
        Debug.Log("Start of the method");

        await SomeAsyncOperation();

        Debug.Log("After the async operation");
    }

    async Task SomeAsyncOperation()
    {
        await Task.Delay(2000); // Simulating a time-consuming operation
    }
}
Example 1
The following code loads an asset, creates a new object with the asset, and then moves the object to a specific location:
 void Start()
 {
   SpawnPlayer();
 }

async void SpawnPlayer()
{

 GameObject player = await AssetDatabase.LoadAssetAsync("Assets/Player.asset");
 GameObject playerBody= new GameObject(playerBody);
 await playerBody.transform.position = new Vector3(1, 5, 4);

}
Example 2
Imagine you’re a magician performing a series of magic tricks. Each trick requires some setup time, and you want to perform them one after another without making the audience wait too long between tricks.
Using async/await, you can perform multiple tricks concurrently and ensure a smooth flow of your performance. Let’s see how it works:
using System;
using UnityEngine;
using System.Threading.Tasks;

public class Magician : MonoBehaviour
{
    public async Task PerformMagicShow()
    {
        Debug.Log("Preparing for the magic show...");

        Task trick1Task = PerformTrick("Card Trick");
        Task trick2Task = PerformTrick("Coin Trick");

        // While the tricks are being prepared, you can engage the audience
        Debug.Log("Engaging the audience with some jokes...");

        // Await the completion of each trick
        await trick1Task;
        Debug.Log("Card Trick performed!");

        await trick2Task;
        Debug.Log("Coin Trick performed!");

        Debug.Log("Magic show completed!");
    }

    private async Task PerformTrick(string trickName)
    {
        Debug.Log($"Preparing for {trickName}...");

        // Simulate the time it takes to set up the trick
        await Task.Delay(3000); // 3 seconds

        Debug.Log($"Performing {trickName}!");
    }

    public async Task StartMagic( )
    {
        await PerformMagicShow();
    }

    public void Start()
    {
         StartMagic();
    }

 }
In this example, the Magician class represents a magician performing a magic show. Each trick is represented by the PerformTrick method, which is called with the name of the trick.
Inside the PerformMagicShow method, two tricks (Card Trick and Coin Trick) are initiated concurrently using PerformTrick and stored in separate Task objects (trick1Task and trick2Task).
While the tricks are being prepared, you engage the audience with jokes, giving them an entertaining experience during the setup phase.
By assigning PerformTrick("Card Trick") to the trick1Task variable, you are creating a Task object that represents the asynchronous operation of performing card trick. However, at this point, the PerformTrick("Card Trick") method will start executing, and the program will proceed to the next line without waiting for the 3-second delay to complete.
The execution will continue to the line Task trick2Task = PerformTrick("Coin Trick");, which starts the PerformTrick("Coin Trick") method. Similarly, this method contains an asynchronous operation simulated by Task.Delay(3000). Here again, the program will start executing this method, but it won't wait for the 3-second delay to finish.
The line await trick1Task; will pause the execution of the PerformMagicShow() method and wait until the trick1Task is completed before moving on to the next line of code.
When you use the await keyword, it essentially tells the program to pause at that point and allow other tasks to continue executing while it waits for the awaited task to complete. In this case, it will wait for the trick1Task to finish.
Once the trick1Task is completed, the program will resume execution at the next line after the await statement. In this code example, it will print "Card Trick performed!" to the console.
So, the await keyword ensures that the subsequent code is not executed until the awaited task (in this case, trick1Task) has finished its execution.
Then, using await, the program waits for each trick to complete before moving on to the next line. Once a trick is completed, a corresponding message is printed to the console.
Finally, when all the tricks are finished, the program prints a completion message, indicating that the magic show is complete.
This playful example demonstrates how async/await can be used to perform multiple tasks concurrently, allowing you to keep the audience engaged while seamlessly transitioning between different tricks during a magic show.
Unity is single threaded. Coroutines are useful for executing methods over a number of frames.
Async methods are useful for executing methods after a given task has finished.
Unity’s main thread is single-threaded, meaning that all Unity-related operations, such as rendering and updating the game, are handled on that thread. However, async/await can still be beneficial in Unity for handling certain types of tasks, even if they don’t run on separate threads.
The key idea is that while the async operations themselves may not run on separate threads, they still allow the Unity main thread to continue processing other tasks and remain responsive.
In summary, while Unity’s main thread is single-threaded, async/await can still be utilized in Unity to handle async operations in a non-blocking manner, allowing the main thread to continue processing other tasks while waiting for the completion of the async operations.
When utilizing coroutines, a feature in Unity, they will automatically stop running as soon as you stop the Unity editor or the game ends. However, when using threads, they can continue running in the background even after stopping the Unity editor. To ensure proper handling, it becomes necessary to manually stop the thread when stopping the Unity editor to prevent any unintended background execution.
To solve the problem we will use Task Cancellation feature of c#, you can read more about it here :
https://learn.microsoft.com/en-us/dotnet/standard/parallel-programming/task-cancellation
public class TestAsync : MonoBehaviour
{

    private CancellationTokenSource token;

    private void OnEnable()
    {
        token = new CancellationTokenSource();
        Debug.Log(" task , on enable");

        // Start the work in a separate task
        Task.Run(DoWork);
    }

    private void OnDisable()
    {
        Debug.Log(" task , on disable , task cancel");

        // Cancel the task when the script is disabled
        token.Cancel();
    }

    private async void DoWork()
    {
        Debug.Log(" task , do work");
        await Task.Run(() =>
        {
            for (int i = 0; i < 5; i++)
            {
                Debug.Log("Hello");
                if (token.IsCancellationRequested)
                {
                    return;
                }
            }
        }, token.Token);

        if (token.IsCancellationRequested)
        {
            Debug.Log("task was cancelled.");
            return; // further code will not be executed
        }

        // Code to be executed after the task completes successfully
        Debug.Log("task completed successfully.");
    }
}
Hope you understood the concept.
Converting A Coroutine To An Async
Preface
The original content is from the author Michael Quinn from Medium.com. It has been modified and updated for use in this wiki.
This is an advanced topic! You should have an understanding of Object Oriented Programming in C# as well as an understanding behind C# Delegates.
I could have translated the code below into code snippets, but I found it more important to physically type what's needed for the sake of understanding.
About
Coroutines are amazing ways to sequence logic together over many frames. Asynchronous programming, or async, allows the code to similarly be split over multiple frames, but allows for multithreading which has the benefit of logic being concurrently executed instead of sequentially.
The Coroutine Way
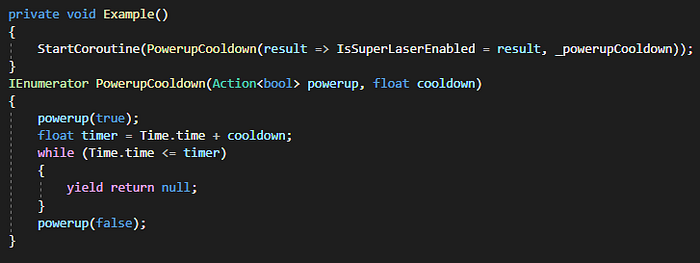
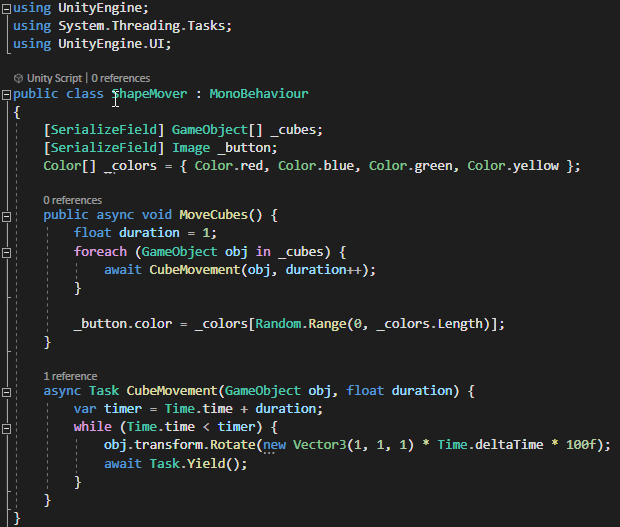
I have a very simple example that rotates cubes for a certain amount of time.
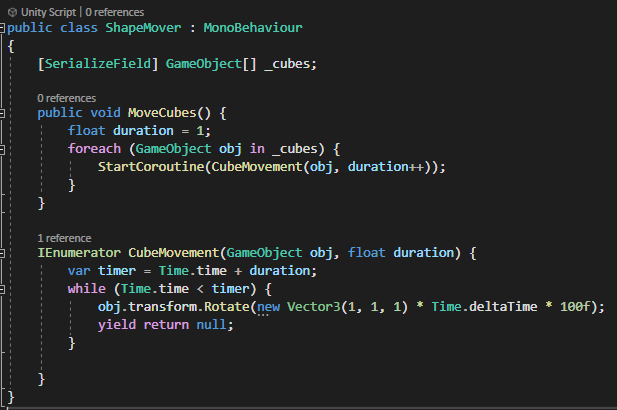
This script will do a loop over all the cubes and trigger a coroutine that will rotate them. Setting this function to run when a button is pressed and we have the following effect.
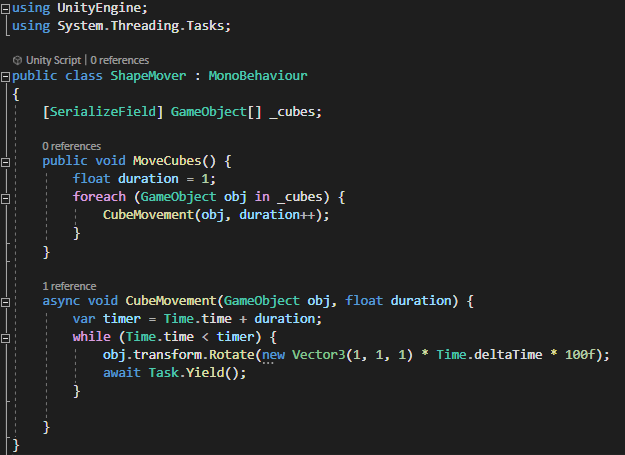
The Async Way
To convert the current method we are going to swap IEnumerator to async and then change the yield to an await task.
With the proper using statement, we can simplify the naming and finish with the following code.
Get ready for the results! They are … exactly the same.
Okay so where is the power in this? The benefits are immense. The very first we may be able to see was that I had to add a return type when converting the function from a coroutine to an async method. Coroutines don’t return values like that.
To get around this shortcoming, I’ve had to do crazy things like this before.
Ugh, yuck. Who wants to read that? With async, everything is far more readable and easier when it comes to return values.
The strongest immediate benefit of async is the power of multithreading. Coroutines run on what is called the main thread. The longer it takes the main thread to move, the more lag your application will experience. Async, however, can run on threads besides the main thread. This benefit from async can give a major benefit to an applications performance.
Multithreading is not totally noticeable in this example, but this next benefit is. Async has the ability to run sequentially using the keyword await.
But if Coroutines are made for sequential logic, then how is this a benefit? Coroutines are made for sequential logic, but they are not made for sequentially executing coroutines.
Now, there are ways to sequentially execute coroutines. The absolute simplest way would be to have a StartCoroutine() function at the end of a coroutine. This chaining however, will lead to very difficult code to unpick when it comes time to refactor. A cleaner way to handle this with async methods is using await.
Our first step is to change the return type, from void to Task. Then we can use the await functionality by making the original function also async.
Now when we test this logic, we will see the cubes only rotate after the one before it is finished.
Another benefit, that might convince you to never use coroutines again, is that with async, you can make logic wait until a series of tasks have completed.
To demonstrate this, I’m going to create a simple array of colors, then have the button change ONLY after all the cubes have finished moving.
Before we change this logic, let’s see what we have currently.

Okay, so now with async, we will be able to change the behavior around so that all the cubes will rotate at the same time, but the button will still only change after they are all finished.
We are going to want to create a list of tasks that we can add to, then check to see if all those tasks have finished before changing the color of the button.
The entire code will now look like the following.

That’s pretty cool right there.
Takeaway
This article has only scratched the surface of the power of asynchronous programming but it has definitely convinced me to make the switch from coroutines to async.
AR Basics in Unity
Prerequisites
In Unity Hub, under the tab Installs, select the gear icon on your Unity installation and choose "Add modules."
- For Android builds, check Android Build Support, OpenJDK, and Android SDK & NDK Tools.
- For iOS, you MUST BE ON A MAC and choose iOS Build Support. You will also need Xcode installed on your machine as well as the iOS Platform installed (Xcode/Settings/Platforms/iOS xx.x). Finally, you have to be signed-in under Xcode/Settings/Accounts
Do not install iOS Build Support on a Windows machine, you can only make Apple-based builds using Xcode which is only available on the mac. This add-on is available for windows machines for users who perform remote-builds, for instance.
Xcode generates a LOT of storage problems with cache to your machine without an intuitive way to remove the cache. Occasionally, it's a good idea to remove it. I have provided a small tool from the macOS App Store that I recommend: DevCleaner
Getting Started
Ensure you have read the prerequisites above. Fire up Unity Hub and select New Project at the top. Under All templates, select Universal 3D (you may have to Download template). Give your project a name, location, and be sure to uncheck Connect to Unity Cloud. Select Create project.
You will be greeted with the Unity Editor as well as the Build Settings window. The Build Settings window can be found by selecting File/Build Settings. Select iOS or Android under Platform and click the Switch Platform button.
Next, select the Player Settings button. On the left, choose XR Plugin Management and then choose Install XR Plugin Management with the button that appears. Select the XR Plugin Management tab again on the left. Check the plug-in providers you will be using. For instance, iOS will use ARKit. If you receive a warning about using the new input system, choose YES and the editor restarts.
Return back to the Player Settings window. You will notice there is now a drop down under XR Plug-in Management. Browse through these to see how the settings are enabled. Under Project Validation, you may have issues here. Many can be fixed by selecting Fix All but you should always read the errors.
You can now close these extra windows and return to the main Unity editor.
You may have the Read Me asset shown in the editor regarding URP. I usually click the remove button to remove the extra files.
Install Packages (Optional)
Go to Window/Package Manager. The button is small, but there is a dropdown button in the top left of the Package Manager window (next to a '+') where you can switch between packages In Project and Unity Registry. Switch to Unity Registry.
You can find additional packages here, depending on the Unity version. If you are looking to support both Android and iOS devices, you can install additional packages here.
AR Rig Setup
If you have set up VR in Unity before, the process is similar.
Click on the game object Global Volume and either delete it or disable it. Post processing is very heavy with mobile devices.
Delete your Main Camera. Right click in the Hierarchy and choose XR/XR Origin (Mobile AR). This creates your rig! Be sure to browse the components in the inspector including the children objects so you obtain an understanding of what has been created. When finished, click somewhere in the Hierarchy to unselect any game object.
Now, right click and choose XR/AR Session. Again, browse the components.
There is one last thing we need to do. We are using URP (Universal Render Pipeline), a modern way to create design-friendly shaders and performance modes. Currently, we need to add a rendering feature for AR so that our camera will work as intended in a build.
In your Project window, you will find a folder called Settings. This is a great folder for (as you would expect) file-based settings for your project! Select each Renderer file (e.g. URP-Balanced-Renderer, URP-HighFidelity-Renderer, etc.) and within the Inspector, click the button Add Renderer Feature. Select AR Background Renderer Feature in the pop-up window. Again, do this for each file ending in "-Renderer."
Build Settings
Let's set up a few settings in our Project Settings so that our project is better optimized for assets/quality.
Go to File/Build Settings/Player Settings (same place we installed XR Plugin Management).
Under Quality you will find a grid-like area called Levels. Choose either Balanced or Performant.
Select Player and choose the following
- Company Name: Enter your name or the company name
- Product Name: Change this if needed.
- Other Settings/Bundle Identifier: Give a UNIQUE name here in reverse URL format. E.g. com.scil.MyAwesomeProject
- Other Settings/Camera Usage Description: For iOS, be sure something has been added here or the build will fail.
Build Your Project
Android
If you are using an Android device you may need to be in developer mode. Depending on your phone there are different procedures. After developer mode is set up, plug the phone into the computer with a USB cord. Select "allow USB debugging" on your phone if the message appears. Finally, under File/Build Settings, you can refresh in the drop down until your phone appears. After it appears, select Build and Run.
iOS
iOS is tricky and it's best to decipher error messages as you get them. Results vary, but here is a general step-by-step guide:
Go to File/Build Settings and select Build. Create a new, empty folder to host the generated Xcode generated files. Open the directory after the build completes. Inside will be an Xcode project file called something like Unity-iPhone.xcodeproj. Open that file and a wild Xcode will appear.
- On the far left in Xcode you will see a list of files and a blue root directory called something like Unity-iPhone. Select that file and you will notice there are settings for the overall app that appears. At the top left is a row with General, Signing & Capabilities, Resource Tags, etc. Select Signing & Capabilities.
- Under Signing & Capabilites, first check your Bundle Identifier. Change it to a unique ID if not already in reverse URL order (e.g. com.scil.MyAwesomeProject). If you do not have a unique ID, the build will fail.
- Next check the box for Automatically manage signing.
- Under team, select your team (usually your signed-in account as Personal Team). If you have the unique ID, everything should work.
- Now, plug-in your iOS device you will be TESTING. Select allow after plugging in your device.
- You may need to set up Developer Mode, you can find info here
- When you are ready select the big Play button icon after your device is configured. You can also choose Product/Run.
- The very last step, is the first time you run a project on your device the build will fail and complain that this is an un-trustred developer. To "trust" yourself, you need to allow projects with your ID within the device. Go to your device Settings/General/VPN & Device Management and choose and allow your team. You will need to select Run again from Xcode.
You should now be able to play and test your project. The nice thing, is after your project and device is configured, you won't have to run these extra steps again. The purpose for these steps is Apple has heavy security on their platforms, as well as the walled-garden
The initial setup is the most time consuming process, but you made it.
Where to go from here?
There are many paths to take when using AR. Try setting up more to your scene and placing objects. You will notice even simple objects, such as a simple cube in Unity, are quite large!
Special technologies, such as plane-detection, image tracking, object tracking, and more are available. I recommend starting with plane-detection which you can learn about here: https://learn.unity.com/tutorial/configuring-plane-detection-for-ar-foundation#