Unreal Engine
- Getting Started with Unreal
- Unreal Engine for Unity Developers
- VR Settings for Unreal Engine 4/5
- XR Rig Setup
- Setting up basic teleport Pt.1
- Setting up basic teleport Pt.2
- Picking up objects (Basic)
- Input Mappings in Detail for Unreal
- Worldspace UI in Unreal
- Create a Skybox
- VR Expansion Plugin
- Useful Tutorials and Guides
- Packaging for PC
- Packaging for Standalone
- Passthrough Setup
- Meta Hand Tracking Unreal
- Upgrading Unreal Versions
- AR in Unreal
Getting Started with Unreal
Getting Started (with Unreal!)
Below is are two tutorials on how to set up a basic scene in Unreal. It's recommended for beginners to follow these guides to get familiar with the engine. After following the first tutorial, you'll notice your sky is black (and eerie) where previous Unreal guides featured a beautiful sky. The second guide shows how to add a sky using the Sky Atmosphere Component.
Level Designer Quick Start in Unreal Engine | Unreal Engine 5.4 Documentation
Where do I go from here?
This is a guide to get familiar with using Unreal, HOWEVER, it is NOT VR FRIENDLY! For example, the sky creation is usually substituted with a sphere mesh and panoramic sky image, and real time lighting is taken under heavy consideration.
Building for VR? Start with a new project and begin some of the other guides listed here. SCiL staff/workstudies are available for assistance or clarification.
Unreal Engine for Unity Developers
https://docs.unrealengine.com/5.0/en-US/unreal-engine-for-unity-developers/
VR Settings for Unreal Engine 4/5
Applying these settings will take time during a restart!
Some of these features are not available on all versions
For PC VR:
- Project Settings | Engine | Rendering | VR | Instanced Stereo: True
- Project Settings | Engine | Rendering | VR | Round Robin Occlusion Queries: True
- Project Settings | Engine | Rendering | Forward Renderer | Forward Shading: True
- Project Settings | Engine | Rendering | Default Settings | Anti-Aliasing Method: MSAA
- Project Settings | Engine | Rendering | Default Settings | Ambient Occlusion Static Fraction: False
- Project Settings | Project | Description | Settings | Start in VR: True
- Project Settings | Engine | Rendering | Defaults Settings | Auto Exposure: False
- Project Settings | Engine | Rendering | Mobile Shader Permutation Reduction | Support Combined Static and CSM Shadowning: False
- Project Settings | Engine | Rendering | Misc Lighting | Allow Static Lighting: True
Additionally, standalone VR:
- Project Settings | Engine | Input | Mobile | Default Touch Interface: None
- Project Settings | Target Hardware: Mobile and Scalable
- Project Settings | Platforms | Android | APK Packaging: Configure and set settings needed
- Project Settings | Platforms | Android SDK: Verify that your SDK locations are set.
- Project Settings | Engine | Rendering | VR | Mobile HDR: False
- Project Settings | Engine | Rendering | VR | Mobile Multi-View: True
- Project Settings | Engine | Rendering | VR | Mobile Multi-View Direct: True
- Project Settings | Engine | Rendering | VR | Monoscopic Far Field: True
- My UE4.27 Project Settings To Build Oculus / Meta Quest 2 Applications And Performance Settings
Installing the MetaXR plugin will present a feature to apply all of the settings above. You may then decide to disable the plugin if you no longer need it for the project and retain the applied settings.
XR Rig Setup
Getting Started
Start by launching Unreal Engine from either the Epic Games Store launcher or icon on the desktop.
Create Project
Launch the appropriate editor version. To create a new project, select GAMES.
Project Defaults:
- Blank preset enabled
- Blueprint enabled
- Target Platform: Mobile
- Quality Preset: Scalable
- Raytracing should be disabled if available.
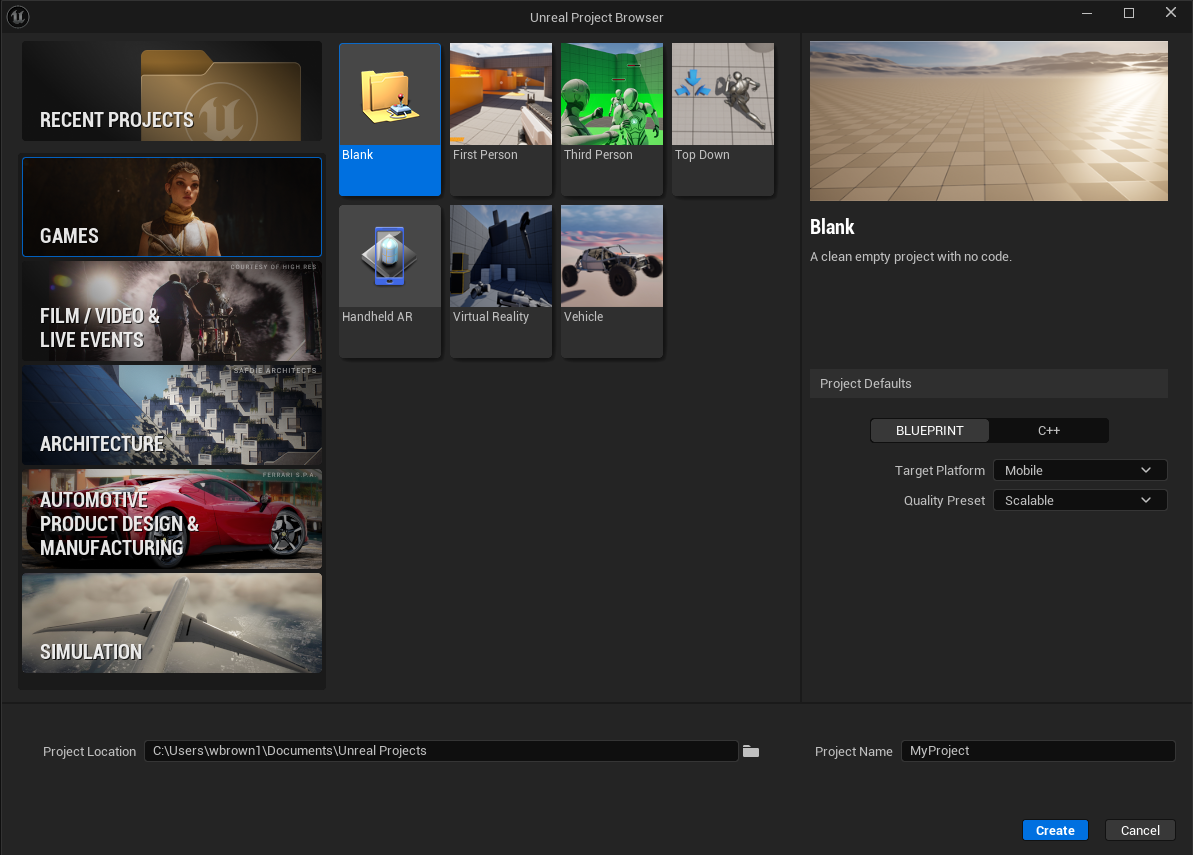
Edit the Project Location, name your project within Project Name, and click blue Create button. After some time the new project appears.
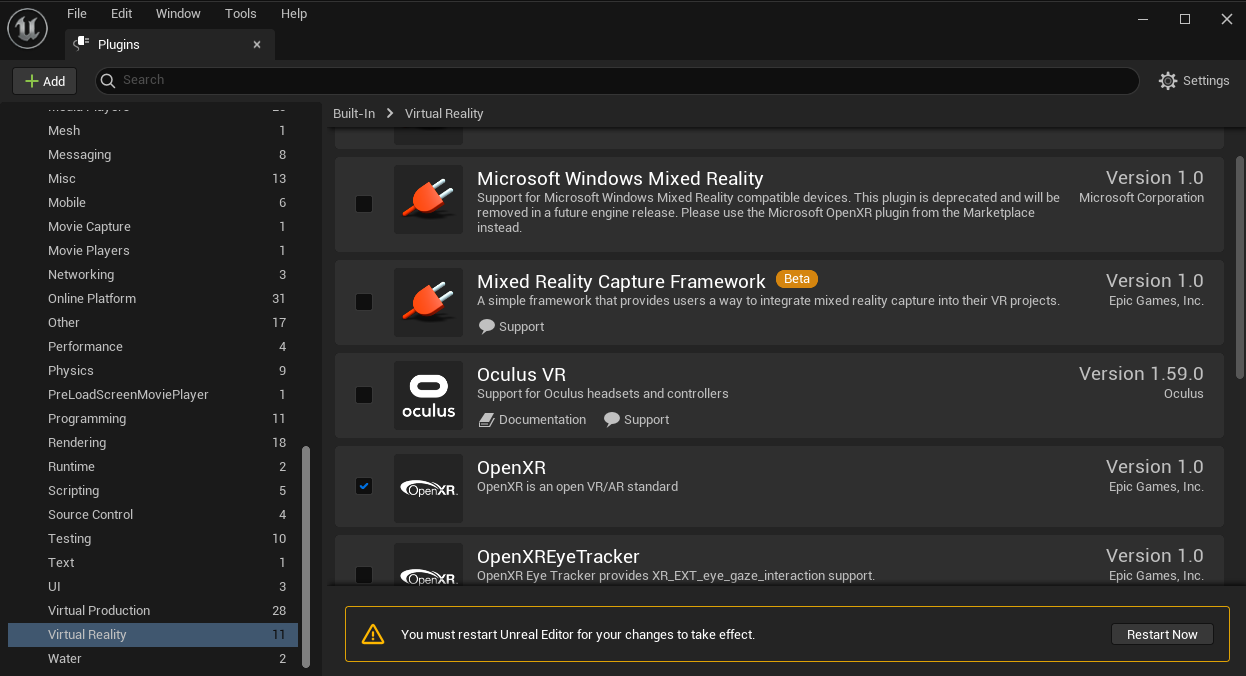
Configure Project
Select plug-ins in the Edit menu.
Select Virtual Reality in the left menu, under built-in.
Check OpenXR
A box outlined in yellow should appear at the bottom. Click Restart Now.
Once restarted, go to File > New Level
Select Empty Level (preferred) or Basic Level.
If this is your first time in Unreal Engine, do NOT use Open World as a new level! There is NOT an easy way to transfer progress back to an empty/basic level!
Go to File > Save Current Level and give your level a meaningful name and location.
Now is a good moment to APPLY VR SETTINGS
Create the XR Rig
Click on the Content Drawer (at the bottom-left of the screen). Right-click in the empty space and choose Blueprint Class.
When prompted, choose Pawn. Give it a meaningful name, such as VRPawn_BP.
Double click the new pawn to open and edit it.
A new window should appear- this is the Pawn Object Editor.
In the upper left corner of the Pawn Object Editor under Components, click the Add button (marked by a green +).
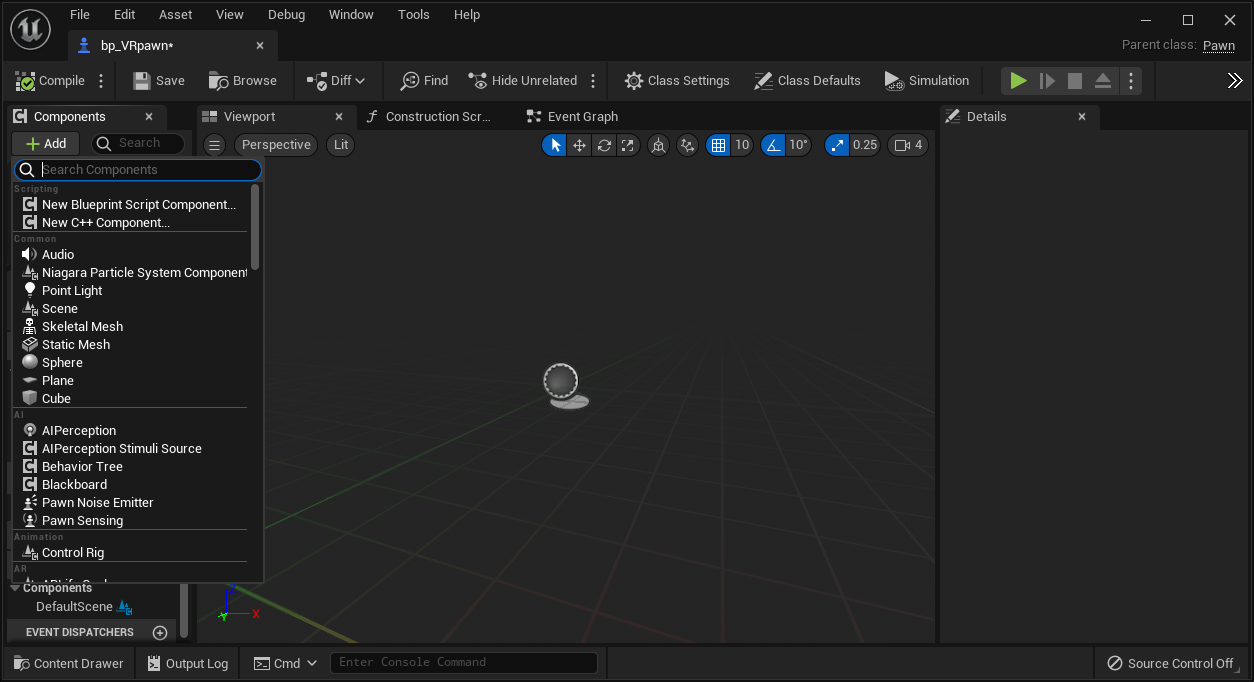
Choose scene and rename it to CameraOffset.
With CameraOffset selected, press Add again and add a camera. Leave the name as "camera".
Select CameraOffset once again, press Add, and add a motion controller. Name it "Motion_Controller_L".
Repeat the previous action, this time naming it "Motion_Controller_R".
Select "Motion_Controller_L". With this component selected, add a component by either clicking the +Add button or right-clicking and add the component XR Device Visualization. This should now be a child of Motion_Controller_L. Rename the component to something like "XRDeviceVisualization_L".
In the Details panel on the right side of the screen, under Collision, change Can Character Step Up On to No, and change the Collision Presets from BlockAllDynamic to NoCollision. Finally, move to the Visualization section of the Details panel and check Is Visualization Active.
Repeat with "Motion_Controller_R".
Make sure the Motion Source is set to Right under the Motion Controller section (directly under Visualization) for "Motion_Controller_R". Do not select Display Device Model (it is deprecated and replaced with a component as mentioned above).
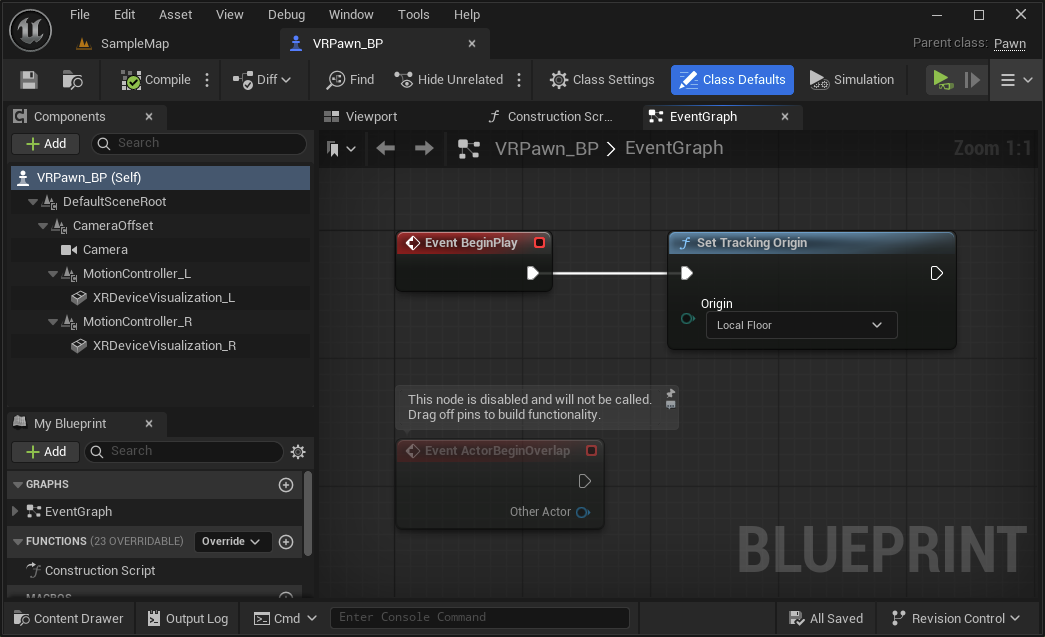
Finally, switch to the Event Graph tab and find the node listed Event BeginPlay. Right click and add a Set Tracking Origin node and under origin verify LocalFloor is selected. From the BeginPlay node, drag a white connector pin to the newly added node.
Press compile at the top left of the screen. When finished, your VRPawn_BP should look like the screenshot below. Note the way the various components (on the left) are structured into a specific parent-child heirarchy.
Once your VRPawn_BP is set up like this, press save and return to the level view.
Add your pawn to the level
Add your newly created player pawn to the scene. Select your pawn and in the details panel, under Pawn, change Auto Possess Player from Disabled to Player 0. You can also change these values within the pawn blueprint itself, especially if you are using it in multiple maps.
In the same panel as the play button, click the three dots and select VR Preview (if you don't see VR Preview, leave Unreal, run the Meta Link software,, confirm VR is working through the headset, and restart the Unreal editor).
Test the scene in your headset. (Adding an object and/or lighting point may be helpful for testing).
Where to go from here?
The wiki is full of guides, but it is important to learn basic teleport as it covers additional basics for both Unreal and VR.
Setting up basic teleport Pt.1
This content is from the following book: Unreal Engine 4 Virtual Reality Projects
It has been modified to work more independently from other systems that are introduced in the book.
Organization is key. I would recommend a folder in your project, possibly named Player where your pawn is stored along with additional assets that are needed by the player.
Overview
Let’s break down the items we are going to need to solve teleporting. Some items will get refined as we go:
- Get our motion controller and send out a line trace (other engines call this a raycast)
- Get the information of what our line trace is hitting (hit result)
- Create a temporary visual, for debugging purposes
- Narrow down our line trace by only interacting with certain actors (a new teleport area blueprint)
- Storing this information so we can use it in Part 2
Prerequisites:
- You should already have a work VR pawn, with motion controllers from here: XR Rig Setup
- If you are new to visual scripting, take a look at the guide below. You do not need to do this guide, just browse through to get the general idea of how things work.
Get our motion controller and send out a line trace
Let's begin with the first thing we need to do to get our teleport running—figuring out where the player wants to go:
1. Open up our BP_VRPawn Blueprint, and open My Blueprint | Graphs | EventGraph, if it isn't already open.
The motion controllers setup do a great job for the visuals. We need to add another motion controller but this will not be for visuals. Instead, it will make use of the controller’s “aim” configuration.
Add a motion controller component, name it MotionController_Teleport_R. In the Details panel, change its Motion Source to RightAim.
We should still see the BeginPlay event in our Event Graph where we set our tracking origin. Now, we're going to add some code to our Event Tick.
The Tick event is called every time the engine updates the frame. Be careful about putting too much work into your Tick events, as they can eat performance.
2. If you don't already see an Event Tick node in your Event Graph, right-click anywhere in the graph, type tick in the search box, and select Add Event | Event Tick. If you already have a Tick event defined, this won't add a new one—it'll just take you to that node in the event graph. If you don't, this will create one now.
3. Right-click to the right of Event Tick and add a Line Trace by Channel. Connect the pin from the Event Tick to the Line Trace Channel.
When you perform a line trace, you supply a start point and an end point, and tell it what collision channel you're looking for. If an actor with a collision set to the supplied collision channel intersects the line between the start and end points, the trace will return true, and will return information about what it hit. We're going to use this behavior to find our teleport destination.
Let's start our trace at the location of the right motion controller:
1. From your components list, grab MotionController_Teleport_R, and drag it into your event graph.
2. We want to start our trace at the motion controller's location, so let's drag a connector out from the MotionController_Teleport_R return value and release.
3. In the dialog that appears, type getworld into the search bar and select GetWorldLocation.
4. Drag the result of GetWorldLocation into the Line Trace node's Start input pin.
Now, let's set the trace end point. We're going to end our trace at a point 10,000 units away from our start location, in the direction the controller is facing. Let's do a bit of simple math to figure out where that point is.
5. From the MotionController_Teleport_R output, create a Get Forward Vector node. This will return a vector with a length of 1 that aims in the direction the controller is facing. We said we wanted our end point to be 10,000 units from the start, so let's multiply our Forward vector by that value.
6. Drag the Get Forward Vector return value out and type * (or multiply) into the search bar. Right-click the bottom input and convert the pin to a float (single precision).
Now, drag a connector out from the float input to the multiply action, and select Promote to Variable:
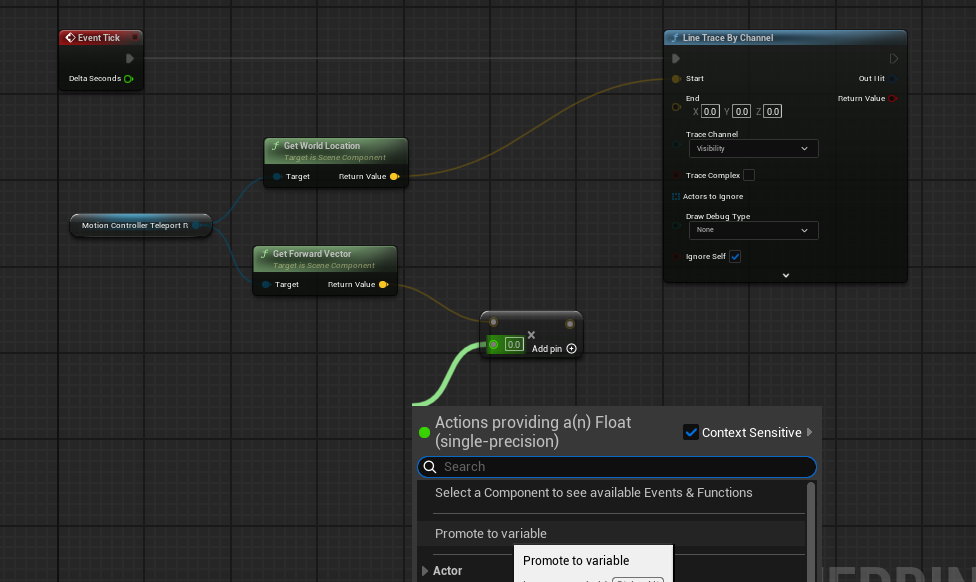
7. Name the new variable TeleportTraceLength, compile the Blueprint, and set the variable's value to 10000.
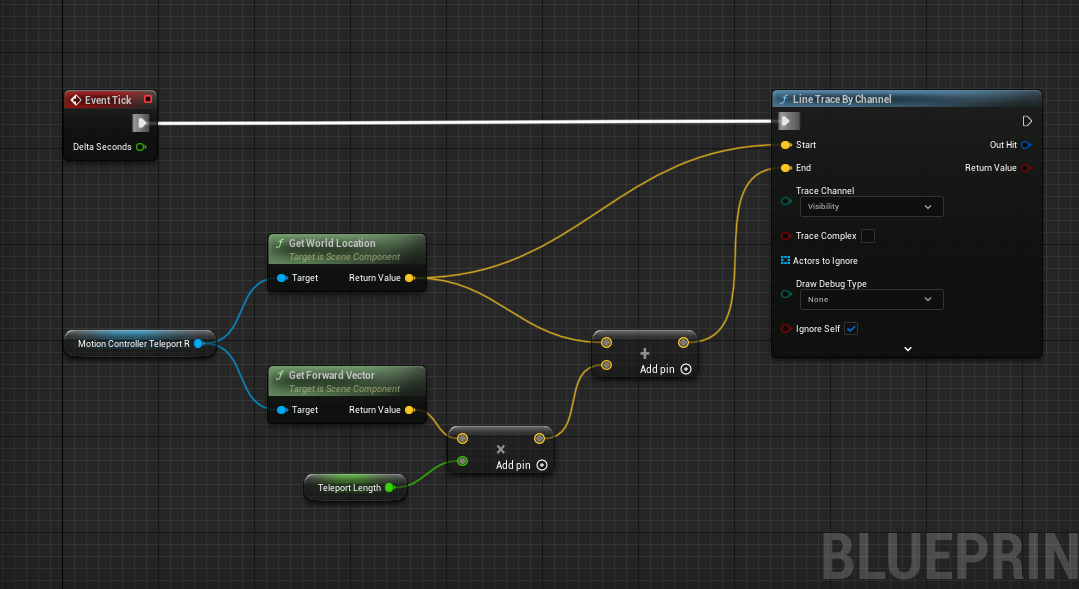
We now have a vector that's 10,000 units long, aiming in the controller's forward direction, but right now, it would be running 10,000 units from the world's center, rather than from the controller, as we intend. Let's add the controller's location to this vector to fix that:
1. Drag another connector from the controller's GetWorldLocation call, and type + in the search bar. Select vector + vector.
2. Drag the output from our forward vector multiplication into the other input.
3. Connect the output of this addition to the End argument of LineTraceByChannel:
Before we move on, let's set up some debug drawing to see whether everything is behaving as we expect so far.
4. Hold down the B key and click on the open space to the right of the Line Trace node to create a Branch node. (You can also right click and create a Branch node the way you usually do, but this is a useful shortcut.). Connect execution pin from the LineTraceByChannel to the Branch node.
5. Drag a connector from the Line Trace node's Boolean Return Value to this branch's Condition.
The trace operation will return True if it hits something, and False if it doesn't. We're only interested in debug drawing the result if it hits something, so we're just going to use the True output from our branch. If we did hit something, we need to know where the hit occurred.
6. Drag a connector from Out Hit and select Break Hit Result to see the members of the hit result struct.
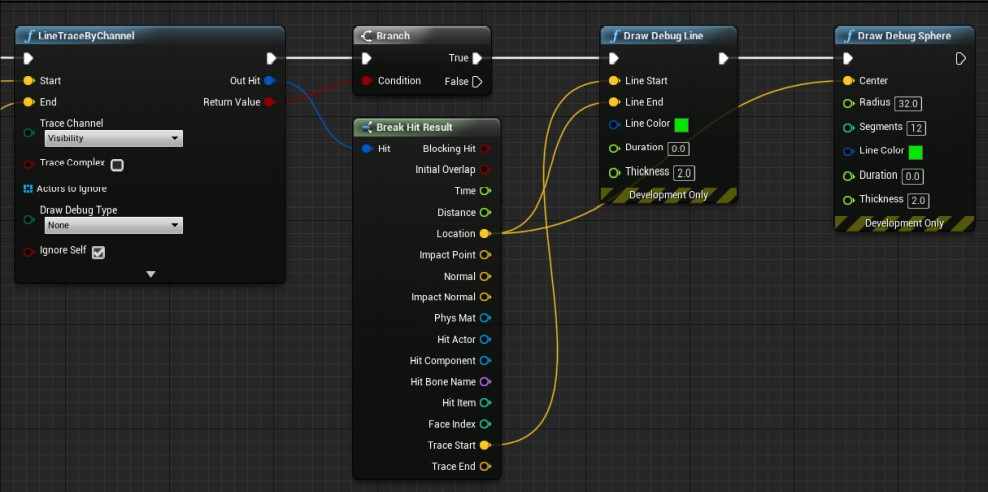
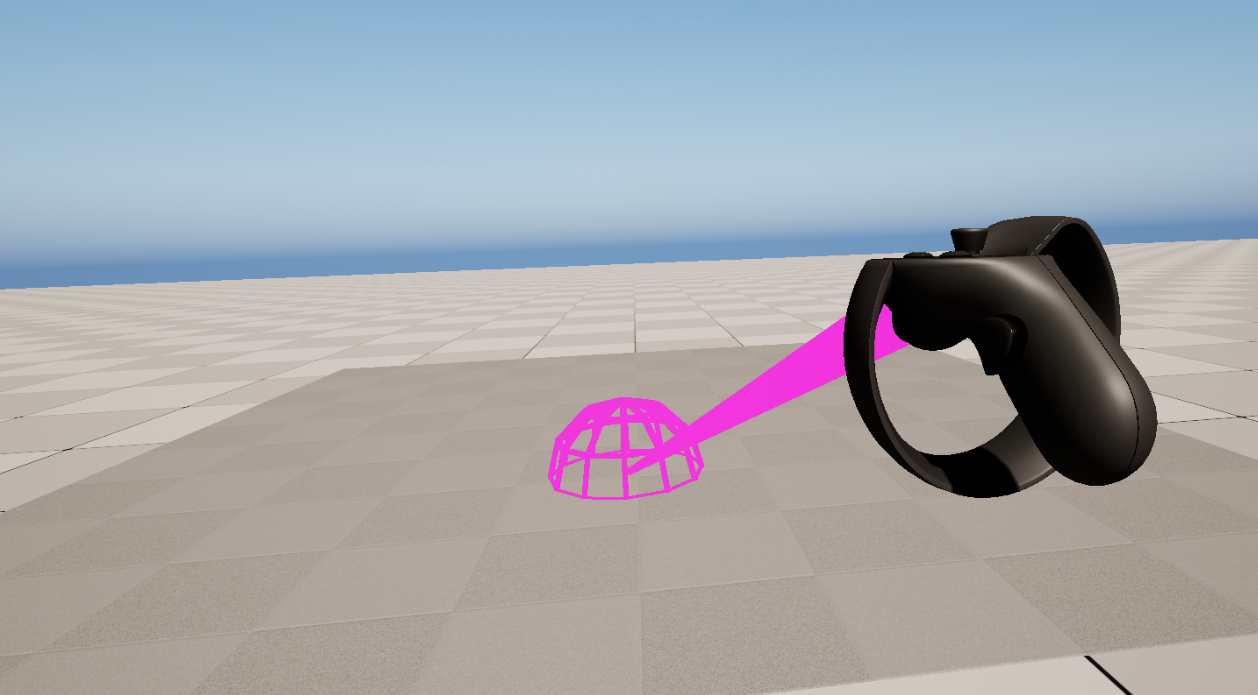
Now, let's draw a debug line representing our trace:
1. Drag an execution line from our Branch node's True output, and create a Draw Debug Line action.
2. Drag the Location from the Hit Result struct into the Line End input on the Debug Line call.
3. Drag the hit result's Trace Start to the Line Start.
4. Set the line's thickness to 2, and set its color to anything you like.
A Draw Debug Line node or Draw Debug Sphere only shows in ONE EYE within VR. You would not ship your project with these nodes. Typically developers replace these with visual blueprints such as meshes and splines!
While we're at it, let's draw a debug sphere at the hit location:
1. Create a Draw Debug Sphere node.
2. Connect its execution input to the debug line's output.
3. Set its Center to the hit result's Location:
Be aware that Draw Debug calls only work in development builds. They're useful for understanding what's going on, but they're just debugging tools and need to be replaced with real visualizations for your actual software. We'll do that shortly.
4. Let's test it.
Good. So far, it's doing what we expect—casting a ray from the controller, and showing us where it hits a surface. The problem, though, is that it's just as happy to hit a wall as a floor. We need to restrict it to valid teleport destinations. Let's do that.
Improving our Trace Hit Result
We need a blueprint to represent our teleport area so that we can narrow down what our Line Trace hits.
1. In your content drawer, create a new folder at the root called Interactions. This will hold blueprints for player interactions in our map.
2. In this new folder, right-click and create a new Actor blueprint. Name it something like TeleportArea_BP. Open it up.
3. Add a new component of type StaticMesh. In the Details panel to the right, change the Static Mesh field from None to Plane. Set the scale to (5, 5, 5).
4. Compile, save, and close for now. You can edit the size and visuals later! Add this blueprint to your scene.
We can now check if our line trace is hitting that teleport area only.
1. Make some space between our branch node and our two debug draw nodes. From our Break Hit Result, choose the Hit Actor and drag out and type Cast to TeleportArea_BP. Choose the node. This says that the actor our trace is hitting should check if it's the type TeleportArea_BP. Connect the execution pins between the branch and the Debug Draw nodes.
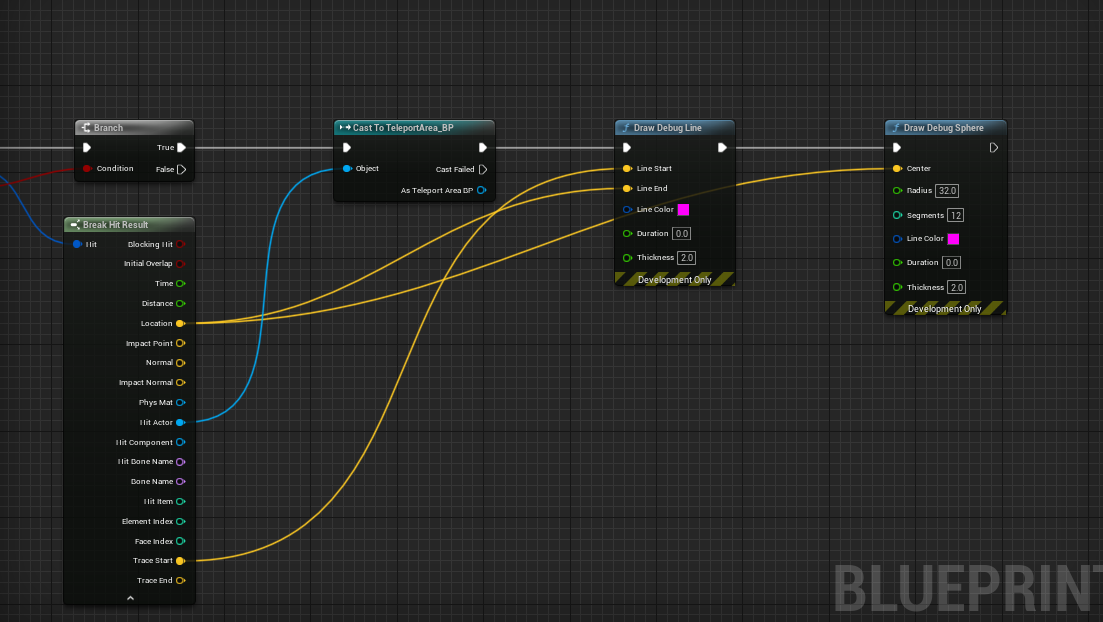
2. Test and verify that everything is working. Although you can't teleport yet, we have a visual and a way to interact with our teleport point. Feel free to edit the size of the teleport area and maybe "hide" the visual of the teleport area.
Setting up basic teleport Pt.2
PREREQUISITE: Setting up basic teleport Pt. 1
The following has been taken and slightly modified from pages 196-201 of the book "Unreal Engine 4 Virtual Reality Projects..."
Teleporting the player
The first thing we need to do in this instance is give the player a way to tell the system when they intend to teleport.
Creating Input Mappings
We're going to use our Engine Input Mappings to set up a new named input. Let's get started:
1. Open your Player folder (where your pawn is kept) and create a new folder inside called Input. This folder can get quite heavy later! Right-click and choose Input-> Input Mapping Context. Name it something like PlayerInput_IMC.
2. In the same folder, do the same as above but choose to create a Input Action file. Name it TeleportRight_IA.
Input Actions default to a boolean, or true/false action. This is handy for buttons on controllers or keyboards. There are other settings too for other types of actions.
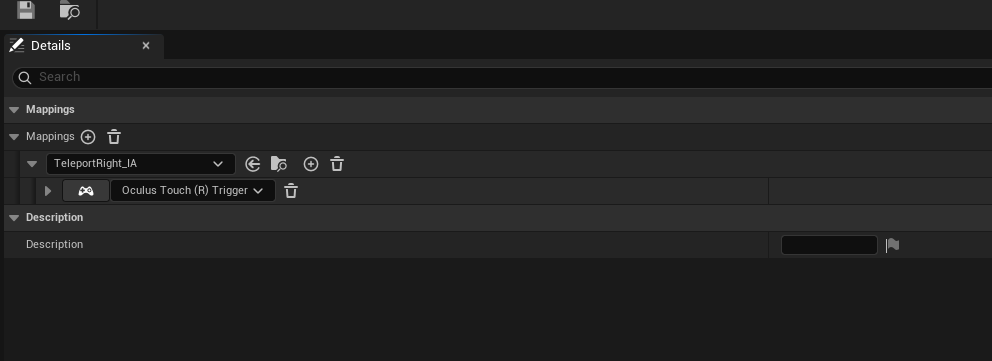
3. Open your PlayerInput_IMC file. There are many drop downs and sub-drop downs here. Click the (+) icon next to Mappings and add your TeleportRight_IA. From here, you can add many different controller supports! Let's add Oculus Touch (R) Trigger by selecting the None dropdown and choosing Oculus Touch->Oculus Touch (R) Trigger.
Your PlayerInput_IMC file should look like this when finished:
Add Input to Pawn
These mappings have been setup and can be edited later. They are also configurable for players who wish to change their input mappings at runtime. Let's tell our player pawn to use these mappings.
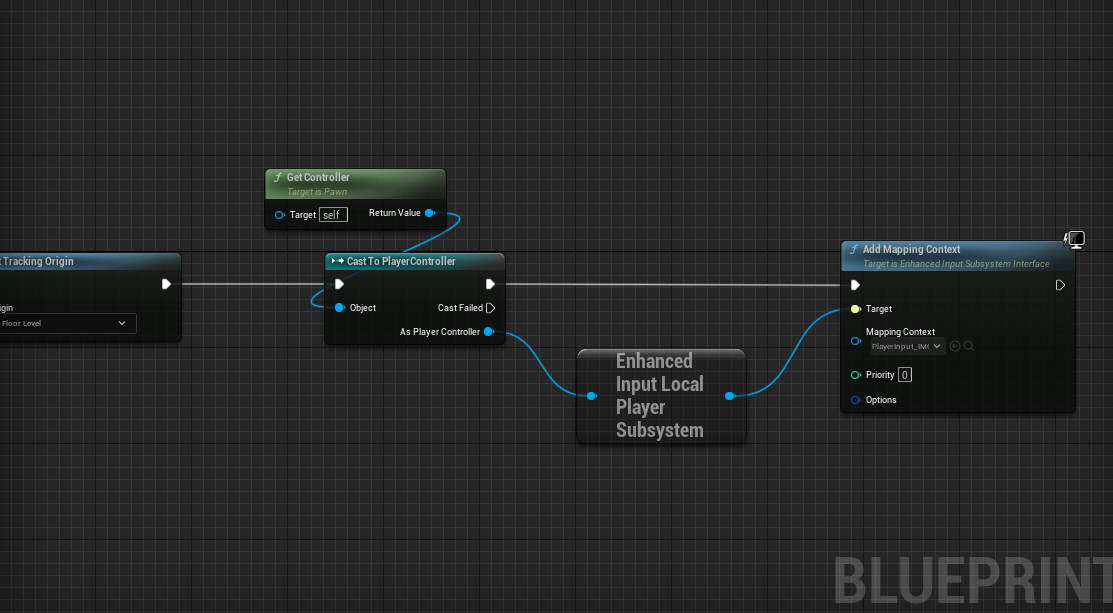
1. Open your player pawn and find the node Event BeginPlay. This is where you added the node Set Tracking Origin in a previous tutorial. Right click and type Get Controller and a LOT of items will show! We are looking for Get Controller exclusively in the Pawn Section from the list.
2. From the blue return value pin on Get Controller, drag out and type Cast To PlayerController. Select that node and set its executiion pin from Set Tracking Origin. From the As Player Controller blue pin, drag out and type Get EnhancedInputLocalPlayerSubsystem.
3. From that node, drag out and type Add Mapping Context. Connect the two execution pins from Player Controller to this new node.
4. In the mapping context node, you will see a drop down that says Select Asset. Choose your PlayerInput_IMC asset.
When you are finished, it should look like the following:
Caching our teleport destination
Now, before we do anything with this event, we need to store the location we found in our
trace method previously so that we can use it here when the player tries to teleport:
1. Under My Blueprint | Variables, hit the + sign to create a new variable.
2. Set its type to Vector, and name it TeleportDest.
3. Add another variable called bHasValidTeleportDest. and make sure it's set to Boolean (red).
Variable names are important. They tell the reader (who might be another developer maintaining your code or might be yourself in the future) what a variable represents. Your variable names should accurately reflect what they contain. In the case of True/False Boolean variables, make sure your name describes what question it's actually answering. So, for instance, in this case, Teleport would be a poor choice for a name, as it doesn't indicate whether the variable's value means that the player can teleport, is teleporting, has recently teleported, or just enjoys daydreaming about teleporting. Be clear about these things. bHasValidTeleportDest clearly indicates what it means. Prefixing Boolean variable names with b is a practice mandated by Epic's coding style guide for C++, but it's a good idea to follow it in Blueprint development as well. (If you plan on developing in C++, you should know and follow the Unreal style guide, which can be found at
https://docs.unrealengine.com/5.6/en-US/epic-cplusplus-coding-standard-for-unreal-engine/
Let's populate these variables. The location we care about is the Projected Location found by the Project Point to Navigation method we're calling at our hit location. Let's store whether we've found a valid location. You'll probably want to drag the Draw Debug Sphere node a bit to the right to give yourself some room since we're about to add a few nodes before we call it:
Let's set our TeleportDest to the Project Point to Navigation method's projected location if it returns true:
1. Drag our bHasValidTeleportDest variable onto the event graph and choose to set it. Do it again (you should have two).
2. Place the first after the Cast To TeleportArea_BP node, and the other below for Cast Failed and connect that node. Check the box for the top. The idea here is that if the cast is successful, this variable is set to true (checked). If it fails, it's set to false (unchecked).
3. Add your TeleportDest variable (set) to the graph twice too and place them after the two nodes we just made. The bottom can just be fed an execution pin and left default (0, 0, 0). The other, you can feed in Location from the Break Hit Result.
4. Finally, off the branch node, connect from False to where you set bHasValidTeleportDest to be false.
Your graph should now look like this:
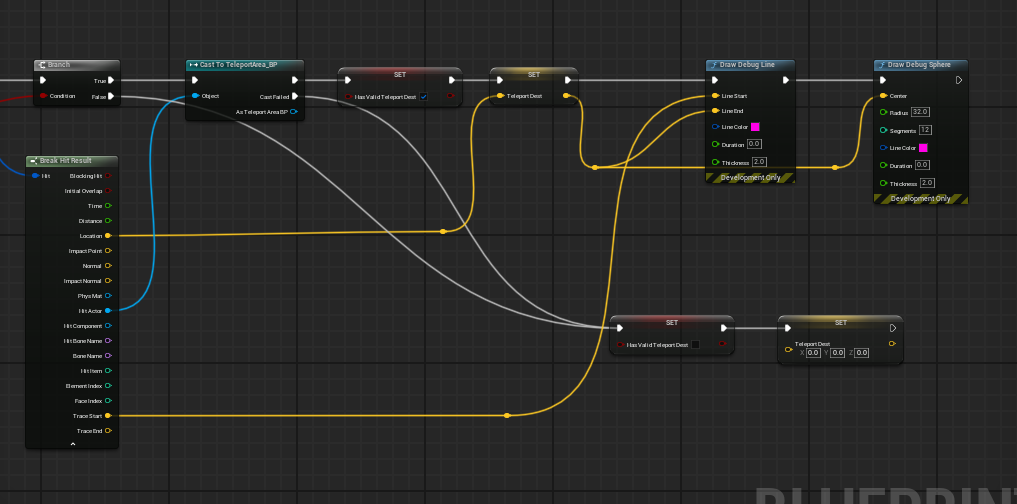
The yellow dots you see are called Reroute Nodes. You can double click on a noodle to add them. Feel free to rearrange so that the graph looks nice.
Now, on every tick, we have either a true or a false value in bHasValidTeleportDest, and if it's true, we have the location to which we could teleport!
Executing the teleport
Let's use the value we've just stored in the bHasValidTeleportDest flag to see whether we have a valid destination, and teleport the player pawn to the TeleportDest if we do:
1. Make some space and let's add our input action from earlier. Below our Event Tick, with space, right-click and search TeleportRight_IA and choose the one under Enhanced Action Events.
2. From the TeleportRight_IA input action we created a moment ago, we'll connect an execution line from its Started output into a Branch node.
Remember that you can hold down B and click to create a Branch node. Take a look at the other shortcuts found on Epic's Blueprint Editor Cheat Sheet here: https://docs.unrealengine.com/en-us/Engine/Blueprints/UserGuide/CheatSheet. They'll save you a lot of time.
3. Grab your bHasValidTeleportDest variable and drag it onto the Branch node's Condition input.
4. From the True execution output, create a SetActorLocation action, and drag your TeleportDest variable onto its New Location input:
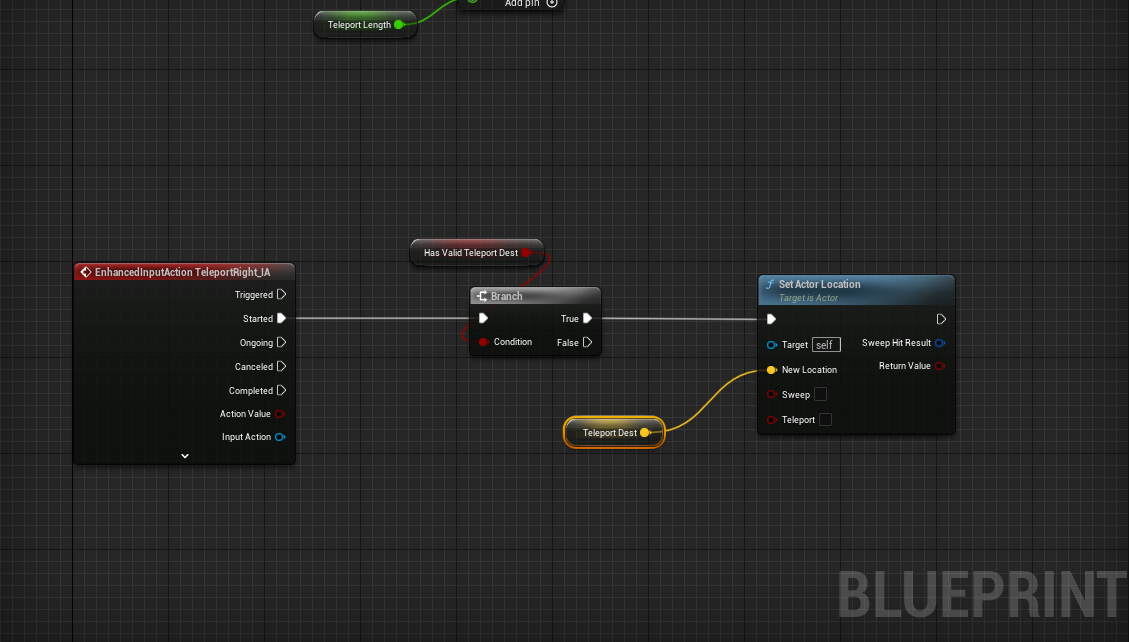
Launch it into a VR preview and give it a shot. You should now be able to teleport around the map. It's nice to be able to explore, right?
Picking up objects (Basic)
Prerequisites
Basic Teleport is optional, but it is important you have gone through the guide at least once to familiarize yourself with deeper blueprinting as well as setting up and handling controller input.
Grab Motion Controllers
Starting here, you should have at least an XRRig setup within a pawn, the input system setup within the pawn (even if you have no input mappings), and the pawn is placed in the level. If not, you should revisit the Prerequisites above.
Begin by creating two new Input Action files in your Input folder called GrabLeft_IA and GrabRight_IA. Next, open your Input Mapping Context file and add these two new mappings, mapping Oculus Touch -> Oculus Touch (L or R) Grip. Finally, in your pawn, right click and add the two new EnhancedInputAction events for these inputs.
I like to add Print String nodes temporarily that connect to Started and Completed to check to make sure my controllers are working before preceding.
If you take a moment and look at your motion controller components in your pawn, you'll notice you can make a lot of edits in the Details panel, but you can't create new functionality. We want our motion controllers to work like before but with the ability to pickup and drop objects.
In your Player folder, right click and select New Blueprint Class and under the All Classes dropdown, search for MotionControllerComponent, click on MotionControllerComponent and click Select. Name it Grab_MotionController.
While we are here, do the same again but this time search and select StaticMeshActor. Name this new blueprint Grabbable. This blueprint, Grabbable, will serve as a special static mesh that can be picked up and dropped later.
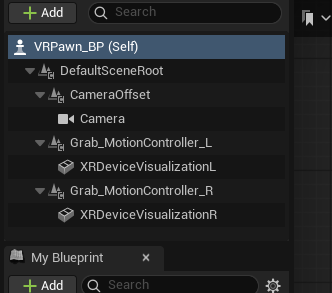
Next, we will add these new grab components to our pawn. In your player pawn, drag the Grab_MotionController blueprint onto your CameraOffset component. Rename what you dropped to Grab_MotionController_L. Do this again but then name the other Grab_MotionController_R. Finally, select Right for your Motion Source in the Grab_MotionController_R.
From here, you now in theory have 4 (or more) motion controllers! Move both the XRDeviceVisualization components to the new grab controllers. The old motion controller components can be safely deleted. As one final setup, select each of the XRDeviceVisualizations and turn off collisions by going to Collision/Collision Presets and selecting NoCollision in the Details panel.
Your new rig should look like this (maybe with an extra motion controller for teleport):
Create Pickup and Drop Events
Open up your Grab_MotionController blueprint.
Right click somewhere and create a new Custom Event and call it Pickup. Do this again and call the other event Drop.
When we call this Pickup event we want the following to happen: Create an invisible sphere to check which objects are nearby. If one of the objects is a Grabbable type, we want to save what we hit for when we drop, turn off physics for that object, and then attach it to our hand.
Dragging off the white pin in Pickup, create a new node called Sphere Trace By Channel. For the start and end yellow pins, right click and create a Get World Location node and connect its Return Value to both Start and End. Finally, give the Radius something like 7.0.
Coming off of the sphere trace by channel node, create a Branch that connects the Return Value and branch's red connection pin. For the blue Out Hit pin, drag off that pin and choose Break Hit Result. Finally, in the Break Hit Result, drag off Hit Actor and choose Cast To Grabbable and connect the True pin from the branch to this new node.
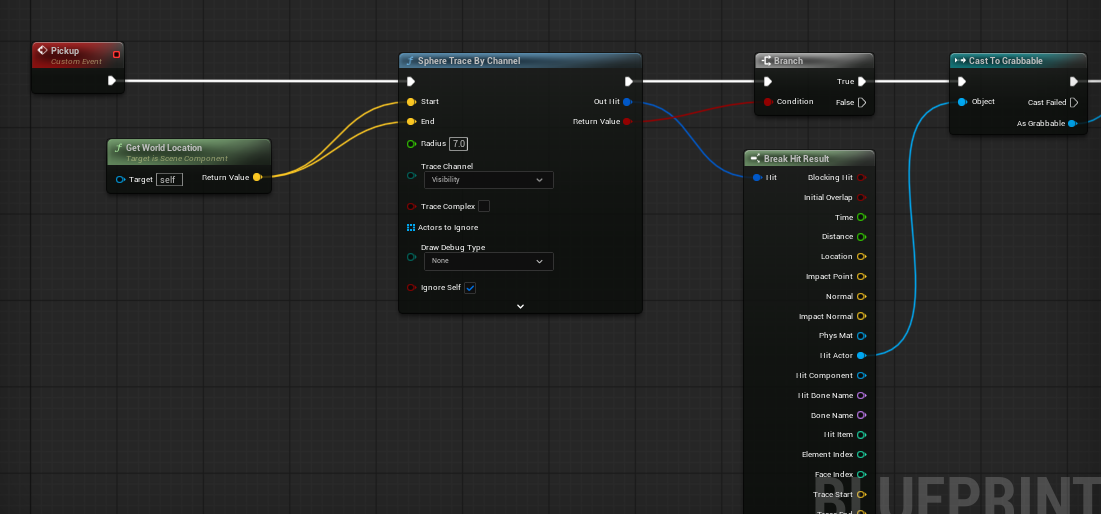
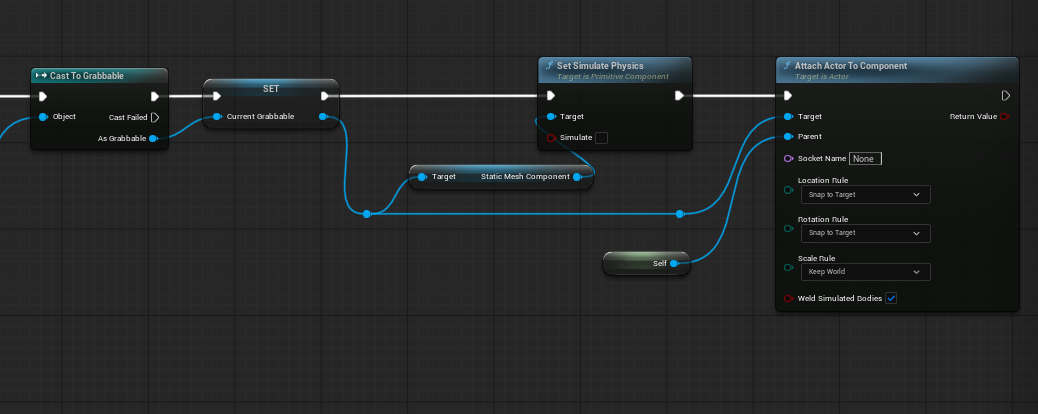
Next, for the blue pin As Grabbable, drag off and select Promote to Variable and name it CurrentGrabbable. This will be useful when we go to drop this object. Be sure to create the connection pins to this new variable from Cast to Grabbable.
Coming off the right blue pin for Current Grabbable, drag off of the pin and select Set Simulate Physics. You'll notice we are referencing the Static Mesh Component here. Uncheck Simulate.
Again, off of the right pin in Current Grabbable, drag off and select Attach Actor To Component. In this new node, under Parent, drag off and choose Self.
From here, it is a personal preference, but I like to start with Location Rule and Rotation Rule set as Snap to Target and Scale Rule set to Keep World.
Feel free to rearrange your nodes so that it looks pretty:
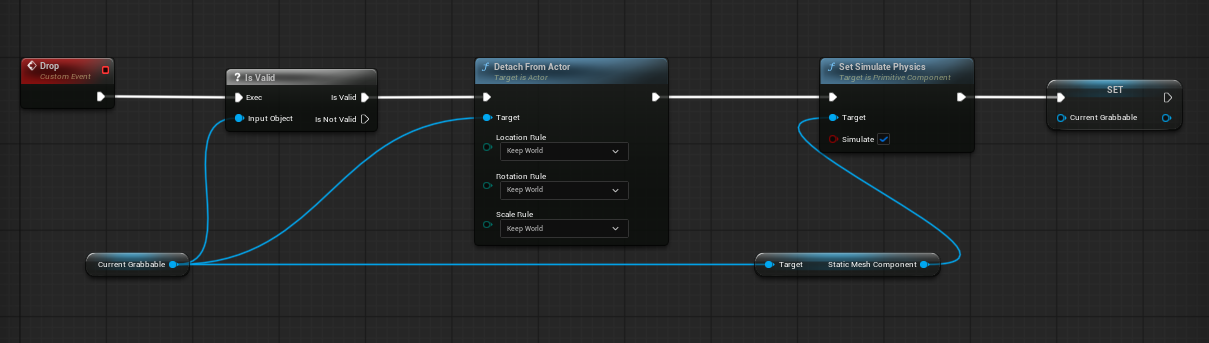
Now, move to your Drop event.
You should have a variable created on the left sided called CurrentGrabbable. drag this into the EventGraph and choose Get... if asked. With this node added, drag off and select Is Valid (should be a white ? mark). Connect Drop to the Exec pins.
Drag off the Current Grabbable node again and select Detach From Actor and connect this node to the Is Valid pin. For Location, Rotation and Scale choose Keep World.
Again, drag off of Current Grabbable and choose Set Simulate Physics and connect this new node to Detach From Actor. Be sure to check Simulate!
Finally, from the variables menu to the left again, drag CurrentGrabbable onto the EventGraph again and this time choose Set... You don't need to do anything here, just connect Set Simulate Physics to this new node. This new node serves as a way to reset the variable after you drop the object.
Feel free to rearrange these nodes to look pretty:
Connect Pickup and Drop to Controllers
Switch back to your pawn.
For both the Left grab event, drag the Grab_MotionController_L onto your graph near this event. Coming off the new node, select Pickup and drag off the node again and choose Drop. Now connect the Pickup to the Started pin and Drop to the Completed pin.
Repeat for the Right.
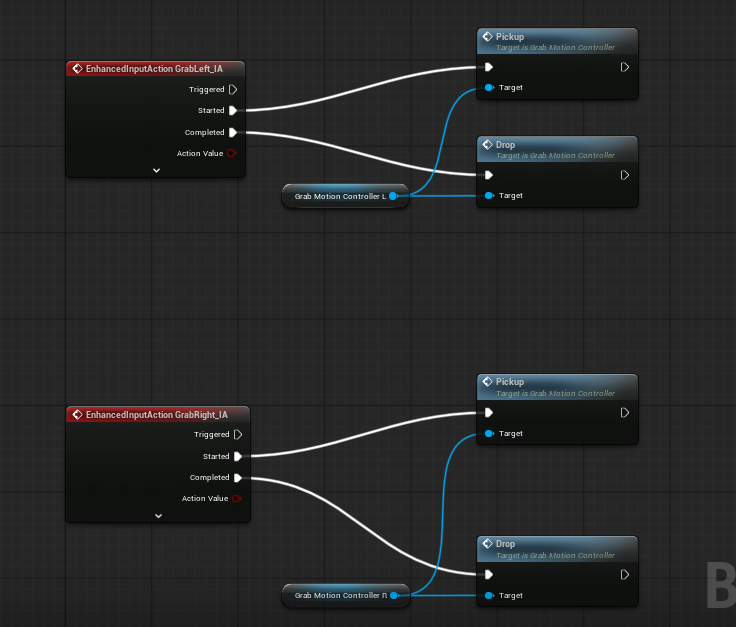
There is an arrow at the bottom of the red events to collapse unused pins!
Add a grab to the map
Now for the exciting part!
From your content drawer, drag the Grabbable blueprint into your map. Choose a mesh for the Static Mesh (such as a cube), and click Simulate Physics. Feel free to rename the actor as you see fit.
Because Grabbable is a blueprint, or a template, Simulate Physics is NOT selectable until there is a static mesh assigned.
From here, be sure to TEST in VR before adding more objects. If you run into issues, carefully review above and check the screenshots for connections too.
Where do we go from here?
There is a reason this guide is called Picking up objects (Basic) because you'll notice some limitations. One, for example is that you cannot do a two handed grab. There is also not a quick way to lock rotation or translation values for things like doors, drawers, or levers. For a better interaction system, there is the VR Expansion Plugin.
Input Mappings in Detail for Unreal
Unreal Documentation
https://dev.epicgames.com/documentation/en-us/unreal-engine/enhanced-input-in-unreal-engine
Worldspace UI in Unreal
Prerequisites
If you have not done the previous guides, setting up an XR Rig or setting up teleport, you must complete these guides! One important note is the tutorial listed below uses the OLD input system whereas newer versions of Unreal have the Enhanced Input System. This is covered in the Teleport series here in the wiki. From here, you should be able to substitute the old version with the new version of input when following below.
Create and Interact with UI for Virtual Reality
Something is wrong! In YouTube tutorials, comments are your friend! Other users tend to update the "changes" in the comments since the video was created.
Where do I go from here?
The tutorial listed above uses a "debug" line where most developers use a spline and spline mesh components as well as creating a reticle to act as a cursor against the UI.
Create a Skybox
About
This guide will show you how to create a "sky" by building a 3D model, importing the model into Unreal, and setting its material properties to accept a 360 photo (or video).
Consider a skybox texture at 2K but no larger than 4K. PNG extensions are preferable but HDR is a secondary option. Generally, don't use JPG here due to compression artifacts or EXR due to massive file size!
Although this guide makes use of Blender and Unreal Engine, the concepts are the same for any modelling software or other game engine.
Getting Started
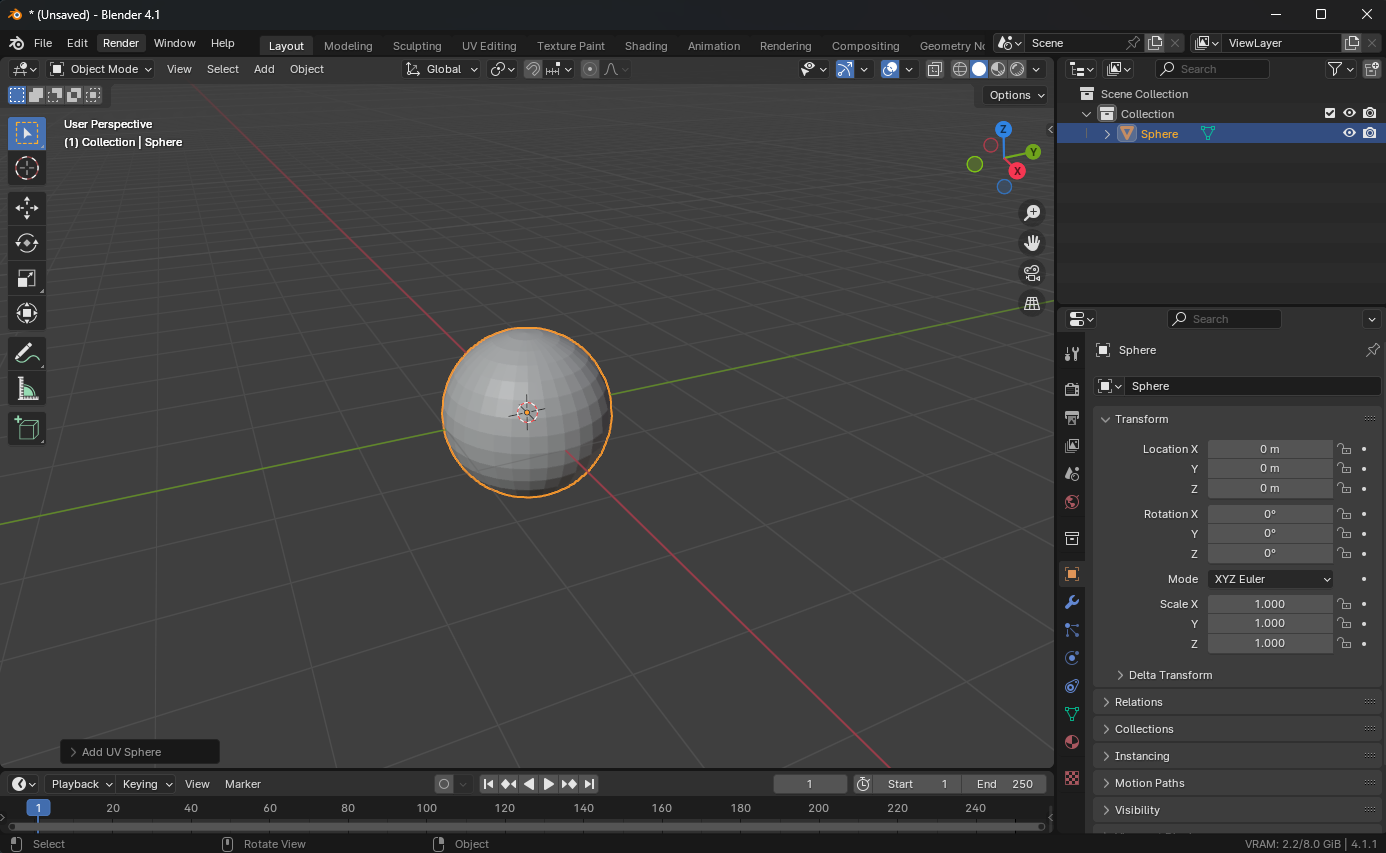
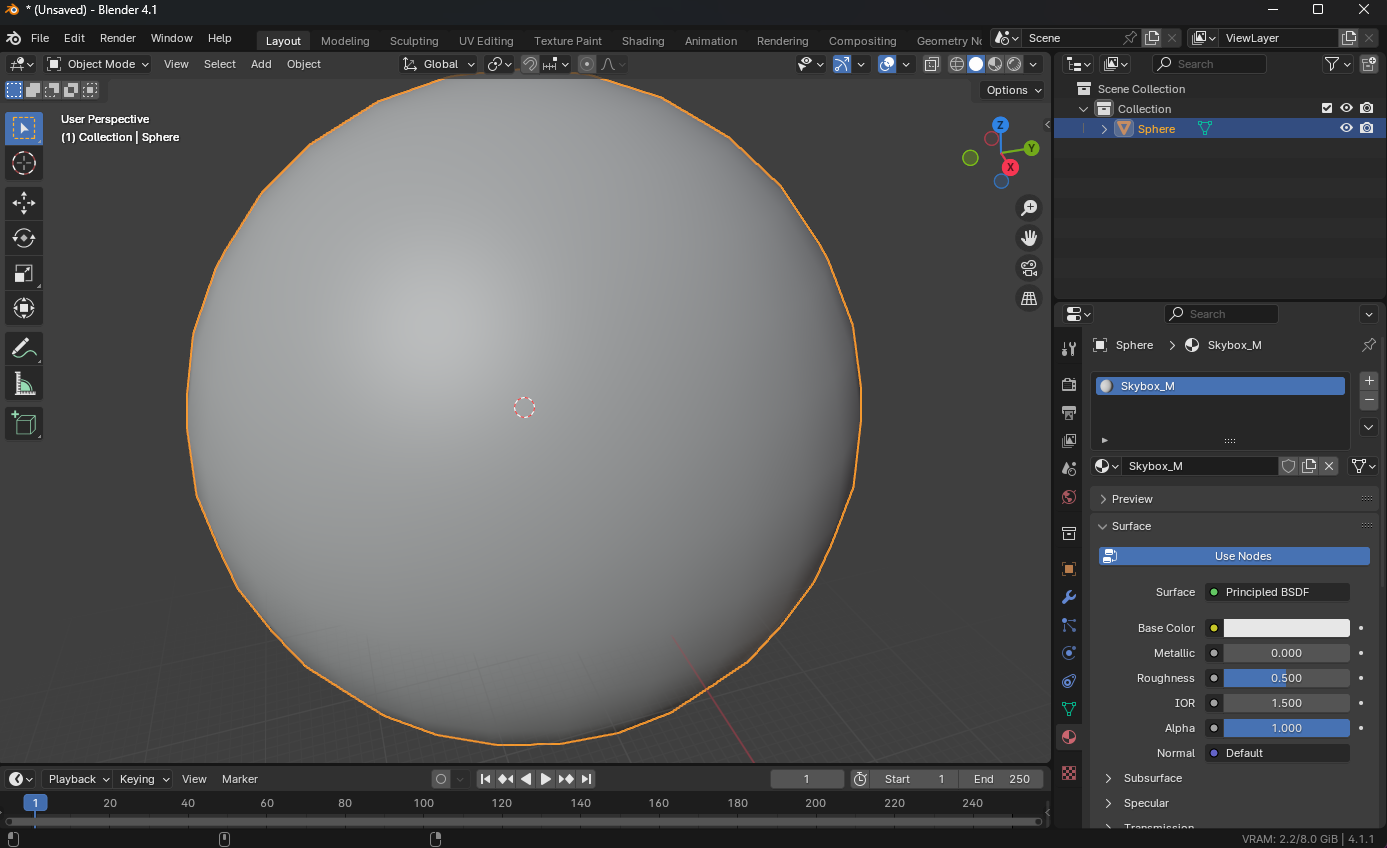
For this guide I will be using Blender but the concepts should translate if you use Maya or another tool. Open Blender and go to File/New/General. Delete the Cube, Camera, and Light. Add a UV Sphere mesh by going Add/Mesh/UV Sphere.
Modelling: Adjust smoothness
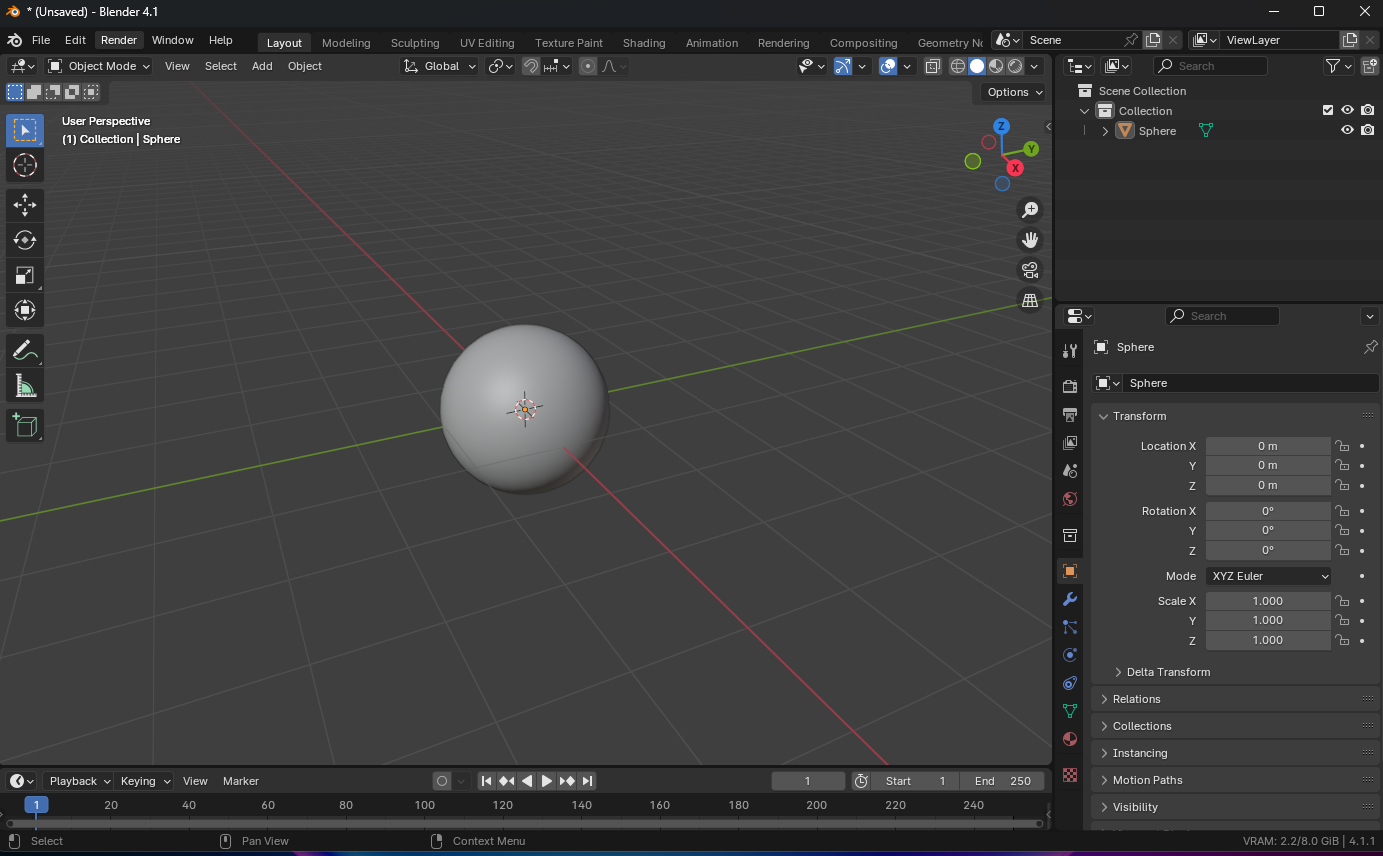
Currently, there are hard edges along the sphere, we will use smooth shading for those edges. Select the object, press [TAB] to enter Edit Mode (or use the drop down in the top left), press [A] to select all the faces, and using the menus at the top, select Face/Shade Smooth.
Modelling: Invert normals and scale
If you are not still in Edit mode, switch to Edit Mode [TAB]. Select all the faces [A] and using the menus at the top, go to Mesh/Normals/Flip.
You can check the face orientation (normals): YouTube - Display Face Orientation
Now return to Object Mode [TAB], select the object, press [S] to scale and type 500. Zoom out using the scroll wheel on the mouse and notice it's large and the ViewPort starts to clip. Using the menus, go to Object/Apply/All Transforms.
Optional: You can select the Red/Pink Material button in the right column, select [New] to create a new material, and rename it to something like Skybox_M.
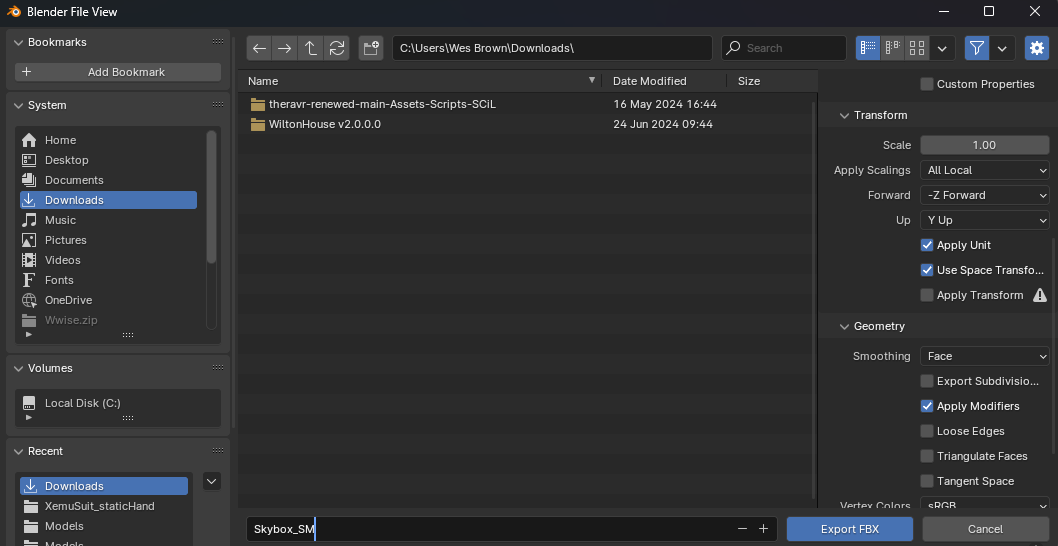
You can now export as an FBX. Go to File/Export/FBX (.fbx). Make sure under the Geometry drop down, select Smoothing: Edge
Unreal Engine
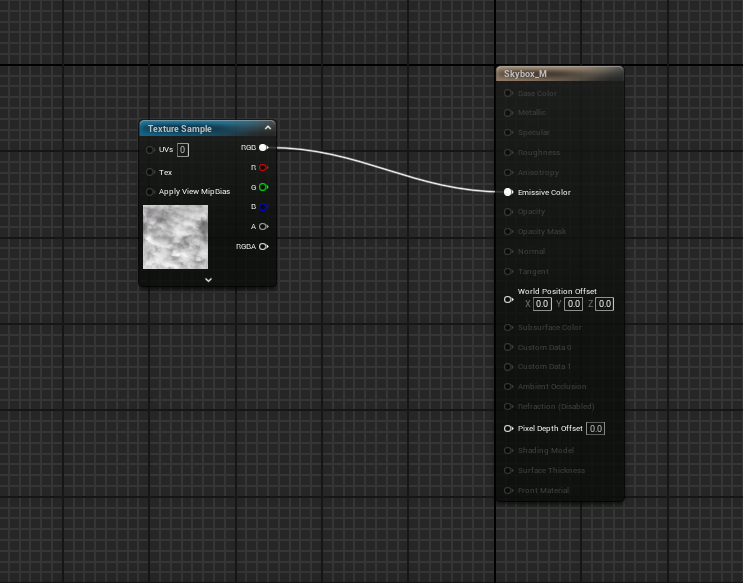
I am assuming you are using an EMPTY level, or a level without all the sky/lighting actors. I am also assuming you have imported the sky model (drag and drop) into your well-organized, stress-free, and cohesive folder structure. If you had not created a material on your model in the previous steps, create a new material and assign it to the mesh if necessary. Next, open that material.
- Click on the actual node that represents the material (it has a brown header).
- Change its Shading Model to Unlit
- Look for Is Sky and check the box
Only 1 material that is labeled as Is Sky should be in your map!
Drag and drop your 360 panorama photo or other texture you are using into your project and drag this texture as a node into the material editor. Connect its RGB output pin to the Emissive Color pin.
What about an HDR Sky?
Let's say you are using an HDRI sky (.hdr file extension). You need an additional node called Absolute World Position. Connect its XYZ output to the UVs input of your texture.
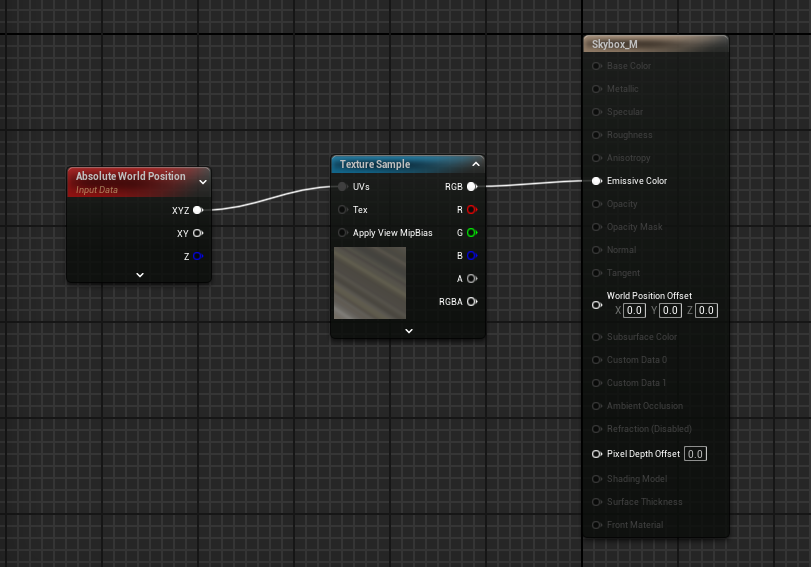
The EXR file extension is not recommended because of the file size. For skyboxes, I prefer PNG first and then HDR.
Finishing Touches
Open up your scene in Unreal Engine. Add a SkyLight actor to the scene with the default settings if you do not already have one.
Now, drag the Sky mesh into the scene that you created in Blender.
- Set the scale to x: 100 y: 100 z: 100
- Leave Mobility to Static
- Adjust Collisions: Set Can Character Step Up... to No and Collision Presets to No Collision.
- Alternatively, you can open the mesh up directly in Unreal and using the menus select Mesh/Remove Collision, then save.
Save your work. Bake the lighting if needed (probably). This concludes the guide.
VR Expansion Plugin
What is the VR Expansion Plugin?
VR Expansion Plugin
If you are new to this page, I have assumed you have gone through the basics such as setting up a VR rig, basic teleport, and picking up objects. If you have not it is highly recommended you do so before proceeding with this plugin!
This plugin adds a variety of features to quickly build for VR and has extremely high customization. It is different than other tool kits, such as the VR Interaction Toolkit in Unity because there are little constraints in how developers can create interactions.
Some notable example features:
- Multiplayer (out of the box)
- Grab and drop with advanced physics
- Sliders
- Levers
- Dials
- Buttons
- Gesture recognition and recording
- Encapsulation
Unity developers may notice this plugin does not come with continuous movement. Most locomotion systems are already built into Unreal by default and the VR Expansion Plugin simply builds off of these feature sets.
An Important Consideration
I have noticed when creating interactions that the author of the plugin sets default values when adding components/actors. Sometimes, these values have collisions turned off, or physics enabled in one or the other. There is a detailed explanation for this reason but the big lesson is that is important to always be testing!
From the website
The VR Expansion Plugin (VRE) was created to help facilitate advanced Virtual Reality interactions and gameplay elements in UE4/UE5. It is an MIT licensed and open source overhaul of many of the engines elements to better accommodate VR.
Installation
Download the pre-built plugin here: https://vreue4.com/binaries
Unzip it then copy the unzipped file.
Open your project's folder. In the "Plugins" folder (which you may need to create), paste the unzipped plugin file.
I have run into crashes when the plugin stack grows, e.g. MetaXR plugin, VR Expansion Plugin, etc. Set the RHI to DirectX11 by searching for RHI in Project Settings.
Full installation documentation: https://vreue4.com/documentation?section=installation
Getting Started
Prerequisites
It is important you have gone through basics, such as setting up an XR Rig, teleport locomotion, and basic grab. These blueprints will be replaced with VRE blueprints. One important reason for going through the previous guides here in the wiki is I cover the new Enhanced Input System, which the official tutorials below cover the OLD input system!
Please take into account new engine features and enhancements. Tutorials should be a guide.
I have run into crashes when the plugin stack grows, e.g. MetaXR plugin, VR Expansion Plugin, etc. Set the RHI to DirectX11 by searching for RHI in Project Settings.
Guides
Additional VRE Tutorial Videos
Visit the link here. It should open in a separate tab, but return here. From the list:
1. can be watched and it covers a lot of conceptual info on the plugin. You shouldn't need to reproduce anything here if you already installed the plugin.
2. Skip (outdated)
3. Although I have my own videos for setup, check this out for basic objects to grab.
4. Movement modes: The author of the YouTube channel covers his implementation of Smooth and Teleport locomotion. It's worth a look to see how other developers accomplish this task, however, SCiL generally uses implementations from other resources. The crouching and climbing work well though from students who have followed those guides in the past.
5. If you followed item 3 above, you should be set to start creating interactions and these guides go deeper into how to use these components.
Something is wrong! In YouTube tutorials, comments are your friend! Other users tend to update the "changes" in the comments since the video was created.
Where do I go from here?
The YouTuber, VR Playground, is one of my favorite Unreal channels. He dives into a lot of interesting VR interactions, even beyond the expansion plugin!
https://www.youtube.com/@VRPlayground/videos
Useful Tutorials and Guides
Link to useful tutorial and guides:
- Setting Up Rich Text in Unreal: UMG Rich Text Blocks in Unreal Engine | Unreal Engine 5.3 Documentation
- Sky Box Creation: Unreal Engine 5 UE5 How to Create a Skybox | Sky & Atmosphere System - Bing video
- Guidance on mixing grass and terrain: I see the Grass only in a Round Area from the Player - Platform & Builds / Debugging, Optimization, & Profiling - Epic Developer Community Forums (unrealengine.com)
- Guidance on LOD Settings for Quixel Assets: LOD / BIllboard Issue for Foliage – Quixel
- Materials and Textures on Very Large Meshes: UDIMs — Blender Manual
- Lighting the Environment (documentation)
Packaging for PC
If you need VR Project settings can be found here.
Getting Started
The documentation, listed below, is extremely helpful to help configure your project for packaging. The article below does not cover optimizations, advanced packaging, or the build tools needed to compile the project (those are listed below).
In this field, you will find many synonyms for workflows, tools, etc. Packaging in Unreal is also referred to a Build, an EXE (Windows), an APK (Android), an App or Application, or a Distributable.
Packaging Tools Needed
Visual Studio will need to be installed, along with the following components/workloads from the Visual Studio Installer. Generally, these packages are already installed on SCiL workstations.
- Install .NET SDK
- Game development with C++ [Workload]
Unreal Engine Documentation:
Packaging Your Project | Unreal Engine 5.6 Documentation | Epic Developer Community
Double-check your default maps! You may wish to peek at some of the documentation above!

Packaging for Standalone
Setup
The Meta plugin for Unreal helps configure the project quickly and easily and can be disabled after applying settings if you don't need it. The plugin should be available if you are using one of the SCiL workstations, but if you are building elsewhere, you can find the instructions here: MetaXR Plugin
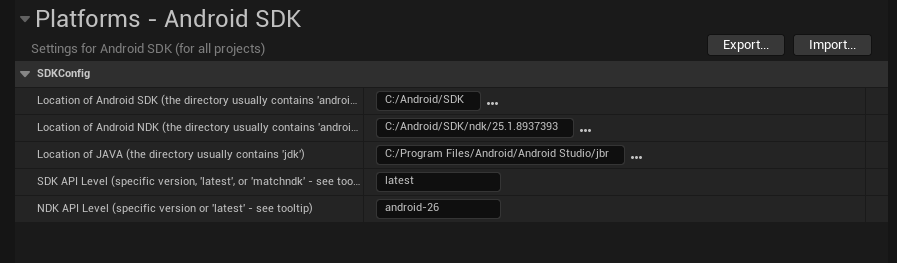
Under Project Settings -> Android SDK -> SDKConfig set the following (use the 3 dots):
- Location of Android SDK: C:/Android/SDK
-
UNREAL 5.5 - Location of Android NDK: C:/Android/SDK/ndk/25.xxx
UNREAL 5.6 - Location of Android NDK: C:/Android/SDK/ndk/27.xxx
- Location of JAVA: C:/Program Files/Android/Android Studio/jbr
Do not copy and paste above, set the actual folders.
Building (in the SCiL lab)
DO NOT run Install Sdk per the Unreal documentation on the SCiL workstations. They are configured differently.
Typically, Unreal would be configured according to the documentation if you are building at home. But for the SCiL lab, Android SDKs have been configured for all users of the workstation.
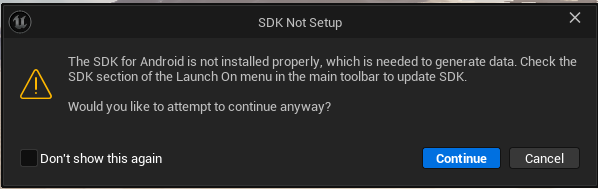
Go to Platforms -> Android -> Package Project
You will get a warning popup about SDK Not Setup. Click Continue.
Select a folder (it is recommended to use a folder called Builds that is in the root of the project). This location will save for the next time you build too. You can then load your APK and OOB files to a headset via Meta Quest Developer Hub.
Common things to check if the project did not build:
- Ensure the SDK locations listed above are properly placed.
- Sometimes Gradle (the building tool) will fail because an instance is already running. Try the build again. If it persists, restart the computer (this removes the processes that may be running, especially if other users are using the machine and have logged out).
Building (not in lab)
For the individuals who wish to build at home, ensure Android SDK for Unreal is setup according to this documentation:
Manual Project Configuration
Configure project according to other pages in WIKI, including VR Settings for Unreal Engine 4/5
Additionally, under Project Settings/Android, check the following:
- Under APK Packaging, select Configure Now/Accept SDK License (you may need to do this on the build workstation)
- Support Vulkan
- Support OpenGL ES3.2 OFF (IMPORTANT)
- Advanced APK Packaging/Package for Meta Quest Devices
Additional Configurations
Additional settings may be required depending on the standalone/deployment platform (such as AppLab or Oculus store)
Passthrough Setup
Ensure MetaXR plugin is enabled and ALL RULES are applied (should be a green dot on the icon in the editor). The plugin should be installed on all workstation computers. More information can be found here.
Create a new EMPTY Level.
Create a simple player pawn and add to the the map.
Add a SkyLight component, leave as Stationary. Choose Source Type: SLS Specified Cubemap. Under Cubemap, choose DaylightAmbientCubeMap (or any that you prefer). If you don't see any in the list, click the gear icon with the popup window open and choose Show Engine Content.
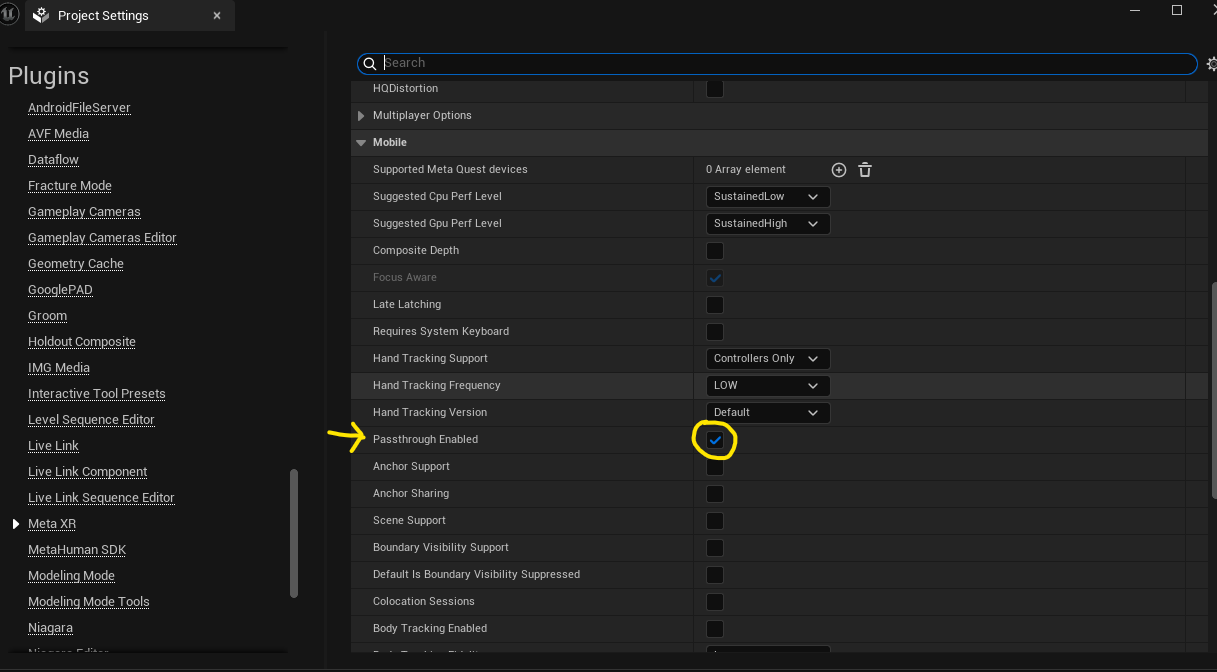
Next, enable Passthrough by going to Project Settings -> Plugins (MetaXR) -> Passthrough Enabled
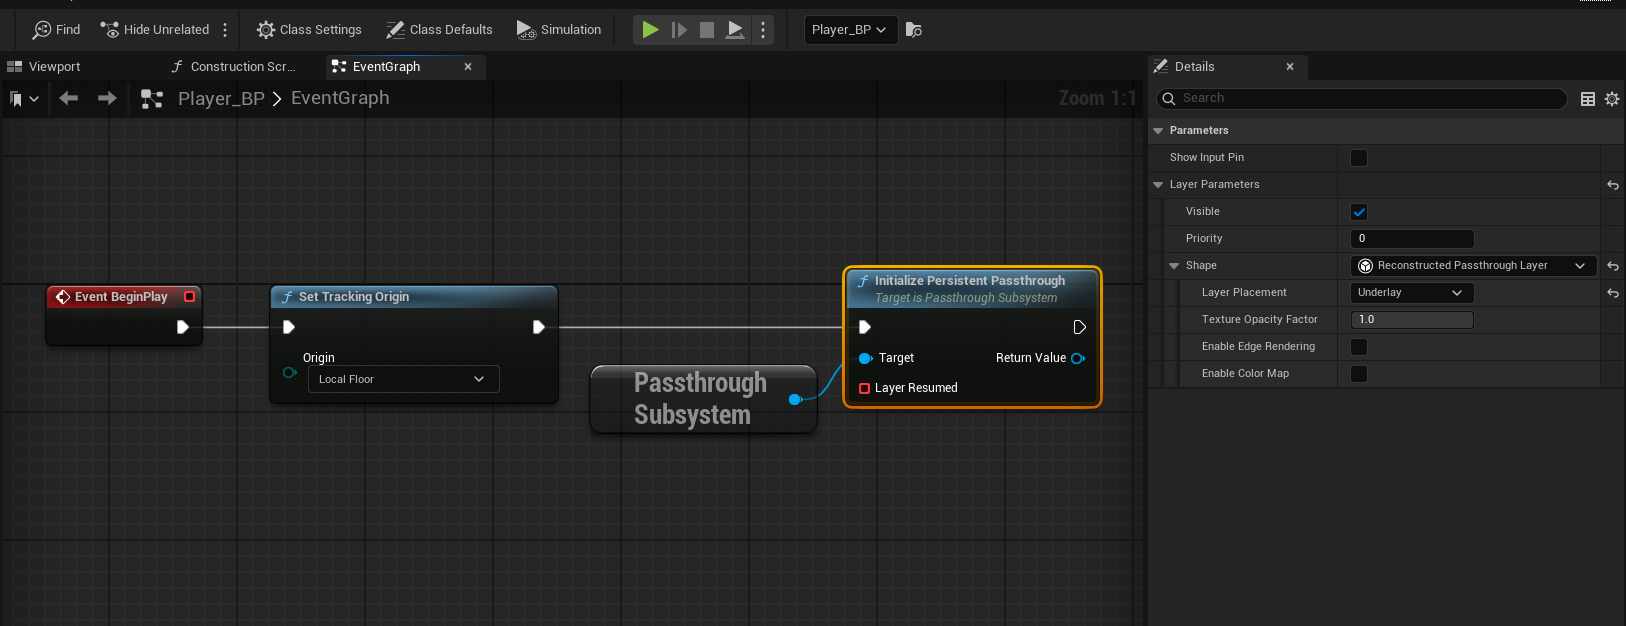
In your pawn, under Event BeginPlay, right-click and search for Passthrough Subsystem from the blue pin, drag off and choose Initialize Persistent Passthrough and connect the execution pins to this node. Finally, select that node and in the Details panel look for Layer Parameters -> Shape -> Layer Placement and choose Underlay (ReconstructedPassthroughLayer should be default).
You can now build your project for Android and deploy to test!
Where to go from here?
There is lots of documentation with additional features such as spatial anchors and more. Check out the documentation here:
https://developers.meta.com/horizon/documentation/unreal/unreal-passthrough-overview
Meta Hand Tracking Unreal
Prerequisites
- Meta XR plugin is enabled in your project. The SCiL workstations typically has this plugin installed but if you are working from home, you can find out more about the plugin here. Ensure all the Meta XR recommendations are in place!
- XR Rig (VR Pawn) is properly working with controllers.
- All interactions should be working correctly with the controllers
- Optional: Passthrough has been setup
Setup
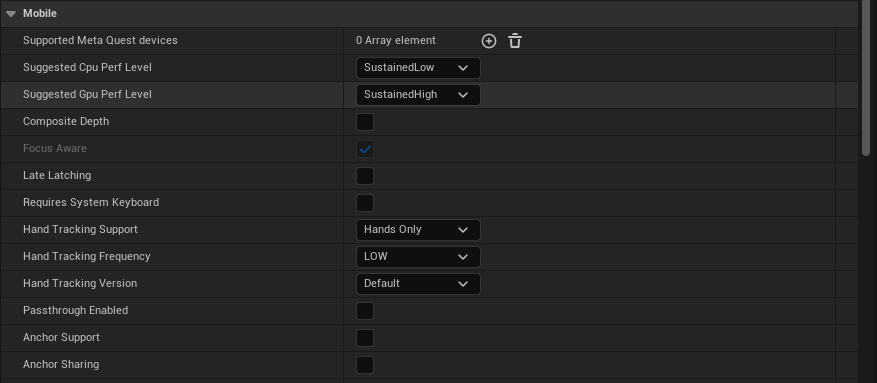
For this guide, we will be setting our controllers to Hands Only, Hand Tracking Frequency to LOW, and leave default values for the rest.
Go to Edit -> Project Settings -> Plugins -> Meta XR. Under the section for Mobile, set Hand Tracking Support to Controllers Only. The other default values are fine.
Now open your VR Pawn/XR Rig. On both of your main Motion Controller components, i.e. the motion controller components marked to use the motion source Left or Right (NOT Right Aim etc.), Disable (set Hidden in Game) or delete any XRDeviceVisualization components that may be there.
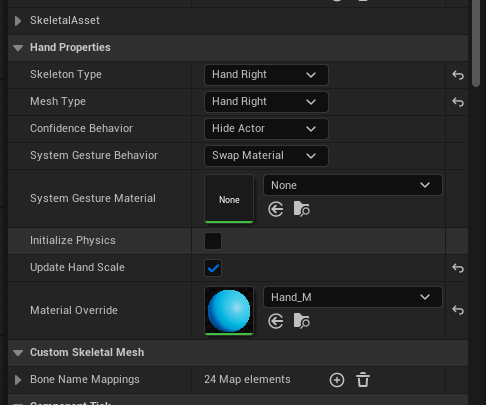
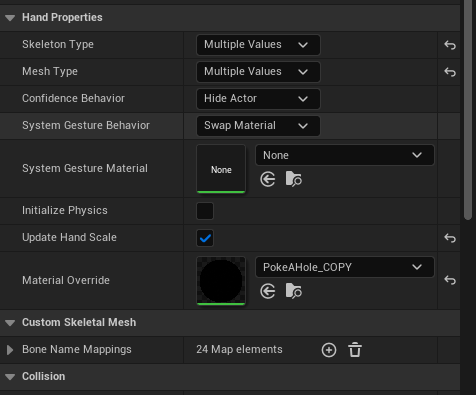
Now add an OculusXRHand component as a child of each main Motion Controller (labeled OculusXRHand_L for the left and _R for the right). Let's take a look at the settings for you to configure:
- Skeleton Type: Set for either the Left or Right hand in the component you are working with.
- Mesh Type: Set Left/Right, same as above
- Confidence Behavior: Leave this alone
- System Gesture Material: This is a material you can optionally assign when your hand's palm is facing close to your face, triggering Meta's system to show a home button to either pause or leave the app.
- Initialize Physics: Except for special use-cases, I would leave this off for performance purposes.
- Update Hand Scale: Set this to true to allow the hand to scale to be the same size as yours
- Material Override: This is your default hand material.
Here is a basic setup:
Be sure to build your app and test in standalone VR to ensure quality
Input and Gestures (Input already Enabled)
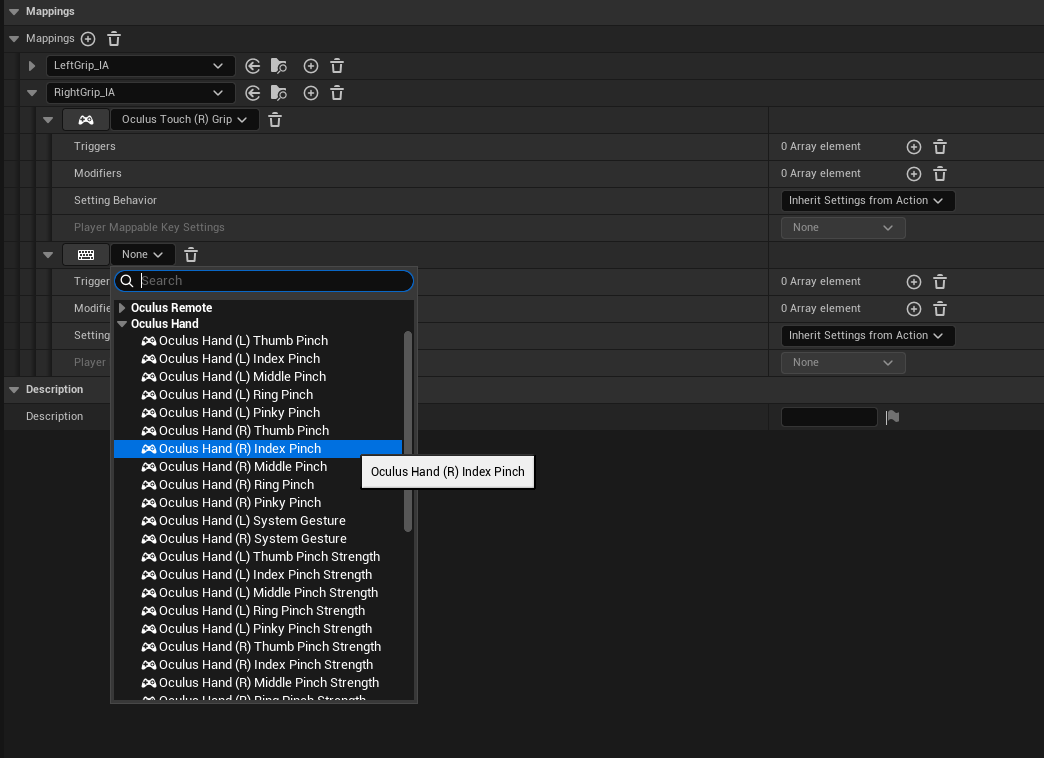
For input, such as pinch, you can open your input mapping context file and choose a mapping to add built-in gestures, such as Oculus Hand (R) Index Pinch:
Optional: For more advanced gestures and custom gestures, see this video: https://www.youtube.com/watch?v=VV9PKQ_DruA
Optional: Passthrough Hands with Depth Occlusion
You must have passthrough setup and working as outlined in the prerequisites above.
You MUST FOLLOW the following instructions CAREFULLY!
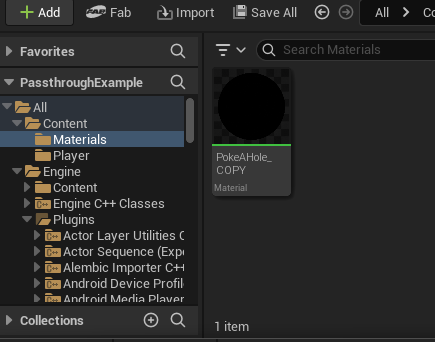
- Open your Content Drawer and look for the button Settings on the top right. Enable Show Engine Content and Show Plugin Content.
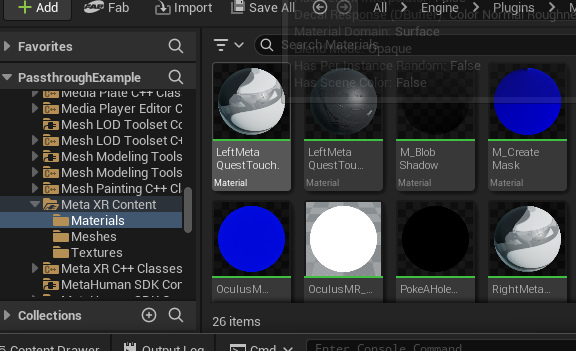
- Now, browse through the folders in your Content Drawer and browse to Engine -> Plugins -> Meta XR Content -> Materials
- Look for the material PokeAHoleMaterial.
- Click (but don't open) on this material to select it.
- COPY it (CTRL+C)
- In your project's Content folder, PASTE (CTRL-V) this material in your project's materials folder. I would SUGGEST renaming it, maybe PokeAHole_COPY.
- Disable Show Plugin Content in the Settings button of the Content Drawer, to prevent accidents in the future.
- Assign this copied material to the Material Override in your OculusXRHand components.
Here are some screenshots of the process:
From here, build your application and test in standalone.
For occlusion depth in Meta Link, you need to set in the Project Settings Alpha Output to TRUE and in older versions Enable alpha channel support in post processing option set to Allow through tonemapper.
Upgrading Unreal Versions
PLEASE BACKUP YOUR PROJECT BEFORE PROCEEDING!
It is recommended you use version control and/or File/Zip Project before proceeding.
This guide contains a generic upgrade path. Some additional considerations may be taken depending on the size/project configuration.
Upgrade Project
Ensure your project is fully closed.
Delete any of these temporary files: Build, Binaries, DerivedDataCache, Saved, Intermediate.
Remove and replace any plugin in your Plugins folder (for example VRExpansionPlugin) with the plugin version that matches the engine.
Right click on the blue Unreal project icon -> Show more options -> Switch Unreal Version. Choose the appropriate version.
Launch project. The project may prompt to complete various things as needed. If the project fails, check your Saved folder for Logs.
Android Builds for SCiL Workstations
You may need to update your path to your NDK below:
Edit -> Project Settings -> Android SDK
UNREAL 5.5 - Location of Android NDK: C:/Android/SDK/ndk/25.xxx
UNREAL 5.6 - Location of Android NDK: C:/Android/SDK/ndk/27.xxx
AR in Unreal
THIS PAGE IS A WORK IN PROGRESS!
Setting up a new AR project
Packaging for iOS
Packaging for Android