Getting started with Unreal Live-Action Cinematics
This guide is a work in progress.
About
This guide provides an OVERVIEW of Unreal live-action cinematic video. Covered in this guide include tutorials to get familiar with Unreal, tools and hardware required, the checklist of operations, and an overview of the template project. To avoid confusion, this guide does not cover the capturing and exporting video from Unreal. Another guide will be posted.
This guide makes use of OpenXR systems but no one will be wearing the headset in a traditional sense.
Prerequisites
New to Unreal?
Checklist of items:
- Meta VR headset with Meta Link. Other headsets in theory could be used, but I found Meta Link behaves better when the headset goes to sleep. We will use an HMD because SteamVR requires one. Note: SteamVR will use the OpenXR runtime.
- SteamVR. This will be the default OpenXR runtime and will be what we used to capture the Canon DSLR movement.
- Vive Ultimate Trackers with the Vive HUB. A vive tracker will be mounted to the Canon DSLR to track its movement to Unreal.
- Canon DSLR Camera with a connection from mini HDMI to USB. For recording the live-action elements in front of a green screen.
- Unreal and the target set on the desktop shortcut (see below)
- Microphone for Unreal PC. To to help with scene slating
- Any additional equipment. Such as lighting, props, mics, etc.
Order to activate equipment
OpenXR equipment is still early technology and can sometimes lose tracking, freeze, and other challenges. Keep in mind you may need to restart devices, re calibrate, and more. The good news is every year bugs, software, and hardware improves.
At the time of this writing, the following should be turned on and checked for calibration in this order, please read the FAQ below:
- Start Meta Link. Use a Quest 2 and set up a boundary FACING THE GREEN SCREEN. A stationary boundary is fine.
- Start Vive HUB. Verify tracker is working. A solid green light may say it is working, but verify in SteamVR (below) that it is tracking.
- Start SteamVR. Verify the app sees the headset, 2 controllers, and a Vive tracker. SteamVR should be the default OpenXR runtime. If the tracker loses tracking, close SteamVR and Vive HUB and reopen until it works.
- Set the Vive tracker in SteamVR to anything BUT a controller, hand, etc. I usually use Left Foot.
- Put on VR headset. Make sure you are in the SteamVR home environment. Use the menu button on the left controller to bring up the SteamVR menu. Select the button to calibrate the Vive tracker. Follow the in headset instructions.
- Verify the Unreal Desktop icon has the target flag set to -XRtrackingonly. Right click on the desktop icon, select Properties, select Shortcut, and verify the the Target says -XRtrackingonly.
- Open your project by launching from the Unreal Desktop icon. DO NOT USE the Epic Games Launcher, the app icon for your project, or some other way as the flag above won't get called and Live Link may not cooperate.
FAQ
- If at any point your floor is not calibrated, close SteamVR and exit Meta Link and reset the floor.
- If the tracker loses tracking, you may have to repeatedly close SteamVR and Vive Hub until it recognizes tracking. Do not cover the cameras and make sure the light faces out.
Verify plugins are enabled in your project
- OpenXR
- OpenXRViveTracker
- Vive OpenXR - This is a local plugin enabled in the Plugins directory of your project. It can be downloaded here if it is not included in the template project.
- LiveLink
- LiveLinkXR
Overview of template project
Open up the CinematicMap map. Take a moment and review all the actors in the Outliner. Before getting started, let's open a couple of tabs that may not have imported.
Quick fixes
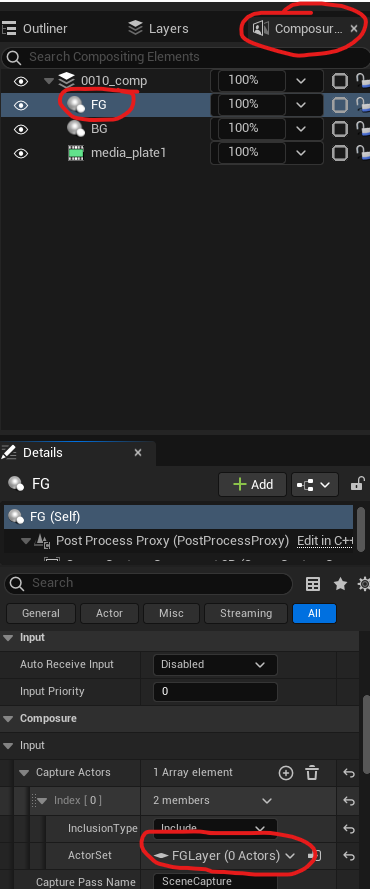
Go to Window/Virtual Production/Composure Compositing and dock this window as a tab next to Outliner. You'll find there is an item called 0010_comp with three items as children. All of these are actors in our map.
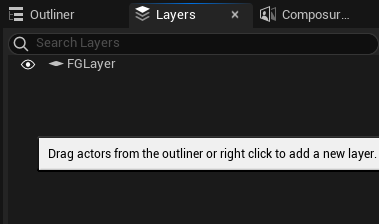
Go to Window/Layers and dock this window as a tab next to Outliner and Composure.. Our Foreground layer was not saved when the project was zipped so let's recreate it. Right click in the Layer tab, create an empty layer called FGLayer. This layer will be for all the foreground objects that sit over top the green screen and background objects. You do NOT need to create a background layer.
Now click on the Composure... tab, click on FG, and within the Details panel, go to Composure/Input/Capture Actors/Index [0]/ and verify the ActorSet has FGLayer assigned. If not, assign the layer.
Actors overview
A demo of the following will be presented during your class.
The following are the actors in the outliner along with their purpose.
- Lighting folder - This contains a DirectionalLight and SkyLight. It is strongly recommend you used either Baked lighting or Mixed
- Sky_Sphere - This actor can hold your skybox or 360 photo
- SM_Template_Map_Floor - A simple floor object to get started and to understand spatially where the floor starts in relation to the cameras.
- BG, FG - These actors are part of the composition. You shouldn't need to mess with these actors.
- media_plate1 - This special actor is the live feed for your DSLR camera. The only setting you should need to change occasionally is your green screen chroma key. This is under Composure/Transform/Compositing Passes/Transform Passes/Chroma Keying/Key Colors/Index[0]
- 0010_comp - You will use this actor most of the time to serve as the PREVIEW COMPOSITE SHOT of the unreal and DSLR cameras. When this object is selected, there is a preview window that appears and a button in the top right corner to maximize. Be careful to not open too many windows!
- CineCameraActor - This is the primary camera that will film your virtual shot. As a child is another camera, CompCamera, which you will not use but serves as the output from our 0010_comp actor.
Setup
If everything is running properly, go to Window/Virtual Production/Live Link. Click the button + Add Source and choose LiveLinkXR Source and check all the boxes. You should see your HMD, two controllers, and most importantly, the Vive Tracker. If not, close the editor and ensure everything is working. If you see the tracker, close this window.
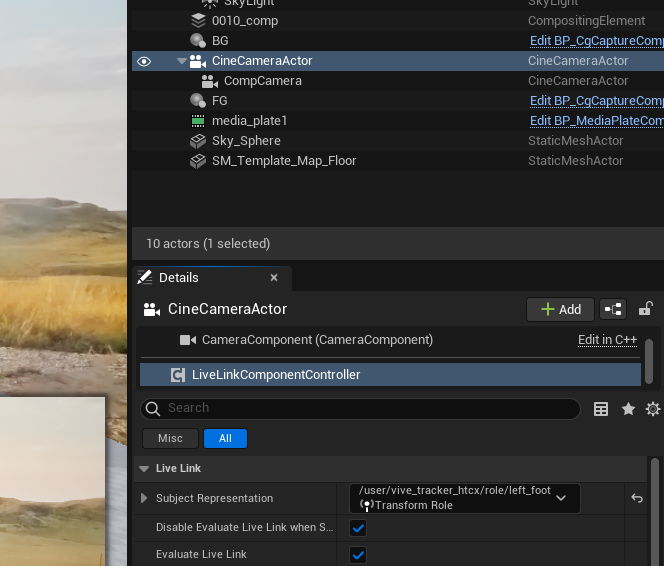
Click on CineCameraActor. In the Details panel, scroll down in the components window (it's tiny) and choose LiveLinkComponentController (screenshot below). Under Live Link in the Details panel, make sure to assign the tracker under Subject Representation.
Now we need to get the DSLR feed. Ensure the DSLR is turned on.
Open the Content Drawer, go to Movies/NewMediaPlayer and open it up. In the top left of the video preview is a tiny folder icon, just below the Save icon. Select it, choose Video, and choose the DSLR camera. If you can see the video feed, you can MINIMIZE this window.
DO NOT CLOSE the NewMediaPlayer window after you open the video feed or you will "close" the video feed!

From here, select the actor 0010_comp and verify everything is working, including tracker, camera feed, etc.
Where to go from here?
The next steps would be to prepare both the studio and the Unreal world for cinematic capture. This takes time and planning, particularly with lighting, perspective, and positioning of both real-life and CGI objects. Consider recording a few tests and making a composite before officially recording your takes. Another guide will be posted on an overview on capturing within the Unreal environment and exporting the footage.