Simple XR Rig Setup
Project Setup (Updated for Unity 6)
This guide covers how to set up a simple or basic XR rig, similar to other guides on this wiki. There are "prefabs" or a packaged object available for an entire player object that has everything we need, but sometimes it's nice to start with the basics and add features manually as we need them.
This guide assumes you have been briefed on the basics of the Unity editor, such as the project folder, inspector, hierarchy, scene, game tabs, etc.
Launch Unity Hub.
Click New project.
Under the templates, choose Universal 3D Core (URP).
Why URP?
Unlike the standard or built-in 3D pipeline for Unity, the universal rendering pipeline (URP) gives scalability for different systems out of the box as well as node-based shader creation.
See more: https://docs.unity3d.com/Packages/com.unity.render-pipelines.universal@17.0/manual/index.html
Give your project a name and choose a file destination under Project settings.
Project files can be large, so I recommend a fast connection external ssd.
Uncheck Connect to Unity Cloud and Use Unity Version Control. You can connect to these services later, if you wish.
Click Create project.
The project will be built. Take a few moments and get acquainted with the layout of the Unity Editor. Take a particular look at the Project Window, where your assets will live. Check out the URP Readme file. When you are ready, you may click the Remove Readme Assets button in the Inspector. You can also delete the InputSystem_Actions file as we will get our input from the XR Interaction Toolkit.
Enabling OpenXR
Go to Edit > Project Settings. Click on XR Plugin Management on the left and install the XR Plugin Management.
Check Open XR under Plug-in Providers.
If you get a message about enabling backends for the new input system, click yes. Unity will restart. This switches Unity to use the new Input System (which is better and more scalable).
Click the yellow warning sign next to OpenXR. Click fix all in the upper right corner of the window that appears. This may take a moment to process.
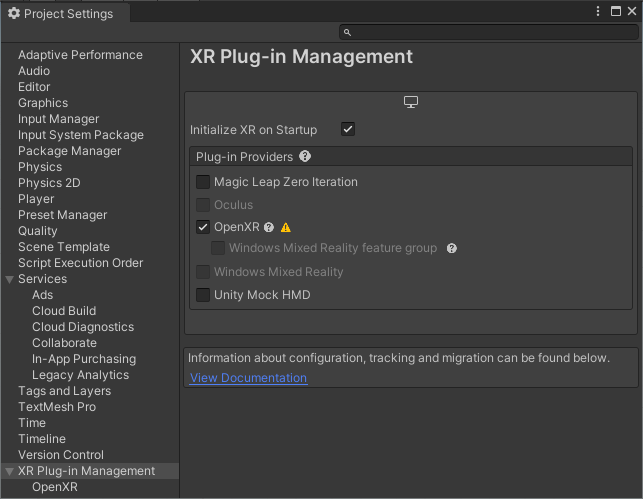
You'll notice not all of the warnings went away. What is left is adding controller support in something called the Interaction Profile. Before you leave, sometimes it is good to come back here to Project Validation to verify warnings are properly dealt with.
Under Interaction Profiles click the + button and add Oculus Touch Controller Profile. You may add more support for other devices if you wish.
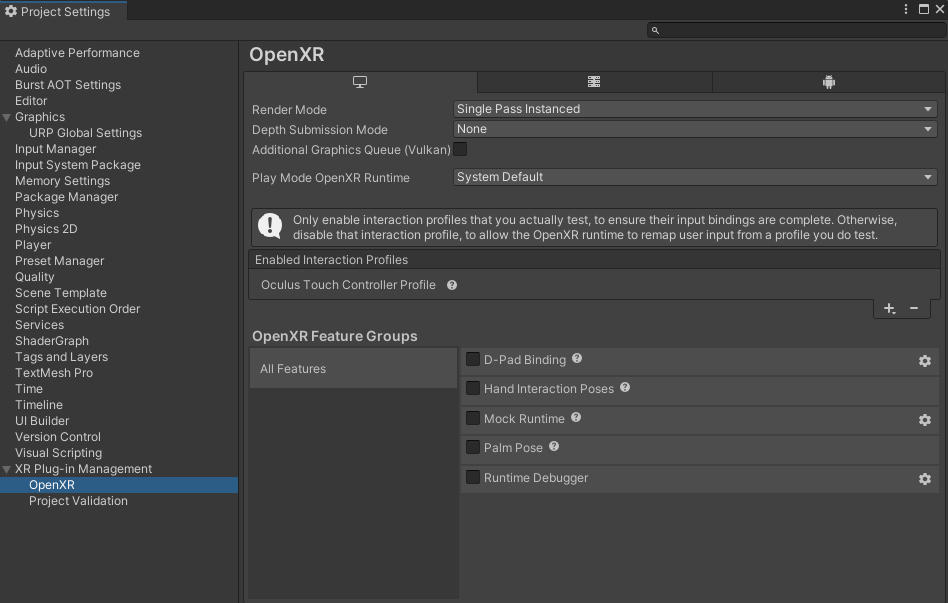
Close Project Settings window.
Add the XR Interaction Toolkit (XRIT)
At the top, go to Window/Package Manager. Select Unity Registry on the left and scroll down until you find XR Interaction Toolkit. Select it and the window should change to give you descriptions and the ability to install. Click the Install button.
After a moment or two, a new tab within the window will appear called Samples. Click the tab and under Starter Assets, click the Import button. After a moment, you will have a Samples folder with Starter Assets inside your project.
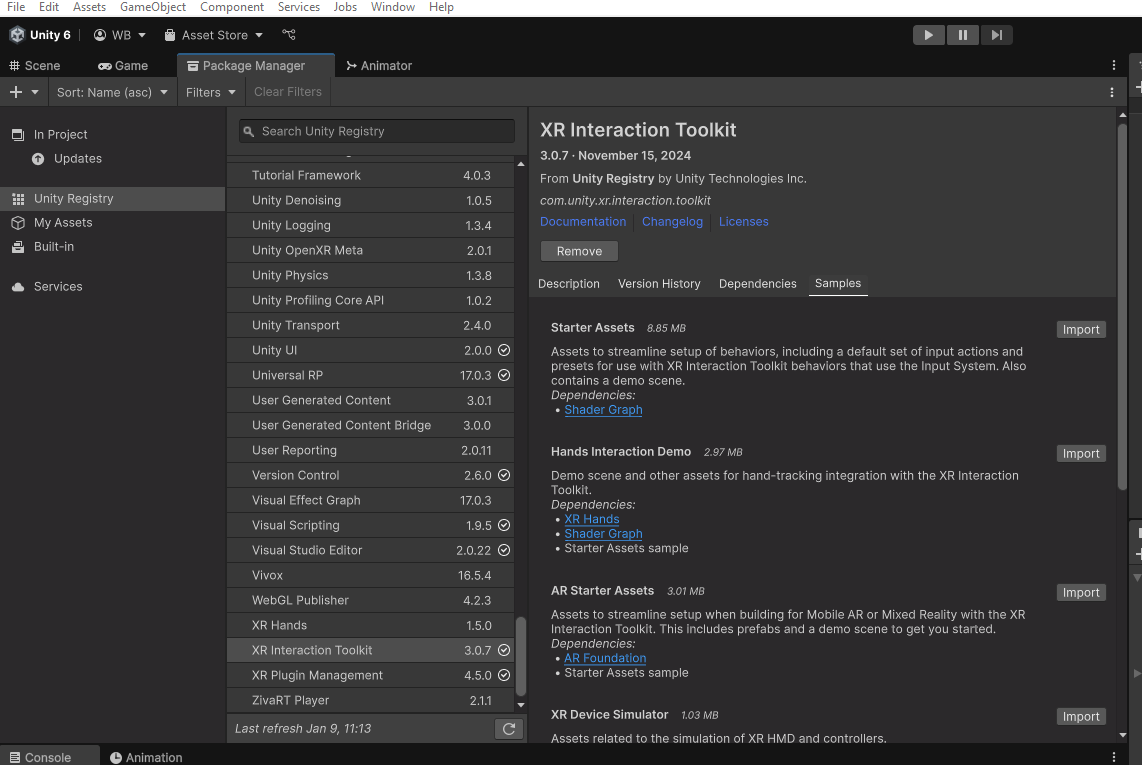
Feel free to browse these other samples but I caution you to not install them until you are comfortable with Unity, VR, and the basics!
Switch back to the Scene tab. If you get a window that pops up about Interaction Layer 31 should be set to 'Teleport' for... then select Fix or Fix all.
Create the XR Rig
Back in the scene tab, you should not have any cameras in your scene. Right click in the Hierarchy window and select XR/XR Origin (VR).
This creates two objects; an XR Interaction Manager which is responsible for the core parts of XR Interaction Toolkit, and an XR Orgin (VR) game object. If you select the XR Orgin (VR) game object, reset its position and rotation to 0, 0, 0.
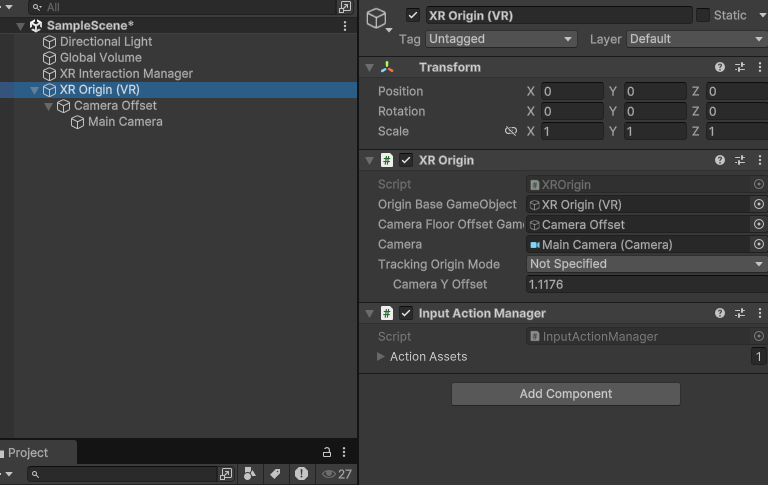
Notice that this game object has an XR Origin component and an Input Action Manager component. The Input Action Manager has input bindings configured from the starter assets we obtained. There is also a child object called Camera Offset that is controlled by the XR Origin, and a Main Camera as a child object of that. Feel free to browse these items but do not change their values until you have adequately tested your project.
This is a great moment to test your project in VR. Verify your headset is working through the PC. If you have to turn on PC-VR with Steam or Meta Link, it is a good idea to save and close your project, get VR up and running, and then reopen the project. This is the same for any game engine you use.
In Unity, press the Play button at the top-center and verify VR is working. If it is, proceed to the next step. If it is not, check connections, headset, restart the editor, Steam/Meta Link, or even the computer.
Adding Controllers
Because Unity has changed the way inputs are handled with XR Interaction Toolkit from the previous version (v2), we will handle things a little differently than the past. We will be using in this case, XR Direct Interactors to show our hands, but there are other options you can try in the future as well as different configurations. This guide, again, is for a simple XR Rig.
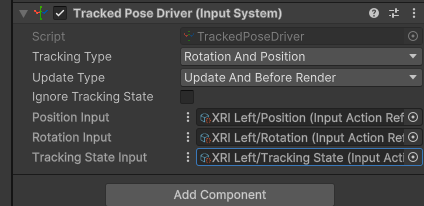
Right click on the Camera Offset game object and go to XR/Direct Interactor. Change its name to something like Left Direct Interactor since we will add another for bother controllers. Select new game object and in the Inspector, add a new component called Tracked Pose Driver (Input System).
DO NOT choose the one that is MISSING the (Input System) part otherwise you will have to delete the component and add the correct one again.

Inside this new component, change the Position Input, Rotation Input, and Tracking State Input values from Action to Reference buy selecting the vertical 3-dots icon and select Use Reference.

This is the tricky part for some: Click the bulls-eye icon on each value and assign the correct reference from the samples folder. Here is an example for Position: After you click the bulls-eye icon, a window appears. Start to type "XRI Left/Pos" and you will filter the results for left-controller position. Do this for rotation as well "XRI Left/Rot." For Tracking State Input, select the bulls-eye and begin to type "XRI Left/Track" and you will get the correct reference.
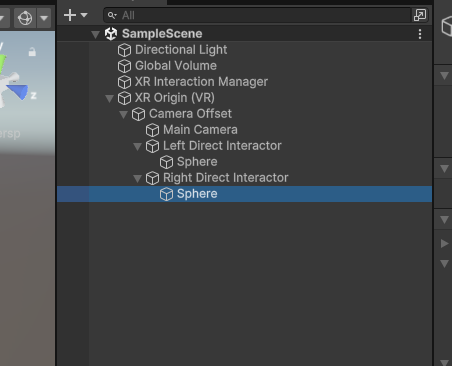
If you were to test this for the left hand right now, the hand will probably work but you won't "see" anything. For now, lets add a basic sphere for a visual for our hand. Right-click on the Direct Interactor game object and add a 3D object/Sphere and a child. Change its scale to 0.2, 0.2, 0.2. Remove the Sphere Collider component from the sphere object (NOT from the Direct Interactor).
Test in VR and you should have a left hand with a sphere. If everything works, repeat the process above and use values for Right instead of Left. When you are finished your rig should look like this:
This tutorial is now complete.
Where to go from here?
This guide served as an introduction to VR in Unity. At the time of this writing, explore the following playlist by Valem Tutorials on YouTube:
https://www.youtube.com/playlist?list=PLpEoiloH-4eM15HYUXK_2a6rldDDx8FcF
This resource provides more in-depth foundations of interaction and locomotion within Unity.