XR Interaction Toolkit Setup
Setup
This guide is for XR Interaction Toolkit version 2. If you are using a newer version, such as v3, OR you are using Unity 6 or higher, this guide is deprecated!
In Package Manager, click the packages drop down in the upper left (next to the + sign) and change it to Unity Registry.
Scroll down to XR Interaction Toolkit and click Install.
Once XR Interaction Toolkit is installed, click continue. (If it gives you another prompt, accept it and let Unity restart.)
Click Samples. Import the Starter Assets.
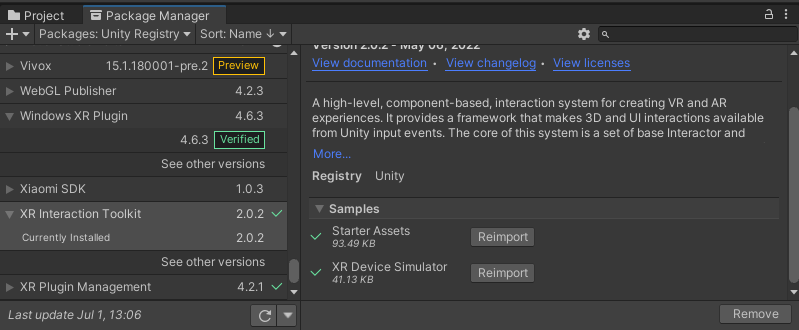
In the Project window, a Samples folder has been added. Click Samples > XR Interaction Toolkit > [Version] > Starter Assets. For each of the XRI presets, click Add to... at the top of the inspector.

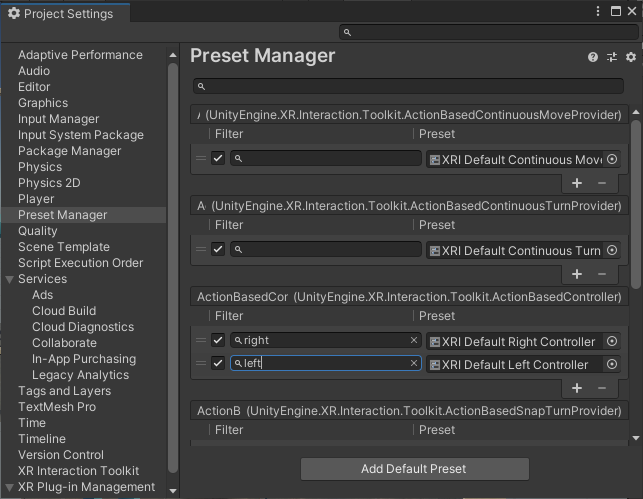
In Edit > Project Settings select Preset Manager from the left.
In the two boxes where it says XRI Default Right/Left Controller (it should be the third section down) type "right" and "left" for the corresponding box.
If you have a current XRRig, make a note of your XRRig position and rotation values and then delete your existing XR Rig.
Right click in the hierarchy and click XR > XR Origin (Action Based).
Select the XR Origin in the hierarchy and set its Tracking Origin Mode to "Floor" in the inspector window. *WARNING (see below)
As of January, 2024, there may be a bug with setting the Tracking Mode to floor with the XR Interaction Toolkit. Leave the dropdown as its default state (varies) will still project most modern headsets to the floor by default.
Open the XR Origin hierarchy and select the "left controller" object. Delete it. Then select the "right controller" object and delete that as well. (We are going to build our own versions of these)
Now we have a choice: 1) we can either set up a direct interactor that will let us pick up objects in the world, or 2) we can set up a ray interactor that will let us set up teleport locomotion.
In this tutorial, we will add both of these interactors. You can start with either one.
Decide which hand will be used for your direct interactor (for picking up world objects) and which hand will be used for your ray interactor (for teleport locomotion). For the purposes of this tutorial, you will want these functions assigned to different hands.
Setting Up a Ray Interactor (Teleport Locomotion)
Right click on the Camera offset (within the XR Origin) in the hierarchy and choose XR > Ray Interactor (Action-Based).
This will add a Ray Interactor to the rig. You can rename this in the inspector. Rename it to "R Ray interactor" to show that this will be assigned to the right hand (or "L Ray Interactor" as the case may be).
Make sure the R Ray Interactor object is selected.
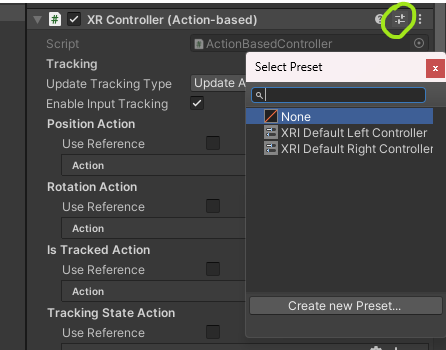
In the header of the XR Controller (Action-based) component, click the preset icon. This is the small icon on the right side of the component header between the question mark icon and the icon with three dots.
A window will appear. Choose either the left or right preset as appropriate.

Add a Teleport Area
Right click in the hierarchy and go to XR > Locomotion System (Action-Based).
If your XR Origin is not set, drag your XR Origin in.

Right click in the hierarchy and go to XR > Teleportation Area. This sets the area that can be teleported in- resize and position it to your liking. Multiple teleportation areas can be active at once. When positioned, turn off the mesh renderer to make it invisible.
Setting Up a Direct Interactor (Picking Up World Objects)
Right click on the Camera offset (within the XR Origin) in the hierarchy and choose XR > Direct Interactor (Action-Based).
This will add a Direct Interactor to the rig. You can rename this in the inspector. Rename it to "R Direct interactor" to show that this will be assigned to the right hand (or "L Direct Interactor" as the case may be).
Make sure the L Direct Interactor object is selected.
In the header of the XR Controller (Action-based) component, click the preset icon. This is the small icon on the right side of the component header between the question mark icon and the icon with three dots.
A window will appear. Choose either the left or right preset as appropriate.
Add visual objects for the hands (if desired). One way is to add a sphere as a child object of your interactor. Scale appropriately and REMOVE the collider component.
Add a Grabbable Object
For this tutorial we will make a grabbable cube.
Right-click in the hierarchy and create a 3D cube.
On the cube, add the XR Grab Interactable component.
Now, when you test your scene in VR, you should be able to pick up the cube with whichever hand is set up as a direct interactor.