Picking up objects (Basic)
This
Prerequisites
Prerequisites
Basic Teleport (covers input)
Basic Teleport is
Motion Controller Setup
In the following sections we will go over how to setup your Motion Controllers so that they can picksetting up and drophandling itemscontroller thatinput. are
Grab Motion Controllers
Starting here, you should have at least an XRRig setup within a pawn, the input system setup within the pawn (even if you have no input mappings), and the pawn is placed in the level. ForIf thisnot, guide,you weshould will focus on usingrevisit the justPrerequisites the LEFT controller.
Component, Variable, & Event Setup
Before we can start to add nodes to the Event graph, we first need to create and set up a few Components and Variables. In the following section, add these variables to your variable list
Component / Variable Type
Name
Value
PrimitiveComponentType
HitComponent
Boolean
IsHoldingObject
false
Actor
PickedUpActor
above.
YouBegin willby also need to createcreating two new CustomInput EventsAction files in your EventInput Graphfolder called GrabLeft_IA and name them the following:
Node Name
Value
PickUpObject GrabRight_IA
N/A
DropObject
N/A

The names of these do not differentiate between Left or Right (and that is on purpose). AtNext, the end of the tutorial, I recommend adding "Inputs" to these events and feeding your controllers in. But don't do that now.
Finally, if you haven't already, as found in the teleport tutorial, you need to create two additional Input Actions for Left and Right grip actions. Be sure to assign these actions toopen your Input MappingsMapping Context file and add these two new mappings, mapping Oculus Touch -> Oculus Touch (L or R) Grip. HereFinally, isin ayour linkpawn, ifright youclick forgotand howadd the two new EnhancedInputAction events for these inputs.
I like to setadd upPrint input:
https://scil-wiki.su.edu/books/unreal-engine/page/setting-up-basic-teleport-pt2
If you take a moment and look at your motion controller components in your pawn, you'll notice you can make a lot of edits in the Details panel, but you can't create new functionality. We want our motion controllers to work like before but with the ability to pickup and drop objects.
In your Player folder, right click and select New Blueprint Class and under the All Classes dropdown, search for MotionControllerComponent, click on MotionControllerComponent and click Select. Name it Grab_MotionController.
While we canare onlyhere, pickdo onethe objectsame upagain atbut this time search and select StaticMeshActor. Name this new blueprint Grabbable. This blueprint, Grabbable, will serve as a time.special Thestatic reason this is important is we only want the user to be able to pick up one object at a time.
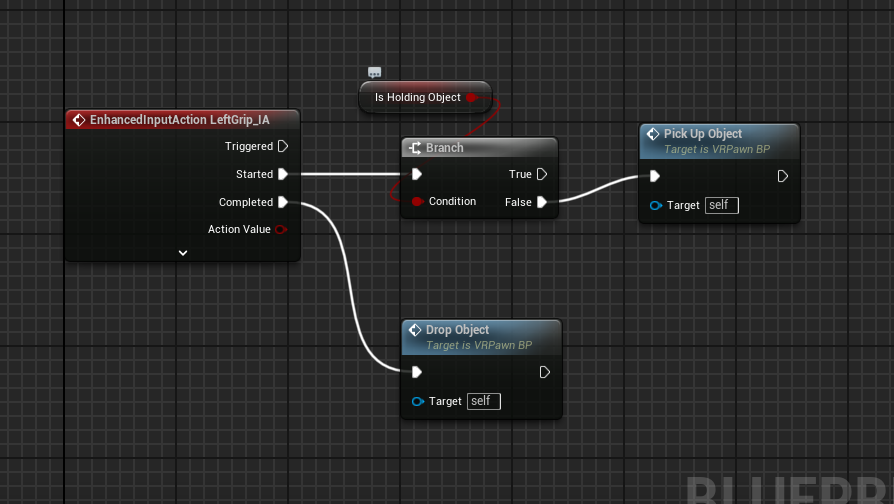
Pick Up Object Event
The Pick-Up Object Event section handles all of the logic for finding objectsmesh that can be picked up and pickingdropped themlater.
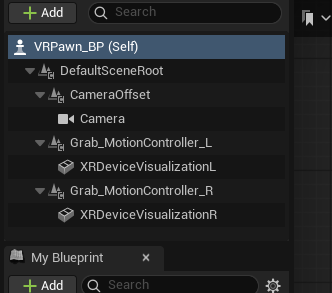
Next, Whilewe will add these new grab components to our pawn. In your player pawn, drag the Grab_MotionController blueprint onto your CameraOffset component. Rename what you dropped to Grab_MotionController_L. Do this isagain onebut function,then itname doesthe other Grab_MotionController_R. Finally, select Right for your Motion Source in the Grab_MotionController_R.
From here, you now in theory have two4 parts(or thatmore) itmotion controllers! Move both the XRDeviceVisualization components to the new grab controllers. The old motion controller components can be brokensafely downdeleted. into.As Inone final setup, select each of the XRDeviceVisualizations and turn off collisions by going to Collision/Collision Presets and selecting NoCollision in the Details panel.
Your new rig should look like this (maybe with an extra motion controller for teleport):
Create Pickup and Drop Events
Open up your Grab_MotionController blueprint.
Right click somewhere and create a new Custom Event and call it Pickup. Do this again and call the other event Drop.
When we call this Pickup event we want the following section,to wehappen: willCreate takean ainvisible looksphere atto thesecheck twowhich partsobjects andare whatnearby. theyIf do.
The first partone of the Pick-Upobjects Object Event deals with finding the object in the world that meets the requirements for being picked up. To do this,is a rayGrabbable istype, castwe 1,000 CM into the world from the forward facing direction of the user's Left Hand Motion Controller. This ray is also toldwant to ignore any object that does not have an Object Type of Physics Body.
For testing purposes, the Draw Debug Type has been set to Duration allowing us to the ray that was cast into the world. When you are ready to use this in production, make sure to set the Draw Debug Type to None .
The second part of the Pick-Up Object Event deals with what happens once we find an object we can pick up. When an object is found the Break Hit Result node is used to get more information aboutsave what we hit.hit Infor this case,when we aredrop, usingturn itoff tophysics find out what Actor and Component where hit. Physics is then disabled onfor that object, and the object is then attachedattach it to our hand.
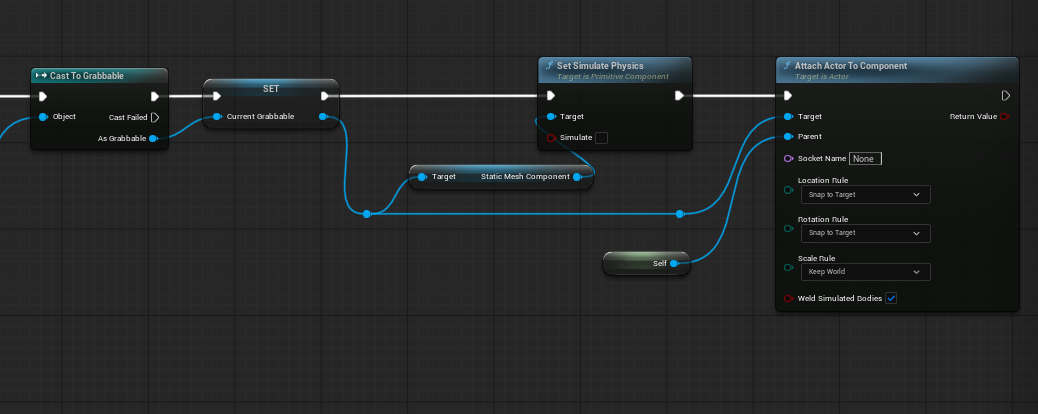
Dragging off the white pin in MotionPickup, Controllercreate a new node called Sphere Trace By Channel. For the start and end yellow pins, right click and create a Get World Location node and connect its Return Value to both Start and End. Finally, we setgive the variableRadius something like 7.0.
Coming off of the sphere trace by channel node, create a Branch that toconnects truethe soReturn Value and branch's red connection pin. For the blue Out Hit pin, drag off that wepin canand notchoose pickBreak somethingHit elseResult. up.
Itthe mayBreak beHit difficultResult, todrag seeoff Hit Actor and choose Cast To Grabbable and connect the True pin from the imagebranch above,to butthis new node.
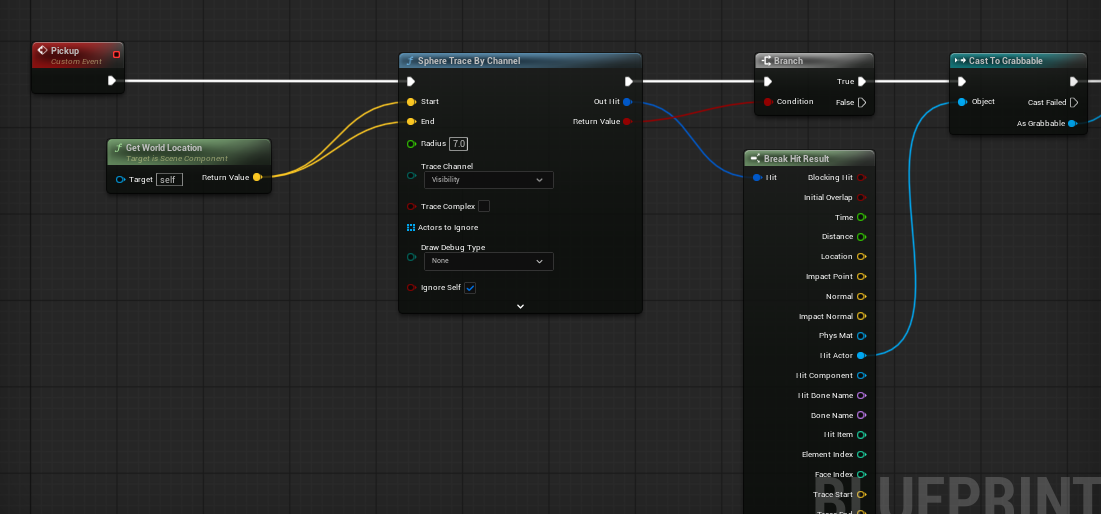
Next, for the blue pin As Grabbable, drag off and select Promote to Variable and name it CurrentGrabbable. This will be useful when we go to drop this object. Be sure to create the connection pins to this new variable from Cast to Grabbable.
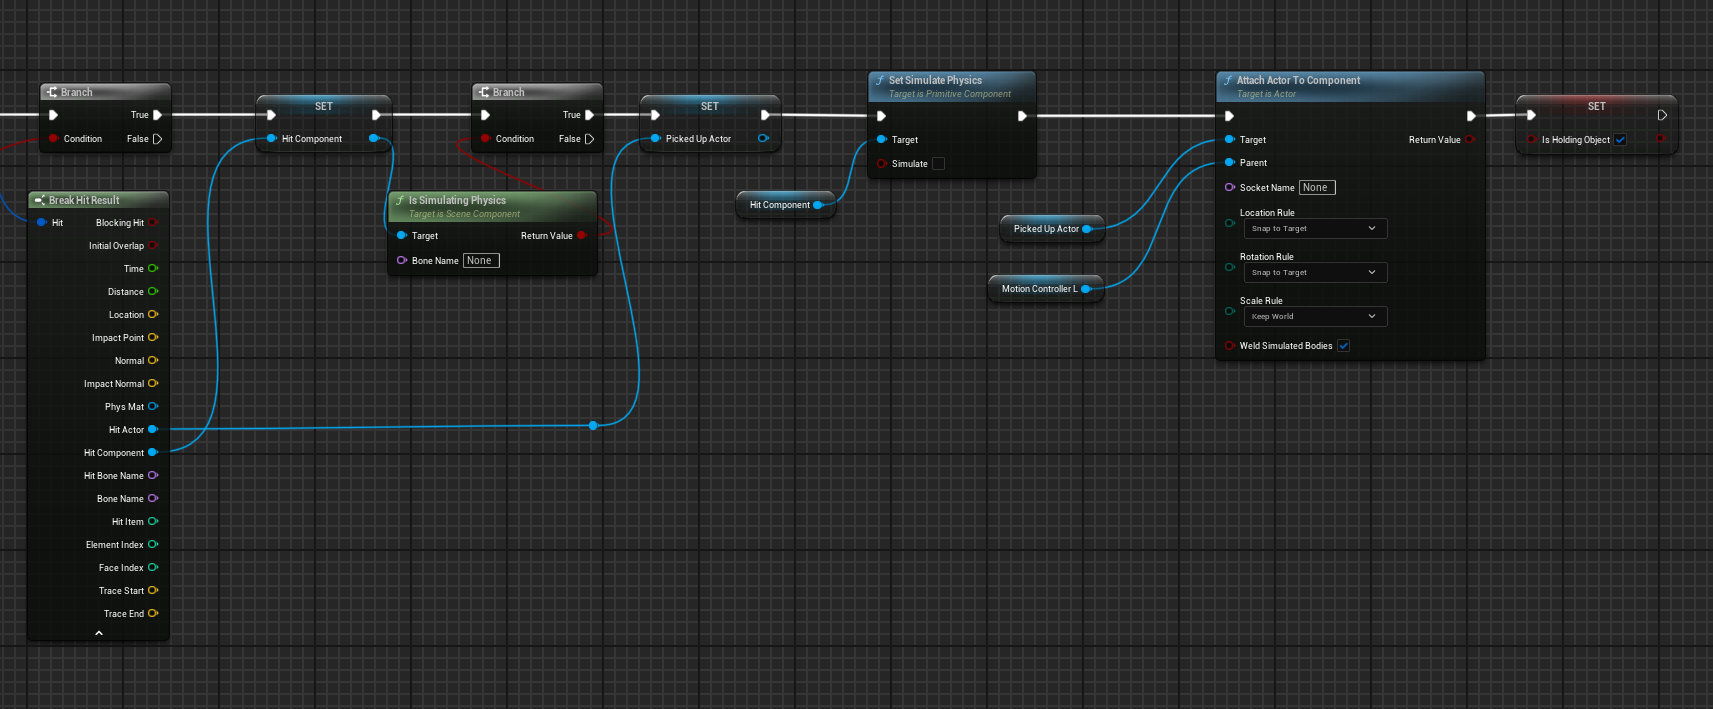
Coming off the right blue pin for Current Grabbable, drag off of the pin and select Set Simulate Physics. You'll notice we are referencing the Static Mesh Component here. Uncheck Simulate.
Again, off of the right pin in Current Grabbable, drag off and select Attach Actor toTo Component. hasIn this new node, under Parent, drag off and choose Self.
From here, it is a personal preference, but I like to start with Location Rule and Rotation Rule set toas Snap to TargeTarget t and Scale Rule set to Keep World.
Feel free to rearrange your nodes so that it looks pretty:
Drop Object Event
TheNow, move to your Drop Objectevent.
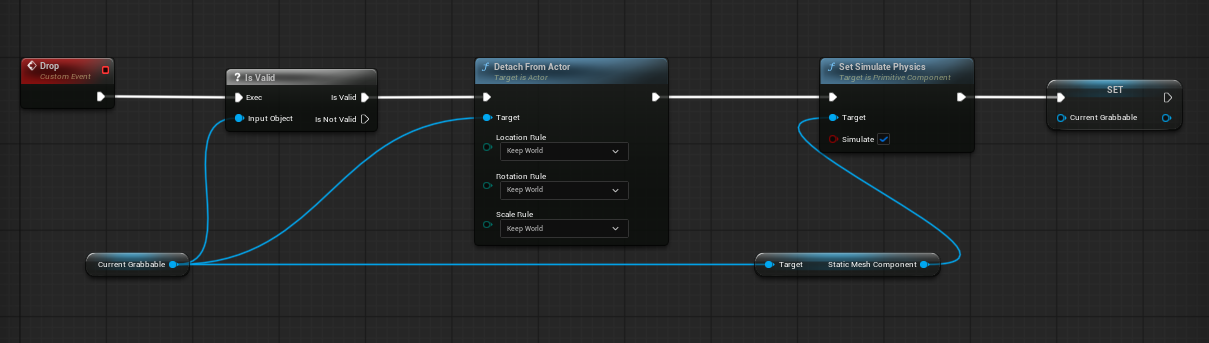
You sectionshould handleshave alla variable created on the logicleft forsided droppingcalled objectsCurrentGrabbable. thatdrag havethis beeninto pickedthe upEventGraph and choose Get... if asked. With this node added, drag off and alsoselect makingIs sureValid that(should everythingbe isa reset,white so? wemark). areConnect readyDrop to pick something else up.The first thing that the DropExec Eventpins.
Drag is check to make sure thatoff the userCurrent isGrabbable holdingnode something that can be dropped. If they are holding something, then that object is then detached from their Motion Controlleragain and hasselect itsDetach physicsFrom re-enabledActor allowingand itconnect tothis fallnode to the ground.Is FinallyValid pin. For Location, Rotation and Scale choose Keep World.
Again, drag off of Current Grabbable and choose Set Simulate Physics and connect this new node to Detach From Actor. Be sure to check Simulate!
Finally, from the Hitvariables Componentmenu to the left again, drag CurrentGrabbable onto the EventGraph again and Pickedthis Uptime Actorschoose variablesSet... areYou cleared of any old data making sure they are ready to store the newly picked up object.

With the Blueprint now complete, we justdon't need to adddo someanything objectshere, just connect Set Simulate Physics to this new node. This new node serves as a way to reset the variable after you drop the object.
Feel free to rearrange these nodes to look pretty:
Connect Pickup and Drop to Controllers
Switch back to your pawn.
For both the Left grab event, drag the Grab_MotionController_L onto your graph near this event. Coming off the new node, select Pickup and drag off the node again and choose Drop. Now connect the Pickup to the Started pin and Drop to the Completed pin.
Repeat for the Right.
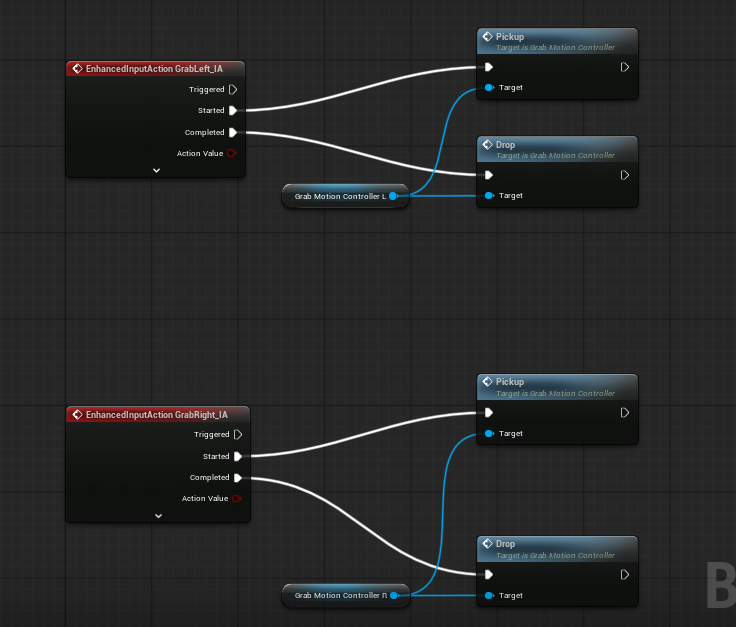
There is an arrow at the bottom of the red events to collapse unused pins!
Add a grab to the worldmap
Now for the exciting part!
From your content drawer, drag the Grabbable blueprint into your map. Choose a mesh for the Static Mesh (such as a cube), and click Simulate Physics. Feel free to pick up. Sincerename the objectsactor weas areyou lookingsee tofit.
Because upGrabbable must haveis a physicsblueprint, body, you can just addor a fewtemplate, StaticSimulate MeshPhysics andis setNOT theirselectable until Mobilitythere is toa static Movablemesh assigned.
also
From here, be sure to enableTEST in SimulateVR Physics.before adding more objects. If you run into issues, carefully review above and check the screenshots for connections too.
Where do we go from here?
YouThere canis adda inputreason parametersthis guide is called Picking up objects (Basic) because you'll notice some limitations. One, for example is that you cannot do a two handed grab. There is also not a quick way to yourlock Inputsrotation sectionor oftranslation thevalues Pickupfor andthings Droplike events.doors, Thesedrawers, inputsor you can fill with your motion controller. Then, the parameters can be used within the event itself by replacing the motion controller. If you are stuck, see Wes in SCiL.
This covers basic grab interactions.levers. For a more completebetter interaction system, considerthere usingis the VR Expansion Plugin: VR Expansion Plugin
.