Setting up basic teleport Pt.1
This content is from the following book: Unreal Engine 4 Virtual Reality Projects
It has been modified to work more independently from other systems that are introduced in the book.
Organization is key. I would recommend a folder in your project, possibly named Player where your pawn is stored along with additional assets that are needed by the player.
Overview
Let’s break down the items we are going to need to solve teleporting. Some items will get refined as we go:
- Get our motion controller and send out a line trace (other engines call this a raycast)
- Get the information of what our line trace is hitting (hit result)
- Create a temporary visual, for debugging purposes
- Narrow down our line trace by only interacting with certain actors (a new teleport area blueprint)
- Storing this information so we can use it in Part 2
Prerequisites:
- You should already have a work VR pawn, with motion controllers from here: XR Rig Setup
- If you are new to visual scripting, take a look at the guide below. You do not need to do this guide, just browse through to get the general idea of how things work.
Get our motion controller and send out a line trace
Let's begin with the first thing we need to do to get our teleport running—figuring out where the player wants to go:
1. Open up our BP_VRPawn Blueprint, and open My Blueprint | Graphs | EventGraph, if it isn't already open.
The motion controllers setup do a great job for the visuals. We need to add another motion controller but this will not be for visuals. Instead, it will make use of the controller’s “aim” configuration.
Add a motion controller component, name it MotionController_Teleport_R. In the Details panel, change its Motion Source to RightAim.
We should still see the BeginPlay event in our Event Graph where we set our tracking origin. Now, we're going to add some code to our Event Tick.
The Tick event is called every time the engine updates the frame. Be careful about putting too much work into your Tick events, as they can eat performance.
2. If you don't already see an Event Tick node in your Event Graph, right-click anywhere in the graph, type tick in the search box, and select Add Event | Event Tick. If you already have a Tick event defined, this won't add a new one—it'll just take you to that node in the event graph. If you don't, this will create one now.
3. Right-click to the right of Event Tick and add a Line Trace by Channel. Connect the pin from the Event Tick to the Line Trace Channel.
When you perform a line trace, you supply a start point and an end point, and tell it what collision channel you're looking for. If an actor with a collision set to the supplied collision channel intersects the line between the start and end points, the trace will return true, and will return information about what it hit. We're going to use this behavior to find our teleport destination.
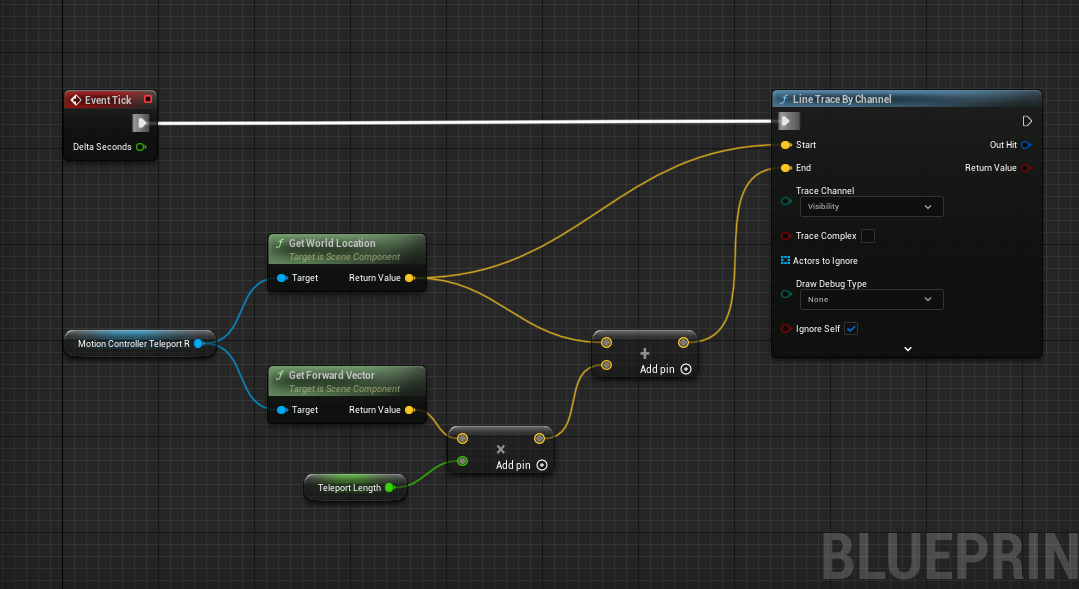
Let's start our trace at the location of the right motion controller:
1. From your components list, grab MotionController_Teleport_R, and drag it into your event graph.
2. We want to start our trace at the motion controller's location, so let's drag a connector out from the MotionController_Teleport_R return value and release.
3. In the dialog that appears, type getworld into the search bar and select GetWorldLocation.
4. Drag the result of GetWorldLocation into the Line Trace node's Start input pin.
Now, let's set the trace end point. We're going to end our trace at a point 10,000 units away from our start location, in the direction the controller is facing. Let's do a bit of simple math to figure out where that point is.
5. From the MotionController_Teleport_R output, create a Get Forward Vector node. This will return a vector with a length of 1 that aims in the direction the controller is facing. We said we wanted our end point to be 10,000 units from the start, so let's multiply our Forward vector by that value.
6. Drag the Get Forward Vector return value out and type * (or multiply) into the search bar. Right-click the bottom input and convert the pin to a float (single precision).
Now, drag a connector out from the float input to the multiply action, and select Promote to Variable:
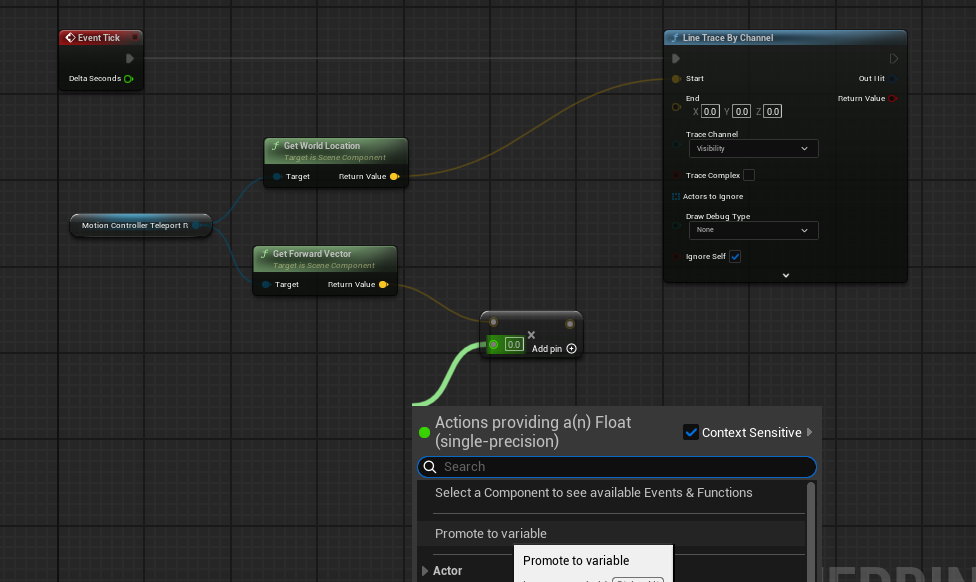
7. Name the new variable TeleportTraceLength, compile the Blueprint, and set the variable's value to 10000.
We now have a vector that's 10,000 units long, aiming in the controller's forward direction, but right now, it would be running 10,000 units from the world's center, rather than from the controller, as we intend. Let's add the controller's location to this vector to fix that:
1. Drag another connector from the controller's GetWorldLocation call, and type + in the search bar. Select vector + vector.
2. Drag the output from our forward vector multiplication into the other input.
3. Connect the output of this addition to the End argument of LineTraceByChannel:
Before we move on, let's set up some debug drawing to see whether everything is behaving as we expect so far.
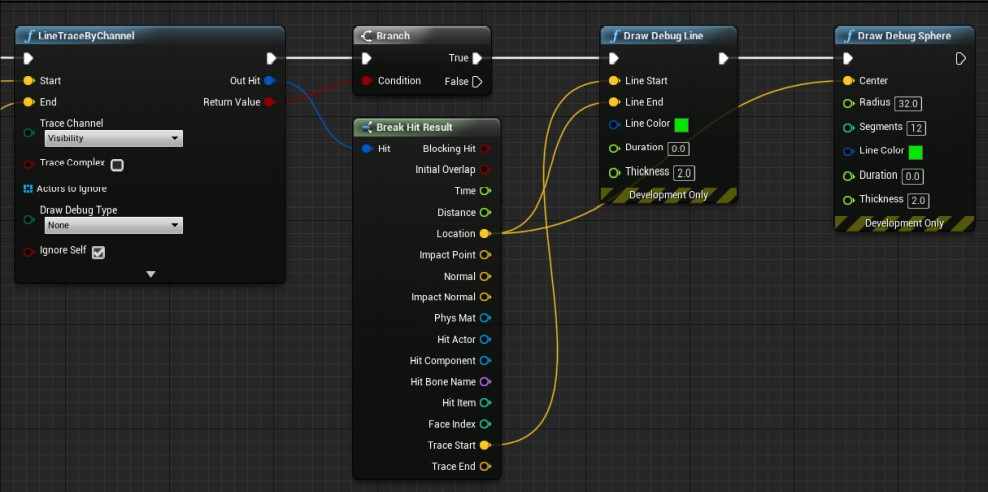
4. Hold down the B key and click on the open space to the right of the Line Trace node to create a Branch node. (You can also right click and create a Branch node the way you usually do, but this is a useful shortcut.). Connect execution pin from the LineTraceByChannel to the Branch node.
5. Drag a connector from the Line Trace node's Boolean Return Value to this branch's Condition.
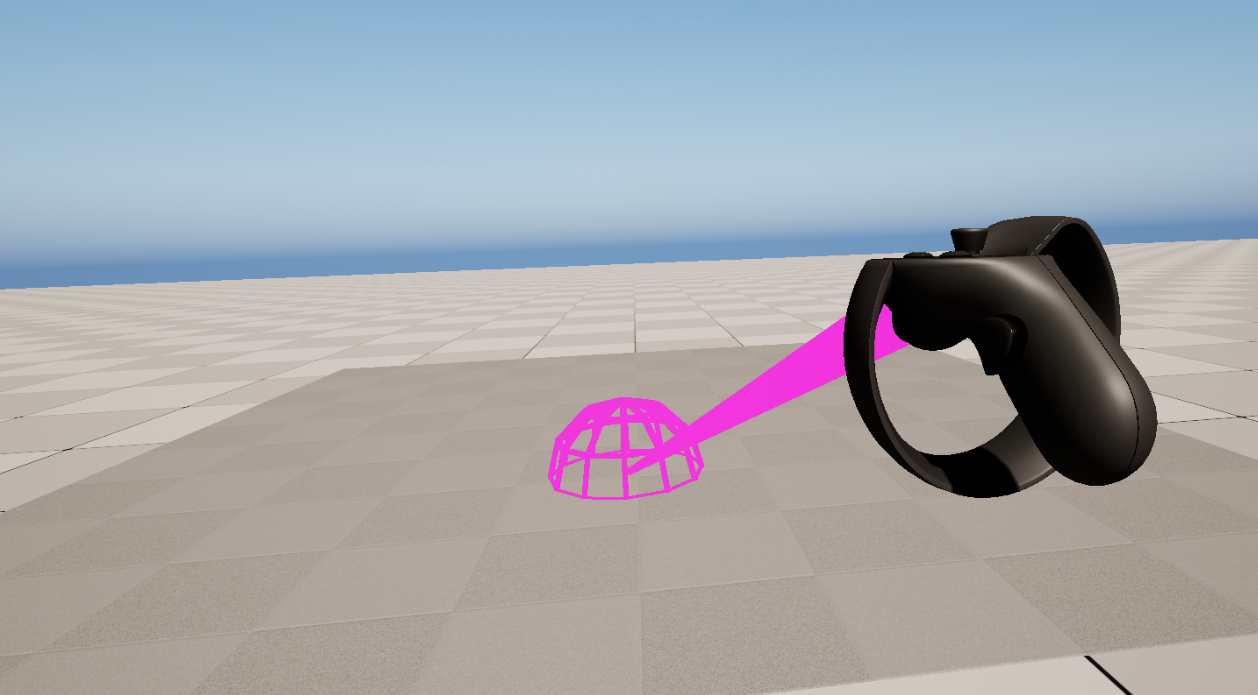
The trace operation will return True if it hits something, and False if it doesn't. We're only interested in debug drawing the result if it hits something, so we're just going to use the True output from our branch. If we did hit something, we need to know where the hit occurred.
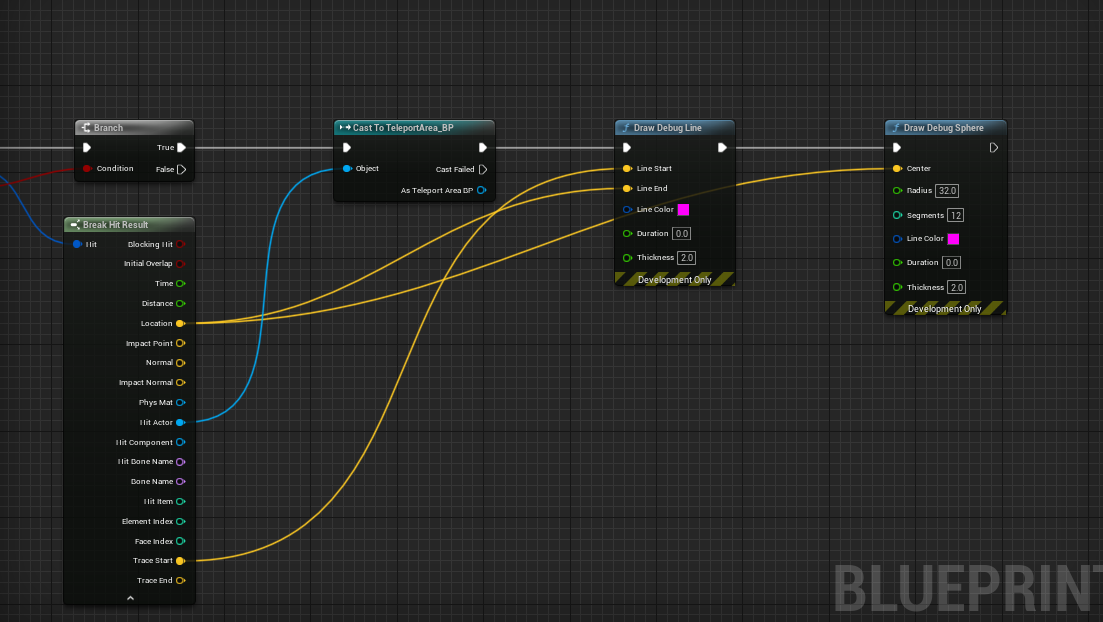
6. Drag a connector from Out Hit and select Break Hit Result to see the members of the hit result struct.
Now, let's draw a debug line representing our trace:
1. Drag an execution line from our Branch node's True output, and create a Draw Debug Line action.
2. Drag the Location from the Hit Result struct into the Line End input on the Debug Line call.
3. Drag the hit result's Trace Start to the Line Start.
4. Set the line's thickness to 2, and set its color to anything you like.
A Draw Debug Line node or Draw Debug Sphere only shows in ONE EYE within VR. You would not ship your project with these nodes. Typically developers replace these with visual blueprints such as meshes and splines!
While we're at it, let's draw a debug sphere at the hit location:
1. Create a Draw Debug Sphere node.
2. Connect its execution input to the debug line's output.
3. Set its Center to the hit result's Location:
Be aware that Draw Debug calls only work in development builds. They're useful for understanding what's going on, but they're just debugging tools and need to be replaced with real visualizations for your actual software. We'll do that shortly.
4. Let's test it.
Good. So far, it's doing what we expect—casting a ray from the controller, and showing us where it hits a surface. The problem, though, is that it's just as happy to hit a wall as a floor. We need to restrict it to valid teleport destinations. Let's do that.
Improving our Trace Hit Result
We need a blueprint to represent our teleport area so that we can narrow down what our Line Trace hits.
1. In your content drawer, create a new folder at the root called Interactions. This will hold blueprints for player interactions in our map.
2. In this new folder, right-click and create a new Actor blueprint. Name it something like TeleportArea_BP. Open it up.
3. Add a new component of type StaticMesh. In the Details panel to the right, change the Static Mesh field from None to Plane. Set the scale to (5, 5, 5).
4. Compile, save, and close for now. You can edit the size and visuals later! Add this blueprint to your scene.
We can now check if our line trace is hitting that teleport area only.
1. Make some space between our branch node and our two debug draw nodes. From our Break Hit Result, choose the Hit Actor and drag out and type Cast to TeleportArea_BP. Choose the node. This says that the actor our trace is hitting should check if it's the type TeleportArea_BP. Connect the execution pins between the branch and the Debug Draw nodes.
2. Test and verify that everything is working. Although you can't teleport yet, we have a visual and a way to interact with our teleport point. Feel free to edit the size of the teleport area and maybe "hide" the visual of the teleport area.