Picking up objects (Basic)
Prerequisites
Basic Teleport is optional, but it is important you have gone through the guide at least once to familiarize yourself with deeper blueprinting as well as setting up and handling controller input.
Grab Motion Controllers
Starting here, you should have at least an XRRig setup within a pawn, the input system setup within the pawn (even if you have no input mappings), and the pawn is placed in the level. If not, you should revisit the Prerequisites above.
Begin by creating two new Input Action files in your Input folder called GrabLeft_IA and GrabRight_IA. Next, open your Input Mapping Context file and add these two new mappings, mapping Oculus Touch -> Oculus Touch (L or R) Grip. Finally, in your pawn, right click and add the two new EnhancedInputAction events for these inputs.
I like to add Print String nodes temporarily that connect to Started and Completed to check to make sure my controllers are working before preceding.
If you take a moment and look at your motion controller components in your pawn, you'll notice you can make a lot of edits in the Details panel, but you can't create new functionality. We want our motion controllers to work like before but with the ability to pickup and drop objects.
In your Player folder, right click and select New Blueprint Class and under the All Classes dropdown, search for MotionControllerComponent, click on MotionControllerComponent and click Select. Name it Grab_MotionController.
While we are here, do the same again but this time search and select StaticMeshActor. Name this new blueprint Grabbable. This blueprint, Grabbable, will serve as a special static mesh that can be picked up and dropped later.
Next, we will add these new grab components to our pawn. In your player pawn, drag the Grab_MotionController blueprint onto your CameraOffset component. Rename what you dropped to Grab_MotionController_L. Do this again but then name the other Grab_MotionController_R. Finally, select Right for your Motion Source in the Grab_MotionController_R.
From here, you now in theory have 4 (or more) motion controllers! Move both the XRDeviceVisualization components to the new grab controllers. The old motion controller components can be safely deleted. As one final setup, select each of the XRDeviceVisualizations and turn off collisions by going to Collision/Collision Presets and selecting NoCollision in the Details panel.
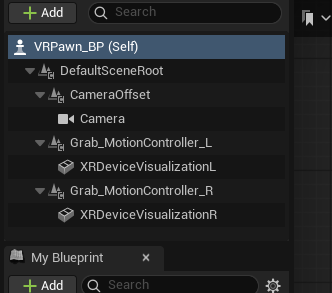
Your new rig should look like this (maybe with an extra motion controller for teleport):
Create Pickup and Drop Events
Open up your Grab_MotionController blueprint.
Right click somewhere and create a new Custom Event and call it Pickup. Do this again and call the other event Drop.
When we call this Pickup event we want the following to happen: Create an invisible sphere to check which objects are nearby. If one of the objects is a Grabbable type, we want to save what we hit for when we drop, turn off physics for that object, and then attach it to our hand.
Dragging off the white pin in Pickup, create a new node called Sphere Trace By Channel. For the start and end yellow pins, right click and create a Get World Location node and connect its Return Value to both Start and End. Finally, give the Radius something like 7.0.
Coming off of the sphere trace by channel node, create a Branch that connects the Return Value and branch's red connection pin. For the blue Out Hit pin, drag off that pin and choose Break Hit Result. Finally, in the Break Hit Result, drag off Hit Actor and choose Cast To Grabbable and connect the True pin from the branch to this new node.
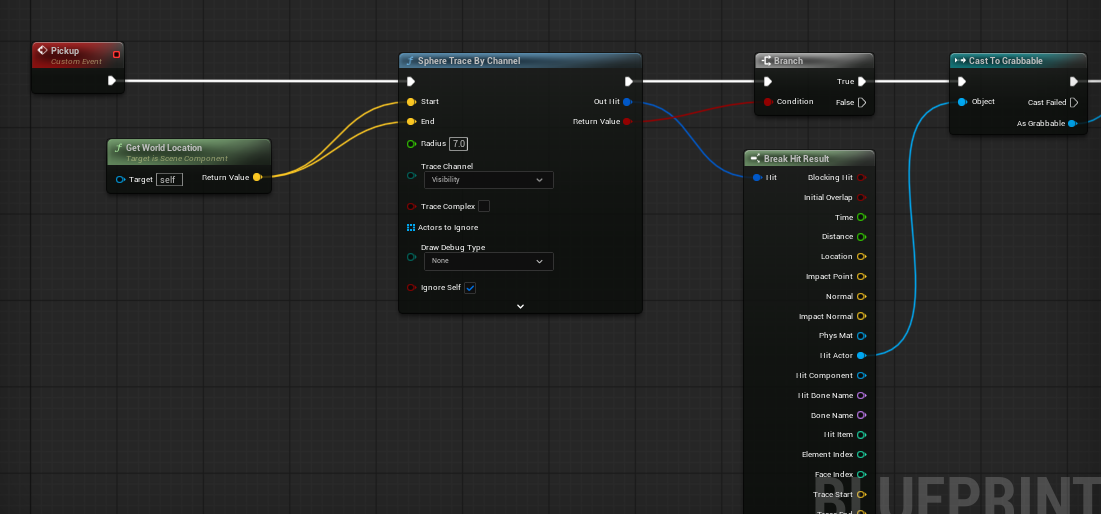
Next, for the blue pin As Grabbable, drag off and select Promote to Variable and name it CurrentGrabbable. This will be useful when we go to drop this object. Be sure to create the connection pins to this new variable from Cast to Grabbable.
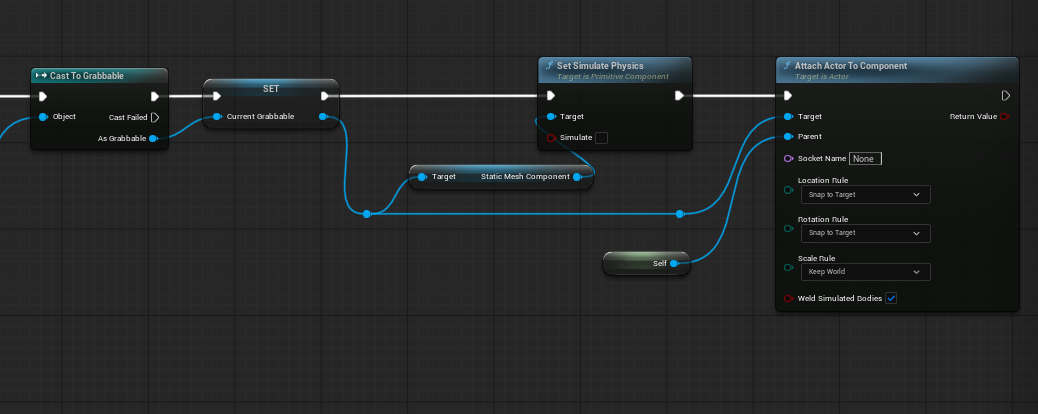
Coming off the right blue pin for Current Grabbable, drag off of the pin and select Set Simulate Physics. You'll notice we are referencing the Static Mesh Component here. Uncheck Simulate.
Again, off of the right pin in Current Grabbable, drag off and select Attach Actor To Component. In this new node, under Parent, drag off and choose Self.
From here, it is a personal preference, but I like to start with Location Rule and Rotation Rule set as Snap to Target and Scale Rule set to Keep World.
Feel free to rearrange your nodes so that it looks pretty:
Now, move to your Drop event.
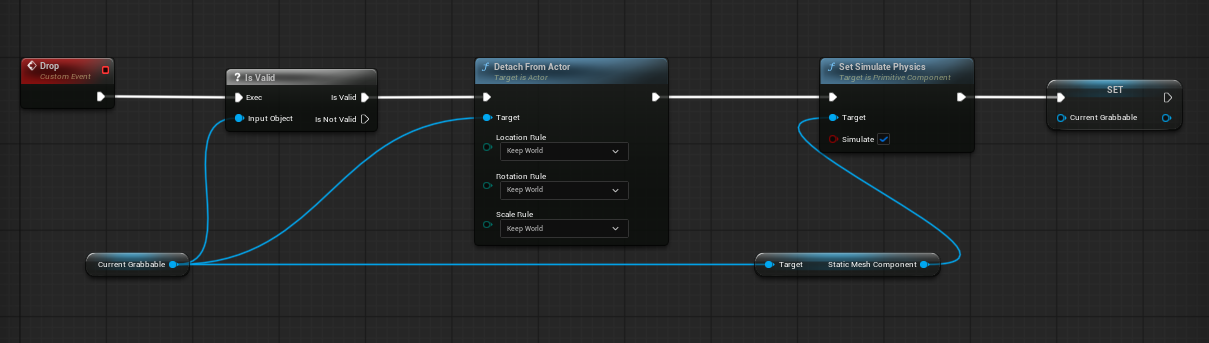
You should have a variable created on the left sided called CurrentGrabbable. drag this into the EventGraph and choose Get... if asked. With this node added, drag off and select Is Valid (should be a white ? mark). Connect Drop to the Exec pins.
Drag off the Current Grabbable node again and select Detach From Actor and connect this node to the Is Valid pin. For Location, Rotation and Scale choose Keep World.
Again, drag off of Current Grabbable and choose Set Simulate Physics and connect this new node to Detach From Actor. Be sure to check Simulate!
Finally, from the variables menu to the left again, drag CurrentGrabbable onto the EventGraph again and this time choose Set... You don't need to do anything here, just connect Set Simulate Physics to this new node. This new node serves as a way to reset the variable after you drop the object.
Feel free to rearrange these nodes to look pretty:
Connect Pickup and Drop to Controllers
Switch back to your pawn.
For both the Left grab event, drag the Grab_MotionController_L onto your graph near this event. Coming off the new node, select Pickup and drag off the node again and choose Drop. Now connect the Pickup to the Started pin and Drop to the Completed pin.
Repeat for the Right.
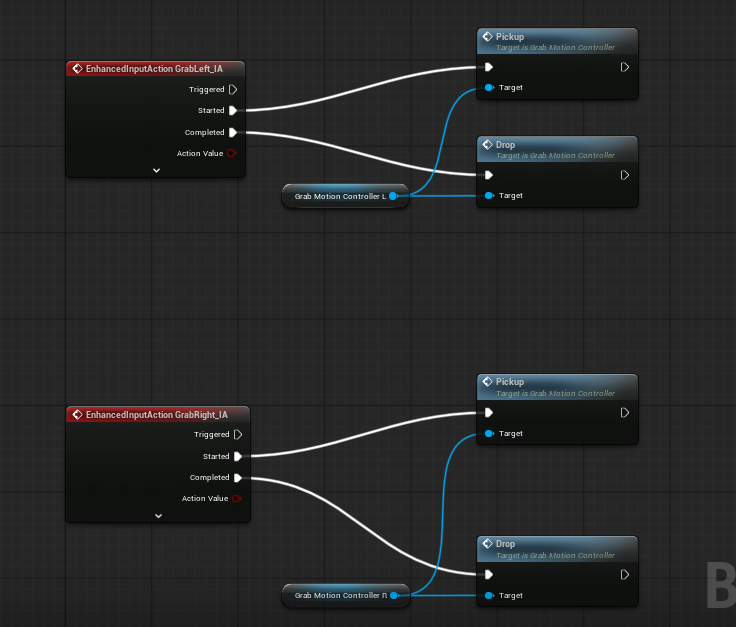
There is an arrow at the bottom of the red events to collapse unused pins!
Add a grab to the map
Now for the exciting part!
From your content drawer, drag the Grabbable blueprint into your map. Choose a mesh for the Static Mesh (such as a cube), and click Simulate Physics. Feel free to rename the actor as you see fit.
Because Grabbable is a blueprint, or a template, Simulate Physics is NOT selectable until there is a static mesh assigned.
From here, be sure to TEST in VR before adding more objects. If you run into issues, carefully review above and check the screenshots for connections too.
Where do we go from here?
There is a reason this guide is called Picking up objects (Basic) because you'll notice some limitations. One, for example is that you cannot do a two handed grab. There is also not a quick way to lock rotation or translation values for things like doors, drawers, or levers. For a better interaction system, there is the VR Expansion Plugin.