Setting up basic teleport Pt.2
PREREQUISITE: Setting up basic teleport Pt. 1
The following has been taken and slightly modified from pages 196-201 of the book "Unreal Engine 4 Virtual Reality Projects..."
Teleporting the player
The first thing we need to do in this instance is give the player a way to tell the system when they intend to teleport.
Creating Input Mappings
We're going to use our Engine Input Mappings to set up a new named input. Let's get started:
1. Open your Player folder (where your pawn is kept) and create a new folder inside called Input. This folder can get quite heavy later! Right-click and choose Input-> Input Mapping Context. Name it something like PlayerInput_IMC.
2. In the same folder, do the same as above but choose to create a Input Action file. Name it TeleportRight_IA.
Input Actions default to a boolean, or true/false action. This is handy for buttons on controllers or keyboards. There are other settings too for other types of actions.
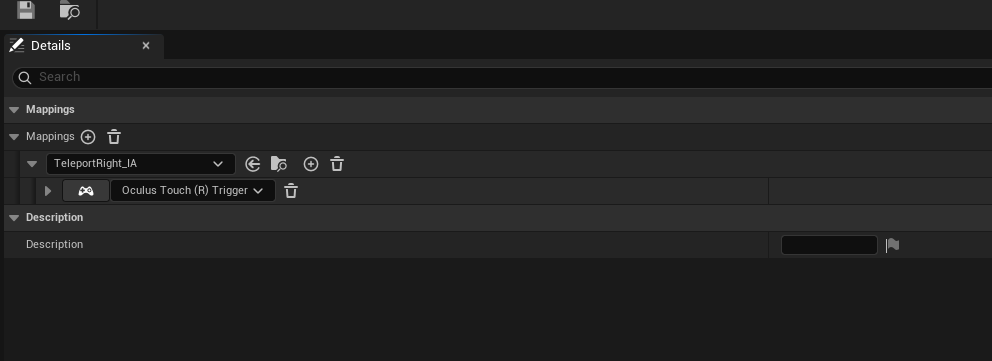
3. Open your PlayerInput_IMC file. There are many drop downs and sub-drop downs here. Click the (+) icon next to Mappings and add your TeleportRight_IA. From here, you can add many different controller supports! Let's add Oculus Touch (R) Trigger by selecting the None dropdown and choosing Oculus Touch->Oculus Touch (R) Trigger.
Your PlayerInput_IMC file should look like this when finished:
Add Input to Pawn
These mappings have been setup and can be edited later. They are also configurable for players who wish to change their input mappings at runtime. Let's tell our player pawn to use these mappings.
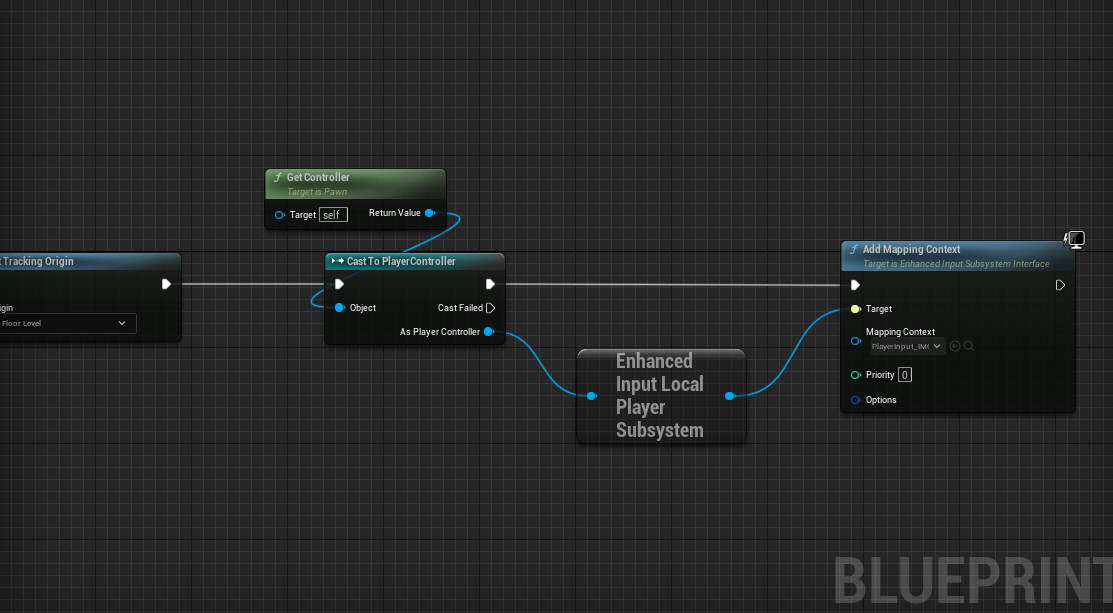
1. Open your player pawn and find the node Event BeginPlay. This is where you added the node Set Tracking Origin in a previous tutorial. Right click and type Get Controller and a LOT of items will show! We are looking for Get Controller exclusively in the Pawn Section from the list.
2. From the blue return value pin on Get Controller, drag out and type Cast To PlayerController. Select that node and set its executiion pin from Set Tracking Origin. From the As Player Controller blue pin, drag out and type Get EnhancedInputLocalPlayerSubsystem.
3. From that node, drag out and type Add Mapping Context. Connect the two execution pins from Player Controller to this new node.
4. In the mapping context node, you will see a drop down that says Select Asset. Choose your PlayerInput_IMC asset.
When you are finished, it should look like the following:
Caching our teleport destination
Now, before we do anything with this event, we need to store the location we found in our
trace method previously so that we can use it here when the player tries to teleport:
1. Under My Blueprint | Variables, hit the + sign to create a new variable.
2. Set its type to Vector, and name it TeleportDest.
3. Add another variable called bHasValidTeleportDest. and make sure it's set to Boolean (red).
Variable names are important. They tell the reader (who might be another developer maintaining your code or might be yourself in the future) what a variable represents. Your variable names should accurately reflect what they contain. In the case of True/False Boolean variables, make sure your name describes what question it's actually answering. So, for instance, in this case, Teleport would be a poor choice for a name, as it doesn't indicate whether the variable's value means that the player can teleport, is teleporting, has recently teleported, or just enjoys daydreaming about teleporting. Be clear about these things. bHasValidTeleportDest clearly indicates what it means. Prefixing Boolean variable names with b is a practice mandated by Epic's coding style guide for C++, but it's a good idea to follow it in Blueprint development as well. (If you plan on developing in C++, you should know and follow the Unreal style guide, which can be found at
https://docs.unrealengine.com/5.6/en-US/epic-cplusplus-coding-standard-for-unreal-engine/
Let's populate these variables. The location we care about is the Projected Location found by the Project Point to Navigation method we're calling at our hit location. Let's store whether we've found a valid location. You'll probably want to drag the Draw Debug Sphere node a bit to the right to give yourself some room since we're about to add a few nodes before we call it:
Let's set our TeleportDest to the Project Point to Navigation method's projected location if it returns true:
1. Drag our bHasValidTeleportDest variable onto the event graph and choose to set it. Do it again (you should have two).
2. Place the first after the Cast To TeleportArea_BP node, and the other below for Cast Failed and connect that node. Check the box for the top. The idea here is that if the cast is successful, this variable is set to true (checked). If it fails, it's set to false (unchecked).
3. Add your TeleportDest variable (set) to the graph twice too and place them after the two nodes we just made. The bottom can just be fed an execution pin and left default (0, 0, 0). The other, you can feed in Location from the Break Hit Result.
4. Finally, off the branch node, connect from False to where you set bHasValidTeleportDest to be false.
Your graph should now look like this:
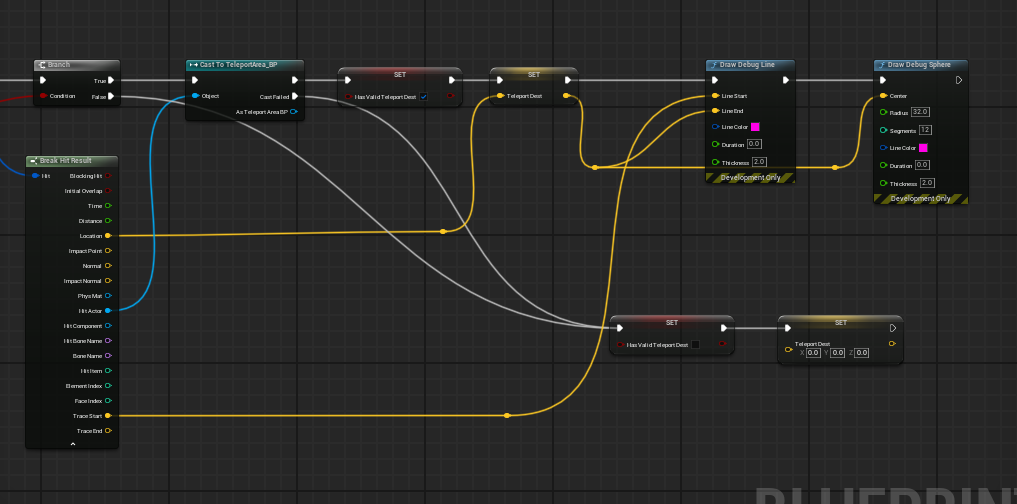
The yellow dots you see are called Reroute Nodes. You can double click on a noodle to add them. Feel free to rearrange so that the graph looks nice.
Now, on every tick, we have either a true or a false value in bHasValidTeleportDest, and if it's true, we have the location to which we could teleport!
Executing the teleport
Let's use the value we've just stored in the bHasValidTeleportDest flag to see whether we have a valid destination, and teleport the player pawn to the TeleportDest if we do:
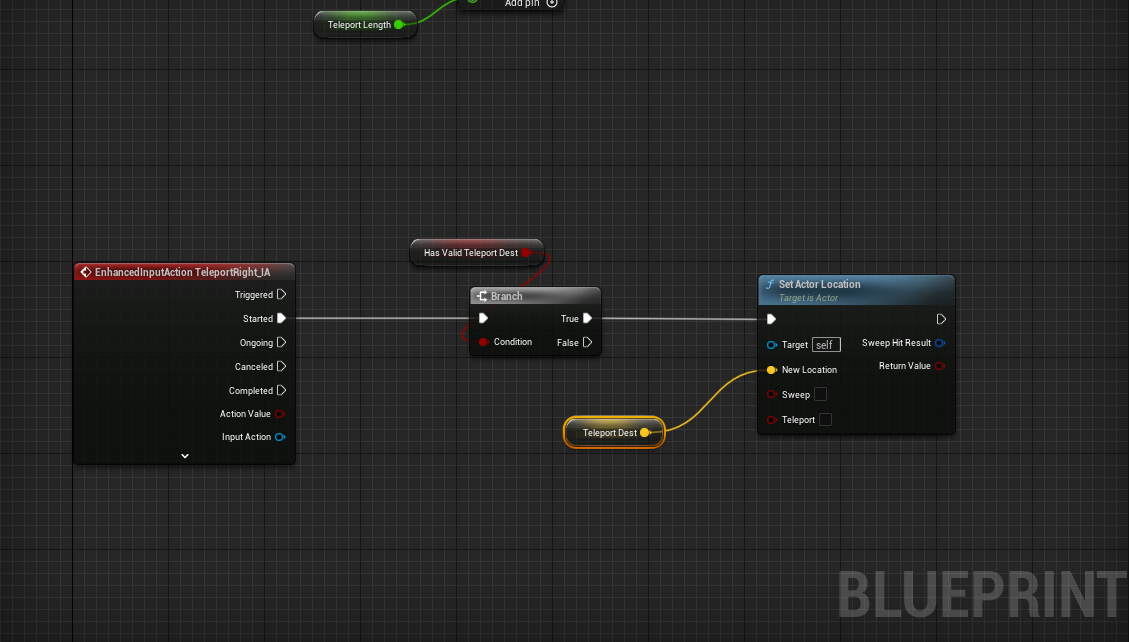
1. Make some space and let's add our input action from earlier. Below our Event Tick, with space, right-click and search TeleportRight_IA and choose the one under Enhanced Action Events.
2. From the TeleportRight_IA input action we created a moment ago, we'll connect an execution line from its Started output into a Branch node.
Remember that you can hold down B and click to create a Branch node. Take a look at the other shortcuts found on Epic's Blueprint Editor Cheat Sheet here: https://docs.unrealengine.com/en-us/Engine/Blueprints/UserGuide/CheatSheet. They'll save you a lot of time.
3. Grab your bHasValidTeleportDest variable and drag it onto the Branch node's Condition input.
4. From the True execution output, create a SetActorLocation action, and drag your TeleportDest variable onto its New Location input:
Launch it into a VR preview and give it a shot. You should now be able to teleport around the map. It's nice to be able to explore, right?